Introduction
Welcome to the Braiins University online learning book. You can select a chapter from the sidebar. This book is written in Markdown with the mdBook documentation tool and its source is hosted at https://github.com/luciusmagn/braiins-university.
Organization
The Rust education project is organized into several topics, which are comprised of theoretical introduction with runnable code examples, links to further materials, and description of a task to program, which is a Rust project.
TIP: To run code examples, click
the ▶️ button to see output appear underneath the code snippet.
Clicking the copy icon let's you easily transfer the code to a Rust Playground
which allows you to modify it and experiment. Just using Ctrl-C is usually not
enough, as many examples contain hidden code to reduce clutter and ensure only the
important part of the snippet is emphasized. Some code examples might also be
editable.
Chapter dependency graph
This graph should help you orient yourself how to begin and how to proceed:

Click on the image to see it enlarged.
Projects
All chapters contain a practical part in the form of a project targeting what you just learned. Applying theory in practice is a key component of education, and especially important in the context of Rust, as it is quite different from most of the mainstream programming languages. The projects generally follow Braiins code guidelines and should be organized properly and versioned with git.
Having an environment for Rust development in your device is a strong requirement, as the Rust Playground can only get you so far, and some projects may require you to import crates that are not available on the playground. Please check out the following list of links to help you get a working setup:
- rustup (installation tool): https://rustup.rs/
- Are We (I)DE Yet? (overview of editor support and what plugins/extensions are required if any): https://areweideyet.com/
- Rust toolchain component overview (to get you familiarized with the programs you might be using): https://rust-lang.github.io/rustup/concepts/components.html
TIP: Prefer rust-analyzer over RLS where possible. Plugins that use
this (still not default) implementation of LSP have much better performance, completion and goto features than the
old RLS ones. This is particularly notable in the case of Visual Studio Code, where you really want install
this extension https://marketplace.visualstudio.com/items?itemName=matklad.rust-analyzer.
Workshops
This page also contains accompanying text versions of Braiins Rust workshops. These will be mostly accompanied by work on a repository, which will be linked in every chapter. You can find available workshops in the sidebar, beneath the project chapters. Feel free to message me with questions, suggestions and complaints regarding a/the workshop(s).
Resources
We provide links to recommended text, video and community resources, please check out:
- Concept Prerequisites
- General Rust Pathway
- Reference Bits from the sidebar
In the context of Braiins, check out the following streams on Zulip:
- #Rust Learning
- #Development>Rust
- You can also message me directly
Errata
Send mistakes or typos to Lukáš Hozda or create an issue/MR on the repository.
Concept Prerequisites
Among the many programming languages used in production, Rust is one of the less beginner friendly.
This is for a couple of reasons:
- It is very strict and requires understanding of its key concepts to program effectively (which means that just jumping head first can lead to frustration)
- Knowledge of both lower-level systems programming and high-level functional/declarative programming concepts is required
- Strong static typing with explicitly written types in many places
- Concepts uncommon in the industry such as extensive pattern-matching and reliance on traits
Therefore a theoretical foundation is required before jumping head first into Rust.
It is also important to note that our field is full of trade-offs. The greater investment required to learn and implement Rust opens up the possibility of a great pay-off in terms of safety, correctness, performance and maintenance cost.
In general, languages are either good for developing effective (performant) applications or good for developing applications effectively (rapid prototyping). Rust leans more into the category of the former, although its development time requirements are not prohibitively long.
I recommend having at least a cursory knowledge of these topics (more important topics are highlighted):
- What is a variable and a reference/pointer
- https://www.careerride.com/C++-what-is-pointer.aspx
- You don't need to know the C syntax, Rust has a slightly different one, but you should know what a pointer is
- Mutability
- The capability of a value (variable binding) to be changed after initial assignment
- http://rigaux.org/language-study/various/mutability-and-sharing/
- User-defined (compound) types vs primitive types
- https://en.wikipedia.org/wiki/Data_type - See sections Primitive types and Composite types
- https://ict.senecacollege.ca/~oop244/pages/content/struc_p.html - no need to read C syntax
- Bools, Strings, Integers, Floats (IEEE-754)
- Bool - https://www.thoughtco.com/definition-of-bool-958287
- String - https://en.wikipedia.org/wiki/String_(computer_science)
- Integer - http://cs.potsdam.edu/Documentation/php/html/language.types.integer.html
- It is especially helpful to know that there is such a thing as integer overflow and underflow
- Data Types in general
- General control structures (ifs, loops, etc.)
- Subroutine - procedure, function, method and the distinction between these terms
- https://en.wikipedia.org/wiki/Subroutine
- All procedures in Rust are functions, they return a value even if it is
()indicating nothing - Traits and structures have methods implemented on them
- The terms structure, class, inheritance, enumeration, union
- Generics and polymorphism
- Generics: https://dev.to/designpuddle/coding-concepts---generics-34cf
- Polymorphism:
- https://www.educba.com/what-is-polymorphism/
- https://www.bmc.com/blogs/polymorphism-programming/
- The type of polymorphism most often employed by Rust is Bounded parametric polymorphism, you can find it described in the Strange Linked List chapter
- Manual memory management vs Garbage Collection
- https://en.wikipedia.org/wiki/Manual_memory_management
- https://cs.wikipedia.org/wiki/Garbage_collection
- Rust does not use a Garbage Collector, but it is important to know what it is. Also, reference-counting GCs are related to the
RcandArctypes
- Stack vs Heap
- Multitasking - parallel vs concurrent vs distributed systems
- Interpreted vs compiled languages
- https://www.freecodecamp.org/news/compiled-versus-interpreted-languages/
- Rust is a compiled programming language, although an experimental Rust interpreter exists
- Imperative vs declarative programming
- https://www.freecodecamp.org/news/imperative-vs-declarative-programming-difference/
- Rust is a multi-paradigmatic programming language, and generally, you will write a blend of both mentioned above, however, where it is possible, idiomatic Rust tends to prefer a declarative approach (for example: using iterators over loops)
Feel free to just DuckDuckGo (or even Google) these topics, you don't need to be proficient in any of these, but it helps to know what these concepts are, so that you are familiar with the terms when they are mentioned.
General Rust Pathway
In contrary to some other pieces of technology, looking into Rust for the first time may leave one overwhelmed by the sheer amount of resources, and it is necessary to discover the ones that are high quality.
Rust is also a rapidly developing language, and so it is easy to stumble upon outdated resources, which may be doing things in a way which is no longer the most optimal, and, even worse, might be incorrect.
Luckily, Rust resources and documentation are generally high-quality, so with a couple hints, it is easy to get access to good resources.
DONTs
- Don't learn from StackOverflow, it is actually not very good for Rust yet. Answers are often outdated, but you can't tell, since they were edited reasonably recently
- Don't use any resources older than 2015. That's before Rust 1.0 was introduced, and Rust from back then is largely incompatible with today's Rust and conceptually differs in several key ways
- Don't fall for resources behind a paywall. It is largely unnecessary, as of this writing, I haven't heard about any such resources that would merit its cost
DOs
- Use official Rust resources, such as TRPL, Rust-By-Example or Rustlings
- Use recent resources from Rust bloggers (about 1-3 years back should be okay. In 2018, the second edition of Rust was released and there is only minuscule differences to 2021, so this is all valid)
- Use resources which use
mdBooklike this website does. These generally follow in the footsteps of official resources (in fact, many official resources are 'promoted' former community projects), and are usually pretty good if they are recent enough - Use the standard library docs as a primary source of information
- Use
docs.rswhen looking into 3rd party libraries
TIP: If you have Rust installed, you already have most of the official documentation including The Rust Programming Language book installed. Use the command
rustdoc opento open its main portal. The documentation and the books work offline perfectly, meaning you can study Rust on the go without mobile data.
Rust has also long prided itself in having a very learner-oriented community, most of the active members are happy to share their wisdom regardless of your level of knowledge. In the context of Braiins, it means you can message me (Lukáš Hozda) anytime, and I will point you in the right direction or just explain what you need.
Make sure you don't get stuck with concepts too long before asking, it will make the learning process much more pleasant and you will feel productive sooner.
Entry-level resources
If you are new to programming in general, or are not too confident in your English skills as a medium of learning, start with Easy Rust. It is written in Simple English, comes in bite-sized chapters and covers all of the bare necessities of Rust.
While you are at it, you can concurrently check out Rustlings. These are very tiny and generally very easy exercises to help you get used to reading and writing Rust code (and get used to its compiler and its very verbose and helpful way of complaining).
Another great short introduction is A Gentle Introduction To Rust written by Steve Donovan. It is rather brief, well explained and tries to not overburden the reader with information. Of note is its usage of Nim to demonstrate parsing, which makes it different from most other guides.
For an overview of syntax, give a read to A Half Hour to Learn Rust. It is a very quick read and it gets you going, no non-sense, syntax oriented.
If you are more of a visual type, look into the current options for availability of Rust in Motion, an introductory video course of Rust by Rust developers Carol Nichols and Jake Goulding.
Intermediate resources
For a more in-depth look at Rust, and if you have more time on your hands, you can follow up by checking out the official The Rust Programming Language book, otherwise known in the community as TRPL. It covers Rust from top to bottom, and is a very hefty read of about 500 pages in its paper version.
Again, a more practical counterpart could be Rust By Example, which contains many runnable code excerpts which show you how to solve the most common problems in Rust.
It might also be a good idea at this stage to flip through Rust Design Patterns if you want to get familiar with ways we solve certain categories of problems in Rust.
At this stage, it is a good idea to start doing Braiins University aka, this website. It is focused on the specifics of Rust explained and then ingrained by way of practical projects.
An interesting take on learning Rust in a very practical way is the Learning Rust with Entirely Too Many Linked Lists Book. As you will see in the following chapters of this website, lists are a great tool demonstrating key Rust concepts, and Too Many Linked Lists leans heavily into it.
Advanced resources
Rust has a complex underbelly of nasty stuff and under-the-hood oddities, these are documented in the Nomicon, a book of Rust dark arts. It is not necessary to know most of these things for day-to-day usage of Rust, but it can help you make pragmatic decisions in a couple of situations, especially regarding performance and interactions if C/C++ code. It is an indispensable resource for writing unsafe Rust correctly.
If you are willing to invest, or to borrow my paper-copy, a great advanced Rust resource is the Rust for Rustaceans book by Jon Gjengset. He also creates a great YouTube series called Cruft of Rust, where he goes into the nitty gritty implementation details of parts of the standard library and considerations that must be taken into account when implementing them. The videos are a similar level of resources as the Nomicon - not necessary for most work, but a nice-to-have.
Finally, it is time to go domain-specific:
- For macros, see The Little Book of Rust Macros
- Embedded development is best described in the Rust Embedded Book
- For performance, see The Rust Performance Book
- and there are many others, which are usually easy to find...
Video Resources
If you prefer video as your vehicle of education, here is a couple recommendations. Similar to the above-mentioned Easy Rust, there is a simple bite-sized video version also called Easy Rust. As a non-free resource (already mentioned above), there is an excellent series published by Manning called Rust in Motion, it is written by Carol Nichols and Jake Goulding, both of whom are heavily involved with the development of the language and its community. Carol is also the author of rustlings.
Alternatively, the Rust Tutorial series by Doug Milford is also an excellent choice for a beginner.
There is also a Rust for Beginners series by Microsoft.
If you prefer one-piece large crash-courses, I recommend checking out one of the following:
- Rust Course by freecodecamp
- Rust Crash Course by Traversy Media
- Introduction to Rust Part 1 and Introduction to Rust Part 2
For the theoretical underpinnings of Rust (related to what is written in Choosing Rust), you may want to check out the Stanford Rust seminar by Aaron Turon.
Finally, an advanced video resource is afore-mentioned Cruft of Rust series.
Community resources
Rust has been known for years to have a fairly welcoming and approachable community willing to help and guide newcomers. Here is a couple great facets of the community that you can use to reach out to other developers while learning Rust and afterwards:
- The Rust Programming language User Forum
- Rust Subreddit
- There is a Rust IRC channel
##rust@irc.libera.chat. IRC used to be the primary mode of communication of Rust enthusiasts, so there is still quite a lot of people using it - Rust Zulip - used both by community and the language developers. It is one of the best places to get in touch with compiler developers
Minimal Rust learning pathway
- Choosing Rust
- Rustlings + Easy Rust
- Braiins Uni
- (At this point you can probably start working on Rust tasks)
- TRPL
- Advanced resources
The Git Versioning system
You are likely already familiar with Git. In Braiins, we take great care to use Git properly, with the aim of creating a clear, consistent and linear history.
Clients
The lingua franca of Git is the default command-line client, the git command.
Make sure to be familiar with it, as most materials will only refer to it instead
of pulling apart each GUI client. You can expect that your colleagues and reviewers
of your merge requests will advise/request changes in terms of the Git cli also.
If you want to use a GUI/TUI client for git, make sure said client gives you a great degree of control, is unopinionated and does not insert any fluff or garbage config files into the repository.
Here is a couple recommendations:
- https://github.com/Extrawurst/gitui - a very handy and straightforward GUI client
- https://github.com/chriswalz/bit - essentially cli, but with auto-complete and hints
- https://github.com/jonas/tig - ncurses-based text-mode interface for git
- some of our developers had success the built-in clients of VS Code and JetBrains IDEs
Practice
You can practice general git work using the following website:
https://learngitbranching.js.org/
Especially these sections are important:
- Main: Introduction Sequence
- Main: Ramping Up
- Main: Moving Work Around
- Remote: Push & Pull -- Git Remotes!: Sections on
fetchandrebase
Braiins git conventions
We are very particular about how we organize work in Git, you need to pay attention to the following:
- commit formatting
- commit locality
- branch naming
- merging
Start by reading the following document:
http://pool.pages.ii.zone/main/braiins_standard/tools/git.html
TIP: Remember that the CI rejects commits that are created with other emails than your work one, make sure to use
git configto set it correctly before committing anything
Commit message lengths, prefixes and suffixes
A commit should have at least one prefix. The first prefix should specify which project
(or part of the Braiins codebase) a commit is related to or its topic, while the optional second can be used for:
a. Further defining scope within a project (for example: first prefix -> cargo workspace, second prefix -> particular crate)
b. In the context of bosminer, for specifying which machines are affected by the commit
Here is a couple example prefixes:
bosminer:stratum-proxy:bosminer+:docker-spider:stopwatch:bosminer+: x17:
Some Braiins crates end with the suffix -plus. As you can see in the examples above, in commit messages,
we substitute these with the + sign. This also helps save characters
Prefixes should be separated by a colon and a space from each other and the title of the commit, and the title of the commit should start with a capital letter:
# Incorrect
bosminer+:x17: Fix a bug or implement something
bosminer+: x17: fix a bug or implement something
bosminer+: x17:Fix a bug or implement something
# Correct
bosminer+: x17: Fix a bug or implement something
If a commit has to be related to two different things (such as two Antminer model lines), separate them with a comma without a space:
bosminer+: x17,x19: Fix a bug or implement something
Length limitations apply:
- The entire first line of the commit (ie. prefixes & title) has to be at most
72characters long - Break other lines at about
80characters for readability
Remember that the commit title length limitation also includes the Redmine ticket number suffix
Commit message content
In Braiins, for clarity and consistency, we write commits in the imperative mood. What this means in less linguistic terms is that you write that a commit does something instead of you did something in a commit. If you struggle formulating your changes in imperative, try answering the question:
"What will this commit do, if I apply its changes?"
your answer will be something like:
"It will make <project/topic/crate> check dependencies in the generic run() impl on Executor"
Then you take the project/topic part, making it your prefix, and take the rest after it with first capital letters, forming your commit message (optionally sticking ticket number at the end):
crate: Check dependencies in the generic run() impl on Executor #6667
This is 69 characters, so we fit in the length limit.
Per the example on Pool pages, the body (if required) of the commit message should be also in imperative, split into bullet points:
topic: Imperative subject description #1234,#5678

- #4321,#8765
- refactor this method because ....
- add new implementation of XYZ to support new protocol
Commit locality
All commits, unless they are code-moves and or you have a very good reason for breaking this rule, should at least compile, and hopefully also work
Moves/rename commits are a special class of commits: if you are moving a large chunks of code and at the same time you are changing the code, you should SPLIT IT into two commits: one doing the code move and one doing the actual change. The reason for this is simple:
-
the code move + code change in single commit is impossible to review, because (at least in gitlab) you don't see what was moved and what was changed
-
the code is not rebasable - if you have conflict you have to first undo your changes, then resolve the conflict, then apply you changes back
Furthermore, a commit should have a reasonable scope, there is a hard requirement and a soft requirement:
The hard requirement is that a commit can only modify proprietary code, or open-source code, but not both at once.
For projects, which have a variant with the -plus suffix, the non-plus version is generally considered open-source
and the plus version is proprietary. Projects placed under the open/ folder in the root of the repository is all
considered open-source. A commit modifying both proprietary and open-source code would prevent extracting just the
open-source git history into its own separate repository.
The soft requirement is that a commit should have one clear goal, if your commit changes too many projects at once, or does too many things at once, the reviewer of your merge request may request you to split it into logical components
It also probably a bad idea to change code and database migrations in one commit in case either would need to be reverted.
Branch naming
Branch naming is documented in the pages link as such:
xxx/change_description
Where:
xxx: is your GitLab handle (e.g. pmo)
change_description: should help to recognize the work being done on that branch easily. It can include the name of the app or library being worked on.
Don't use any letters with diacritics or special characters other than /-_
If you have a branch with multiple segments, such as bos/frontend/translate-to-finnish, make sure that
there doesn't exist a branch whose name would end with one of the non-terminating segments, such as bos/frontend.
This will cause trouble in git and Gitlab.
Some prefixes have special meaning and are parsed by the CI/CD, affecting which pipelines and jobs are run. If you are unsure, ask your team-leader, DevOps, or other colleagues.
Merging
In Braiins, we build a linear history by using git-rebase. The rebase command is a useful multi-tool for editing Git history, and you should become very familiar with it.
Namely, make sure you know and can use the following:
- Rebase in place of merging (Link 2) - Merge commits are considered invalid, and they make viewing history in tools like tig or gitk confusing
- Rebase for editing history (interactive rebase)
essentially the only tool you need for editing history, remember that you can use it to do the following:
- edit or redo commits
- change commit message
- reorder commits
- drop commits completely
- squash several commits into one
- Editing a distant commit with
--fixupand then auto-squashing - Pivoting the branch your dev branch originates from with
--onto
TIP: Use
git rebase --ontoif the branch your branch originates from had its history altered. In Braiins, it is highly unlikely this will happen withmaster, but you may be developing on top of a branch of a colleague(s) which is a WIP
TIP 2: Also look into cherry-picking
TIP 3: When resolving conflicts during a rebase, keep in mind that the terms
ours/usandtheirs/themused by Git are the opposite of what you might expect.If I am on branch
bos/lho/fix-somethingand I do agit rebase master, thenours/usismasterandtheirs/themisbos/lho/fix-something.This is because
usis always the base branch, and when rebasing, its state used as a starting point upon which changes from the rebased branch are applied. To make the situation confusing, some GUI clients swap the terms around when displaying conflicts to the user, so if you use one, verify which is which.
Bitcoin Mining Introduction
Out of all the fields pertaining to Bitcoin and cryptocurrencies in general, mining remains one of those that are shrouded in mystery even to some people who otherwise show interest in cryptocurrencies. It is public knowledge that mining is computationally demanding, that hardware is involved, and that mining serves a critical function in the PoW (Proof-of-Work) model.
This surface-level knowledge is often coupled with the myth that mining Bitcoin involves solving complex mathematical operations. That is, however, not the case.
There is a number of possible explanations as to why this myth is so pervasive, perhaps it was misinformation in early key resources, perhaps the term "computationally demanding" is conflated with "mathematically complex", or maybe the term difficulty throws some people off.
In this short text, let's sort this all out and set up a bare minimum of correct knowledge for anyone interested in how mining works.
History
Many moons ago, spam email seemed like a real problem. Make no mistake, it still is, but the sheer power of our internet infrastructure can handle it pretty well, and the spam traffic does not critically maim contemporary mailing services. Advanced spam filters have also been implemented, capable of stopping spam somewhere along the way, or at least moving a vast majority of it out of sight.
However, back in the day, the situation was different, malicious actors were able to spam rather freely and DoS attacks, whether unintentional or intentional, were a real threat, so measures to prevent users from sending very many emails quickly, as spammers do, were considered. One of the simplest and more insidious (for the providers) ways of combating this was the idea to introduce fees per email sent.
This proposal was not popular with a number of people, and one of those people was Adam Back, who suggested an alternative yet a similar idea, where the payment for an email (or service) would not be money, but the computational performance of the sender's computer by way of hashing, hence why Back called his idea Hashcash.
The Hashcash proof-of-work system was introduced to require the user to compute a moderately hard, but not intractable function. While this system saw a couple of implementations for emails, it was never ubiquitous, never saw widespread usage, and the situation was complicated by implementations often being incompatible with each other (such as, of course, the Microsoft implementation lacking compatibility with anything).
How does Hashcash work
To understand how this model works, we first need to go back and see how hashing itself works.
A hashing function is a cryptographic tool that takes an input regardless of its size and produces an output value that is always of the same length. This output is called a hash, and it is a number just like any other, regardless of how it is encoded. Furthermore, a hashing function should fulfill the following criteria:
- one-directionality -> it should be impossible to recover any part of the input from the output
- minimal collisions -> it should be extremely unlikely to randomly encounter two inputs that produce the same output. For this reason, secure hashing functions generally return numbers from a really large range, whereas less secure ones, such as Adler32 do not.
- collisions should be impossible to calculate -> you shouldn't be able to compute an input that produces one exact hash by any method better than brute-forcing
However, these are ideals, and not all of these always hold true. This is why we have been changing which hashing functions are the most popular ever since the concept became popular in computing.
In Hashcash, we leverage the qualities of secure hashing functions. The main principle is taking an input, adding a variable element, and iterating these two combined through a hashing function until we encounter a hash that fulfills requirements.
For a hash to be acceptable, it has to start with a number of zero bits or to put it in another way, the number that is the result of the hashing function has to be smaller than some target number. Increasing this amount of leading zeroes will decrease the probability of encountering an acceptable hash. If the hashes produced by a particular function are distributed randomly, then every leading zero-bit will cut down your chances of encountering a correct hash in half, but more on that later.
To keep it simple, we will simply append our variable input as a two digit number at the end.
All we need to do now is to iterate this number at the end until we encounter a suitable hash:
In the original Hashcash, the 160bit SHA-1 hashing function is used, and the default amount of leading zero bits is 20, this corresponds to the 5 most significant hex digits being zero.
Let's consider a simpler example that is easier to compute, where we only require the first 4 bits to be zero -> this results in a single leading zero character in the hexadecimal representation of the hash.
Now let's say that our input data is the following text:
The Future is Bitcoin. - Braiins
To keep it simple, we will append our variable input as a two-digit number at the end.
All we need to do now is to iterate this number at the end until we encounter a suitable hash:
The Future is Bitcoin. - Braiins00 -> 392a8e0bd141ef6196816fb0b8a00719225159d2
The Future is Bitcoin. - Braiins01 -> eb9ebf6b721b21d0f040b407121f399a1fa0cbe0
The Future is Bitcoin. - Braiins02 -> 0c44a782d510c0f97b61f8b131e7e0137d4e0edb
For a single leading zero in the hexadecimal representation, we found an acceptable hash on the third try.
But what if we said eight leading zero bits, or in other words, two leading zeroes in the hexadecimal representation of the hash?
Well, I am personally lazy to compute this by hand, so let's write a short script to find it for us:
import std/sha1, std/strformat, std/strutils

# iterate through numbers from 0 to 100
for i in count_up(0, 100):
    # set input to our desired string and a the current `i`, padded with a leading zero if under two digits
    let
        input = "The Future is Bitcoin. - Braiins" & fmt"{i:02}"
        hash = secure_hash(input) # calculate the sha1 hash of the input

    # stringify the hash (hexadecimal representation by default) and check if it has 2 leading zeroes
    # in a more serious application, you probably want to use bitwise operators rather than comparing strings
    if ($hash).starts_with("00"):
        echo input # if successful, print input
        echo $hash #                print output
This is written in Nim, the program would be quite a bit longer in Rust and it would require us to pull in external libraries.
If we run, we would see that it takes a handy 89 tries to find an acceptable hash:
lh-thinkpad magnusi » nim c ./hashminer.nim
lh-thinkpad magnusi » ./hashminer # cheeky name for a program, totally not foreshadowing
The Future is Bitcoin. - Braiins89
00773A74BE7BFD213D9B1C36759A2041BC1784B7
But what were the probabilities and how lucky we were?
Probabilities and luck
The SHA-1 function produces a 160-bit value, meaning there is 2^160 possible hash values.
If we ask for 4 leading zero bits, that leaves us with 2^156 acceptable hashes. Therefore,
the chance of randomly selecting an acceptable hash is 1 in 2^4, or 1 in 16.
For the second scenario, there are 2^152 acceptable hashes, meaning a chance of 1 in 2^8, or 1 in 256.
As you can see, that is a much lower chance. You should be able to easily deduce that every leading
zero bit will halve the chance of encountering a valid hash.
Because we encountered an acceptable hash at the 3rd and the 89th try out of one hundred respectively, we can consider ourselves quite lucky. For the second experiment, there was a non-negligible chance we wouldn't encounter an acceptable hash in our one hundred attempts at all!
Since we are working with probabilities, luck is a certain factor. You can find an acceptable hash very quickly, or quite late. This translates to a luck factor when mining Bitcoin as well.
Bitcoin mining and Hashcash
The first and major cryptocurrency, Bitcoin, uses the Hashcash proof-of-work function as its mining core.
Bitcoin mining is nothing other than computing the hash of a proposed block (actually just its header) of transactions along with a variable part until an acceptable hash is found.
Generally, this "variable part" is called a nonce, which stands for "number only used once".
The nonce in a block is a 32-bit (4-byte) a field whose value is adjusted by miners so that the resulting SHA-256 hash of the block header is lesser or equal to the current target of the network.
Targets and difficulty
The target is a number - the boundary - which a hash has to be lesser than to be considered acceptable. The lower the target is, the more difficult it is to generate a valid block.
The largest target is the following number:
0x00000000FFFFFFFFFFFFFFFFFFFFFFFFFFFFFFFFFFFFFFFFFFFFFFFFFFFFFFFF
However, because bitcoin stores the target as a floating-point number, most digits of the number are truncated resulting in the following:
0x00000000FFFF0000000000000000000000000000000000000000000000000000
Bitcoin pools sometimes use non-truncated targets.
As you can see, the highest target (meaning the least difficult) has eight leading zeroes in its hexadecimal representation meaning the first 32-bits are zero. This gives a chance of 1 in 2 ^ 32, meaning 1 in 4,294,967,296.
This target corresponds to a difficulty of 1.
Difficulty is a measure of how difficult it is to find a hash lower than a given target. There is a global difficulty for the Bitcoin network, mining pools also have a pool-specific share difficulty, and finally, you can set any difficulty you want on your miner, for example, for the purpose of debugging while developing mining software.
To calculate difficulty, the following formula is used:
difficulty = difficulty_1_target / current_target
Each block stores its target in a packed representation in the Bits field.
The global Bitcoin network difficulty changes dynamically such that the probability is that the network produces one block every 10 minutes. The target (and thus the difficulty) is changed once every 2016 blocks, which corresponds to two weeks if the goal is kept perfectly. A single retarget never changes the difficulty by more than a factor of 4, so that changes in difficulty that are too large do not occur.
You can see the current difficulty, and how long until there is a difficulty adjustment here: https://www.coinwarz.com/mining/bitcoin/difficulty-chart
Furthermore, also check this graph, which shows the block times of the past three years (configurable): https://bitinfocharts.com/comparison/bitcoin-confirmationtime.html#3y
At the time of this writing, it looks roughly like this:
 (click to enlarge)
As you can see, the block times were quite unstable in summer 2021, with some blocks that were under 8 minutes, and one block that took nearly 25 minutes.
In the grand scheme of things, the nonce is quite small
The Nonce field in the header is only 32-bits, which corresponds to 2^32 possible values,
or, in other words, 4,294,967,296.
This is quite a small nonce space, and it is very likely that you will not find a hash that meets the target within these 4 billion (and some change) attempts. If you also consider the speeds at which machines are capable of hashing, you can deduce that searching this range is quite fast.
To increase the nonce space, two other tools are used:
- updating the
Timefield containing the timestamp - incrementing
extraNonce
The extra nonce is not stored in the header but the coinbase transaction. The coinbase transaction is the first transaction in a block. It is a unique transaction that formats specially allocated reward transactions, meaning new coins and fees from the transactions contained in the block.
An interesting piece of information is that bitcoins in coinbase transactions cannot be spent until they have received at least 100 confirmations in the blockchain. That corresponds on average to 16 hours and 40 minutes.
Because extraNonce is stored in the coinbase transaction, it does not modify the header directly,
but rather via the Merkle root, which has to be recalculated. To put it very simply, the Merkle root,
stored in the hashMerkleRoot field, is a hash that serves as a fingerprint of the transactions contained
in the block and allows efficient verification.
Shares
It is quite likely you have seen the term shares going around quite often. Shares are a concept introduced in pool mining. A share is a hash that is smaller than the target for the pool difficulty. In the past, the difficulty for finding shares was set to 1, however, nowadays, different models are used.
Slush Pool uses the Vardiff algorithm, which sets a higher difficulty for stronger miners so that the average communication frequency is the same for all miners (roughly 16-20 times a minute).
A share has no actual value, they serve as a sort of an accounting mechanism to keep miners honest, divide rewards fairly, and inform the pool of the activity of miners. The fairness comes from the fact that a miner cannot choose when it generates a share, there are only two deciding factors: hashrate and pool difficulty.
In solo mining, there is no need to keep track of shares, since the reward is not being split and it is not possible to cheat yourself.
The concept of shares forms the backbone of reward methods. Of note is the slush approach, where older shares have a lower weight than more recent shares, to help prevent cheating by switching pools mid-round.
Mining hardware and hashrate
The rate at which you can produce hashes is called the hashrate. In the beginning, Bitcoin was mined on the CPU,
a historical fact which was immortalized in the quote One CPU, one vote, sometimes written as 1 CPU = 1 vote.
However, a lot of Bitcoin is about incentives. If you want to mine the maximum amount of Bitcoin, you are incentivized to dump the maximum amount of computational power you can spare into mining, and better yet, at the best possible power efficiency, which is an important factor in considering the feasibility of a particular miner.
After we conquered even the most powerful CPUs, we reached the epiphany that mining is a job that is easy to parallelize, and so we employed GPUs in mining. Eventually, we arrived at manufacturing custom mining hardware, which is even more effective.
This hardware uses ASICs, standing for Application-specific integration circuits, which, as the name implies are IC chips customized for a particular use, perhaps a particular algorithm, rather than for general purpose usage. Specializing in a particular application allows the hardware to be orders of magnitude more efficient than non-specialized chips.
For Bitcoin ASICs, there are many manufacturers, Braiins OS supports, at the time of this writing, some models from Bitmain and Whatsminer.
Since hashrate can get quite high, standard SI prefixes are used:
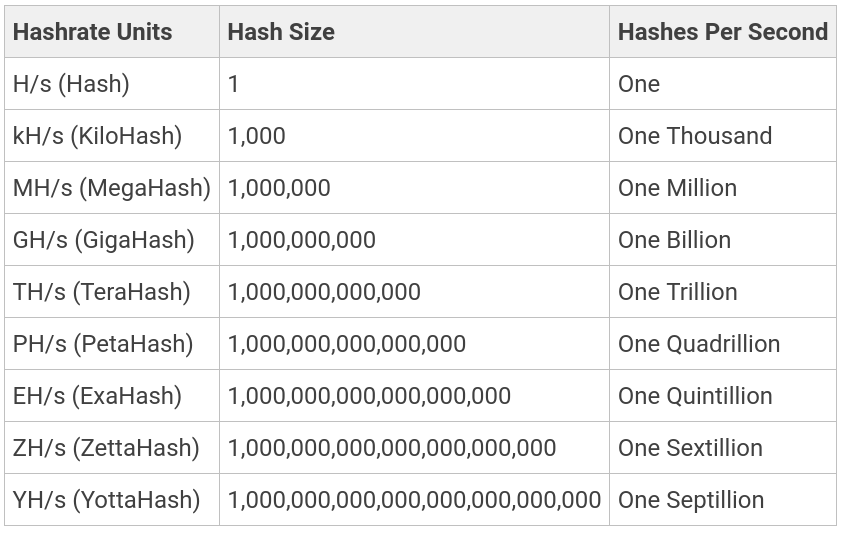
According to BitInfoCharts, the hashrate of the entire Bitcoin network is in the hundreds of exashashes (EH/s) per second.
Miners used today generally have dozens to over a hundred Terahashes (TH/s).
Mining efficiency
Power efficiency for Bitcoin miners is generally measured in Joules per Terahash (J/TH) or Watts per Terahash a second (W/THs). According to a publicly available sheet for the Bitmain Antminer S17+ machine, its efficiency is +-10% within 40 J/TH:

If the power efficiency is too low and your electricity costs are too high, mining with a particular machine may not be feasible. This is nowadays the case with all CPUs and GPUs. They consume hundreds of watts, yet can only do between hundreds of Megahashes to units of Gigahashes when mining Bitcoin.
How long until a share or a block is found?
To figure out the average time needed to find a valid hash at a difficulty, we will need need to know the hashrate and the target at difficulty 1.
diff_1 = 0x00000000FFFFFFFFFFFFFFFFFFFFFFFFFFFFFFFFFFFFFFFFFFFFFFFFFFFFFFFF
# at the time of this writing
difficulty = 30283293547737
Because we know that difficulty = difficulty_1_target / current_target, we can divide the diff 1 target to get the current target
target = diff_1 / difficulty
# 890258076607565408321464494223180464566834094801944576
If we divide the target by 2^256 (since SHA-256 produces 256-bit hashes), we will find the probability of getting the correct value:
p = target / (2 ** 256)
# 0.00000000000000000000000768841880711711754499394264998153659528114610212755766015016423674255374720587496994994580745697021484375
This corresponds to 1 in this many:
one_in = 1 / p
# 130065755402698246586368
Let's say the current hashrate is 220 EH/s, if we divide one_in by the hashrate, we should get the amount of seconds
it should take to find a good hash on average:
hashrate = 220 * (10 ** 18)
secs = one_in / hashrate
# 591.2079791031739
That's nearly 10 minutes, lucky!
We can simplify this to the following equation, for example:
\[ secs = \frac{2^{256} \cdot diff}{target_1 \cdot hr} \]
Where:
- \( diff \) is the difficulty we are computing this for
- \( target_1 \) is the target at difficulty 1
- \( hr \) is the hashrate per second
Calculating hashrate from chip frequency and core count
If you delve deeper into the topic of ASICs, it might be useful to be able to calculate hashrate from the information you know about the hardware:
- frequency
- chip count (or alternatively, chip count and hashboard count)
- core count
It is simple multiplication. Let's consider a hypothetical miner X, with the following parameters:
frequency = 600 * 1_000_000 # Mhz
chip_count = 144
core_count = 400 # let's say 400 cores per chip
We get the hashrate by simply multiplying the three:
hr = frequency * chip_count * core_count
# 34560000000000 hashes/second
If we convert this number to a more readable unit, we get 34.56 TH/s.
Keep in mind that especially for newer machines, the amount of core per chip is not public knowledge and is usually the subject of reverse-engineering by 3rd party firmware developers and the mining community as a whole.
The Task: Exercises
- Calculate the target for difficulty 256.
- What is the difficulty of target
0x0000000000000000000901ba0000000000000000000000000000000000000000? - How long (roughly in seconds) will it take me, on average, to produce a share at difficulty
465_661_290if I have 2 TH/s hashrate? - What is the hashrate of a hypothetical miner mining at 720MHz with 180 chips, each possessing 500 cores?
Other sources
Check out these two articles from the Braiins website:
- Bitcoin Mining is NOT Solving Complex Math Problems [Beginner's Guide]
- Bitcoin Mining Pools: Luck, Shares, and Estimated Hashrate Explained
The Domain of Communication and Storage
“But I’m not guilty,” said K. “there’s been a mistake. How is it even possible for someone to be guilty? We’re all human beings here, one like the other.” “That is true” said the priest “but that is how the guilty speak”
-- Franz Kafka, Der Prozess
As the demands for applications increase, we must start thinking about how to scale properly. The algorithm, idea, or user-perspective functionality is no longer the only important thing, and we must pay heed to what goes on behind the curtain.
Scaling is a ubiquitous issue that affects all industries, not least the IT industry, and that's at every step of the way. We have to scale our companies, our services, our hardware, our operations, our audience and whatever else may be necessary. What are minutia in the beginning start to matter as time goes on.
In software development, we talk about two types of scaling - horizontal and vertical. Vertical scaling, also known as scaling up entails adding more resources to the system(s) running your application. In practice, this means using a more performant server, adding additional RAM or storage, or upgrading the network connection to the server. From a developer's perspective, vertical scaling is easier, and may even require no action from the developer. Of course, exceptions exists, for example, to benefit from a stronger CPU with more cores you have to write your software in a multi-threaded manner, otherwise the extra cores would be useless.
p.1: Vertical scaling
Horizontal scaling, also known as scaling out is the practice of adding more nodes to your infrastructure to cope with the increasing customer/user demands. This means running the application or more machines, with some mechanism existing to distribute the load. Oftentimes, to be able to scale horizontally, the application has to be written in a way that supports it. There are two fundamental ways of going about horizontal scaling, which both may be utilized at once (and often are):
- Running the same binary on multiple systems with a load balancer / load distributor
- Splitting the application into services, each performing a different part of the total functionality of the application.
If you have heard ever about the monolithic vs. microservice architecture debate, that has become an especially popular topic during recent years, this practice shouldn't be entirely new to you.
p.2: Horizontal scaling
However, as we transform our applications from lonely monoliths into bustling communities of (micro)services, new problems arise, that we, as developers need to deal with, in order to be even able to undertake the endeavor of horizontal scaling.
The communication between components wasn't a problem originally. Everything lived in the same binary, and yes, you had some internal APIs, and distinct modules or namespaces within your program, but all of it lived under the same roof, and communication was not an issue, you would just call your methods and functions, use your types, and so on, and so on. The problem was mostly designing internal APIs that were reasonable. In more advanced cases, things like binding to libraries dynamically, concepts like language interoperability and calling conventions were encountered, but most applications can do without it, or if this is in a library you depend on, it has likely been solved by the author of the library and it is not an issue for you to deal with.
However, as we split off the components of our application system into actual components, which may not be (and in production in fact rarely are) running on the same machine, you have to worry, about how to communicate information between these components, in a matter that is:
- safe
- efficient
- effective
It also helps if it is general enough (as opposed to home-grown ad hoc what you made up for a particular set of programming languages and components), so that you can fully leverage the potential benefits of the microservice architecture, such as not caring about concepts like ABIs, architectures, and programming languages. This is not a trivial task, and even if you may be convinced otherwise in writing your own binary protocol for serialization and communication between your services, remember these words when you eg. forget that endianness is an issue, data gets corrupted, or straight out lost.
This task is better left to the experts whose work it is directly to work on designing and developing these protocols, and the less you have to worry about it, the more you can focus on delivering the product you are developing in a timely and effective manner. Very importantly, it is also a delegation of responsibility to the respective parties, and slightly more peace of mind for your as a developer. If there is a bug in gRPC, it's not your fault.
Multiple paradigms or patterns of communication have been conjured up over the last decades, with each having their use-cases and pros and cons. Selecting what pattern and what technology to develop your application with is an important decision when scaling horizontally.
A related problem is the problem of storage. In the inception of an application, where things such as scaling or data safety are not a worry, the selection is not very restricted at all. Small applications may even get away with storing their data in plain files. However, as your service grows, you have to start worrying about three things:
- The amount
- Effective access
- Safety in terms of preservation and concurrent access
(interesting how the problem domains of communication and storage overlap, isn't it?)
It is real trouble if two services writing to the same destination can corrupt the data, or if the failure of a single disk, (or otherwise a single node) can put you of business. If you store your data in text-based formats like JSON, you may also learn that the amount of data you are storing swells up in file-size.
Effective concurrent access also becomes a critical topic, if the storage is not merely a final destination for data to be idly retrieved from, but is also a medium from which data is constantly pulled for another processing, only to be then put back in, you may run into issues with database responsivity and performance degradation due to too many simultaneous connections.
In these situations, whether we like it or not, the database becomes a medium of communication. We want be able to pass some sort of messages to a different part of the system, but those messages have an information value so high that we need to make them persistent. It may also be important to be able to replay these messages.
In the last paragraphs, I am subtly coercing us to start thinking in terms of events, not objects. These events, persistent for all intents and purposes, are leading us to think differently about service communication and application structure. That is, in terms of messages, queues and events triggering other events.
I am far from the first person to notice there is a useful overlap between communication and storage, and in the following chapters, I hope to crossover these domains through the singular technology called Apache Kafka.

This Kafka cycle the beginning of which you are currently reading is slightly different from the majority of Braiins university, in that we shall explore the theoretical implications of what leads us to deciding to use Kafka and hopefully these texts will inspire you to use it properly.
We shall examine both of these perspectives, starting with storage paradigms and then communication patterns.
Storage paradigms
“Someone must have slandered Josef K., for one morning, without having done anything truly wrong, he was arrested.”
-- Franz Kafka, Der Prozess
A long long time ago, storage was conceptually a reasonably simpler matter. Of course, with the shortcomings of the computer technology that many decades ago, the hardware realization was anything but simple, but on the abstract theoretical level, things tended to be uncomplicated.
This was not because it would be an uncomplicated matter, but rather, in these primordial ages, no one had yet had the time to stop to think about it. For a long time, there wasn't as much pressure to do so anyway, as our computing system, and, hell, utilization of computers in different industries and applications remained limited.
Perhaps it was the horrors from serving in World War II, or inspiration from his trip to Canada, but at the dawn of the 1970s, Edgar "Ted" Codd decided to complicate our lives, leading us closer to proverbial salvation in the process. While working at IBM, Codd worked out his theories of data management, eventually issuing the infamous paper "A Relational Model of Data for large Shared Data Banks", coining the term (and inventing) relational databases, and opening the flood gates for further research into the topic of databases and data storage.
The paper is available freely online, if you wish to take a look: https://dl.acm.org/doi/pdf/10.1145/362384.362685
However, before we get to relational databases, let's examine a couple other models. While there exists quite many models, we shall only limit ourselves to ones that are most common and emblematic of different approaches and use cases of storing data.
Key - Value stores / databases
The simplest paradigm to reason about is the Key-Value paradigm. You have a set of keys, where every key is unique and points to some value. Perhaps the most well known and important example of a Key-Value (KV) database (also sometimes called KV store) is Redis.
KV stores typically have at least the two following commands for working with data:
set <k> <v>, which sets a value to a particular keyget <k>, which retrieves value associated with a key if it exists
In the case of Redis and Memcached, all the data is held in the machines memory, as opposed to most other databases that keep all their data on the disk. This has several implications. For one, the amount of data you can store is much more limited than disk-based databases, since you will typically have much less RAM than disk space and RAM doesn't scale up so well. On the other hand, however, this makes the database very fast, as RAM has much faster access speed, and queries may also be faster due to the database being conceptually extremely simple.
However, this means that you cannot execute any complex queries and if you want to work with your data in a more sophisticated way, you have to put in the proverbial leg-work yourself in your program. This may reduce efficiency and it complicates things for you as the end developer. To put it in other words, your data modeling options are very limited.
KV stores don't have a schema, and some don't even distinguish between types, which can complicate things for you if you do not know how the stored data is structured.
The KV storage pattern for entities is that we typically break them down into keys, and the identifier is typically a part of the key.
Imagine the following Rust structure:
#![allow(unused)]
fn main() {
struct Person {
    id: usize,
    name: String,
    age: usize,
    nationality: String,
}
}
In Redis, we could store the following instance:
#![allow(unused)]
fn main() {
let p = Person {
    id: 101,
    name: "Satoshi Nakamoto".into(),
    age: 69,
    nationality: "japanese".into()
};
}
As such:
SET person:101:name         "Satoshi Nakamoto"
SET person:101:age          "69"
SET person:101:nationality  "japanese"
This is better than doing something like SET person:101 <json of the Person instance>, as it makes
it easier to mutate the records (you don't have deserialize and reserialize just to increment age, for instance),
and it prevents you from being obligated to fetch all the data every time, even when you may be interested in
only one field.
The result of the aforementioned strengths and limitations is that KV stores are typically used for
things like caching, leaderboards, storage of temporary data and in the case of persistent KV stores,
they may also be used as the backing storage medium of a more complex database. A common example of this is RocksDB,
which may be the backend for Apache Cassandra, ArangoDB, MariaDB/MySQL, and FusionDB, which all differ
in what their storage paradigm is.
As you can see KV stores are quite flexible. Many of them also provide functionality for the Pub-Sub communication pattern, which we will discuss later.
Wide column databases
The previous paradigm one quite simple, one key, one value,. Wide column databases are quite similar to Key-Value databases, however, some structure has been introduced on the value side of things.
A wide column database is like if you took a KV store and added a second dimension to it. Keys are associated with column families, are each column family contains a set of ordered rows.
Let's take the previous Person example, and try storing it in Apache Cassandra:
INSERT INTO Person (id, name, age, nationality) VALUES ('101', 'Satoshi Nakamoto', '69', 'japanese');
The syntax used to store this data may look very similar to SQL, but in fact, it is not. The Cassandra Query Language cannot do joins or sub-queries, and other advanced things you might expect from SQL.
Wide column databases, similarly to KV stores, do not have a schema, and can therefore handle unstructured data. This makes them easier to set up, but contributes to the aforementioned issues.
On the other hand, wide column databases tend to be easier than relational databases to scale out and replicate across multiple nodes. In other words, wide column databases tend to be decentralized and scale horizontally.
Popular use cases of wide column databases include storing large amounts of time-series data (although there exist specialized time-series databases also!), historical records, and other use-cases, where you expect high amounts of writes, but low amounts of reads.
Apart from Apache Cassandra, other common implementations include Apache HBase and Apache Accumulo. Beyond Apache managed projects (as we will here a lot about Apache in these chapters), we might also include Scylla, which is essentially a C++ reimplementation of Apache Cassandra :)
Document databases
Wide column DBs are nice, but they typically will not be the main databases of your applications. For that, you need something that is more general purpose. In this domain, we may start with document-oriented databases.
In this paradigm, we have documents. Each document is a container of key-value pairs. They are unstructured, and also do not require a schema. The documents are grouped together in so called collections. Documents inside collections can be indexed, and collections can be organized into a logical hierarchy.
This allows you to model and retrieve relational-ish data to a significant degree. However, document-oriented databases still do not support joins, so instead of normalizing your data, you are encouraged to embed your data into a single document.
The downside is that while reads are typically fast and simple, but reading or updating records tends to be comparatively slower and more complex.
From a developer perspective, this database paradigm is very easy to used, and so it is found very commonly, especially in smartphone applications, games, content management systems, or applications for the Internet of Things. If you are not exactly sure how your data is structured, document databases might be a place to start.
Most commonly used document-oriented databases include MongoDB and Google's Firestore. An alternative for the proprietary Firestore is Apache CouchDB.
We can try storing the Person in CouchDB to illustrate:
curl -X PUT http://127.0.0.1:5984/my_database/101 -d '{ "name": "Satoshi Nakamoto", "age": "69", "nationality": "japanese"}'
CouchDB doesn't have a specialized query syntax, so we have to use the REST API.
Relational databases
Finally, huh :)
Document databases typically fall short where you have a lot of disconnected but related data, that is however updated often. Data like this has to be joined, and that is not easy to do in any of the aforementioned database paradigms.
Enter the relational database. This paradigm is the one you are most likely to be familiar using, as it has been around for more than fifty years, and it is the one that's commonly taught in schools and other software development courses.
The creation of relational databases inspired the development of SQL, which stands for Structured Query Language. It is a special type of a declarative programming language, called query language, that allows you to access and write data to the database.
Unlike the previously mentioned paradigms, relational databases have a schema, the data you store in them is structured, and if you want to alter the structure, you need to use special queries.
This less dynamic approach gave the way of the migration pattern, where you manage and in order apply the changes you make to your database in order to produce consistent state.
In Braiins, we store both the final schema and the migrations that lead to it, so that we can detect if there was a mismatch between them in the CI pipeline.
The concept of a document from document oriented databases is replaced with the concept of a relation, you can think of a relation as a table of rows and columns. Each row corresponds to one entry, each column corresponds to a particular piece of data we are tracking for each entry.
There is at least two special types of columns we must mention: primary key and foreign key. Primary keys are the IDs and main identifier of entries in each relation, whereas foreign keys are columns in one relation, that correspond to primary keys of another relation. These form relationships, and help facilitate joins, and subqueries.
This makes relational databases very versatile when modeling your data, and you can do a lot of your querying and "processing" work declaratively with SQL on the side of the database, which can be more handy for the developer, and also more effective, as less data has to be transferred.
Here is how you would store our Person in an SQL database:
INSERT INTO person (id, name, age, nationality) VALUES (101, "Satoshi Nakamoto", 69, "japanese");
However, we require a schema upfront, the table must be created:
CREATE TABLE `person` (
	`id` INT,
	`name` VARCHAR,
	`age` INT,
	`nationality` VARCHAR,
	PRIMARY KEY (`id`)
);
Another thing to note about relational databases is that the most ubiquitous implementations are ones that are so-called ACID-compliant. ACID stands for Atomicity, Consistency, Isolation, and Durability.
These guarantees are related to transactions:
- Atomicity - If one part of a transaction doesn't work like it's supposed to, the rest will fail. In other words, either all of a transaction succeeds or none of it. It must be impossible for a transaction to produce an invalid state in the database, where only some changes we applied.
- Consistency - The database must follow the appropriate data validation rules. If a transaction occurs and results in data that do not follow the rules of the database, it must be rolled back to a previous state which does comply with the rules. On the other hand, if a transaction succeeds, and produces valid data, the data must be added to the database and the resulting state will be consistent with existing rules
- Isolation - This guarantees that all transactions will occur in isolation. This means that no transaction may affect another until it is completed. For example, if your transaction writes some data to the database, then another concurrently running transaction should be able to read said newly written data until the first one has completed.
- Durability - Data must be saved once a transaction is completed, even if a power outage or system failure occurs. If the database tells the connected client the transaction has succeeded, it must have, in fact, succeeded, and the data must be stored in persistent storage
ACID-compliance and the rest of the features of relational database make them harder to scale out. Although the situation has been improving in recent years, you are still more likely to struggle harder scaling out (horizontally) a relational database than any other of the previously mentioned paradigms.
Some of the most influential implementations are PostgresSQL and MySQL/MariaDB, and with a focus on horizontal scaling, CockroachDB.
As for applications, relational databases, in spite of their trade-offs, remain highly general purpose, and are used for all sorts of applications. However, they are not ideal for unstructured data.
Graph database
Let's go back a bit to the concept of a relationship from relational databases. What if we want a step further, and treated relationships as just another piece of data?
That let's us abstract ourselves all the way back to the concept of a graph, about which you were no doubt taught at school. In graph databases, data is represented as nodes and relationships between them are represented as edges. To retrieve the data you need for a particular use within your application, you just have to traverse the graph across the edges you need.
The mention of relationships with regards to primary and foreign keys in the previous section has been simplified, as we have not discussed how to do many-to-many relationships. In SQL databases, you would have to set up a join table, which tracks pairs of foreign keys between two relations to define the relationship.
In graph databases, we don't need such a table, we just define and edge and connect it to the other records. In addition, graph databases have pretty good performance, especially on larger datasets. These databases are slightly different to reason about (as we can no longer use the "thinking of things as a table" crutch), but they provide a formidable alternative to SQL databases, especially if your dataset makes sense to represent as a graph.
While there is not as many graph databases as there are for most of the previously mentioned paradigms, a number of them still exists and is used by big corporations.
Let's for example Redis Graph (because Redis, although originally a KV store ends up being able to do pretty much everything, including SQL, wide column and document), and see how it's used. To be able to leverage the graph, we need to complicate our example to include more than just a Person.
We will add another Rust type into the fray:
#![allow(unused)]
fn main() {
struct Car {
    id: usize,
    make: String,
    model: String,
}
}
Now we can define two relationships: people who drive the car and the person who owns the car.
CREATE (:Person { id: "101", name: "Satoshi Nakamoto", age: "69", nationality: "japanese" })->[:drives]->(:Car { id: "1", make: "Ford", model: "Mondeo"});
MATCH (c:Car) WHERE c.id = "1" CREATE (:Person { id: "102", name: "Ahti Mettälä", age: "39", nationality: "finnish"})->[:drives]->(c);
MATCH (c:Car) WHERE c.id = "1" CREATE (:Person { id: "103", name: "Lukáš Hozda", age: "21", nationality: "czech"})->[:drives]->(c);
MATCH (c:Car), (p:Person) WHERE c.id = "1", p.id = "Satoshi Nakamoto" CREATE (p)->[:owns]->(c);
In practice, we have to embed these queries in the GRAPH.QUERY <graph name> "<query>" statement.
We can visualize this data with a crappy online tool:
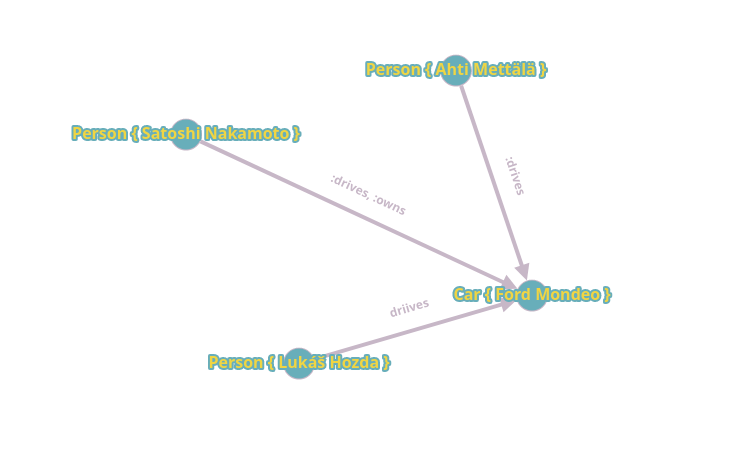
The most commonly used implementations are Neo4j, Apache AGE and ArangoDB. Their use cases include anything that can be modeled as a graph, such as knowledge graphs and recommendation engines.
Search Engines
But what if the most important functionality for you is the ability to search effectively and as fast as possible? That brings us to search engines, which are a type of database optimized for searching queries.
The basic functionality of a search engine is that for a small input text, the database must be able to return the most relevant search results as quickly as possible, and in a proper order, and we are typically searching through a huge amount of data.
Many of the databases in this domain are based on the Apache Lucene project, which has been around for over two decades. Well known search engines built on Lucene are for example Solr or Elasticsearch, from non-Lucene search engines, the french engine MeiliSearch which is written in Rust deserves a mention.
From your perspective as a developer, search engines are quite similar to document databases. You start with an index, and then you add a bunch of data to it. The difference from document databases lies in the fact, that under the hood, the engine analyzes your input and creates indexes of searchable terms.
When a user performs a search, the engine only has to search the index as opposed to completely searching through every contained document in the database. That makes it very fast, even on large datasets. The database can also run a number of algorithms to improve those results, such as ranking results, filtering out typos and accounting for linguistic features of a particular language to accommodate for things such as diacritics or declension.
This adds a lot of overhead and search engines can be quite expensive to run at scale, but at the same time they can add a ton of value to the user experience. Their most common usecases are building, well, search functionality into applications, log processing and analysis, and typeahead.
For example, to insert our original person into MeiliSearch, we would use cURL again:
curl -X POST 'http://localhost:7700/indexes/people/documents' -H 'Content-Type: text/csv' \
     -D \
'id:number,name:string,age:number,nationality:string
101,Satoshi Nakamoto,69,japanese
'
(JSON and NDJSON are supported also, but would be longer to type out)
Log-based databases
In the previous chapter, we discussed transforming our mode of thinking from object to events. We can then log these events, producing a log that can be read sequentially, or seeked through by any number of readers.
This type of databases leans in to a stream-based mode of thinking, including switching from instant single queries to continuous queries. That helps us deliver results faster and prevent having to deal with long running and potentially time-expensive batch tasks.
Log-based databases are also typically geared towards horizontal scaling, which makes them more cost effective when your operations scale significantly. This also helps us with data safety, as we can choose how we want our data replicated, and the system does not lose data and keeps going on, even in case of node failures (to a certain extent, it is the same principle as RAID with drives).
The most ubiquitous and commonly used implementation of a log-based database Apache Kafka, which we use at Braiins too, and which is used by many big corporations in critical use cases. For a smaller scale example, we might look at Redis again, which has had the functionality also implemented for the last couple years.
However, as we shall see soon, their usecases differ.
Let's get more into how we deal with Kafka as a storage medium in the chapter.
Looking at Kafka from the perspective of storing data
Look at this, Willem, he admits he doesn’t know the law and at the same time insists he’s innocent.
-- Franz Kafka, Der Prozess
I believe that now, it is time to properly introduce Apache Kafka. To quote its website:
Apache Kafka is an open-source distributed event streaming platform used by thousands of companies for high-performance data pipelines, streaming analytics, data integration, and mission-critical applications.
And that describes it pretty well in the most succinct terms.
Kafka allows us to send messages (ie. events) into logs. These logs contain messages sequentially, and can be iterated over quite effectively.
So that we bring our terminology more on par with what is used when discussing Kafka specifically, we must include a couple new terms.
Message
A message is a piece of data that you add to a topic (think log for the couple next lines until we get to it). A message has two parts:
- a key
- a value
Unlike for KV-stores which we discussed in the previous chapters, the key might be null, ie. missing, or it may be duplicate. Message keys serve as means to filter out certain groups of data from the log.
For example, imagine the following situation: You are a weather station, and you have a number of sensors, which all report the same type of data, and you want to differentiate between which sender is responsible for which message. In Kafka, the correct way to do this would be to use some sort of unique sensor identifier as the key.
Message content - Avro example
The value in Kafka can be essentially whatever. A format that's used commonly specifically with Kafka is Apache Avro. Apache Avro is a bit similar to JSON, but it stores its own schema.
Schema for Person from the previous chapter might look something like this:
{
    "namespace": "example",
    "type": "record",
    "name": "Person",
    "fields": [
        { "name": "id", "type": "int"},
        { "name": "name", "type": "string"},
        { "name": "age", "type": "int"},
        { "name": "nationality", "type": "string"}
    ]
}
However, although it looks JSONy like this, that's just a human readable representation of Apache Avro, in reality, it is stored in a compact binary format. The benefit of Avro is that because it contains its own scheme, you can parse Avro data without having to learn the schema beforehand from a different source.
Topic
To make good on my promise from a couple lines above, the place where messages are sorted out to is actually called a topic, whereas a log is the name we use for the logical collection of various data segments of a topic present on the disk. In other words, topic is the concept, log is the realization.
Logs are further split into segments. The existence of segments is generally out of reach for regular users of Kafka, and have to do with things like persistence and effective storage.
Some topics in Kafka might have compact logs. Topic log compaction modifies the behavior of the key part of the message, such that only the newest message with one key is preserved.
This is useful in cases, where rather than caring about history, you care about current state, and it more resembles what we might be used to when reasoning about types of databases like key-value and wide-column. This significantly saves space, and also time in cases we need to go through the entire topic to get to the bottom of things.
Offset
Messages sorted into a topic are identified by a number called the offset. The default behavior for Kafka is that offset starts at 0 and only keeps incrementing. Since topics are logs, we need to keep track of the offset to be able to figure out where we want to read from.
If you specify offset 0, then you will read all messages in a topic.
Partitions
Kafka's topics are divided into partitions. While a topic represents a concept for the storage of logs, a partition represents the smallest storage unit that holds a subset of records owned by a topic. Every partition is a single log file, where records are written to, generally in an append-only fashion.
Partitions serve the important function of both distributing data and providing redundancy for it. That is because one topic may have partitions across several brokers.
Brokers
When talking about horizontal scaling, which is something that Kafka is particularly known to be good at, a broker represents a node. A Kafka cluster is composed of machines running Kafka called brokers. Each broker has a number of partitions.
There is a number of partitioning strategies and you are free to configure it, so that it both suits your needs and corresponds to the hardware dedicated to the brokers. You can also easily repartition Kafka.
Brokers also serve as so called bootstrap servers, and all brokers are bootstrap servers. In distributed systems, a bootstrap server is one you connect to discover other nodes so you can connect to them. Typically, when connecting to a Kafka cluster, you specify at least two nodes, in case one becomes unavailable. This will make sure that your service still starts successfully even if there is a dead node.
Consumers and producers
The Kafka architecture is asymmetrical when we discuss the terminology of clients. Here, clients are not universal, but divided into two groups, each performing a particular function.
Producers are responsible for creating messages and storing them in topics. Here is a simple example of a Kafka producer, written in Rust:
#![allow(unused)]
fn main() {
async fn produce(brokers: &str, topic_name: &str) {
    let producer: &FutureProducer = &ClientConfig::new()
        .set("bootstrap.servers", brokers)
        .set("message.timeout.ms", "5000")
        .create()
        .expect("Producer creation error");

    // This loop is non blocking: all messages will be sent one after the other, without waiting
    // for the results.
    let futures = (0..5)
        .map(|i| async move {
            // The send operation on the topic returns a future, which will be
            // completed once the result or failure from Kafka is received.
            let delivery_status = producer
                .send(
                    FutureRecord::to(topic_name)
                        .payload(&format!("Message {}", i))
                        .key(&format!("Key {}", i))
                        .headers(OwnedHeaders::new().insert(Header {
                            key: "header_key",
                            value: Some("header_value"),
                        })),
                    Duration::from_secs(0),
                )
                .await;

            // This will be executed when the result is received.
            info!("Delivery status for message {} received", i);
            delivery_status
        })
        .collect::<Vec<_>>();

    // This loop will wait until all delivery statuses have been received.
    for future in futures {
        info!("Future completed. Result: {:?}", future.await);
    }
}
}
(this is with the rdkafka crate, which we will discuss later)
On the other hand, consumers are the reader-counterpart of producers. They read messages, optionally processing them, and sending the results elsewhere.
Here is an example of a consumer:
#![allow(unused)]
fn main() {
async fn consume_and_print(brokers: &str, group_id: &str, topics: &[&str]) {
    let context = CustomContext;

    let consumer: LoggingConsumer = ClientConfig::new()
        .set("group.id", group_id)
        .set("bootstrap.servers", brokers)
        .set("enable.partition.eof", "false")
        .set("session.timeout.ms", "6000")
        .set("enable.auto.commit", "true")
        .set_log_level(RDKafkaLogLevel::Debug)
        .create_with_context(context)
        .expect("Consumer creation failed");

    consumer
        .subscribe(&topics.to_vec())
        .expect("Can't subscribe to specified topics");

    loop {
        match consumer.recv().await {
            Err(e) => warn!("Kafka error: {}", e),
            Ok(m) => {
                let payload = match m.payload_view::<str>() {
                    None => "",
                    Some(Ok(s)) => s,
                    Some(Err(e)) => {
                        warn!("Error while deserializing message payload: {:?}", e);
                        ""
                    }
                };
                info!("key: '{:?}', payload: '{}', topic: {}, partition: {}, offset: {}, timestamp: {:?}",
                      m.key(), payload, m.topic(), m.partition(), m.offset(), m.timestamp());
                if let Some(headers) = m.headers() {
                    for header in headers.iter() {
                        info!("  Header {:#?}: {:?}", header.key, header.value);
                    }
                }
                consumer.commit_message(&m, CommitMode::Async).unwrap();
            }
        };
    }
}
}
The producer and consumer we created process string messages with string keys. That is the simplest example. You can see a particular architectural difference. Consumers are typically running in an endless loop, but producers do not have to be.
We can look at all the messages in a topic from command-line by using the kcat tool:
kcat -C -b localhost:9092 -t <topicname>
Beware that doing this for a topic that has too many messages in it might take some time, so consider limiting what messages you want to view in that case.
Task
For starters, it's quite easy, start Kafka on your machine, and try to get the two examples up there running :)
You can see how to start Kafka on your computer by the visiting Appendix: Kafka setup.
I recommend also installing kcat, see this link: https://github.com/edenhill/kcat
You need the rdkafka library installed in the system to be able to build and use kcat.
Communication and Kafka
Take my warning to heart instead, and don't be so unyielding in future, you can't fight against this court, you must confess to guilt. Make your confession at the first chance you get. Until you do that, there is no possibility of getting out of their clutches, none at all.
-- Franz Kafka, Der Prozess
Let's move to the other side and consider Kafka from the perspective of patterns of communication.
The situation with patterns of communication is a little more complicated than it was with database systems and storage paradigms. This is because no matter what storage paradigm, you can pretty much bend every single one to every single use case. It will not be effective, mind, and it may require a lot of work on your side of the program, especially if there is a great mismatch between the optimal use cases for a particular paradigm and your use case, for example, if you have data that you need to model extensively and perform joins, and you use Redis, or another KV store, you will have a lot of work to do, and your solution might end up being subpar anyway.
However, in the case of communication patterns, sometimes you just don't have a choice. The trade-offs would either be too high, or you are integrating with a system or standard that dictates it for you.
Let's take a basic over view of some patterns, so we can finally get to how Kafka falls into the puzzle.
Request-response
This pattern is the one you are most likely to have practiced before when developing software. Also called request-reply, it is one of the most basic methods computers use to communicate with each other in the network.
One program sends a request for some data, and another one responds to the request. In more generic terms, it is a message exchange pattern, in which a requestor sends a requesting message to a replier, and the replier validates and processes the request, finally returning a response message.
This is a simple messaging pattern that allows two parties to have two-way conversation with one another over a channel, and you most commonly see it in client-server architectures (since there is nothing that says that each party has to only have one other party exclusively).
As a result, the requestor is often interchangeably, at the cost of specificity, called client and the responder is called the server
simplistic depiction of request-response
Typically, this pattern is purely synchronous, and your most likely encounter with it is in HTTP, which, to refresh our knowledge, stands for Hyper Text, Transfer Protocol. (technically, HTTP in recent versions can do more, but let's not complicate things here)
The difference between this and one-way computer communication is that we await a response, whereas one way communication doesn't.
Request-response is great, if you need two components to talk each other, but if you want one components' message to be delivered to multiple destinations, you have to use another communication pattern.
Batch processing
This is essentially a one-way communication pattern. One party sends or stores data in a place, and another periodically (and the period might be quite long) comes to pick them up from the destination. The destination may be a different component from the processor entirely.
The processor then either store the data elsewhere, or it may put it back into the original storage medium.
an example of batch processing
For the producer, this pattern of communication is definitely one-way because it doesn't care about what happens to the data it sends.
Some implementations might of course be two-way, if it is requested that the store sends back an ACK (acknowledgment), confirming the receipt of data.
Fire-and-forget
This is an option of the first part of the previous one taken to the extreme. In the fire-and-forget pattern of communication, we do not care. The message sender does not await any sort of response from the destination, it doesn't care if the destination received the message. In this model, the recipient would have no relationship with the originator/sender of the message.
An example of a protocol that can be fire-and-forget is UDP, the User Datagram Protocol. We are just sending datagrams somewhere, and we literally care about nothing with regards to its delivery.
The benefit of fire-and-forget is that from the sender perspective, it is very fast. You just send it somewhere and you are done, and now you focus onto the next task.
Point-to-point
In the point-to-point pattern, the sender sends messages to only one receiver, even if there are many receivers listening in the same message channel/queue. Oftentimes, some there is an intermediary involved that handles routing of the message.
point-to-point
For example, we can consider emails to one persons: You are sending your email to an stmp server (which serves as our channel), and there are receivers that exist for this channel, however, the email is delivered only to the person you intend it to (unless its some sketch malicious implementation, of course).
The difference between point-to-point and fire-and-forget is that point-to-point cares about message delivery success, whereas, as we discussed earlier, fire-and-forget does not.
Pipes and Filters
The pipes and filters pattern can stands betwixt an architecture pattern and a communication patterns. Here, we have a source and a destination, just like in the point-to-point pattern, but there is a couple differences.
For starters, we would now prefer to use the term pipe to refer to a communication channel between the original source and the final destination, and there major difference is that there is now a couple stops along the way. These stops are the titular filters. Each filter is responsible for a single transformation or data operation. The messages, or data, are streamed from one stop to the next as quickly as possible, and all of the operations are running in parallel.
Ideally, the filters are loosely-coupled and so they can be used to create more than one pipeline. One filter always receives data from only one filter/original sender and only delivers transformed data to one filter/final destination.
We can see some similarities with the batch processing pattern, as it was depicted above, the difference here is that the stages of a batch-sequential model operate in turn, that is, one at a time, whereas pipes and filters are all running concurrently in parallel.
The origin and the final destination are often just called source and sink
pipes and filters
If you have used a Unix command-line pipeline, then you have observed the pipes-and-filters pattern in action.
For example:
grep "name" < Cargo.lock | tr -d ' ' | cut -d'=' -f2 > res
But keep in mind that not all UNIX pipelines are technically examples of pipes-and-filters. If we only slightly changed the previous example, it wouldn't be anymore:
grep "name" < Cargo.lock | tr -d ' ' | cut -d'=' -f2 | sort > res
The sort command requires the entire input, and so it is more batch processing than anything else.
Publish-subscribe (Pub-sub)
Publish-subscribe pattern is a pattern where senders of messages, which we here refer to as publishers, do not send the messages with the intent to be send directly to a specific receiver, but instead, the published messages are stored into some sort of classes, based on which the receivers, in this pattern called subscribers express intent in some classes, and so they only receive messages that are of interest to them, without the knowledge or possible intervention of publishers which subscribers, if even any at all, receive the messages.
To differentiate what messages are delivered to a particular subscriber, the process is called filtering. There are two basic types of filtering:
- topic-based
- content-based
Under content-based filtering, subscribers subscribe to a particular pattern to be found inside the content of the message. It is typically the subscribers, which are responsible for classifying the messages.
The topic-based model has publishers categorize their messages under topics, which are named logical channels.
Furthermore, in most realizations, a broker stands between publishers and subscribers.
publish-subscribe, sending a message under the topic 't1'
Push-pull (also known as Message Queue)
Push-pull/Message queue is a very similar pattern (in structure and components) to point-to-point and pub-sub. However, here, instead of messages from a sender being delivered to every receiver that "subscribes" to them, instead, they are distributed evenly between each other.
The terminology here is that we call the sender component a producer, and the receiver components we call consumers.
While the methods of distributing the messages may differ, the typical default behavior is to perform a round-robin between all of the consumers.
We can deduce from it that sending messages in a push-pull manner is the best if we want to distribute tasks between destinations that all do the same thing with the data, therefore scaling a particular single component horizontally, whereas publish-subscribe is what we need if we want to send a particular message to all components that require it, generally because they all need to do something different with it.
For example, going back to the old example of you being a weather station, you might require your things to be so distributed that you break down your statistics application suchly:
- logger - saves the temperatures into a publicly available database
- averager - continually calculates different temperature averages
- min/max - watches for minimum and maximum temperatures over a particular time
All of these require the same data on input: whatever the temperature sensors record. That suits the pub-sub pattern of communication.
However, if the logging task would be lagging behind because the machine you rented has too low upload, and you want to spread it about two rented machines, then you might want to distribute messages to two machines that have discrete internet connections, so that the data can freely flow into the final database.
push-pull with round-robin approach, numbers indicate messages
You should be also deduce an important feature of application systems that is key for us: communication patterns are not exclusive, we can use pub-sub and push-pull at once, to tackle two different scaling problems.
If we needed to scale all of the components, there is nothing preventing us from overlaying pub-sub over a push-pull architecture, such that we can scale every component horizontally, while also making our system distributed. This flexible approach facilitates effective scaling out that lets us meet customer/user demand without having to invent NASA-level strong servers, we can just throw many weaker machines at it, that are more efficient. If we design our system suchly, we can use the fact that we have a big application cluster, to distribute our systems across the word, so we reduce latency for our users, and also follow the old backup rule of not having copies of data colocated.
Kafka at last
Now that we have observed some of the most common communication pattern, you might be wondering how Kafka falls into this. As a matter of fact, that's why are here.
Well, we examined Kafka as a storage medium in the previous chapter, but Kafka is a communication medium as well.
In some of the previous communication patterns, a component that stayed the same was something called the broker. Kafka, which calls itself a message streaming platform is essentially a broker from the perspective of communication.
It has some defaults. By default, Kafka saves all messages in a log, as we discussed, this is great for persistence, as we may get into a situation where a program's state may depend on all previous messages (for example, from the weather station example, consider a naively implemented average temperature component).
Another default is the publish-subscribe architecture. All messages sent by producers to a particular topic will be received by all consumers that subscribe to said topic. However, push-pull is built in also.
Keep in mind that there is no real way to do point-to-point in Kafka, as producers
cannot know anything about consumers and vice versa, and so they cannot choose a specific
consumer to deliver a message to, despite there being multiple consumers subscribed
to the same topic
Consumer groups
To be able to leverage Kafka to distribute our work to copies of the same consumer, ie. if we want to scale a particular component only. We need to use something called a consumer groups.
Consumer groups are a tool to group the same consumers together, and by default, messages are round-robin distributed between all of the consumers in a particular consumer group. Let's illustrate this example with a system, where we have one consumer group with three consumers and another consumer that is either a different consumer group, or doesn't have it specified at all.
consumer from group two receives all of the messages
However, we also need to keep in mind that there can be more than one producer producing a particular type of message. This means that we can horizontally scale producers as well. Here, there is no special behavior, messages are typically ordered by arrival.
There is nothing limiting the number of producers and the number of consumers in distinct consumer groups. However, what is limited is the amount of consumers per a consumer group. The upper amount is equal to the amount of partitions a certain topic has.
In the Appendix, depending on how we set up Kafka, we either have
a topic test with three partitions, three replicas and three brokers running, or we have
only one of each in the case of Docker based setup with docker-compose.
We wouldn't be able to realize the previous example like this with the Docker setup
because the g1 consumer group has three consumers, but the topic test only has
one partition.
Kafka patterns - 1-to-1
The most simple pattern we encounter when using Kafka is the one-to-one pattern, where we have, per topic, only one producer and one consumer. While this is significantly less useful than using Kafka to distribute data and scale horizontally, it still has some uses.
For one, it opens up the possibility of connecting something like Kafka Connect
to pour the data from a topic into some other persistent storage, like an SQL database,
which can be very useful by letting you execute queries, or connecting with services
that do not have support for Kafka and it is out of your reach or out of your budget
to go and implement this functionality, or into Secor, which is a tool for persisting
your topic log into cloud storages such as Amazon S3, Google Cloud Storage, Microsoft Azure
Blob Storage, and OpenStack Swift.
Another benefit, apart from opening up possibilities for the future is that the message log is persistent. Beyond what we spoke about before, this may also be useful if you encounter a sequence o data that breaks your application. Instead of trying to decipher what might have happened from your logs, which could frankly be incomplete, you can replay the exact sequence of messages that killed your application. Therefore, we have a debugging benefit as well.
Finally, although it may seem clear already, this makes your applications much more loosely coupled, even if your consumer dies, your producer will continue receiving input and producing messages to put into the topic, and this data will not get lost. Compare and contrast with reply-request architecture, where the data may not only be permanently lost, but the failure of a server might lead to a cascade failure of all the clients and bring the entire application down for everybody.
In production, especially if you have many users, this may be very costly to you, both in terms of profit generated by product being missed, and by the customer impression of your service (of course, the common Joe gets unbelievably angry at the slightest inconvenience, such is the way of life).
1-to-1 Kafka pattern
Example with Kafka Connect
Even in a 1-to-1 scenario, Kafka's message delivery semantics can bring some peace of mind, but we shall speak about them a little later.
However, since you are here, you are most likely more interested in patterns that do more interesting things than delivering data from
Kafka patterns - Stream pipeline
In this pattern, we are essentially modeling something from the pipes and filters pattern. Components are encouraged to take the data they received from the topic, process it, and push the processed results to another topic, from whence it may either be stored somewhere or processed further, but that is no longer your problem as that particular cog of the machine,
Here, consumers are producers also, but care must be taken to not push messages to the same queue that you are reading from, or you are gonna have a bad time, even if the formats would have been compatible.
This pattern encourages stream based thinking, and should be at least somewhat familiar to you, if you have ever played the Czech videogame Factorio.
Using Kafka to create this pipes-and-filters approximating architecture has the benefit, of letting you easily scale horizontally every component of the pipeline to meet the demands of your usecase and the amount of your users.
In the following depiction, there is multiple Kafka circles, this is a limitation of the chart DSL used, so just imagine that it is all one Kafka cluster:
Stream processing
Kafka patterns - Many to Many
While this pattern already makes sense and should be fairly clear, let's mention it anyway. The most common way to use Kafka is to scale out our producers and consumers, not to mention provide them with more durability and decoupling as producers no longer have to care about consumers existence or numbers and vice versa.
many to many
Message delivery semantics
An important aspect of message delivery is the semantics, or rather guarantees that we can expect. Kafka provides three different models of message delivery:
- At most once
- At least once
- Exactly once
Depending on which semantics we use, we can expect different things.
At most once
This strategy is also known as best-effort. Here, the producers sends messages to the broker without waiting for an acknowledgement, and if the broker is unreachable or the message is lost for one reason or another, there will be no attempt to resend the message, in other words, the message will be delivered either one, in the best case scenario, or not at all.
This is useful when the data isn't critical, but the throughput may be, and when we care more about progress rather than a result. For example, if you have a service that registers clicks for creating a heat map of your website usage, you probably don't care if you miss one or two clicks every now and then. The same can be applied to other types of tracking, and even IoT sensors. You may be a very special weather station that just doesn't feel bad about missing some data.
This strategy should definitely not be used for data you really want to keep.
At least once
Here, the producer sends a message to the broker and expects ACKs (acknowledgements) to make sure that the message has been received successfully and added top the topic. If there was no acknowledgement received after a timeout is reached, whether due to network latency or any other reason / issue along the way, the producer will retry sending the message, acting under the assumption that the message has not been received in the previous attempt.
This makes it ensures that our messages get through, but the downside is that it may lead to duplicates. If your usecase doesn't have a problem with that, then this is a good strategy to use. For example, if you had a message "update user X's name to Y", then you would not mind if the message is processed twice, the end result is the same and the user will not notice anything.
However, if you were processing financial transactions, you really do not want to double spend funds, or create invalid states by duplicating transactions, that would be quite bad.
In those cases, we must rely on the Exactly once strategy.
Exactly once
The final strategy essentially does what it says on the tin. Every message is delivered precisely once, it offers and end-to-end exactly-once guarantee for read-process-write tasks such as stream processing applications. To support this guarantee, Kafka utilizes two features:
- Idempotent delivery - this allows a producer to send a message exactly once, wherein messages that are duplicated belonging to the same producer will be ignored by the broker (a simple check-summing technique is in place)
- Transactional delivery - producers can send data to multiple partitions in an atomic way, which implies that either all events are successfully delivered, or none of them are. We spoke about the atomicity of transactions in the storage chapters, feel free to come freshed up on ACID
Keep in mind that exactly-once is a guarantee on the part of Kafka only. This means consuming events, updating state stores, and producing events (messages). If you are trying to update a state that is not a part of Kafka, like a row in database, or you make an API call, the guarantee will be of course weaker. We have already proven that doing things exactly once is a rather complicated problem in computing.
The Task
Take the producer and consumer from the previous chapter, and try scaling them horizontally.
Kafka, RabbitMQ, Redis
"One morning, as Gregor Samsa was waking up from anxious dreams, he discovered that in bed he had been changed into a monstrous verminous bug. He lay on his armour-hard back and saw, as he lifted his head up a little, his brown, arched abdomen divided up into rigid bow-like sections."
-- Franz Kafka, Der Prozess
When developing a distributed, highly-available and performant system based on messaging, and we need to leverage both pub-sub and push-pull, we need to select the broker implementation that suits our needs and usecases the most.
Some of the needs are unrelated to the use-case, for example, it is a better idea to use a message queue / pub-sub broker that already has official, or strong community, support for the programming language we are using, so that we do not have to expend time creating bindings for the technologies we are using, which not only costs more time, but can also lead to bugs down the line, and will prevent us from benefiting from upstream support.
While there are many such implementation, for the sake of simplicity, let's consider three major tools we can use: Apache Kafka, RabbitMQ and Redis. Bet you didn't expect Redis would show up again, would you? :D
RabbitMQ
RabbitMQ, a very popular message queue, is an implementation of the AMQP protocol, which stands for Advanced Message Queueing Protocol. With this type of messaging model, instead of producing messages directly to a queue, we are sending messages to a so-called exchange.
An exchange is a router, we could say it is similar to the post office, it inspects the messages and decides into which message queue(s) it should put them to. The queue(s) are connected to the consuming services, or in other words, consumers.
The exchange is connected to queues using something called bindings. These bindings can be specifically referenced using something called the binding key.
The ways in which messages can move through the system are extremely flexible. That is because there is many exchanges available, which provide different behaviors, and you can also write plugins for RabbitMQ which extend its functionality.
Here is a couple exchanges that are available in RabbitMQ:
- fan-out - messages are sent to every single queue the exchange knows about
- direct - in this paradigm, the producer will produce a message with a particular routing key, the routing key is being compared to a binding key, and if it is an exact match, the message goes into said queue. This is, in-effect a point-to-point pattern
- topic - here, the routing key serves as a topic, and is compared partially against the binding keys. This means that the messages will go to all queues who match the pattern specified by the routing key
- header - the routing key is ignored completely, and the message is routed through the system according to a header
- default - this is a exchange that is unique to RabbitMQ, and is not part of the AMQP standard. It is also called a nameless exchange. Here, the routing key is tied to the name of the queue itself.
That is of course not all the models with which you can route messages, there is more, and you can also build on existing models.
In RabbitMQ, the behavior of the message is largely dictated by the message metadata, as opposed to the broker administrator.
RabbitMQ is quite fast, but it does not keep the messages it routes through itself. By default, it is not persistent either, although a persistence layer is available should you wish to use it.
Redis
Redis seems to pop up pretty much everywhere. Since the last couple of years, it has had support for both message queues (push-pull) and the pub-sub pattern.
The pub-sub pattern works pretty much how you would expect it to work, it is quite basic. Unlike with Kafka and RabbitMQ, we do not call the storage medium here a topic, but rather a channel.
You can see the pub/sub documentation here: https://redis.io/docs/manual/pubsub/
To provide message-queue / push-pull functionality, Redis streams are used: https://redis.io/docs/manual/data-types/streams/
Unlike RabbitMQ queues, Redis streams keep all of the messages received by default, use offsets just like Kafka, and so you can seek and replay just the same.
However, since we are still talking about Redis, everything is always stored in the RAM, so while it is very fast, RAM size is a constraint, and scaling out is less effective.
You also have to "pick one" in Redis, it is not possible to use pub-sub and message queues with a single-topic.
So, when to use what?
The key difference between RabbitMQ and Kafka is that RabbitMQ has a smart broker + dumb consumer, the producer sends the message to the exchange, and the exchange routes the message to queue. The exchange does the routing, and so it is a smart broker. Meanwhile in Kafka, the broker is dumb and the consumer is smart, It is up to the consumer to decide what topic it is interested in, creating consumer groups and deciding what listens to what.
If your broker doesn't have to be smart, then Kafka is the better option.
Another benefit of Kafka is message persistence. It has the best storage capabilities out of the three. But if your messages are not source of truth, but rather notifications, then RabbitMQ can be the better solution for you. For example, if you want to notify a user that a new message arrived at runtime (as opposed to showing unread messages in the inbox), then you might use RabbitMQ to distribute notifications to services, which can create an actual system notification for the end user.
There is often no harm done if such a notification is lost in the case of a power failure, network failure, or system restart, so it's fine to use RabbitMQ.
On the other hand, Redis and Kafka have better persistence capabilities and can replay messages. Redis is very fast, but cannot store as much as Kafka, and sharding and replication may be more complicated.
However, an argument in favor of Redis is that Redis has a lot of other storage-related functionality, and so you may get away from introducing another technology to your stack. If you are for example already using Redis for caching or temporary storage of some data, and your messaging needs are not overly complicated, then you can just leverage Redis and easily extend the functionality of your applications.
Keep in mind that you cannot mix and match pub-sub and streams in Redis, so that is a good threshold of what would be considered "overly complicated messaging".
Braiins Kafka
We have now finally built up enough theoretical background to get down to the nitty gritty of why are we even concerning ourselves with Kafka here. The simple answer is because we use Kafka in Braiins.
The Kafka message streaming platform forms a key part of the Dynamo project, where it
serves as a broker between services. We do not use Kafka as a final destination for data,
that is, as an absolute source of truth, the data from mining-view ends up in a PostgreSQL
database.
rdkafka
There exist two main implementations of Kafka clients (for producers and consumers) in Rust.
A pure-Rust one exists, aptly called just kafka and then there is one that binds to librdkafka,
a C library for communicating with Kafka, which is called rdkafka.
The second one is far more mature and stable, and so it is the one we elected to use. We have
seen examples with rdkafka in the previous chapters.
The main library can be found here:
https://crates.io/crates/rdkafka
We maintain a particular version we use in the monorepo. As you can see, the rdkafka client
has some nice features:
- Support for all Kafka versions since 0.8.x. For more information about broker compatibility options, check the librdkafka documentation.
- Consume from single or multiple topics.
- Automatic consumer rebalancing.
- Customizable rebalance, with pre and post rebalance callbacks.
- Synchronous or asynchronous message production.
- Customizable offset commit.
- Create and delete topics and add and edit partitions.
- Alter broker and topic configurations.
- Access to cluster metadata (list of topic-partitions, replicas, active brokers etc).
- Access to group metadata (list groups, list members of groups, hostnames, etc.).
- Access to producer and consumer metrics, errors and callbacks.
- Exactly-once semantics (EOS) via idempotent and transactional producers and read-committed consumers.
The benchmark shows that is is also quite performant.
However, the issue with rdkafka is that it is quite low-level, and we needed to write a more
high-level interface.
twitch
Our interface has ended up in a library we call twitch. Twitch provides a safe way for streaming
arbitrary data in and out of a Kafka cluster, handling storage formats and other necessities for us.
Twitch is found in the monorepo under lib-rs/twitch. The library is quite transparent and clearly
written, so you are encouraged to look at its source code to familiarize yourself with it.
Here is an example of a producer written with twitch:
use std::env;
use std::time::Duration;
use tracing::*;
use tracing_subscriber::{self, EnvFilter, FmtSubscriber};
use twitch::warden::{KafkaCluster, TopicConfiguration};
use twitch::{Record, TopicPartition};
pub use rand::RngCore;
use rand::SeedableRng;
use rand_xorshift::XorShiftRng;
use serde::{Deserialize, Serialize};

pub const TOPIC: &'static str = "test_topic";
pub const TEST_SIZE: usize = 30_000;
pub const PAYLOAD_SIZE: usize = 320;
pub const TIMEOUT: Duration = Duration::from_secs(15);

#[derive(Serialize, Deserialize, Debug)]
pub enum TestMessage {
    Reset,
    Data(Box<[u8]>),
}

pub fn init_test_logging() {
    let env_filter = if env::var_os(EnvFilter::DEFAULT_ENV).is_some() {
        EnvFilter::from_default_env()
    } else {
        EnvFilter::new("debug")
    };

    let builder = FmtSubscriber::builder();
    builder.with_env_filter(env_filter).init();
}

pub fn make_rng() -> impl RngCore {
    XorShiftRng::seed_from_u64(0)
}

#[tokio::main]
async fn main() {
    init_test_logging();

    let brokers = env::var("KAFKA_BROKERS").unwrap_or("localhost:9092".into());
    let tp = TopicPartition::from_str(TOPIC, 0);
    let kafka_cluster = KafkaCluster::new(brokers.clone(), "example".into());

    let _ = kafka_cluster
        .wait_for_brokers()
        .await
        .expect("BUG: Failed to connect to brokers");
    info!("Broker seems to be up & running...");

    kafka_cluster
        .create_topics(&[TopicConfiguration::new_with_default(TOPIC)])
        .await
        .expect("BUG: Failed to create topic");
    info!("Test topic created/exists...");
    let mut writer = kafka_cluster
        .get_writer_for_partition(tp)
        .expect("BUG: cannot get writer");

    let reset_msg = bincode::serialize(&TestMessage::Reset).expect("BUG: Serde problem");
    writer
        .produce_and_flush(Record::new(reset_msg))
        .await
        .ok()
        .expect("BUG: failed to send Reset message to kafka");

    let mut rng = make_rng();
    let mut buffer: Vec<u8> = vec![0; PAYLOAD_SIZE];

    for i in 0..TEST_SIZE {
        rng.fill_bytes(buffer.as_mut());

        let msg = TestMessage::Data(buffer.clone().into_boxed_slice());
        let msg = bincode::serialize(&msg).expect("BUG: Could not serialize TestMessage");
        let record = Record::new(msg);
        writer.produce(record).await.expect("BUG: Send error");

        if (i + 1) % 100 == 0 {
            info!("Write: queued {} messages...", i + 1);
        }
    }

    info!("Write: queued {} messages...", TEST_SIZE);

    let _offset = writer.flush().expect("BUG: flush failed");
}
Try to get it working :)
Why we chose Kafka
For us, the main reason to choose Kafka were its persistence features. We want to keep the messages we receive, and we expect there to be a very large amount of messages.
This makes Redis unsuitable for us because RAM would be too much of a constraint, and it makes RabbitMQ unsuitable for us because it is not really built for keeping messages.
Therefore, our choice wasn't that much complicated, we had to choose Kafka.
The task:
You have tried using Kafka directly through rdkafka two chapters back.
Visit the repository with twitch and look at the examples to see how to write a consumer as well.
Now, let's design an application that can leverage Kafka.
Make sure your Kafka deployment has a test topic ready with three partitions.
- Write a
temp_gencrate, which is a producer that produces a random temperature. You can userng.gen() - rng.gen()(methods onThreadRngfrom therandcrate) to introduce variance to the temperature - Write an
average_tempcrate, which is a consumer, which calculates an incremental average and prints it to stdout.
First, try running it 1-to-1, then try running it 1-to-3. Then run it 1-to-3 with all three consumers having the same consumer group specified.
Appendix: Kafka setup
All [the authorities] did was to guard the distant and invisible interests of distant and invisible masters.
-- Franz Kafka, Der Schloss
Setting up Kafka is a process which can be as involved as much pain you are willing to tolerate.
Here, let's list two options - Docker and direct installation. Of course, it also would have been possible to set up Kafka on Kubernetes, but we don't need that for demo purposes in these chapters.
It can be added later, though.
Docker setup with docker-compose
This is the quick and relatively pain-free way.
Start by installing docker-compose and docker:
# arch/artix
pacman -S docker-compose docker

# ubuntu/debian
apt install docker-compose docker

# void linux
xbps-install -S docker-compose docker

# fedora
dnf install docker-compose docker

# older RHEL based distros
yum install docker-compose docker
(make sure to start the Docker daemon, how this is done depends on your system and init.
You might have to install an additional package with init/service scripts, if they aren't
bundled with the docker package by default)
Next, let's create a docker-compose.yml file somewhere. It is advised to put it into its own
folder, you might also want to consider putting it into git.
This content might be enough for us for the first try:
# docker-compose.yaml
version: '2'
services:
  zookeeper:
    image: wurstmeister/zookeeper
    ports:
      - "2181:2181"
  kafka:
    image: wurstmeister/kafka
    ports:
      - "9092:9092"
    environment:
      KAFKA_ADVERTISED_HOST_NAME: 127.0.0.1
      KAFKA_CREATE_TOPICS: "test:1:1"
      KAFKA_ZOOKEEPER_CONNECT: zookeeper:2181
    volumes:
      - /var/run/docker.sock:/var/run/docker.sock
As you see, Kafka requires Apache Zookeeper as well.
Let's start our containers:
docker-compose up -d
If all went right, you should now have a very small Kafka setup running :)
We have also created the test topic. This will create the topic with 1 partition and 1 replica.
That's not very safe for production, but "alright I guess" for us.
You can verify that it works using kcat:
First, let's start a consumer on the topic test:
kcat -C -b 127.0.0.1:9092 -t test
And now let's start a producer in another terminal window that endlessly reads from stdin:
kcat -P -b 127.0.0.1:9092 -t test
If you type in something and press enter, you should see your message appear in the consumer terminal window.
The more involved way to set up Kafka
Start by going to kafka.apache.org/downloads and download the latest release of Kafka. The versioning
might seem a little confusing, as the Scala version number is included first in the archive name.
When you have downloaded it, start by unpacking the tarball:
tar -xzf kafka_2.11-3.2.0.tgz
cd kafka_2.11-3.2.0
Then go let's look at the bin folder, and let's start ZooKeeper:
bin/zookeeper-server-start.sh config/zookeeper.properties
This will start a single-node instance of ZooKeeper with the default port and settings.
To make things spicier, and to demonstrate Kafka as a distributed system, let's spin up three brokers:
cp config/server.properties config/server0.properties
cp config/server.properties config/server1.properties
cp config/server.properties config/server2.properties

# Edit each file above to have the following changed properties respectively
vi config/server.properties config/server0.properties
broker.id=0
listeners=PLAINTEXT://localhost:9092
log.dir=/tmp/kafka-logs-0

vi config/server.properties config/server1.properties
broker.id=1
listeners=PLAINTEXT://localhost:9093
log.dir=/tmp/kafka-logs-1

vi config/server.properties config/server2.properties
broker.id=2
listeners=PLAINTEXT://localhost:9094
log.dir=/tmp/kafka-logs-2
Pay attention to the ports, we need to make sure they are not the same. The IDs have to be unique as well, and having all Kafka instances log into the same file would be a bad idea also.
Now, we can start each broker:
bin/kafka-server-start.sh config/server0.properties
bin/kafka-server-start.sh config/server1.properties
bin/kafka-server-start.sh config/server2.properties
You will have to run each of these commands in a separate terminal window. Or run them in the
background by appending & to the command, but beware that you might see some confusing
output scroll.
Now, let's create a topic. Because we have three brokers running, we can go proverbially buck wild and run them with three partitions times and three replicas:
bin/kafka-topics.sh --zookeeper localhost:2181 --create --topic test --partitions 3 --replication-factor 3
If it succeeded, you should see the output:
Created topic "test"
See if the topic is there:
bin/kafka-topics.sh --zookeeper localhost:2181 --list
If you want to see a bit more under the hood, you can also view topic layout:
bin/kafka-topics.sh --describe --zookeeper localhost:2181 --topic helloworld
We can verify that the deployment was correct by using kcat again.
First, let's start a consumer on the topic test:
kcat -C -b 127.0.0.1:9092 -t test
And now let's start a producer in another terminal window that endlessly reads from stdin:
kcat -P -b 127.0.0.1:9092 -t test
And you can try sending messages again.
It should work.
Alternatively, the Kafka distribution comes with its own commands for creating simple cli consumers and producers:
bin/kafka-console-consumer.sh --bootstrap-server localhost:9092 --topic test --from-beginning
bin/kafka-console-producer.sh --broker-list localhost:9092 --topic test
Modes of communication continued - RPC
When discussing communication patterns in relation to Kafka, we were predominantly focused on modes of communication related to messaging, however, there are other paradigms, and one of the most common of them are Remote Procedure Calls.
RPC is a technique where one computer program executes a procedure of another, remotely, as if it were a normal local procedure call. This paradigm is more abstract, it may be implemented as messaging, but it is realized without the programmer explicitly implementing the details for the remote interaction between the program. Of course, this is within reason, and it will likely be slightly different and not exact same, but still, the result is the same.
RPC is quite old, being first conceptualized all the way back in 1960s, although it would take another twenty years for practical implementations to start popping up. Another fifteen or so years later, when Object Oriented Programming became the whole new sensation sweeping the nation (and the world at large), the concept was furthered into Remote Method Invocation, which, after we sobered up from the drunken stupor of Object Oriented Programming all the way (tm), largelly fell out of popularity, as significantly less versatile and universal between languages.
Over the years, a number of implementations have popped up. For us in Braiins, we are mostly concerned with Google's gRPC. We have already partially investigated the topic in one of our Rust chapters, feel free to see Protobufs and gRPC.
Here we have once again reiterated the fact that gRPC is very tightly coupled with Protocol buffers. Protobufs are the one and only ubiquitous format, and that is for a good reason. Unlike with communication over Kafka, which prescribes us no way in which to format our data, and lets us be more involved with the configuration process by default, gRPC is quite prescriptive, and the only allowed format is protobuffers.
This ensures compatibility, and creates some implications with regards to the evolution of interfaces, which we shall discuss later.
Use of RPC
The major usecases of RPC is to create direct communication between server and client, without the need for any intermediary. Whereas with Kafka, our architecture is fairly centralized (on a conceptual level, as we know that we can scale the cluster horizontally), here, there is no central broker that we have to go through. Nodes can create a peer-to-peer network, wherein they talk to each other directly as they need.
Furthermore, there is a slight conceptual gap between RPC and messaging. In messaging, we dealt mostly with events or notifications, whereas with RPC, we are executing a remote call, and that may well be for the purpose of performing an action on the remote host, rather than contacting it for the purpose of transferring data to be processed and stored, or to transfer that an event occurred or a notification has to be communicated.
Modern RPC implementations have many features which let us get quite sophisticated with our inter-program communication.
To kick off these chapters, let us remind ourselves with an example of a gRPC service
from our Rust chapter:
syntax = "proto3";
package calc;

message CalcInput {
    int32 a = 1;
    int32 b = 2;
}

message CalcOutput {
    bool is_error = 1;
    int32 result = 2;
}

service Calculator {
    rpc Add (CalcInput) returns (CalcOutput);
    rpc Sub (CalcInput) returns (CalcOutput);
    rpc Div (CalcInput) returns (CalcOutput);
    rpc Mul (CalcInput) returns (CalcOutput);
}
Muck like Kafka, gRPC is one of technologies that helps us transform our large monolithic applications into smaller, more manageable microservices.
The cons of using gRPC
However, unlike Kafka, there is no persistence of communication, and so we might experience losses of data. This loss of date would typically occur when one side of the connection is unavailable. An improperly designed service (or properly, if that is the better behavior given the severity such failure would have), could crash or fail to function if its gRPC counterpart is no longer available.
In Kafka, messages would simple continue to be pushed into the queue, ready to be processed when a consumer starts accepting messages again. Keep this in mind when designing your application.
Furthermore, gRPC is a bit problematic on the web browser side, as it heavily depends on the HTTP2 protocol in a way that's too low-level for browsers. There exist proxies for usage on the web, but of course, limitations apply.
Lastly, there is no consistent error handling. While gRPC describes the concept of a status code and message, there is no clear and consistent way to properly catch the errors across programming languages. While there are recommendations and guides related to error-handling, no universal consensus exists. Error handling is discussed in a later chapter.
Performance and bandwith
gRPC streams have quite low bandwidth and pretty good performance. Furthermore, since gRPC is more peer-to-peer, and don't have to go through a broker, then it is less likely the bandwith utilized for communication between two services will impact communications between a different pair of services.
This could happen with Kafka if you have only one broker, or enough traffic to fully saturate the connections of all of your brokers. In gRPC, it is less likely that two services would have connection routed through the same machine.
gRPC is also better suited as a public API (although there are better options even then). With gRPC, it is fairly okay to accept thousands or more connections, but it would be more difficult to setup Kafka in a way that having foreign agents connect to it in the numbers of tens of thousands would be okay, and prevent access issues and other unsavory things.
Deadlines and cancelling
To ensure reliable throughput, gRPC supports the concepts of deadlines and cancelling.
A deadline is essentially a timeout for a particular call (and you may hear it being referred to as such). By default, gRPC calls do not have deadlines, and so they aren't limited. The deadline is sent with the gRPC call to the service and is independently tracked by both the client and the service. It is possible that a gRPC call completes on one machine, but by the time the response has returned to the client the deadline has been exceeded.
If a deadline is exceeded, the client will immediately abort the HTTP request, whereas the server will also produce the cancelled status.
gRPC clients may also choose to cancel long-running calls when they are no longer needed. This is important in calls that use streams with no set bound, as they would otherwise be essentially running endlessly.
Evolution of interfaces
Let's go back again to a more theoretical level. When we are creating an API, which is in any capacity public, we are signing ourselves up for an undertaking which may be more complex than might appear it first. In some ways, it is similar to choosing our SQL database schema and the caution and care we must exercise every time we need to make changes to it, especially if it is in production with large amounts of critical data.
There are two ways an API can be public. First is internally, wherein one API is shared by several components written by different teams of developers. These components might have entirely different release cycles and it may be infeasible or even outright impossible to keep rewriting and redeploying them side-to-side. Therefore we have to design an API that is public, that means it is carefully selected and intended for the maximum degree of stability and backward and perhaps also forward compatibility, about which we shall speak in a moment.
The second way an API can be public is if it is straight out exposed to end users / customers. This may be either because a piece of software that's ran by the customers uses this API, or we may just be exposing a public API intended for developers. These developers than build on said API and expect it to be stable within reason. If it weren't, and if they are building a commercial, or hell, even a large OSS, project, our API may no longer be as attractive because we provide them an unsteady ground to stand on.
The same goes with software ran on the machines of customers. It is impossible, or very difficult and costly, to force all customers to update to the latest version. Therefore we cannot lightly make incompatible changes lest we break it for the customers. This is not good from a business stand point. If you have ever done analytics about version usage, you will know that even after it has been obsolete for years, very old versions of software may still be ran by a few stragglers. These stragglers sadly cannot be taken lightly, while they may be proverbial computer geronts who simply do not care about updating, they might also be government institutions which may pose big and dangerous clients, and to which we may even be bound contractually (hopefully, Braiins will not get into this situation for a long long time ;-)).
This stresses the importance of backward compatibility and forward compatibility, we should therefore look into how these terms are defined, and then we can look at some exact steps of how gRPC tries to make designing reasonable APIs less difficult.
However, keep in mind that no level of crutches from the side of the technology you are using is a substitute for a well design API. If you have significant experience with the Object Oriented approach to programming, you should know that just making everything public willy nilly is a particularly bad idea.
Some common sense principles apply. You may be familiar with the terms below, but it is still not a bad idea to review them.
Encapsulation
Encapsulation is an OOP term referring to the notion of bundling data along with the methods that operate on said data into a single logical unit. You may be familiar with this concept in the form of classes. Rust has similar encapsulation with type definitions and their accompanying impl blocks. That is a key difference of Rust - implementation is split from data definition.
However, encapsulation goes beyond that. You should bundle data and operations related to a particular topic or subject matter together also. A bad API is one that is hard to navigate, and that is from both the user standpoint and a developer standpoint. A developer that cannot easily get a full picture of what he or she is developing may introduce bugs by forgetting to update obsolete code, which was located in an irrational place.
Within the terms of gRPC, this means making sensible services, and putting related things to the same modules.
Information hiding
A related term is information hiding. To put it simply: keep your API as small as possible. While we have all been tempted by the sweet calls of engineering joy that leads us on a slippery slope that leads down to the dark world of over-engineering, it is really a bad idea.
There is multiple benefits to keeping API small. The first benefit is that it is less work to develop, another benefit is that it is less work to maintain and ensure compatibility for, and finally, we are reducing attack area by it.
The bigger your API is, the more likely it is that a certain usage of your API can introduce invalid state into your application, which may lead to exploits, bugs or even straight up crashes and failures. Therefore, it is best to keep an API small.
This does not mean that you have to go all the way down to the pioneer C lang designers' way of rugged minimalism, as that is at the cost of ergonomics, especially or the end users who may not have as deep of an understanding of the product as you do.
Forward compatibility
Forward compatibility, also known as upward compatibility, is a design feature of an API that allows a system to accept input intended for a later version of itself. This means that an application will work if it has to process data created by a newer version of itself, or its counterpart (for server-client architectures, you can have a server instance accept and process data from a newer version of the client).
To be considered forward-compatible, the input must be processed gracefully, this usually means either ignoring it, or ignoring it and kindly letting the user or the other program know that it is too old, and this and this piece of data has been ignored.
For example, Kafka is both forward and backward compatible, within reason. You can use clients that speak a newer version of Kafka with an older broker. However, you might be losing out on performance, or special features.
Another place where you might commonly see forward compatibility is with archiving
software, especially when it comes to compression. For example archives compressed
with Google's snappy could still be decompressed with many tools that did not know
this algorithm.
Backward compatibility
Backward compatibility, is the property of an API (regardless of whether we are talking an operating system, product or other technology), that allows for interoperability with an older version.
In the previous example, we would be backward compatible, if a new server would have no issue processing input from an older client. If you modify your system in such a way that no longer allows backward compatibility beyond a certain point, it is generally referred to as breaking backward compatibility.
The differences in input between the versions also have to be dealt with gracefully. A common example might be the fact that some fields sent by an older client but expected by the newer server might be missing. Therefore, the server has to be able to handle that some data is not present without failure or crash, or otherwise compromising its functionality in a harmful way.
For example, metrics may be an area where we encounter backwards compatibility. Older clients might not send all the metrics a newer client would, but the server is fine with it, it just does not display said metric, or displays a default value.
It is typically a good idea to design your system in such a way that you can distinguish between missing data and data that sends an invalid default value, so that you can discover potential issues.
Sometimes, breaking backward compatibility may be unavoidable, even though you would like to still support older clients for one reason or another. In these situations, you are forced to keep alive two different versions of the API. This may lead to a significant split in your codebase. The easiest way to deal with this would be to add a translation layer, that translates one version to another. When keeping multiple major versions of an API alive, these versions must be clearly distinguished.
For example, you may add a version component to a web API, such as :
- /v1/... -> old version
- /v2/... -> new version
Of course, some clients might be so old that there is no one to adapt them to the version distinction, in those cases, you have to provide backwards compatibility in the form of automatically interpreting requests without a version specified as the older versions, however, in all cases, make sure to weigh the pros and cons.
Sometimes, it is just the time to cut your losses and stop supporting ancient things.
Being extremely backwards compatible can lead to an overly large and overly messy codebase.
For instance, consider xterm, this terminal emulator, often considered the ubiquitous one,
or the ed of terminal emulators, which is even on many distributions bundled with Xorg itself,
has a very large codebase that supports devices older than time itself, none of which
are likely to even be used in production at this point.
You may end up with some software features being present only for the purpose of "historical reasons". The Jargon File refers to these as hysterical reasons / raisins, and has this to say about it:
(also hysterical raisins) A variant on the stock phrase “for historical reasons”, indicating specifically that something must be done in some stupid way for backwards compatibility, and moreover that the feature it must be compatible with was the result of a bad design in the first place. “All IBM PC video adapters have to support MDA text mode for hysterical reasons.” Compare bug-for-bug compatible.
That speaks a lot about considering how to do things.
gRPC forward and backward compatibility
gRPC with protobuf version 3 leads us to design our systems to be both forwards and backwards compatible. The fact that Protocol Buffers are utilized are a key component in this.
Here is an example of some protocol buffers, a message representing a student who can choose between two language classes, and then we store which group he or she is in as a string in the field:
message Student {
  int32 student_id = 1;
  oneof language_course {
    string lang_eng = 2;
    string lang_fre = 3;
  }
}
In many other formats, this would not be very good, as we might be surprised when a field is missing.
However, protocol buffers version 3 makes everything optional by default, which in Rust translates
to Option<T>, that expresses that the value may not be present and forces us to handle that eventuality.
If you do not handle it regardless, then it was your explicit choice and when it proverbially shoots you in the foot, it is completely on you. Therefore, the only mistake we may find in the definition above is the possibility that a student might choose a French course. The mere thought sends shivers down my spine, but luckily, we can rectify that.
The nice thing to do is to first mark this field as deprecated. We can also add a more sensible choice:
message Student {
  int32 student_id = 1;
  oneof language_course {
    string lang_eng = 2;
    string lang_fre = 3 [deprecated = true];
    string lang_finnish = 4;
  }
}
Now that's a language to grow some hair on your chest! Eventually, we may even stop parsing this field at all. Therefore, we set the field as reserved:
message Student {
  reserved 3;
  int32 student_id = 1;
  oneof language_course {
    string lang_eng = 2;
    string lang_finnish = 4;
  }
}
We have successfully deleted the French and there is peace in the universe.
The fact that the fields are numbered is quite important. This means that the order in which the fields are written is not really important and that we have a notion of an actual slot in the messages. We will therefore not run into issues where a field has been removed and we are no longer expecting it, and so fields get shifted and we receive corrupted date or unparseable messages.
This functionality helps messages to be both backwards and forwards compatible. Server has to handle that all things might be missing, the client does not have to care about sending things that it is not capable of and receiving responses it is not expecting.
Since we are prescribed protocol buffers, we can reasonably expect this behavior to stand.
Interceptors
Never go out to meet trouble. If you just sit still, nine cases out of ten, someone will intercept it before it reaches you.
-- Calvin Coolidge
In the Kafka cycle, in the chapter about communication paradigms, we mentioned the pipes-and-filters pattern of communication. This pattern has data being processed, modified or enriched once or more times along the way until it reaches the destination.
When we consider web application architecture, we can find a similarity in the concept of middlewares.
Interceptors are similar to middlewares, but they are way more limited. Interceptors are transparent to the application logic, and so you can use them for many common tasks, which could have otherwise led to duplicate code.
Using interceptors can also help make implementations be clearer in the meaningful action that they do.
For example, imagine that you need to perform some data validation. You are receiving a message about a User, and it has a user id. User IDs have a particular format. Instead of validating that the format is correct in all of the gRPC calls' implementations, you can write an interceptor that does this for you.
This interceptor would validate that the ID is correct, and if it isn't, it will prevent the gRPC call from proceeding further.
You could take this even a step further and verify with the database that the user in fact exists.
If you are accessing the database, you might as well use it to validate authentication. Now, you no longer have to worry about it in each RPC call, as the interceptor would reject every unauthenticated call.
On the client-side, an interceptor may for example attach a JWT to the metadata, to facilitate said authentication, which will allow us to remove it from the protobuf message definition and optionally allow for multiple authentication methods without polluting the protocol buffers.
Incoming and outgoing
gRPC interceptors can be utilized by both parties of the communication. Client-side interceptors, that is interceptors for outgoing RPC calls, are slightly less useful in terms of doing actionable thing, as it is unlikely, that you would want to stop a call for any reason on your server.
However, they are fairly useful for the two following applications:
- logging
- metrics
Client-side interceptors are the ideal place for a logging harness that will log every call with its metadata, and also a great place to collect client-side metrics about RPC call usage.
Of course, these are both applications that you can do on the server-side also, here we would be talking about interceptors for incoming calls.
To reiterate, the usecases for incoming interceptors are:
- logging
- metrics
- data validation
- authentication
In production, your gRPC calls may end up being a pipeline with interceptors present both on the side of the client and the server:
an example with two client-side interceptors and one server-side interceptor
In Rust - Tonic specifics
Rust has multiple crates for dealing with gRPC. However, the one that is the most mature at the time of this writing, and which is also the one we use, tonic, has some specifics when dealing with interceptors.
Tonic is related to the tower project, which is a library of modular and reusable components for building robust clients and servers. Tower is protocol agnostic, however it is more suited to the request-response pattern than anything.
Interceptors are a bit more limited in tonic, they can essentially only do two things:
- add/remove/check items in the
MetadataMapof a request - cancel a request with a Status
These may be enough to implement functionality for the aforementioned use cases, but users are actually discouraged from doing logging and metrics with them and creating a middleware in tower is the recommended way.
As a matter of fact, tower-http has a built-in Trace middleware which
already implements logging for gRPC, so you can either use that directly,
or take inspiration when implementing your own logging.
https://docs.rs/tower-http/latest/tower_http/trace/index.html
#![allow(unused)]
fn main() {
use http::{Request, Response};
use hyper::Body;
use tower::{ServiceBuilder, ServiceExt, Service};
use tower_http::trace::TraceLayer;
use std::convert::Infallible;

async fn handle(request: Request<Body>) -> Result<Response<Body>, Infallible> {
    Ok(Response::new(Body::from("foo")))
}

// Setup tracing
tracing_subscriber::fmt::init();

let mut service = ServiceBuilder::new()
    .layer(TraceLayer::new_for_http())
    .service_fn(handle);

let request = Request::new(Body::from("foo"));

let response = service
    .ready()
    .await?
    .call(request)
    .await?;
}
*example of using the Trace tower middleware
To create an interceptor in tonic, you simply have to implement the Interceptor trait:
#![allow(unused)]
fn main() {
pub trait Interceptor {
    fn call(&mut self, request: Request<()>) -> Result<Request<()>, Status>;
}
}
The trait is pretty straight-forward, you take a call with the
request in question, and if you return an Err(status), the
call is interrupted and doesn't make it further down the pipeline.
A complete example with an interceptor might look something like this:
use hello_world::greeter_client::GreeterClient;
use hello_world::HelloRequest;
use tonic::{
    codegen::InterceptedService,
    service::Interceptor,
    transport::{Channel, Endpoint},
    Request, Status,
};

pub mod hello_world {
    tonic::include_proto!("helloworld");
}

#[tokio::main]
async fn main() -> Result<(), Box<dyn std::error::Error>> {
    let channel = Endpoint::from_static("http://[::1]:50051")
        .connect()
        .await?;

    let mut client = GreeterClient::with_interceptor(channel, intercept);

    let request = tonic::Request::new(HelloRequest {
        name: "Tonic".into(),
    });

    let response = client.say_hello(request).await?;

    println!("RESPONSE={:?}", response);

    Ok(())
}

/// This function will get called on each outbound request. Returning a
/// `Status` here will cancel the request and have that status returned to
/// the caller.
fn intercept(req: Request<()>) -> Result<Request<()>, Status> {
    println!("Intercepting request: {:?}", req);
    Ok(req)
}

// You can also use the `Interceptor` trait to create an interceptor type
// that is easy to name
struct MyInterceptor;

impl Interceptor for MyInterceptor {
    fn call(&mut self, request: tonic::Request<()>) -> Result<tonic::Request<()>, Status> {
        Ok(request)
    }
}

#[allow(dead_code, unused_variables)]
async fn using_named_interceptor() -> Result<(), Box<dyn std::error::Error>> {
    let channel = Endpoint::from_static("http://[::1]:50051")
        .connect()
        .await?;

    let client: GreeterClient<InterceptedService<Channel, MyInterceptor>> =
        GreeterClient::with_interceptor(channel, MyInterceptor);

    Ok(())
}

// Using a function pointer type might also be possible if your interceptor is a
// bare function that doesn't capture any variables
#[allow(dead_code, unused_variables, clippy::type_complexity)]
async fn using_function_pointer_interceptro() -> Result<(), Box<dyn std::error::Error>> {
    let channel = Endpoint::from_static("http://[::1]:50051")
        .connect()
        .await?;

    let client: GreeterClient<
        InterceptedService<Channel, fn(tonic::Request<()>) -> Result<tonic::Request<()>, Status>>,
    > = GreeterClient::with_interceptor(channel, intercept);

    Ok(())
}
Notice that if your interceptor carries no state, you can also just
use function pointers, see the intercept function. This would be the
preferable option if your usecase is simple.
Both the interceptors showcased above are client-side interceptors, here is how server-interceptors look like:
use tonic::{transport::Server, Request, Response, Status};

use hello_world::greeter_server::{Greeter, GreeterServer};
use hello_world::{HelloReply, HelloRequest};

pub mod hello_world {
    tonic::include_proto!("helloworld");
}

#[derive(Default)]
pub struct MyGreeter {}

#[tonic::async_trait]
impl Greeter for MyGreeter {
    async fn say_hello(
        &self,
        request: Request<HelloRequest>,
    ) -> Result<Response<HelloReply>, Status> {
        let extension = request.extensions().get::<MyExtension>().unwrap();
        println!("extension data = {}", extension.some_piece_of_data);

        let reply = hello_world::HelloReply {
            message: format!("Hello {}!", request.into_inner().name),
        };
        Ok(Response::new(reply))
    }
}

#[tokio::main]
async fn main() -> Result<(), Box<dyn std::error::Error>> {
    let addr = "[::1]:50051".parse().unwrap();
    let greeter = MyGreeter::default();

    // See examples/src/interceptor/client.rs for an example of how to create a
    // named interceptor that can be returned from functions or stored in
    // structs.
    let svc = GreeterServer::with_interceptor(greeter, intercept);

    println!("GreeterServer listening on {}", addr);

    Server::builder().add_service(svc).serve(addr).await?;

    Ok(())
}

/// This function will get called on each inbound request, if a `Status`
/// is returned, it will cancel the request and return that status to the
/// client.
fn intercept(mut req: Request<()>) -> Result<Request<()>, Status> {
    println!("Intercepting request: {:?}", req);

    // Set an extension that can be retrieved by `say_hello`
    req.extensions_mut().insert(MyExtension {
        some_piece_of_data: "foo".to_string(),
    });

    Ok(req)
}

struct MyExtension {
    some_piece_of_data: String,
}
You can see that implementation wise, there is not much difference between client-side and server-side.
To conclude, use interceptors in tonic for simple things, for complex things use middleware. Interceptors are a general gRPC concept and so you will find them in every implementation of the protocol, whereas middlewares are a general concept unrelated to gRPC and so you need to use a 3rd party library that proxies your calls so you can insert them.
The main benefit of these is reducing code duplication that you might have been otherwise prone to create.
unary vs stream
Some implementations of gRPC may also differentiate between unary and stream
On the client-side, an interceptor may for example attach a JWT to the metadata, to facilitate said authentication, which will allow us to remove it from the protobuf message definition and optionally allow for multiple authentication methods without polluting the protocol buffers.interceptors. Clue is in the name, stream interceptors work on stream gRPC calls, whereas unary interceptors are concerned with unary calls.
When an interceptor is triggered for a stream, the trigger is executed at its creation.
Streams in gRPC
"It's streamin' time."
-- Morbius, probably
Thus far, we have spoken about gRPC as about a purely request-response protocol. However, as great as this paradigm is for many applications, it is not always what is needed exactly.
Sometimes, we may want to establish a recurring communication channel with a client and it would be great to be able to do this with gRPC and spare ourselves from having to introduce yet another technology to our stack, which would require developers to learn and maintain.
Furthermore, there are things which are not optimal to be sent in a single go, such as files, and data that you can start processing before all of it has arrived. Having to wait for it would have been ineffective and cumbersome.
For this reason, gRPC has introduced the concept of gRPC streams.
We can liken streams to Rust iterators, or to, well, async streams in
general, as seen for example in the futures crate.
This similarity is quite handy because it lets us implement the Stream
trait for the Tonic's representation of gRPC streams, and so we can ergonomically
handle them as such.
You can see that the implementation exists and what else is available here:
https://docs.rs/tonic/latest/tonic/struct.Streaming.html
Declaring a stream in our .proto files is quite easy, we use the
stream keyword.
Streams may be present both on the client-side and the server-side. The terminology refers to the originator of said stream.
Server-side streaming
We are talking about Server-side streaming when a client sends a request and gets back a stream to read a sequence of messages in return. The client reads from the returned stream until there are no more messages to be read.
You can specify a server-side streaming RPC by placing the stream
keyword before the response type
#![allow(unused)]
fn main() {
  // Obtains the Features available within the given Rectangle.  Results are
  // streamed rather than returned at once (e.g. in a response message with a
  // repeated field), as the rectangle may cover a large area and contain a
  // huge number of features.
  rpc ListFeatures(Rectangle) returns (stream Feature) {}
}
Here is a full example from the Rust side of things:
pub mod pb {
    tonic::include_proto!("grpc.examples.echo");
}

use futures::Stream;
use std::{error::Error, io::ErrorKind, net::ToSocketAddrs, pin::Pin, time::Duration};
use tokio::sync::mpsc;
use tokio_stream::{wrappers::ReceiverStream, StreamExt};
use tonic::{transport::Server, Request, Response, Status, Streaming};

use pb::{EchoRequest, EchoResponse};

type EchoResult<T> = Result<Response<T>, Status>;
type ResponseStream = Pin<Box<dyn Stream<Item = Result<EchoResponse, Status>> + Send>>;

fn match_for_io_error(err_status: &Status) -> Option<&std::io::Error> {
    let mut err: &(dyn Error + 'static) = err_status;

    loop {
        if let Some(io_err) = err.downcast_ref::<std::io::Error>() {
            return Some(io_err);
        }

        // h2::Error do not expose std::io::Error with `source()`
        // https://github.com/hyperium/h2/pull/462
        if let Some(h2_err) = err.downcast_ref::<h2::Error>() {
            if let Some(io_err) = h2_err.get_io() {
                return Some(io_err);
            }
        }

        err = match err.source() {
            Some(err) => err,
            None => return None,
        };
    }
}

#[derive(Debug)]
pub struct EchoServer {}

#[tonic::async_trait]
impl pb::echo_server::Echo for EchoServer {
    async fn unary_echo(&self, _: Request<EchoRequest>) -> EchoResult<EchoResponse> {
        Err(Status::unimplemented("not implemented"))
    }

    type ServerStreamingEchoStream = ResponseStream;

    async fn server_streaming_echo(
        &self,
        req: Request<EchoRequest>,
    ) -> EchoResult<Self::ServerStreamingEchoStream> {
        println!("EchoServer::server_streaming_echo");
        println!("\tclient connected from: {:?}", req.remote_addr());

        // creating infinite stream with requested message
        let repeat = std::iter::repeat(EchoResponse {
            message: req.into_inner().message,
        });
        let mut stream = Box::pin(tokio_stream::iter(repeat).throttle(Duration::from_millis(200)));

        // spawn and channel are required if you want handle "disconnect" functionality
        // the `out_stream` will not be polled after client disconnect
        let (tx, rx) = mpsc::channel(128);
        tokio::spawn(async move {
            while let Some(item) = stream.next().await {
                match tx.send(Result::<_, Status>::Ok(item)).await {
                    Ok(_) => {
                        // item (server response) was queued to be send to client
                    }
                    Err(_item) => {
                        // output_stream was build from rx and both are dropped
                        break;
                    }
                }
            }
            println!("\tclient disconnected");
        });

        let output_stream = ReceiverStream::new(rx);
        Ok(Response::new(
            Box::pin(output_stream) as Self::ServerStreamingEchoStream
        ))
    }

    async fn client_streaming_echo(
        &self,
        _: Request<Streaming<EchoRequest>>,
    ) -> EchoResult<EchoResponse> {
        Err(Status::unimplemented("not implemented"))
    }

    type BidirectionalStreamingEchoStream = ResponseStream;

    async fn bidirectional_streaming_echo(
        &self,
        req: Request<Streaming<EchoRequest>>,
    ) -> EchoResult<Self::BidirectionalStreamingEchoStream> {
        println!("EchoServer::bidirectional_streaming_echo");

        let mut in_stream = req.into_inner();
        let (tx, rx) = mpsc::channel(128);

        // this spawn here is required if you want to handle connection error.
        // If we just map `in_stream` and write it back as `out_stream` the `out_stream`
        // will be drooped when connection error occurs and error will never be propagated
        // to mapped version of `in_stream`.
        tokio::spawn(async move {
            while let Some(result) = in_stream.next().await {
                match result {
                    Ok(v) => tx
                        .send(Ok(EchoResponse { message: v.message }))
                        .await
                        .expect("working rx"),
                    Err(err) => {
                        if let Some(io_err) = match_for_io_error(&err) {
                            if io_err.kind() == ErrorKind::BrokenPipe {
                                // here you can handle special case when client
                                // disconnected in unexpected way
                                eprintln!("\tclient disconnected: broken pipe");
                                break;
                            }
                        }

                        match tx.send(Err(err)).await {
                            Ok(_) => (),
                            Err(_err) => break, // response was droped
                        }
                    }
                }
            }
            println!("\tstream ended");
        });

        // echo just write the same data that was received
        let out_stream = ReceiverStream::new(rx);

        Ok(Response::new(
            Box::pin(out_stream) as Self::BidirectionalStreamingEchoStream
        ))
    }
}

#[tokio::main]
async fn main() -> Result<(), Box<dyn std::error::Error>> {
    let server = EchoServer {};
    Server::builder()
        .add_service(pb::echo_server::EchoServer::new(server))
        .serve("[::1]:50051".to_socket_addrs().unwrap().next().unwrap())
        .await
        .unwrap();

    Ok(())
}
Client-side streams
Client-side streaming RPC is when a client writes a sequence of messages and sends them to the server. Once the client is done writing all of the messages, it waits for the other side to read them and return its response.
Similarly to the previous case, you use the stream keyword, but this time
for the message parameter:
#![allow(unused)]
fn main() {
  // Accepts a stream of Points on a route being traversed, returning a
  // RouteSummary when traversal is completed.
  rpc RecordRoute(stream Point) returns (RouteSummary) {}
}
And on the Rust side, it might look something like this:
pub mod pb {
    tonic::include_proto!("grpc.examples.echo");
}

use futures::Stream;
use std::{error::Error, io::ErrorKind, net::ToSocketAddrs, pin::Pin, time::Duration};
use tokio::sync::mpsc;
use tokio_stream::{wrappers::ReceiverStream, StreamExt};
use tonic::{transport::Server, Request, Response, Status, Streaming};

use pb::{EchoRequest, EchoResponse};

type EchoResult<T> = Result<Response<T>, Status>;
type ResponseStream = Pin<Box<dyn Stream<Item = Result<EchoResponse, Status>> + Send>>;

fn match_for_io_error(err_status: &Status) -> Option<&std::io::Error> {
    let mut err: &(dyn Error + 'static) = err_status;

    loop {
        if let Some(io_err) = err.downcast_ref::<std::io::Error>() {
            return Some(io_err);
        }

        // h2::Error do not expose std::io::Error with `source()`
        // https://github.com/hyperium/h2/pull/462
        if let Some(h2_err) = err.downcast_ref::<h2::Error>() {
            if let Some(io_err) = h2_err.get_io() {
                return Some(io_err);
            }
        }

        err = match err.source() {
            Some(err) => err,
            None => return None,
        };
    }
}

#[derive(Debug)]
pub struct EchoServer {}

#[tonic::async_trait]
impl pb::echo_server::Echo for EchoServer {
    async fn unary_echo(&self, _: Request<EchoRequest>) -> EchoResult<EchoResponse> {
        Err(Status::unimplemented("not implemented"))
    }

    type ServerStreamingEchoStream = ResponseStream;

    async fn server_streaming_echo(
        &self,
        req: Request<EchoRequest>,
    ) -> EchoResult<Self::ServerStreamingEchoStream> {
        println!("EchoServer::server_streaming_echo");
        println!("\tclient connected from: {:?}", req.remote_addr());

        // creating infinite stream with requested message
        let repeat = std::iter::repeat(EchoResponse {
            message: req.into_inner().message,
        });
        let mut stream = Box::pin(tokio_stream::iter(repeat).throttle(Duration::from_millis(200)));

        // spawn and channel are required if you want handle "disconnect" functionality
        // the `out_stream` will not be polled after client disconnect
        let (tx, rx) = mpsc::channel(128);
        tokio::spawn(async move {
            while let Some(item) = stream.next().await {
                match tx.send(Result::<_, Status>::Ok(item)).await {
                    Ok(_) => {
                        // item (server response) was queued to be send to client
                    }
                    Err(_item) => {
                        // output_stream was build from rx and both are dropped
                        break;
                    }
                }
            }
            println!("\tclient disconnected");
        });

        let output_stream = ReceiverStream::new(rx);
        Ok(Response::new(
            Box::pin(output_stream) as Self::ServerStreamingEchoStream
        ))
    }

    async fn client_streaming_echo(
        &self,
        _: Request<Streaming<EchoRequest>>,
    ) -> EchoResult<EchoResponse> {
        Err(Status::unimplemented("not implemented"))
    }

    type BidirectionalStreamingEchoStream = ResponseStream;

    async fn bidirectional_streaming_echo(
        &self,
        req: Request<Streaming<EchoRequest>>,
    ) -> EchoResult<Self::BidirectionalStreamingEchoStream> {
        println!("EchoServer::bidirectional_streaming_echo");

        let mut in_stream = req.into_inner();
        let (tx, rx) = mpsc::channel(128);

        // this spawn here is required if you want to handle connection error.
        // If we just map `in_stream` and write it back as `out_stream` the `out_stream`
        // will be drooped when connection error occurs and error will never be propagated
        // to mapped version of `in_stream`.
        tokio::spawn(async move {
            while let Some(result) = in_stream.next().await {
                match result {
                    Ok(v) => tx
                        .send(Ok(EchoResponse { message: v.message }))
                        .await
                        .expect("working rx"),
                    Err(err) => {
                        if let Some(io_err) = match_for_io_error(&err) {
                            if io_err.kind() == ErrorKind::BrokenPipe {
                                // here you can handle special case when client
                                // disconnected in unexpected way
                                eprintln!("\tclient disconnected: broken pipe");
                                break;
                            }
                        }

                        match tx.send(Err(err)).await {
                            Ok(_) => (),
                            Err(_err) => break, // response was droped
                        }
                    }
                }
            }
            println!("\tstream ended");
        });

        // echo just write the same data that was received
        let out_stream = ReceiverStream::new(rx);

        Ok(Response::new(
            Box::pin(out_stream) as Self::BidirectionalStreamingEchoStream
        ))
    }
}

#[tokio::main]
async fn main() -> Result<(), Box<dyn std::error::Error>> {
    let server = EchoServer {};
    Server::builder()
        .add_service(pb::echo_server::EchoServer::new(server))
        .serve("[::1]:50051".to_socket_addrs().unwrap().next().unwrap())
        .await
        .unwrap();

    Ok(())
}
Bi-directional
Streaming can also be done bi-directionally, where both the input and the result of the RPC are streams. The two streams will operate independently, so clients and servers can write message in whatever order they prefer.
This means that you can either "chat" over the RPC call, or you might in-fact have a use case where you send a sequence of messages and only when you are done sending do you read the response messages.
Bi-directional streams are great in cases where you can design your application with stream-oriented thinking in mind.
Of course, bi-directional streams use the stream keyword on both sides of the
exchange:
#![allow(unused)]
fn main() {
  // Accepts a stream of RouteNotes sent while a route is being traversed,
  // while receiving other RouteNotes (e.g. from other users).
  rpc RouteChat(stream RouteNote) returns (stream RouteNote) {}
}
Load balancing
gRPC does not work effectively with a number of load balancers. Level 4 load balancers distribute TCP connections across endpoints. That is fine with an HTTP1.2 API, but not for gRPC with HTTP2, since it multiplexes calls on a single TCP connection. All gRPC calls then go to one endpoint and there is no load-balancing.
Also keep in mind that you can only load balance gRPC calls that do not have any streams, since for a stream, once the call is established, all messages sent over that stream go to one endpoint.
If you need to balance gRPC, you have essentially two options:
- client-side load balancing, where you implement it yourself
- proxy load balancing, where you use a level 7 (application) proxy
The proxy you want to use must understand HTTP2, and be able to distribute gRPC calls multiplexed on one HTTP2 connection across multiple endpoints. Some suitable proxies are:
- Envoy
- Linkerd
- YARP (Yet Another Reverse Proxy)
Using streams for performance
In cases, where you have a lot of unary calls and are encountering a performance bottleneck, a common optimization is to instead use a bi-directional stream, wherein messages sent back and broth work fill the role of the previous unary calls.
This is because streamed data is sent in the same HTTP2 request and that eliminates the overhead of creating a new request for each call over and over again.
What to watch out for with streams
Streams are not completely magic. They may be interrupted by errors in the service or in the connection. You need to handle that eventuality and restart the stream if necessary. You also need to design your application in such a way that a stream being interrupted is not catastrophic, and optionally, in a way such that restarting the stream does not require redoing all of the work you have already done.
Writing into streams may not be thread-safe in some implementations. In Rust, this will be mostly handled by Rust itself, as you will get an error at compile time, generally, but that may not be the case for other languages. Keep in mind that this may happen, for example in Python applications, and ensure that you are only using thread-safe utilities in a multi-threaded context. Corruption via data races may also lead to gRPC errors, so you should make sure to handle that eventuality, especially if you do not trust the other side that you are talking to.
Lastly, a gRPC streaming method is limited to only one sending type of message and only one receiving type of message. If you expect to be sending many different types of data, and do not expect this particular usecase to be a bottleneck (as a matter of fact, it is better to verify that to expect bottlenecks, so that we can prevent over-optimization with dubious benefits), consider just splitting it into multiple calls. This will also make your API clearer in case it were to get too complication.
Error Handling in gRPC
As mentioned in some previous chapters, error handling in gRPC is a bit of a problematic topic. gRPC itself does not describe or prescribe any consistent error-handling, and there is no global consensus as to how you should handle errors.
Statuses
The basic vehicle for dealing with gRPC errors are statuses. Statuses are often used to indicate errors with the service or the gRPC library itself, you can think of them as something similar to HTTP Response Statuses.
However, gRPC statuses are not included in the schema, you cannot create your own custom statuses and you cannot differentiate between system and business errors (meaning, whether the failure is due to library use issue, or wrong gRPC API usage), which may be a deal breaker for you.
It is possible to attach a string message to a status, which may be used to distinguish some errors:
#![allow(unused)]
fn main() {
use bytes::Bytes;
use tonic::{Status, Code};

let status = Status::with_details(
   Code::InvalidArgument,
   "ID does not exist",
   Bytes::new(),
);
}
Or there are also methods for specific codes directly:
#![allow(unused)]
fn main() {
use tonic::Status;

let status = Status::invalid_argument("ID does not exist");
}
As you can see, there is a third parameter in the first example. This parameter
is called details and it can be used to provide additional binary data.
The usage of this field is a bit problematic, as it is not tracked by the schema. Therefore, you do not have the usual forward compatibility, backward compatibility, and consistent format benefit that you would otherwise have. Without negotiating elsewhere, the other side has no chance to know in what format and shape the details data is. Of course, you could ham-fist another protocol buffer in there, though.
The status you create is used in the return value of your services. For example,
we can take a look at the tonic::server::UnaryService definition:
#![allow(unused)]
fn main() {
pub trait UnaryService<R> {
    type Response;
    type Future: Future<Output = Result<Response<Self::Response>, Status>>;

    fn call(&mut self, request: Request<R>) -> Self::Future;
}
}
or in more concrete terms:
#![allow(unused)]
fn main() {
use tonic::{transport::Server, Request, Response, Status};

use hello_world::greeter_server::{Greeter, GreeterServer};
use hello_world::{HelloReply, HelloRequest};

pub mod hello_world {
    tonic::include_proto!("helloworld");
}

#[derive(Default)]
pub struct MyGreeter {}

#[tonic::async_trait]
impl Greeter for MyGreeter {
    async fn say_hello(
        &self,
        request: Request<HelloRequest>,
    ) -> Result<Response<HelloReply>, Status> {
        println!("Got a request from {:?}", request.remote_addr());

        let reply = hello_world::HelloReply {
            message: format!("Hello {}!", request.into_inner().name),
        };
        Ok(Response::new(reply))
    }
}
}
These are not great, since it can be quite difficult to show a meaningful error to the user on the frontend of the application
Schema:
message UserInfo {}

message LoginUserRequest {
    string username = 1;
    string password = 2;
}

message LoginUserResponse {
    UserInfo userinfo = 1;
}

service AuthenticationService {
    rpc LoginUser(LoginUserRequest) returns (LoginUserResponse);
}
Google's rich error model
This is quite similar to the previous one, except that we now have a gRPC structure that's defined for our Status:
package google.rpc;

// The `Status` type defines a logical error model that is suitable for
// different programming environments, including REST APIs and RPC APIs.
message Status {
  // A simple error code that can be easily handled by the client. The
  // actual error code is defined by `google.rpc.Code`.
  int32 code = 1;

  // A developer-facing human-readable error message in English. It should
  // both explain the error and offer an actionable resolution to it.
  string message = 2;

  // Additional error information that the client code can use to handle
  // the error, such as retry info or a help link.
  repeated google.protobuf.Any details = 3;
}
These are still quite simple to use on the backend, and they do not interfere with 3rd parties - as this status is included in an HTTP header, which lets clients safely ignore it, if they do not support it. Adding a new error state also does not interfere with backward compatibility.
However, we still have issues with transparency. It is not visible in the API, what errors can it return, distinguishing between system and business errors is by convention and is against, not explicit.
Furthermore, due to the Any type, the details are not part of the schema with this model either. Also, Go utilities can sometimes only work with errors that contain error types predefined by Google, which severely limits the set of errors you can use.
Schema:
message UserInfo {}

message LoginUserRequest {
    string username = 1;
    string password = 2;
}

message LoginUserResponse {
    UserInfo userinfo = 1;
}

service AuthenticationService {
    rpc LoginUser(LoginUserRequest) returns (LoginUserResponse);
}
As you can see, there is still no change to the actual schema. Keep in mind that errors propagated this way are meant to be developer-facing and according to Google, must be in English.
Numeric errors (errno 2: The electric boogaloo)
Another option is to encode errors numerically into the response, letting the client decipher it and based on it, and optionally, additional data, present an error to the user. This is the first model here that is more geared to be user-facing.
A smart way that we can do this is by essentially replicating the Result type from Rust.
Another benefit is that we do not need to deal with translating the error on the backend,
as it will be handled by the client.
This error handling model can have errors returned as part of every response, or, once again, be put into an HTTP header, if we want to help the ergonomics of 3rd party clients.
However, if a parameter is part of the error state (for example minimum or maximum length of a password), then that information is implicit and duplicated between systems. Furthermore, adding new error states can be backwards incompatible.
In this model, we store the errors in the schema.
message UserInfo {}

message LoginUserRequest {
    string username = 1;
    string password = 2;
}

enum LoginError {
    UNKNOWN_ERROR = 0;
    USERNAME_IS_TOO_SHORT = 1;
    INVALID_PASSWORD = 2;
}

message LoginErrors {
    Repeated LoginError errors = 1;
}

message LoginUserResponse {
    oneof result {
           LoginErrors errors = 1;
           UserInfo userinfo = 2;
    };
}

service AuthenticationService {
    rpc LoginUser(LoginUserRequest) returns (LoginUserResponse);
}
Explicit error set in every interface
This approach adds a oneof error message that, with adequate types describes
precisely what went wrong, with all the necessary data bundled with it. Think
how you use Rust enums to describe errors in Rust with crates like thiserror.
We can also easily distinguish between system and business errors, as business errors are returned via the error message, whereas system errors returned by the gRPC library et al. are returned as a status (as they always are).
In this error model, we are providing the maximum amount of information to the frontend, which then has an easy time figuring out what and how went wrong to produce a user-facing error.
However, this significantly increases API complexity, and it might be more difficult to use by 3rd parties than the previous approaches. Adding an error state on the backend is backwards incompatible.
It is also quite likely, that you will have to compose the error types like in
Java. For example, on the edge-server, a method may call several backend methods, and
so it must be able to return all possible errors from multiple methods.
Of course, these errors are in the schema.
Schema:
message LoginUserRequest {
    string username = 1;
    string password = 2;


    CaptchaChallengeResponse captcha = 3;


    oneof secondfactor {
        string otp_token = 4;
        WebAuthnResponse webauthn = 5;
    }
}

message LoginUserError {
    oneof error {
        google.protobuf.Empty  captcha_validation_failed = 1;


        // validate_login_credentials errors
        google.protobuf.Empty  invalid_login_credentials = 2;
        core.ValueTooLongError password_too_long = 3;

        // validate_2fa errors
        google.protobuf.Empty  invalid_user = 4;
        google.protobuf.Empty  user_does_not_have_otp = 5;
        google.protobuf.Empty  invalid_otp_token = 6;
        google.protobuf.Empty  user_has_no_webauthn_challenge = 7;
        google.protobuf.Empty  user_has_no_fido = 8;
        google.protobuf.Empty  invalid_webauthn_credential_id = 9;
        google.protobuf.Empty  invalid_webauthn_client_data_json = 10;
        google.protobuf.Empty  invalid_webauthn_challenge = 11;
        google.protobuf.Empty  webauthn_auth_failed = 12;
    }
}

message LoginUserErrors {
    repeated LoginUserError errors = 1;
}

message LoginUserResponse {
    oneof result {
        LoginUserErrors               errors = 1;
        clients.profile_mgmt.UserInfo userinfo = 2;
    }
}

service EdgeServerService {
    rpc LoginUser(LoginUserRequest) returns (LoginUserResponse);
}
Another example:
message LoginUserRequest {
    string username = 1;
    string password = 2;
    CaptchaChallengeResponse captcha = 3;
    oneof secondfactor {
        string otp_token = 4;
        WebAuthnResponse webauthn = 5;
    }
}

// At least one of the booleans inside
// this message MUST be true
message LoginUserErrors {
    bool captcha_validation_failed = 1;
    // validate_login_credentials errors
    bool invalid_login_credentials = 2;
    bool password_is_too_long = 3;
    uint32 max_password_length = 4;

    // validate_2fa errors
    bool otp_token_is_invalid = 5;
    // The input WebAuthn challenge probably expired.
    bool webauthn_challenge_is_invalid = 6;
    // Validation of the WebAuthn response failed - possible reasons: ...
    bool webauthn_auth_failed = 7;
}

message LoginUserResponse {
    oneof result {
        LoginUserErrors errors = 1;
        clients.profile_mgmt.UserInfo userinfo = 2;
    }
}

service EdgeServerService {
    rpc login_user(LoginUserRequest) returns (LoginUserResponse);
}
Pavel's approach
Error handling philosophy
The primary reason for smart propagation of errors is to inform the user about his or her errors, therefore about errors, which are on the side of the user, that the user can do something about (for example, wrong format of entity name), or errors, which are needed to understand continued usage of the system (such as system temporarily unavailable). Detailed errors, which are not caused by the user, or the user cannot do anything about do not have to be communicated to the user.
The set of errors, which can the user cause should be finite over all forms / APIs
and reasonably small. These errors should be reused across different API's (therefore,
the number of different errors should grow asymptotically slower than the API. For example,
the count of errors may be O(log N), where N is the the amount of API calls).
For instance, authentication and authorization issues are typically the same across all calls. Same goes for technical requirements such as the correctness of parameters, existence of entity, entities in correct states, and so on.
Often when calling an API, the only thing that is important for the caller is whether the given operation was executed according to expectations or not. Precise reasons for errors and what do with it can differ case to case.
It is better to keep things simple rather than complicated. Complexity has to be justified, optimally with a practical experience.
Description
In practice, in relation to the actual calls, this method is the same as the second one (Google's rich errors). Therefore, we have a standard extended type for error propagation, just like Google suggests. The difference is in usage and organization of calls.
An API call returns, in the case of an error, a status code with error code, which describes the key issue.
The error code is stored in the reason field of ErrorInfo. The code can also be
transferred in an HTTP header, optionally. The error codes are not part of the API
signature or otherwise strongly-typed.
The error codes are shared between client and server, wherein only errors that can be interpreted by the end user (ie. the frontend) must be shared and maintained. Other errors are always interpretable by the end user as "internal system error".
The meaning of an error code is global and shared among API calls.
For rich user interaction (ie. the understanding of errors) can a form / API / or its exact values an associated precondition checks. These precondition checks verify the validity and appropriateness of form values or the existence / state of entities in the system (such as password quality, existence of user and so on.), or other business requirements. These checks do not have to (and optimally shouldn't) be tied to specific API calls.
Precondition checks must always be read-only, they shouldn't modify the system, and they are reusable for different calls, so that they eventually form a sort of an analytical dictionary for verifying requirements. Furthermore, they should be usable not only before a call, but also after a call that causes an error, without a risk of race-conditions. The reasoning being that API ending by error typically have and should have the semantics of "no change", ie. we can think of it as atomic transactions. Best practice is however verifying ahead of time, if I want to display rich, explanatory errors and, even better, lead the user towards correct calls as opposed to reacting to caused errors.
The return errors of precondition checks do not have to be bools, but can have any explanatory character. They still have to be read-only, though.
The API stays atomic and all conditions are verified as part of its own API call. The API call must be completely independent on whether the user used a precondition check or not, and which ones he or she used. They should eliminate typical reasons for API failure, but everything should work even if they aren't used.
Benefits
There is no added complexity where no added complexity is necessary. Error propagation is trivial, same as the first variant. The validation is proactive before sending the form - this leads to earlier reporting and often eliminates the problem of reacting to an error.
It does not prevent using a complex error type with description for the cases, where this is justified. For example, complex verification logic for forms. It is straightforward for handling typical errors.
It eliminates propagation of changes in interfaces from the backend to frontend and vice versa. Adding an error type, which does not have a user interpretation does not require a change on the frontend. Adding an error with user interpretation is only a weak dependency. FE can theoretically run even without its knowledge.
Detriments
Well, there is multiple calls involved, which can be a detriment in and of itself, and may also lead in rare cases to race conditions. This is why it is key that the precondition checks must remain read-only, so that we prevent data races.
There is also no assurance that the user can process the errors we produce. It however doesn't cause non-functionality or incorrectness of the system, merely less accommodating communication for errors, which is easy to detect and fix.
Lastly, there is a necessity to share standard errors between backend and frontend, perhaps for a public documentation (only the subset of all of our errors).
API example in schema
syntax = "proto3";

import 'google/protobuf/empty.proto';
import 'google/protobuf/wrappers.proto';

// The enum type is not used anywhere as part of the interface annotation,
// but is available for producers and consumers for easy lookup / exhaustive checks.
enum E {
  E_UNKNOWN = 0;

  //
  // Authentication
  //
  // eg.: invalid session on auth.requiring API
  E_AUTH = 101;
  // Stateful and/or time sensitive methods that cannot be validated by themselves / multiple times
  E_AUTH_OTP = 102;
  E_AUTH_FIDO = 103;
  E_AUTH_CAPTCHA = 104;

  //
  // Values
  //
  // eg.: "invalid email format" when raised by "CheckEmail('foo@bar')"
  E_VAL_FORMAT = 201;
  E_VAL_RANGE = 203;

  //
  // Entities
  //
  // eg.: "username is already taken" when raised by "CheckUsername('foo')"
  E_ENT_EXISTS = 301;
  // eg.: "target account doesn't exist" when raised by "MergeAccountWith('JohnDoe')"
  E_ENT_NOT_FOUND = 302;
}

message InitAuthMethods {
  // submit method requires password response in a HTTP header "x-ii-password"
  bool requires_password = 1;
  // submit method requires captcha response in a HTTP header "x-ii-captcha"
  bool requires_captcha = 2;
  // submit method requires fido response in a HTTP header "x-ii-fido"
  bool requires_fido = 3;
  // submit method requires otp response in a HTTP header "x-ii-otp"
  bool requires_otp = 4;
};

// Login
message UserLoginRequest {
  string username = 1;
  string password = 2;
}
message UserLoginResponse {
  string token = 1;
}

// Signup
message UserSignupRequest {
  string username = 1;
  string password = 2;
  string email = 3;
};
message UserSignupResponse {};

// IntegrityCheckedAction
message IntegrityCheckedActionInitResponse {
  InitAuthMethods auth = 1;
};
message IntegrityCheckedActionRequest {
  message SplitItem {
    float value = 1;
    string label = 2;
  }

  // Sum of item's "value" attributes has to be 100!
  repeated SplitItem items = 1;
};
message IntegrityCheckedActionResponse {
  message Errors {
    bool has_sum_100 = 1;
    bool has_unique_labels = 2;
    bool odd_values_are_even = 3;
  };

  oneof result {
    google.protobuf.Empty ok = 1;
    Errors err = 2;
  }
};

service ExampleService {
  // Condition checks
  rpc CheckUsernameIsWellFormed(google.protobuf.StringValue) returns (google.protobuf.BoolValue);
  rpc CheckUsernameAvailability(google.protobuf.StringValue) returns (google.protobuf.BoolValue);
  rpc CheckPasswordIsWellFormed(google.protobuf.StringValue) returns (google.protobuf.BoolValue);
  rpc CheckEmailIsWellFormed(google.protobuf.StringValue) returns (google.protobuf.BoolValue);

  // "Submit" methods that include the "Condition" methods above as part of their inner logic
  // and bounces back an RPC error encoded as "google.rpc.ErrorInfo" message
  //
  // The expectation is that:
  //  - Clients won't even encounter this if it pre-checks everything.
  //  - Re-checks its pre-conditions again should it encounter some error.
  rpc UserLogin(UserLoginRequest) returns (UserLoginResponse);
  rpc UserSignup(UserSignupRequest) returns (UserSignupResponse);

  // Speculative example of interface whose errors cannot be widened
  // to a set of generic errors and has its error state communicated
  // as a strongly typed return value.
  //
  // It can, however, raise authentication related errors
  // as part of the authentication middleware logic.
  rpc IntegrityCheckedActionInit(google.protobuf.Empty) returns (IntegrityCheckedActionInitResponse);
  rpc IntegrityCheckedAction(IntegrityCheckedActionRequest) returns (IntegrityCheckedActionResponse);
}
gRPC & Tower & Layers
The basics provided by gRPC libraries are sometimes not enough when modeling complex applications which may bundle several services together, preprocess the data they are working with, or intend to provide additional insight into the application.
In a previous chapter, we have seen that while some manipulation may be achieved using interceptors, they are still fairly limited, the information they provide is fairly small, and you cannot mutate data freely.
We suggested using layers from the tower crate.
https://docs.rs/tower/latest/tower/
Tower
Tower is a library for building networking applications, both clients and servers. It provides abstractions for modeling networking, and allows you to build components and services on top of one another. While in tower the term "layer" is used prevalently, you may be more familiar with the term middle-ware.
In other words, tower is a framework for building modular networking applications.
The term networking is important, as tower is mostly agnostic to the underlying protocol, and in fact you can use it to expose your service over multiple different protocols.
In case you haven't heard about the framework before, fret not, it is a trustworthy and well-established project, which is used for example by these major Rust systems:
- The Noria streaming data-flow system
- Rust runtime for AWS Lambda
- Linkerd2 proxy
- Toshi
- TiKV
The two main concepts in tower are services and layers.
Services
Services form the backbone of your application, this is where your main application logic will likely be stored.
The Service trait itself is quite simple, let's take a look
#![allow(unused)]
fn main() {
pub trait Service<Request> {
    type Response;
    type Error;
    type Future: Future
    where
        <Self::Future as Future>::Output == Result<Self::Response, Self::Error>;

    fn poll_ready(
        &mut self,
        cx: &mut Context<'_>
    ) -> Poll<Result<(), Self::Error>>;
    fn call(&mut self, req: Request) -> Self::Future;
}
}
As you can see, what you essentially need to do is, given a request,
produce a Future<Response>. This makes tower asynchronous, although
the trait itself is not an async trait. At the cost of a slightly more
verbose API, this gives you the flexibility to construct your service
as a reactor and determine to the async executor when it is and isn't
ready.
You also don't have to work with the async-trait, which might produce
confusing errors.
To use this trait and breathe life into your application, what you need to do is to supply at least a unit struct, and select the contained types for request and response.
These types may be the same, that is up to you.
Here is an example kindly borrowed from the official documentation:
#![allow(unused)]
fn main() {
use http::{Request, Response, StatusCode};

struct HelloWorld;

impl Service<Request<Vec<u8>>> for HelloWorld {
    type Response = Response<Vec<u8>>;
    type Error = http::Error;
    type Future = Pin<Box<dyn Future<Output = Result<Self::Response, Self::Error>>>>;

    fn poll_ready(&mut self, cx: &mut Context<'_>) -> Poll<Result<(), Self::Error>> {
        Poll::Ready(Ok(()))
    }

    fn call(&mut self, req: Request<Vec<u8>>) -> Self::Future {
        // create the body
        let body: Vec<u8> = "hello, world!\n"
            .as_bytes()
            .to_owned();
        // Create the HTTP response
        let resp = Response::builder()
            .status(StatusCode::OK)
            .body(body)
            .expect("Unable to create `http::Response`");

        // create a response in a future.
        let fut = async {
            Ok(resp)
        };

        // Return the response as an immediate future
        Box::pin(fut)
    }
}
}
This simple example simply returns a HTTP response with the text "hello world", encoded as plain bytes.
Of course, you can implement the trait multiple times with different request types. This can let you, within one service conceptually, to do either different things, or the same thing while processing the data in several different formats. You can combine the two as well, but make sure that your application doesn't become confusing as a result.
To create a client, you create an instance of the type and supply the request.
Here is how a hypothetical redis client would look:
#![allow(unused)]
fn main() {
let redis_client = redis::Client::new()
    .connect("braiins-uni.mag.wiki:6379".parse().expect("BUG: Invalid URL"))
    .expect("BUG: Failed to create redis client");

let res = redis_client.call(Cmd::set("test", "test")).await?;

println!("response: {:?}", res);
}
The Cmd here would be the request type, and the best way to model
it in Rust (at least if we only consider simple redis commands), would
be with an enum, which might look something like this:
#![allow(unused)]
fn main() {
struct Enum<S>
    S: ToString
{
    Get(S),
    Set(S, S),
    Auth(S, S),
    Echo(S),
    Del(S),
    Exists(S),
}
}
Helper methods might have to be used to preserve ergonomics when dealing with more complex queries. You can see how this is dealt with in the redis crate, if you are curious: https://github.com/redis-rs/redis-rs
However, often there is duplication in logic and processing between the services, which is where middlewares, referred to as layers, come in.
Middlewares / Layers
Layer is functionality decoupled from the service, and can therefore be used across multiple services. Layers, as the name might imply might also be stacked on top of one another to help you transform, validate or inspect your data in the most tailored manner.
Here is the definition of the Layer trait:
#![allow(unused)]
fn main() {
pub trait Layer<S> {
    type Service;

    fn layer(&self, inner: S) -> Self::Service;
}
}
Typically, Layers are implemented to be generic over S, so that they
can be used with all services (S with a trait bound, of course), for example,
look at this simple logging layer:
#![allow(unused)]
fn main() {
pub struct LogLayer {
    target: &'static str,
}

impl<S> Layer<S> for LogLayer {
    type Service = LogService<S>;

    fn layer(&self, service: S) -> Self::Service {
        LogService {
            target: self.target,
            service
        }
    }
}

// This service implements the Log behavior
pub struct LogService<S> {
    target: &'static str,
    service: S,
}

impl<S, Request> Service<Request> for LogService<S>
where
    S: Service<Request>,
    Request: fmt::Debug,
{
    type Response = S::Response;
    type Error = S::Error;
    type Future = S::Future;

    fn poll_ready(&mut self, cx: &mut Context<'_>) -> Poll<Result<(), Self::Error>> {
        self.service.poll_ready(cx)
    }

    fn call(&mut self, request: Request) -> Self::Future {
        // Insert log statement here or other functionality
        println!("request = {:?}, target = {:?}", request, self.target);
        self.service.call(request)
    }
}
}
As you can see, layers essentially transform one type of service into another, which combines the functionality of all services underlying.
This log implementation is completely decoupled from the underlying protocol and also from client/server concerns, meaning that the same middle were can be used in either.
We can take a look at another example:
#![allow(unused)]
fn main() {
use tower_service::Service;
use tower_layer::Layer;
use futures::FutureExt;
use std::future::Future;
use std::task::{Context, Poll};
use std::time::Duration;
use std::pin::Pin;
use std::fmt;
use std::error::Error;

// Our timeout service, which wraps another service and
// adds a timeout to its response future.
pub struct Timeout<T> {
    inner: T,
    timeout: Duration,
}

impl<T> Timeout<T> {
    pub fn new(inner: T, timeout: Duration) -> Timeout<T> {
        Timeout {
            inner,
            timeout
        }
    }
}

// The error returned if processing a request timed out
#[derive(Debug)]
pub struct Expired;

impl fmt::Display for Expired {
    fn fmt(&self, f: &mut fmt::Formatter<'_>) -> fmt::Result {
        write!(f, "expired")
    }
}

impl Error for Expired {}

// We can implement `Service` for `Timeout<T>` if `T` is a `Service`
impl<T, Request> Service<Request> for Timeout<T>
where
    T: Service<Request>,
    T::Future: 'static,
    T::Error: Into<Box<dyn Error + Send + Sync>> + 'static,
    T::Response: 'static,
{
    // `Timeout` doesn't modify the response type, so we use `T`'s response type
    type Response = T::Response;
    // Errors may be either `Expired` if the timeout expired, or the inner service's
    // `Error` type. Therefore, we return a boxed `dyn Error + Send + Sync` trait object to erase
    // the error's type.
    type Error = Box<dyn Error + Send + Sync>;
    type Future = Pin<Box<dyn Future<Output = Result<Self::Response, Self::Error>>>>;

    fn poll_ready(&mut self, cx: &mut Context<'_>) -> Poll<Result<(), Self::Error>> {
        // Our timeout service is ready if the inner service is ready.
        // This is how backpressure can be propagated through a tree of nested services.
       self.inner.poll_ready(cx).map_err(Into::into)
    }

    fn call(&mut self, req: Request) -> Self::Future {
        // Create a future that completes after `self.timeout`
        let timeout = tokio::time::sleep(self.timeout);

        // Call the inner service and get a future that resolves to the response
        let fut = self.inner.call(req);

        // Wrap those two futures in another future that completes when either one completes
        //
        // If the inner service is too slow the `sleep` future will complete first
        // And an error will be returned and `fut` will be dropped and not polled again
        //
        // We have to box the errors so the types match
        let f = async move {
            tokio::select! {
                res = fut => {
                    res.map_err(|err| err.into())
                },
                _ = timeout => {
                    Err(Box::new(Expired) as Box<dyn Error + Send + Sync>)
                },
            }
        };

        Box::pin(f)
    }
}

// A layer for wrapping services in `Timeout`
pub struct TimeoutLayer(Duration);

impl TimeoutLayer {
    pub fn new(delay: Duration) -> Self {
        TimeoutLayer(delay)
    }
}

impl<S> Layer<S> for TimeoutLayer {
    type Service = Timeout<S>;

    fn layer(&self, service: S) -> Timeout<S> {
        Timeout::new(service, self.0)
    }
}
}
This example, more elaborate that the previous shows how to introduce timeout functionality. Layers are extremely flexible, and can be used to greatly change the behavior of the services they are wrapping around.
To make it clearer: layers are a facility to mutate both requests and responses.
How does this mesh with gRPC?
Tower in gRPC
Well, the answer lies in the prevalent framework, tonic, which we have spoken
about before in different chapters.
The tonic framework is implemented using tower. The client implements
Service and other functionality is provided through layers.
As a matter of fact, we can use the aforementioned interceptors as layers too:
#![allow(unused)]
fn main() {
use tower::ServiceBuilder;
use std::time::Duration;
use tonic::{Request, Status, service::interceptor};

fn auth_interceptor(request: Request<()>) -> Result<Request<()>, Status> {
    if valid_credentials(&request) {
        Ok(request)
    } else {
        Err(Status::unauthenticated("invalid credentials"))
    }
}

fn valid_credentials(request: &Request<()>) -> bool {
    // ...
}

fn some_other_interceptor(request: Request<()>) -> Result<Request<()>, Status> {
    Ok(request)
}

let layer = ServiceBuilder::new()
    .load_shed()
    .timeout(Duration::from_secs(30))
    .layer(interceptor(auth_interceptor))
    .layer(interceptor(some_other_interceptor))
    .into_inner();

Server::builder().layer(layer);
}
We can look at the entry-point of the service implementation here:
https://docs.rs/tonic/latest/src/tonic/transport/server/mod.rs.html#692-727
If we take a closer look, we can see that there is even a BoxService layer pre-applied:
https://docs.rs/tonic/latest/src/tonic/transport/server/mod.rs.html#800-801
BoxService
The BoxService type is a fairly important utility, as it allows turning a service
into a trait object, allowing the response future type to be dynamic. However,
both the service and response futures must be Send:
https://docs.rs/tower/0.4.8/tower/util/struct.UnsyncBoxService.html
In places where you cannot have the future type Send, you can use the
UnsyncBoxService alternative:
https://docs.rs/tower/0.4.8/tower/util/struct.BoxService.html
Other useful utilities are found in the util module of tower:
https://docs.rs/tower/latest/tower/util/index.html
Suggestions for metrics and logging
We have seen a couple paragraphs above that layers can be used to great success with logging.
In practice, you will need to select a logging library.
Our experience in Braiins has revealed to us that the framework that meshes the best with async code, especially when performance is on the line, is tracing.
In tonic, a layer for it already exists and you can very easily
introduce it to your application:
#![allow(unused)]
fn main() {
use http::{Request, Response};
use hyper::Body;
use tower::{ServiceBuilder, ServiceExt, Service};
use tower_http::trace::TraceLayer;
use std::convert::Infallible;

async fn handle(request: Request<Body>) -> Result<Response<Body>, Infallible> {
    Ok(Response::new(Body::from("foo")))
}

// Setup tracing
tracing_subscriber::fmt::init();

let mut service = ServiceBuilder::new()
    .layer(TraceLayer::new_for_http())
    .service_fn(handle);

let request = Request::new(Body::from("foo"));

let response = service
    .ready()
    .await?
    .call(request)
    .await?;
}
A similar functionality is providing metrics. For metrics, the industry standard is Prometheus. This metrics system has been explored in a previous chapter:
Metrics with Prometheus and Grafana
You simply create a layer, and record the prometheus metrics in there, probably based on the data of the request.
Tools by buf.build
As your project grows larger, managing your interfaces correctly becomes an everincreasing priority. If you are using gRPC, your interfaces are stored in Protocol Buffer files, which become absolutely critical as that is the often the only different parts of the system care about. Improper care can create a mess and make it more difficult to manage your API.
In Braiins, we recently started looking into and cautiously implementing tools developed by Buf Technologies, which we shall dub buftools.
These tools are available here:
Installation method depends on your operating system. For Arch, buf can be found
in AUR: https://aur.archlinux.org/packages/buf
The project cites the following as its goals:
- API designs are often inconsistent: Writing maintainable, consistent Protobuf APIs isn't as widely understood as writing maintainable REST/JSON-based APIs. With no standards enforcement, inconsistency can arise across an organization's Protobuf APIs, and design decisions can inadvertently affect your API's future iterability.
- Dependency management is usually an afterthought: Protobuf files are vendored manually, with an error-prone copy-and-paste process from GitHub repositories. Before the BSR, there was no centralized attempt to track and manage around cross-file dependencies. This is analogous to writing JavaScript without npm, Rust without cargo, Go without modules, and all of the other programming language dependency managers we've all grown so accustomed to.
- Forwards and backwards compatibility is not enforced: While forwards and backwards compatibility is a promise of Protobuf, actually maintaining backwards-compatible Protobuf APIs isn't widely practiced, and is hard to enforce.
- Stub distribution is a difficult, unsolved process: Organizations have to choose to either centralize their protoc workflow and distribute generated code, or require all service clients to run protoc independently. Because there is a steep learning curve to using protoc (and the associated protoc plugins) in a reliable manner, organizations often struggle with distributing their Protobuf files and stubs. This creates substantial overhead, and often requires a dedicated team to manage the process. Even when using a build system like Bazel, exposing APIs to external customers remains problematic.
- The tooling ecosystem is limited: Many user-friendly tools exist for REST/JSON APIs today. On the other hand, mock server generation, fuzz testing, documentation, and other daily API concerns are not widely standardized or user friendly for Protobuf APIs. As a result, teams regularly reinvent the wheel and build custom tooling to replicate the JSON ecosystem.
While buftools contain a new protobuf compiler, which is faster, buf doesn't yet support Rust, so we do not use it. However, for us, the greatest benefit buf brings is the ability to lint protocol buffer files (including gRPC definitions) to enforce better API design and structure.
Buf also provides a schema registry, which works similarly to Cargo crates or PyPI, and essentially packages and versions protobufs. We haven't implemented it yet, but the jury is still out on that.
Buf as a linter
Invoking buf as a linter is done by supplying the lint subcommand to buf. In order to be able to
use the tool, you need to organize the protobuf files you want to lint into a Buf module.
This can be done either with the buf mod init command, or you can also write the buf.yaml manifest
by hand.
Here is an example from the monorepo, of how this manifest might end up looking:
# buf.yaml
version: v1

lint:
  use:
    - DEFAULT
    - RPC_NO_CLIENT_STREAMING
    - PACKAGE_NO_IMPORT_CYCLE
  except:
    - SERVICE_SUFFIX
    - RPC_PASCAL_CASE
    - PACKAGE_VERSION_SUFFIX
    - PACKAGE_DIRECTORY_MATCH
    - DIRECTORY_SAME_PACKAGE
    - RPC_REQUEST_STANDARD_NAME
    - RPC_RESPONSE_STANDARD_NAME
    - RPC_REQUEST_RESPONSE_UNIQUE
  ignore:
    # 3rd party files
    - google/
    # FIXME: Ideally there shouldn't be any ignores
    #   The idea behind ignoring those is that we can start fixing the mess
    #   that is already present without breaking everything everywhere
    - asset-server/
    - clearing/
    - dynamo.proto
    - flux/
    - market-data/
    - mining/
    - twitch/
    - user-cache/

breaking:
  use:
    - WIRE
The version field is required, there is no default, and at the time of this writing, the only
two options are v1 and v1beta.
This module manifest is intended for linting mainly:
- The
lint.usekey specifies lints we explicitly want. By default, it is implicitly defined like this:
  use:
    - DEFAULT
Which turns on all of the default lints. This should be your starting point if you want to add lints that are not enabled by default.
- The
lint.exceptkey disables specified lint and can be used pick out lints from groups you have enabled such as theDEFAULTlint group. - The
lint.ignorekey should be self explanatory
As the config indicates, we are fixing the lints continually, and so we have put it into ignore so that we don't start breaking things in the CI and elsewhere.
You can find a complete list of the lint rules and what they do here: https://docs.buf.build/lint/rules
The last three lines of the config indicate another great feature of buftools.
Breaking change detection
As outlined in a previous chapter, backwards and forwards compatibility is a critical selling point of gRPC and protocol buffers (and in general, of designing a good API in mission critical software). However, the fact that it is geared towards being compatible both ways doesn't mean it automatically is, breaking changes can still be introduced due to human error.
For this reason, buftools include a breaking change detector, which is invoked similarly as the linter,
with buf breaking.
The configuration is very similar:
breaking:
  use:
    - FILE
  except:
    - RPC_NO_DELETE
The full list of breaking rules can be found here:
https://docs.buf.build/breaking/rules
Formatting
The buf format command will rewrite your protobuf files in accordance with an established style.
By default, the output will be printed to stdout, so you most likely want to use -w option,
which modifies the files in-place:
buf format -w
You can also display a diff:
$ buf format -d
» buf format -d dynamo.proto
diff -u dynamo.proto.orig dynamo.proto
--- dynamo.proto.orig	2022-09-01 09:21:19.449675408 +0200
+++ dynamo.proto	2022-09-01 09:21:19.449675408 +0200
@@ -50,8 +50,7 @@

 syntax = "proto3";

-package
-  dynamo;
+package dynamo;

 message UpstreamSpecification {
   // Upstream URL; example: stratum+tcp://pool.net:7770
In combination with --exit-code flag, which exists with a non-zero code if there is a diff,
this is particularly useful in the CI and other verification places to ensure that code committed
into a repository is already properly formatted.
Style guide
Buf technologies also provides a very useful style guide for keeping your files up to a reasonable standard:
https://docs.buf.build/best-practices/style-guide
Calling gRPC endpoints from the CLI with help from buf
While buf itself does not directly provide functionality to call a gRPC call, it does support generation of file descriptor sets which are usable by gRPC CLI tools on the fly, especially if gRPC reflection is not available on the server.
There is two options: grpcurl and ghz.
grpcurl: https://github.com/fullstorydev/grpcurl
ghz: https://ghz.sh/
ghz is more of a load testing and benchmarking tool.
To use buf with grpcurl:
$ grpcurl -protoset <(buf build -o -) ...
And to use ghz:
$ ghz --protoset <(buf build -o -) ...
Choosing Rust
Rust is a multi-paradigm, strongly-typed, general-purpose programming language designed for performance, safety, in particular memory safety and safe concurrency without the need for a garbage collector or a runtime.It incorporates features found in high-level languages (especially functional ones from the ML family) in a low-level package that allows precise control over memory and system resources.
![]()
Today, in 2021, Rust is one of the fastest growing programming languages, taking areas such as backend development and new crypto development by a storm. Ever since Rust 1.0 was released, it has been voted the most loved programming language on StackOverflow every single year.
In this chapter, we will go over what makes Rust a great choice for development, and, conversely, where it falls behind,
Let's start with a brief history of Rust.
History of Rust
Rust was first created as a pet project of Graydon Hoare in 2006. He decided to name
it Rust after a species of fungi and
because the string rust is a sub-string of robust.
 Rust fungus under the microscope
Originally, the language took a lot after the functional programming language ML, in particular OCaml (an OO dialect of ML), and the first Rust compiler was also implemented in OCaml.
In 2010, Mozilla officially announced the project, and development began on a self-hosting compiler targeting LLVM. Over the course of the next five years, Rust went through many backwards incompatible iterations, and many features that were added were later cut, such as:
- garbage collection
- type-states
- interfaces
- green threads
- many pointer types
- early form of async
- classes
- objects
Steve Klabnik, one of the Rust core team members has stated in his History of Rust talk that the early form of Rust with garbage collector resembled many of the features Go has today.
This early similarity might have been the catalyst for future comparisons between Rust and Go, despite each language targeting different domains and having different goals.
In 2015, Rust has finally released 1.0, which is the form of Rust we are familiar with to this day.
Despite the language going through many forms (9 years of development), it's guiding principles and goals have not changed.
Guiding principles
No compromises and rigorous design process
The first and foremost principle that followed Rust's development is taking no compromises. This is most apparent in refusal of traditional programming trade-offs.
Here is a sample of trade-offs that are often true:
-
Usually, having a memory safe language means giving up precise memory control and performance, and a garbage collector is utilized.
-
Employing a number of functional features often leads to a more difficult or convoluted design for programmers
-
Writing highly-concurrent code means opening yourself up to data races, race conditions, and complexity with properly distributing data across threads.
-
Performant, strictly-typed and functionally-leaning languages often lead to increased development times.
None of these are true in Rust (well the last one a little bit). Rust developers have iterated on solutions for these problems for years until they reached a solution that didn't require any compromises.
Today, Rust has adopted a model of open-source governance and new features go through a lengthy and elaborate
process of selection, design, implementation and
testing before they are even included in nightly as opt-in through language features.
For every compiler version, a crater run is performed,
which looks for regressions across the whole Rust package registry crates.io and Rust
code it can find on Github.
Generally, this means that even nightly is safe for non-critical development, and the stable release channel is a great choice for just about any application.
You can see the upcoming Rust and changes in the Request For Commentary repository on GitHub: https://rust-lang.github.io/rfcs/
Pre-existing academic research over new inventions
Rather than inventing new features, Rust prefers taking existing ideas from the computer science academic circles and implementing them in a way that is user accessible.
For example, many of the memory safety features of Rust were taken from the language Cyclone, a safe dialect of C designed in AT&T Labs Research and Cornell University. As another example, Rust's channels and concurrency features were inspired by Rob Pike's and Phil Winterbottom's series of concurrent programming languages - Newsqueak, Alef, and Limbo - they developed at Bell Labs.
Other influences can be found here.
Selling points
Strong static analysis
Rust is somewhat known for slow compilation speeds, one can expect to wait minutes even for not so big projects when compiling release builds from scratch.
One of the greatest time consumers is Rust's static analysis step. Rust does very precise checking of your code, aggressively optimizing and resolving what it can at compile time.
Here is one of my favorite examples, simple mathematical algorithms:
/// factorial implemented with an iterator
fn factorial_iter(num: usize) -> usize {
    (1..num)
        .fold(1, |acc, x| acc * x)
}

/// factorial implemented with a loop and a mutable variable
fn factorial_loop(num: usize) -> usize {
    let mut sum = 1;

    for x in 2..num {
        sum *= x;
    }

    sum
}

/// fibbonaci implementation with a loop
fn fibbonaci(n: usize) -> usize {
    let mut a = 1;
    let mut b = 1;

    for _ in 1..n {
        let old_a = a;
        a = b;
        b += old_a;
    }

    b
}

fn main() {
    let x = factorial_iter(12);
    let y = factorial_loop(20);
    let fib = fibbonaci(35);

    println!("factorial 1: {}, factorial 2: {}, fibbonaci: {}", x, y, fib);
}
If you compile this in release mode and inspect the generated assembly, you might be surprised to see this:
subq	$120, %rsp
movq	$479001600, (%rsp)               # <- look here,
movabsq	$2432902008176640000, %rax       # <- here,
movq	%rax, 8(%rsp)
movq	$14930352, 16(%rsp)              # <- and here
If you run the code as well, you will find that these numbers are the factorial of 12, factorial of 20, and 35th Fibonacci number, respectively. That's right, Rust figured out it can evaluate all this code at compile-time, so it did, and now this program now runs finishes instantaneously, as no calculation is being done at runtime.
This is a short contrived example, but Rust resolves a lot of code at compile-time.
Compile time resolution can be enforced by using the const keyword on functions, but
not all language features are yet supported in const contexts. Rust's compile-time
analysis features are utilized by many Rust libraries to achieve high performance or
ensure correctness.
For example, the Diesel database ORM uses this to validate queries during compilation and achieve performance surpassing the fastest C frameworks by pretty much eliminating all query-generating code by compile-time evaluation. Here's a talk which explains this process on an example query
Zero-cost abstractions
This is one of the most advertised points about Rust. Having zero-cost abstraction means, in layman's terms, that the "flavor" of your code does not affect performance. It doesn't matter what language features you use (ie. loops vs iterators), or how many abstractions you have that make your program make sense to you, help clarity and ensure safety, it still compiles down to the same (or very similar assembly), the abstractions that you create do not appear in the final binary.
Apart from Rust being smart, deleting and rewriting your code by itself, Zero-Sized Types are commonly used to model type states, a kind of zero-cost abstraction.
A great example comes from the Rust Embedded book:
Type states are also an excellent example of Zero Cost Abstractions - the ability to move certain behaviors to compile time execution or analysis. These type states contain no actual data, and are instead used as markers. Since they contain no data, they have no actual representation in memory at runtime:
#![allow(unused)]
fn main() {
use core::mem::size_of;

let _ = size_of::<Enabled>();    // == 0
let _ = size_of::<Input>();      // == 0
let _ = size_of::<PulledHigh>(); // == 0
let _ = size_of::<GpioConfig<Enabled, Input, PulledHigh>>(); // == 0
}
Defining a ZST:
#![allow(unused)]
fn main() {
struct Enabled;
}
Structures defined like this are called Zero Sized Types, as they contain no actual data. Although these types act "real" at compile time - you can copy them, move them, take references to them, etc., however the optimizer will completely strip them away.
In this snippet of code:
#![allow(unused)]
fn main() {
pub fn into_input_high_z(self) -> GpioConfig<Enabled, Input, HighZ> {
    self.periph.modify(|_r, w| w.input_mode().high_z());
    GpioConfig {
        periph: self.periph,
        enabled: Enabled,
        direction: Input,
        mode: HighZ,
    }
}
}
The GpioConfig we return never exists at runtime. Calling this function will generally boil down to a single assembly instruction - storing a constant register value to a register location. This means that the type state interface we've developed is a zero cost abstraction - it uses no more CPU, RAM, or code space tracking the state of GpioConfig, and renders to the same machine code as a direct register access.
Safe and efficient multi-threaded and asynchronous programming (aka Fearless concurrency)
Rust's goal of memory safety through strict analysis and powerful type-system eventually led Rust language developers to the conclusion that the same tools can be used to help manage concurrency problems (concurrency meaning concurrency and parallelism, Rust community often uses these terms interchangeably).
The tools used to achieve this are traits and standard library types. In Rust, all types might be automatically marked with these traits:
Send- if it is safe to send this data to another threadSync- if it is safe to share this data between threads (a type is Sync only if and only if a reference to it is Send)
Since these traits are empty, they are a zero-cost abstraction as well.
Rust will not allow sharing/sending data between threads for types that are not Send and Sync. If you need to share data which isn't intrinsically safe to share (such as when you need to mutate data from several threads), Rust forces you to use concurrency-enabling structures, such as mutexes, read-write locks, atomically-counted reference pointers, or condvars. Or to just use atomic data structures in general.
No data that is not atomic or wrapped in a safe locking structure can be mutated.
This, in conjunction with borrowing and lifetime rules (that is, the ownership system), prevents data races. Data races are defined as the following behaviors:
- two or more threads concurrently accessing a location of memory
- one or more of them is a write
- one or more of them is unsynchronized
Data races are examples of undefined behavior, and so they are impossible to create in safe Rust.
However, it is important to keep in mind that Rust does not prevent general race conditions, which are situations that produce different results depending on the order in which operations are executed. As stated in the nomicon:
This is pretty fundamentally impossible, and probably honestly undesirable. Your hardware is racy, your OS is racy, the other programs on your computer are racy, and the world this all runs in is racy. Any system that could genuinely claim to prevent all race conditions would be pretty awful to use, if not just incorrect.
Explicitness
There is very little things in Rust that are implicit. No implicit conversions,
no implicit fallibility through exceptions or NULLS. Generally, you only need
to look at a function's signature to know if it can fail:
#![allow(unused)]
fn main() {
use std::io::Error as IoError;
trait Example { // ignore what a trait is for now ;-)
/// A plain function returning a string
fn this_will_never_fail() -> String;

/// Option replaces the concept of NULL from other languages
/// It either contains `Some(value)` or `None` at all
fn this_operation_might_not_produce_a_value() -> Option<String>;

/// A failing operation should indicate why it is failing and how.
/// In Rust, this is indicated with the `Result<T, E>` type.
/// The function in this contrived scenario might be reading a file
/// from the disk, so it may return an IO error
fn this_operation_might_fail() -> Result<String, IoError>;
}
}
Keep in mind: When we are talking about fallibility here, we mean recoverable errors. Rust has a concept of irrecoverable errors called panics, which usually end either the source thread or the whole process. More on them in a later chapter.
Rust is also explicit about how data is handled:
- You know when data is moved, when data is cloned, when data is passed by reference. Rust does none of these operations implicitly
- No implicit type conversions are done, even between primitive types. This encourages the programmer to handle these conversions (and their possible fallibility) explicitly and cover all cases, or decide which behavior is preferred (for example if adding numbers over the type's limit should wrap around, saturate or error)
- Whether data can be mutated has to be stated explicitly the moment a binding is declared, and immutable is the default. This helps prevent unintentional mutability and opens up a pathway for more compiler optimizations.
Elaborate type system
With the last point, we delved into the field of Rust's type system. Rust has is a strongly-typed language with good generics, allowing it to encode a lot of information in the types.
Information encoded in types is type-checked and verified at compile-time. Good type design in Rust obviates the need for certain tests for relations between data.
Thanks to traits, which in layman terms are comparable to interfaces or Haskell's typeclasses, we can model things such as this:
Other applications are possible, for example:
- Encoding permissions in associated types
- Extremely performant and safe lazy iterators
- Enforcing sequences of events with ordered types
Rust also has a rich selection in its standard library:
- Several enum types (Rust's enumerations resemble algebraic sum types found in functional languages) like Option and Result for expressing state of data
- Many pointer types
- Several string types
- Many traits (typeclass) for describing the behavior, properties or semantics of other types
While it may seem complicated to have many types, the benefit is that it allows precise control over data, and sets what assumptions you can make.
For instance, here is a view of a couple pointer types:
#![allow(unused)]
fn main() {
use std::rc::Rc;
use std::sync::Arc;
use std::pin::Pin;
struct T;

let x = &T; // this is an immutable borrow pointer, I know no one can modify this while I hold it
let mut x = &mut T; // this is a mutable reference, I know no one else has access to this value now;
let x = &T as *const T; // C-ish const pointer, most operations with this require unsafe {}
let mut x = &mut T as *mut T ; // C-ish pointer, most operations with this require unsafe {}
let x = Box::new(T); // Heap allocated pointer
let x = Rc::new(T); // Reference-counted pointer, handles to it can be freely shared, de-allocated when references reach 0
let x = Arc::new(T); // Atomically reference-counted pointer, wraps data immutably in a manner safe across thread boundary
let x = Pin::new(Box::new(T)); // A pinned pointer, data pointed to by this pointer are guaranteeed not to move
}
By selecting the correct pointer type, I can have the behavior I need and only that behavior.
Minimal modular standard library but batteries-included toolchain
A long time ago, a maxim was invented in the Python project:
The standard library is where code goes to die
This was a consequence of a batteries-included approach to the standard library. However, once you include something in the standard library, it is suddenly tied to many other things, and updating it or changing it completely becomes a difficult task because you can assume that every project written in the language might depend on this code (or one of the project dependencies does...).
Furthermore, the standard library is not disjoint from the language itself. Each version of the standard library is bound to one version of the language. Which means that you can't opt to use newer or older standard library while staying at language version you are comfortable with.
Rust tries to prevent this by keeping standard library absolutely minimal, and have it only cover the most basic development tasks centered about the language itself, IO and basic OS interaction.
This functionality is then separate into their own recommended crates, which are sometimes called "blessed". For example, these are:
- rand - random number generation
- chrono - proper, timezone-aware datetime management
- log - a logging facade
- regex - regular expressions
- dirs - standard locations of directories such as cache or home directory
While this may seem cumbersome, it has a large benefit in separating from the language and standard library versions itself, allowing you to use a version of your choosing or use a completely different implementation altogether. Another benefit is that these now become opt-in, and your compiler won't waste time on it and your binaries won't include unnecessary code, if you don't need such functionality at all.
In embedded contexts, it is important to note that while the standard library comes pre-compiled by default, dependencies are always compiled on your build machine when you are building the crate. This can allow you to do the following:
- Compiling in a mode suited to your needs, ie. compiling for size or replacing stack unwinding logic with abort in constrained environments
- Choosing which features of the library to enable to prevent unused machine code in binary
- Swapping out core components like the allocator, a particular dependency, or which version and how the crate links to a system library
- Having the desired amount of debugging information even for dependencies. This extends to being able to use analytic tools on the crates you depend on, to find potential issues, or make decisions to optimize your dependency tree. Compare with C libraries which generally come pre-compiled in your system.
However, the toolchain itself is batteries included, and contains the following tools:
- package manager
- code formatter
- language server implementation
- auto-completer
- linter
- a tool for automatically fixing common mistakes and unambiguous warnings
This means that Rust has a great tooling support and can be used in many editors/IDEs, you can find a list of compatible editors here. Arguably, the best support for Rust has Visual Studio Code via the Rust-Analyzer extension.
Great documentation
Rust has greatly integrated documentation. In fact, documentation is a native language feature, done through special documentation comments.
By making documentation a feature of the language itself, the following is possible:
- All documentation is explicitly tied to specific symbols in the source code
- Rust's documentation features have type lookup, just like the language, allowing for efficient cross-linking between different parts of the documentation
- All code examples are by-default checked for validity, if the example wouldn't compile, then the crate itself doesn't pass testing
- It is possible to prevent undocumented code from compiling, essentially enforcing 100% public API documentation coverage.
Here's a snippet of how documenting is done on the code side of things:
//! This is an interior doc comment
//!
//! It documents either the module, or the item it is found in.
//! Here's a runnable code example:
//! ```rust
//! fn main() {
//!     println!("Hello, world! This is Rust in documentation,
//!                  if I make a mistake here,
//!                  this won't compile ;-)");
//!
//!     // let's use are cool function here, if its API changes,
//!     // this example will need to be updated()
//!     let sum = my_cool_fun(3, 40);
//!
//!     println!("{}", sum);
//! }
//! ```

/// This is an exterior comment documenting a function
///
/// A function adding the sum of all numbers between two numbers
pub fn my_cool_fun(a: i32, b: i32) -> i32 {
    (a..b).sum()
}

fn main() {
    println!("sum of numbers between 10 and 100: {}", my_cool_fun(10, 100));
}
All documentations is then taken and translated into a website form, which allows effective search, and inspecting relevant sections of the source code.
Rust itself is documented this way, check out the following links:
- https://doc.rust-lang.org/std/index.html - documentation of the standard library (keep in mind that these are all doc comments in Rust's source!)
- https://doc.rust-lang.org/core/index.html - documentation of the core library, which is a dependency-free basis of Rust's STL.
Third-party crates have the same documentation:
- https://docs.rs/rand/0.8.4/rand/ - documentation of the Rand crate
For purposes of less code-bound and more elaborate guide-level documentation, Rust also includes a tool for writing online books, mdBook. This page that you are on right now is written in mdBook also, but here is a couple other examples:
- The Rust Programming Language - The open-source main learning book of Rust
- mdBook documentation
- The rustc book - Introduction to the Rust compiler
- Rust By Example - Series of runnable examples illustrating various Rust concepts
Donwsides
Learning curve
As it is often stated, Rust has a steeper learning curve, especially the concepts of borrowing, lifetimes, ownership and move semantics over copy semantics take longer to get adjusted to. Rust's syntax looks deceptively similar to C-like languages, which can lead C/C++ programmers to jump in head-first, and that usually leads to frustration.
Rust really is a language that requires some study first.
Longer development times
Rust is not a language suited for rapid prototyping. As it constantly requires you to handle every possible error, or every possible value, and to prevent possible memory issues by abiding to the borrowchecker, development takes longer.
Since Rust prefers expressiveness, some time is also needed for properly specifying types and doing proper conversions. In fact, unlike most other languages, Rust does not even implicitly convert between numeric types:
fn main() {
    let y: f32 = 6;    // does not compile {{integer}} != f32;

    let byte: u8 = 15;
    let my_num: i32 = 10000 + byte; // does not compile,
                                    // expected i32, got u8
}
However, if you try to run this example, you will see that Rust is quite helpful with its error messages, including suggested changes to fix this issue.
Some people compare the Rust compiler to a tough sensei that beats you with a stick for every indiscretion, but ends up making you the fighter that wins the King of Iron Fist Tournament ;-)
Young ecosystem
Rust has a relatively young ecosystem. Many tools are somewhat new, many commonly used libraries are pre-1.0, and breaking changes are to be expected.
Furthermore, more niche areas are often not covered. The ecosystem is rapidly evolving, with carefully designed libraries and frameworks appearing constantly to satisfy different needs, but you may run into an issue which will require you to write your own solution.
Considerations for Implementing Rust in production
NEUTRAL: Learning curve pt.2
Implementing Rust in Practice will likely take longer than most mainstream languages. Especially learning to co-exist with the infamous borrowchecker takes adjustment, especially for programmers coming from high-level, dynamically-typed languages.
This is also due to Rust being a very strict language that prefers its idioms. It is usually very easy to do things the Rust way, and difficult to do it otherwise. There is a common saying in the community that Rust makes it quite hard to write really bad code.
This however has its benefits:
- Code written in Rust is easier to maintain
- Certain issues that require time are completely eliminated - memory safety issues, concurrency, going around like a detective looking for things which might throw uncaught exceptions
- Foreign Rust code is more trustworthy than for example foreign C code
After overcoming the initial learning curve, however, some of the time is regained, because apart from getting the code to compile, programmers mostly only need to worry about logic errors.
GOOD: Backwards compatibility
Since Rust 1.0, the language is completely backwards compatible. You can run code written in 2015 without a hitch today, it will just work. This is mostly due to an amount of foresight and planning of Rust's future.
Currently, Rust is developed in a way that revolves mostly around non-breaking additions, such as adding new types and trait implementations that weren't previously available, optimizations, or syntax extensions in places which previously wouldn't compile (for example or-pattern anywhere, which is syntax that would previously result in a syntax error).
However, sometimes, breaking changes are necessary, these mostly come in the following forms:
- new syntax (ie. keywords) that makes some old code invalid
- new default imports/trait implementations which might affect existing code (for example, which implementation of getting iterators for arrays is selected)
- fixes for code that was discovered to be unsound
To be able to make these changes without losing backwards compatibility, editions (also sometimes called epochs) were introduced. Rust currently has three editions:
Editions only exist in syntax and high-level internal representation, they are eventually transformed into the same IR, and no further distinctions are made in the compiler.
This has a couple neat implications:
- All editions receive security fixes and optimizations
- All editions receive new features that are not a breaking change
- Editions are completely compatible with one another:
- Rust 2015 crate can depend on a Rust 2021 library
- Rust 2018 crate can depend on a Rust 2015 library
- and so on..
Cross-version has the benefit of not rushing large projects into keeping up with the latest edition. When your codebase is ready for it, it can be ported, but until then, it will continue receiving all the important patches, new features and will be able to use the latest libraries.
It also prevents a Python 2 vs Python 3 schism from occurring in Rust.
The Rust toolchain also contains the tool rustfix for automatically fixing certain common and clear errors/lints, and this includes edition differences, which makes moving to a new edition of Rust much easier.
BAD: The ecosystem
For many applications, Rust isn't quite there yet with libraries and frameworks. Many currently used frameworks are not stable (or past 1.0) yet, so it is fair to expect breaking changes in API, which could occur quite often. This means that to get the security fixes that you need, you have to invest in rewrites of your codebase to be compatible with the latest version.
Cargo with its lock file feature prevents your code from breaking spontaneously, if used correctly, however crates have many dependencies between each other, and you may run into the following situation:
- You want to use new
crate A, or a new version of acrate A crate Adepends oncrate B, which you already depend on in an older version- Other crates you depend on depend on that particular old version of
crate B - New version of
crate Bdepended on bycrate Ais not semver compatible with the old one
Two things result from this:
- If the version requirement in your Cargo manifest is too loose, Cargo will bump the version and your code suddenly no longer compiles
- Cargo cannot find an appropriate version for
crate Band dependency resolution fails
The result is the same: You need to update a significant portion of your dependencies and do a rewrite, or depend on a very old version of A (if such a version even exists), which is prone to contain bugs, or exploits, fixes for which will not be back-ported to the old version.
GOOD: Zero-overhead FFI and interop tooling
It is easy to integrate Rust into existing projects by leveraging its Foreign Function Interface (FFI). Rust can expose its symbols in a way that's consistent with C, which makes it easy to integrate into any language that has C interoperability.
Rust's zero-cost abstractions, lack of runtime and garbage collector allow for writing code that integrates into critical components of projects written in other languages.
While the highest benefit seems to be derived in languages that are on the slower side, such as Python or Ruby, libraries for integrating Rust have been created for many languages:
The best support exists for C/C++, as no special "glue" is required. Rust also has several tools which help the process of interop with C and C++ considerably:
- c2rust - a tool for migrating C code to Rust, produces a compilable Rust implementation of given C code, usually only refactoring needs to be done afterwards
- bindgen - automatically generates Rust FFI bindings to C (and some C++) libraries
This allows for sort of a creeping Rust pattern, where you don't have to commit to Rust completely, but only rewrite a particular component, usually one where performance and robustness is critical, and then continue with more parts of the codebase. This is the route taken by NPM for example.
Interoperability also leads to a lesser cost of rewriting in Rust, as you can break your codebase down into components, even if it is a monolithic application, and then assign different priorities to each component, continually swapping out legacy code for Rust implementations, until you arrive at a fully Rust codebase.
GOOD: Built-in testing, benchmarking, documentation and dependency management
Rust comes bundled with a package manager and build system in one called Cargo. This package manager is available on almost all platforms and makes building both your and 3rd party code effortless by automatically pulling in dependencies, managing language features, and allowing easy deployment of your packages to public registries, most often the official crates.io.i
Tests, benchmarks and documentation are first-class lang features, and the language has means for checking their validity (and e.g. tools for verifying code coverage). While documentation is showcased higher in section Great documentation, this is how tests and benchmarks look in their simplest form:
#![allow(unused)]
fn main() {
#[test]
fn my_test() {
    panic!("this test will fail");
}

#[bench]
fn my_benchmark(b: &mut Bencher) {
    b.iter(|| println!("cpu intensive operation"));
}
}
Depending on where these are located in the package structures, this can be either unit or integration tests
Domains most suited for Rust
Rust is most commonly used in the following areas:
- Backend development where performance matters: For example AWS, Cloudflare npm and Coursera use Rust on the backend in performance-sensitive and robustness-requiring situations. We at Braiins also use Rust for network backend development
- Low-level and OS development - Android now officially supports Rust for developing the OS itself, Fuchsia OS also has parts written in Rust. Independent Rust OS-dev projects have also popped up, most notably Redox OS and Tock
- Embedded development / operating in constrained environments - Rust's modular nature allows stripping it down to bare essentials, and swapping pretty much everything for custom implementations. Many libraries support running without standard library and manual memory management, C interop and inline assembly allow for fine control over hardware in bare-metal environments. At Braiins, Rust is the preferred language for embedded development
Domains not suited for Rust
- AI/Machine Learning - while Rust does have some support for ML, it is still in its infancy, and the theoretical performance benefits are far outweighed by the lack of ML ecosystem in Rust
- Frontend Web Development - using Rust on the frontend is possible and feasible from a internal code-reuse viewpoint (you can share type definitions between frontend and backend effortlessly), however, there is hardly any framework at the time of this writing that would allow rapid prototyping (there are Rust frontend frameworks), and most web libraries either have missing bindings or lack Rust equivalents. Rust is also lacking in terms of surrounding tooling such as tools like webpack, CSS preprocessors, asset preprocessors and so on. This is mostly due to the fact that Rust WebAssembly support has been stable for a relatively short time
- Areas that require standardization and/or certified compiler - Some areas of development require compilers certified for functional safety, for example some areas of medicine. No Rust compiler is currently certified, and there exists no official Rust standard. While standardization is planned, it is still likely years away.
Rust installation
There is a couple ways to install Rust. If you are using a mainstream Linux distribution, Rust is likely to be in its package repositories.
Because Rust updates quite often, and you may want to keep multiple toolchains (some analysis tools require
nightly, and some crates for formal verification are pinned to particular toolchain versions because they import
compiler internals), I suggest installing rustup.
If your distribution does not have a rustup package, or if you are using Windows and MacOS, visit the
website for rustup: https://rustup.rs/
Keep in mind that there are two dependencies you need to satisfy on any system to compile Rust:
gcc,clangor MSVC C compilergit
Sometimes, one or both of these dependencies might be bundled with the Rust distribution for your system. Rust also depends on LLVM for its machine code generation, but that is always bundled.
Conclusion
Rust makes an excellent choice for many applications. While you can use it for pretty much anything, it is most suited for areas listed above in the section Domains most suited for Rust and perhaps least for areas listed in Domains not suited for Rust.
It is up to every programmer, and by extension company or organization, to decide whether the benefits of Rust is something they are interested in when faced with the cost of switching to a different technology, one which has a steeper learning curve.
On the other hand, the issues that Rust solves are critical and not having them is a long-term benefit. In a post from 2019, Mozilla revealed that 73.9% of security bugs would have been prevented by Rust in Firefox's style component alone.
The CVE repository at the time of this writing lists 6386 memory corruption vulnerabilities, caused by use after frees, possible double frees, buffer overflows, a large number of this would have been prevented by Rust. Memory issues may cause security vulnerabilities and arbitrary code execution, which allows malicious actors to cause significant damage.
In light of this, why not give Rust a go? ;-)
Exercises
- Without even needing to have Rust installed, you can run Rust code in your browser by
using the official Rust Playground.
Visit it, run the
Hello, world!, and maybe try experimenting a little. - Try installing Rust on your machine :)
Supplementary materials
- Presentation
- Handout
A Practical Lesson in Rust - Implementing an iterator over delimited string slices
Disclaimer: This section assumes you have a at least a cursory knowledge of basic Rust, and that you have already tried writing some code of your own.
For this, I recommend at the very least that you try out Carol Nichols' rustlings, especially the parts move_semantics, option, strings and traits
Prerequisites
- Trait syntax
- if-let and match
- Option and Result
- Vector, existence of basic iterator and .collect()
In this part, we will examine Rust's approach to references and ownership, and we will do that in relation to string types.
Memory management model
You might have already heard that Rust does not have a garbage collector, and manages its memory manually, but you might be surprised to learn that its model is a different to the one used in C.
Rust's memory management is lexical (with a few exceptions for ergonomics), which means that memory is allocated when a variable (or just a value) is created, and freed when it goes out of scope in terms of the syntax. When something goes out of scope is determined by the Rust compiler, and the compiler also ensures that there are no dangling pointers left. The part of compiler responsible for this is called the borrow checker
Rust enforces RAII (Resource Acquisition Is Initialization), so to put it simply, initializing a variable gives you memory or other resources (such as opening a file), and when an object goes out of scope, its destructor is called and its resources are returned to the system (sockets and files are closed, memory is freed).
In order to implement this effectively, Rust introduces a couple new concepts. Here is a short list with some succinct definitions from Pascal Hertleif (in quotes):
(I strongly suggest you run the examples, Rust's compiler errors are usually very descriptive and can help provide you insight into what is going on)
Ownership: You own a resource, and when you are done with it, that resource is no longer in scope and gets deallocated.
In Rust, to denote that you own something, you simply use its type plainly without any fluff around it:
fn main() {
    // I own this string in this function, by creating this variable,
    // I have allocated memory
    let the_11th_commandment = String::from("Braiins OS rocks!");

    // the memory used by the string will be freed here, since
    // we have not passed its ownership elsewhere and main() ends here
}
References to a resource depend on the lifetime of that resource (i.e., they are only valid until the resource is deallocated).
Often, you only want to give a reference to something. This is the Rust equivalent of
a const <type>* pointer. It only allows read access. You can create as many of these as you want
// in serious Rust, you'd use &str for flexibility, as &String can convert to it automatically
fn print_my_string(string: &String) { // compare to `const char * const string`, which would be the C equivalent
    println!("{}", string);
    // the reference to string is destroyed here
}

/// the print_my_string() function does not take the ownership
/// of the string, so you can pass it multiple times; for references
/// rust creates copies if necessary
fn main() {
    let the_11th_commandment = String::from("Braiins OS rocks!");

    print_my_string(&the_11th_commandment);
    print_my_string(&the_11th_commandment);

    // you can also create a reference and store it in a variable

    let string_ref = &the_11th_commandment;

    print_my_string(string_ref);

    // <- string_ref is destroyed here
    // <- the_11th_commandment is destroyed here
}
However, as stated in the excerpt from Pascal, references are only valid for as long as the resource exists. This is a common pitfall for new Rust programmers:
// this function won't compile
// we have to specify a lifetime explicitly here,
// otherwise Rust assumes you maybe want to return
// constants, which have a 'static lifetime, and
// as such live forever
fn give_me_a_ref<'a>() -> &'a String {
    let temp = String::from("This function is a prison and I am trapped in it.");
    &temp

    // <- temp would be freed here,
    //    the returned reference cannot outlive it
}
Move semantics means: Giving an owned resource to a function means giving it away. You can no longer access it.
This is a major difference to languages with C-like semantics, which use copy semantics by default, i.e. to give a parameter to a functions means to create a copy which is what is then available in said function.
In Rust, however, you take the value you have and give it to a function, and then you can no longer access it:
fn completely_safe_storage(value: String) {
    // <- value is immediately freed
}

fn main() {
    let x = String::from("1337 US Dollars");

    completely_safe_storage(x); // <- ownership of x was moved to completely_safe_storage()

    println!("{}", x); // <- this does not compile, as we no longer have the ownership of x
}
We then say that main() owns x until completely_safe_storage() is called,
at which point ownership is handed to it (= x is moved into the function), and completely_safe_storage() owns x
until it is dropped.
To not move a resource, you instead use borrowing: You create a reference to it and move that. When you create a reference, you own that reference. Then you move it (and ownership of it) to the function you call. (Nothing new, just both concepts at the same time.)
We have already kinda demonstrated this two examples ago, but we can make a more annotated example:
fn takes_reference(my_ref: &String) {
    // <- reference is moved
    println!("{}", my_ref); // <- this macro actually takes all arguments by reference
                            // so a &&String is created here, which is moved into the
                            // interals of the macro
    // <- my_ref is destroyed here
}

fn main() {
    let x = String::from("Hello, world!"); // <- allocate and initialize new string x to
                                           // "Hello, world!"
                                           // main() now owns x

    let reference = &x; // <- create a reference to x
                        // main() owns this reference
                        // we call this "borrowing x (immutably)"

    takes_reference(reference); // <- reference is moved into takes_reference();
    // <- x is freed here
}
To manipulate a resource without giving up ownership, you can create one mutable reference. During the lifetime of this reference, no other references to the same resource can exist.
To prevent issues with pointer aliasing and memmoved() resources, and a whole plethora of possibilities for memory corruption, Rust prevents you from having more than one reference to a resource, if said reference is mutable. For example, you can't do this:
fn main() {
    let mut bitcoin = String::from("bitcoin");

    // Rust is actually pretty smart,
    // so if it sees you are not using mut_ref
    // after you have created ro_ref, it will
    // destroy it early, this is a relatively
    // recent change for ergonomics in Rust
    // called Non-Lexical Lifetimes
    let mut_ref = &mut bitcoin; // <- borrow bitcoin mutably
                                // mut_ref is of type `&mut String`,
                                // given that the variable itself is immutable,
                                // this corresponds to `char* const ptr` in C
    let ro_ref = &bitcoin;      // <- borrow bitcoin immutably

    println!("{}", ro_ref); // <- use the immutable borrow

    mut_ref.push_str(", the cryptocurrency"); // <- use the mutable borrow
}
We briefly also touched up on the concept of lifetime. This denotes how long a resource exists or is accessible from start to finish. Mostly, we speak about these in terms of references.
Rust use the 'ident syntax to denote lifetimes, as we have seen in the invalid
reference-returning example before. Just like in the previous parameter, they
usually appear as generic parameters. What you call them is up to you, although
usually, single letters starting from 'a are used. The only thing you can do
with these explicit lifetimes is verify if they are equal, or rather, if one satisfies
the other (e.g. lifetime 'a lives as long or longer than 'b)
The exception is the 'static lifetime, which denotes references that are valid
for the entirety of the program's run from anywhere, You mainly get these via constants
and statics.
#![allow(unused)]
fn main() {
static NUMBER_REF: &'static i32 = &42;
}
To fully illustrate the concept of lifetimes, we can annotate an earlier example with appropriate lifetime scopes for values. This is more of a pseudo-code, so this example is kind of for looking only:
fn main() {
    'bitcoin_lifetime: {
        let mut bitcoin = String::from("bitcoin");

        'mut_ref_lifetime: {
            let mut_ref = &mut bitcoin; // <- borrow bitcoin mutably

            'ro_ref_lifetime: {
                let ro_ref = &bitcoin;      // <- borrow bitcoin immutably

                println!("{}", ro_ref); // <- use the immutable borrow
                mut_ref.push_str(", the cryptocurrency"); // <- use the mutable borrow
            } // <- ro_ref goes out of scope here  ┐
              //                                   ├ these references can't coexist,
        }     // <- mut_ref goes out of scope here ┘ hence the issue
    } // <- bitcoin goes out of scope here
}
To illustrate how you can assure two references live for the same duration:
// This denotes:
// for two references left and right, which live the same,
// return a reference that lives as long as these two
//
//
// It is important to keep in mind, that Rust can accept
// parameters of varying lifetimes by shortening one of them
// in the perspective of the function
fn max_ref<'a>(left: &'a i32, right: &'a i32) -> &'a i32 {
    if *left < *right {
        right
    } else {
        left
    }
}
You can also specify other types of requirements:
// for two lifetimes 'a and 'b, such that 'a lives
// as long as 'b or longer
fn foobar<'a, 'b>(_x: &'a i32, _y: &'b i32)
where
    'a: 'b
{
    // code...
}
That’s it. And it’s all checked at compile-time.
This is only a very brief introduction, for a more complete overview, please check out the following links:
- https://doc.rust-lang.org/book/ch04-01-what-is-ownership.html
- https://depth-first.com/articles/2020/01/27/rust-ownership-by-example/
- https://blog.logrocket.com/understanding-ownership-in-rust/
Strings in Rust
A peculiarity of Rust is that it does not have a single string type in the standard library,
but rather seven (there may be more when you read this text):
- &
str/ &mutstr- primitive string slice type behind a standard reference - Cow
- Clone-on-Write wrapped string slice, works for both owned and borrowed values, not seen very often (which is unfortunate, since they can be really handy!) - String - owned string
- OsStr - borrowed platform-native string, corresponds to
&str - OsString - owned platform-native string, corresponds to
String - CStr - borrowed C string, corresponds to
&str - CString - owned C string, corresponds to
String
From these, you are most likely to encounter str and String, and
str is the primitive type that is always available regardless of if
you have std and core lib present.
str is a slice type, which comes with some features:
- slices are views into collections regardless of where they are present, string slices can exist on the stack, heap, or compiled into the binary (whereas Strings are on the heap)
- slices' size is not static or always known at compile-time, so just like
trait objects, they can only exist behind a reference, so you'll generally
encounter string slices as
&stror&mut str
In Rust, string literals are string slices too:
#![allow(unused)]
fn main() {
fn my_ref() -> &'static str {
    "Hello world!"
}
}
In the previous example, I have annotated the lifetime of the reference we got. Since string literals are compiled into the library, they are by-default valid for the entire run of the program.
Normal conditions for working with references and ownership still apply. You can't return a string slice of a string you've created in the function you are returning it from:
#![allow(unused)]
fn main() {
fn my_ref() -> &str {
    let my_string = String::new();
    &my_string // <- doesn't compile, return value references temporary value
}

fn my_ref2(input: &String) -> &str {
    &input // <- compiles, since input is known to live longer than the span
           // of this function
}
}
The error here says "missing lifetime specifier" because it correctly deduces that there is nowhere outside (meaning parameters) to deduce the lifetime and borrow the value, so it assumes you must want to return a reference to either a static or a string slice literal (which also has a static lifetime, given it is compiled into the binary).
An important feature is that you can create string slices from other string slices without copying data by re-borrowing:
fn main() {
    let my_str = "Hello, world!";
    let hell = &my_str[..4];

    println!("{} {}!", my_str, hell);
}
We can do this, since we are working with immutable references, and the mutable reference cannot exist so long as immutable ones exist.
fn main() {
    let my_str: &mut str = "Hello, world!";
}
This does not compile because string literals are always immutable (see that the error says "types
differ in mutability"). And no, you cannot circumvent this by doing &mut *"Hello, world" ;-) that
would be very unsafe.
TIP: By the "types differ in mutability" error, you might deduce that a borrow and its mutability make for separate types, that is
T is not the same type as &T is not the &mut T. Keep that in mind when you have enter a generic parameter somewhere or create a trait implementation.
In the task below, we will be using string slices (&str) exclusively, but let's also look into owned Strings.
#![allow(unused)]
fn main() {
fn my_string() -> String {
    String::from("Hello, world"); // or "Hello, world".to_string()
}
}
You usually use owned strings wherever &str is impractical or you need mutability. &String coerces into &str,
so it is always the proper choice when needing read-only string function parameters:
// don't
fn my_fun1(_input: &String) {}

// do
fn my_fun2(_input: &str) {}

fn main() {
    let my_string = String::new();

    my_fun1(&my_string); // both work
    my_fun2(&my_string);
    // however, this wouldn't work:
    //
    // my_fun1("Hello!")   <- type mismatch, expected &String, got &str
}
As you can see, using &str provides greater flexibility.
Lifetimes of owned vs unowned values
Sometimes when looking into Rust, you might hear that owned values have static lifetimes. The static lifetime here
means that the value is not a borrow of anything else, and so no other values imposes a lifetime on it. This makes
owned values type-check where 'static is required.
If a type is holding a borrow to something, then it needs to have the lifetime of the contained reference(s) as a generic parameter, and it will inherit the lifetime of the shortest-lived contained reference (this is to, once-again, prevent memory unsafety).
The lifetime of an owned value is bound by the scope of the function (or rather code block) it was declared in, provided it isn't moved. Without creating a reference, owned values can only be moved and possibly copied if it is allowed for said type.
The lifetime of a references is bound both by the scope of the function it was declared in, and by the lifetime of
the owned value it is borrowing. References itself are values and types also (remember from a couple lines above: Rust considers &T to be a distinct
type and you can implement traits on it), so rules of ownership apply to them as well.
There is a bit of trivia to be known:
&TisCopy, meaning the compiler will create and pass around copies as applicable&mut Tis notCopy, meaning it follows move semantics and when used as a parameter, it gets moved rather than copied
This comes from the definition of borrowing rules written above, and may lead to unexpected surprises when you don't pay attention to it.
Here's an example:
// in the business, we call this foreshadowing ;-)
// remember this code example when working on the project below
struct MyStruct<'a> {
    remainder: Option<&'a str>,
}

impl<'a> MyStruct<'a> {
    // this will keep returning the first character
    fn pop_first_char_as_string(&mut self) -> Option<&str> {
        // surprise! remainder here gets copied,
        // so we are not modifying which pointer is
        // stored in self, but only a copy on the stack
        let remainder = &mut self.remainder?;
        let c = &remainder[0..1];
        if remainder.len() != 1 {
            *remainder = &remainder[1..];
            Some(c)
        } else {
            self.remainder.take()
        }
    }
}

fn main() {
    let mut broken = MyStruct {
        remainder: Some("Hello"),
    };

    for _ in 0..5 {
        println!("{:?}", broken.pop_first_char_as_string());
    }
}
The reason why this code does not work as you might expect is that the underlying immutable reference got copied and then we took an immutable reference to said reference.
We still need a &mut &'a str to properly solve this, however, we need to prevent the copy.
The solution is to borrow mutably while still inside the option either through pattern matching
or by using a handy dandy .as_mut() method on Option, the result of which is another option
containing a mutable reference to the contents of the original Option, if it was Some.
Here is how to pattern-match borrow:
#![allow(unused)]
fn main() {
if let Some(ref mut contents) = Some("Hey") {
    // ...
}
}
The if-let will bind the value to the right of the equation sign to the pattern on the left side, if the pattern matches the value.
ref and ref mut are special pattern modifiers that borrow whatever matches them. Sometimes, new
developers confuse it with (or question why it isn't) Some(&mut contents) = Some("Hey").
The latter is a valid syntax also, but it does the opposite, it pattern matches a
mutable references and binds the data it points to to contents, which is what we don't want
in this case.
You might want to know more about slices and string slices, please check out the following links:
Pattern matching
Pattern matching has been briefly mentioned in the paragraph above. You have likely already encountered it and will encounter it many more times doing common tasks in Rust.
If you want to learn more about pattern-matching, check out the section on the sidebar.
In general, there is two types of patterns, constant patterns and bindings.
Constant patterns limit which values are acceptable by set pattern, for example, in the following pattern
#![allow(unused)]
fn main() {
if let Some(val) = some_option {}
}
The Some(...) part is constant -> nothing other than an Option::Some will match this, whereas val is a binding,
it will bind whatever is in that spot in said value to the name val, which is than available in this if.
Some patterns are also invariant, whereas other are not:
#![allow(unused)]
fn main() {
let (first, second) = a_tuple_of_two;
}
Here, this pattern is always true, we know if we get a tuple, we can always destructure it into its constituent elements.
The fact that it is a tuple of two here is the constant factor, ie. (.., ..).
Patterns can be nested as much as you want or need:
#![allow(unused)]
fn main() {
if let (Some(4), Err(MyErrorEnum::Other(err))) = a_pair {

}
}
Here, this pattern will only match o a pair of Option and Result, if the Option is of the variant Some and Result of the variant Err.
Furthermore, the Option must contain the integer 4, and the Err must contain an MyErrorEnum::Other variant of the supplied error
type. We then bind the inner error in this type into the name err, which then becomes available inside the if-let.
Global "variables" in Rust
While you are unlikely to run into these in this chapter, this is the first chapter most newcomers will read and it therefore stands to reason that one of the most different things about Rust newcomers are prone to run into should be mentioned here.
To put it shortly, Rust really, really, doesn't like global variables. This is with regards to its two of its stated goals, name explicitness and safety.
Global variables are generally pretty bad when it comes to safety especially across threads, and using them properly requires synchronisation mechanisms. Adding these implicitly is beyond the explicitness goal of Rust, so the Rust way to do things is to restrict them severely.
In Rust, global variables are called statics, which speaks to their nature as often being static and requiring static initialization only.
Statics are declared with the static keyword, have to have their type typed out (no, or very little, type inference):
#![allow(unused)]
fn main() {
static N: i32 = 5;
static mut M: i32 = 15;
}
Mutable statics are quite problematic, and they can only be used in unsafe code, since you are prone to running into issues with multithreaded code, data races, race conditions etc.
If you need mutable shared states, you have to use one of the types with interior mutability, such as a Mutex.
However, only literals and constant function calls are allowed in static context (and all references to types have to have the static lifetime), so you need to use a crate that provides lazy static functionality.
The Task - Implementing a &str token iterator
For the first project, it will be your task to implement a string slice token iterator.
The iterator should be a type named TokenIterator and it should
keep returning tokens from an &str of the type &str that were
separated by an &str delimiter.
This means that your Iterator should work with string literals and strings alike.
You are forbidden from using the following to create your list:
- Owned strings (
Stringetc.) - Mutable strings
- slice and str.iter() methods which already provide this functionality
This project should be organized as a legitimate library. Code should be documented, unused code should not be present, the crate should expose a usable public API, and be logically organized into modules.
Develop your project with git, and make sure that your commits abide to the Braiins Guidelines (ADD LINK TO PAGES HERE)
You are also encouraged to write tests, both integration and unit tests. To learn about tests, here is a pair of links that you can to refer to:
- https://doc.rust-lang.org/cargo/commands/cargo-test.html
- https://doc.rust-lang.org/book/ch11-01-writing-tests.html
In fact, here is a couple tests you might want to use for your implementation:
#![allow(unused)]
fn main() {
// assuming method TokenIterator::new(source: &str, delimiter: &str)
#[test]
fn it_works() {
    let test_input = "1 2 3 4 5";
    let tokens: Vec<_> = TokenIterator::new(test_input, " ").collect();

    assert_eq!(tokens, vec!["1", "2", "3", "4", "5"]);
}

#[test]
fn tail() {
    let test_input = "1 2 3 4 ";
    let tokens: Vec<_> = TokenIterator::new(test_input, " ").collect();

    assert_eq!(tokens, vec!["1", "2", "3", "4", ""]);
}
}
1. Basic TokenIterator implementation
Implement TokenIterator as specified above.
After you are done, one should be able to use the TokenIterator such as:
fn main() {
    let iterator = TokenIterator::new("My name is, chka-chka, Slim Shady", " ");

    for word in iterator {
        println!("{}", word);
    }

    // Output:
    //
    // My
    // name
    // is,
    // chka-chka,
    // Slim
    // Shady
}
2. Char delimiters
Let's make our iterator more flexible by allowing for more flexible delimiters.
Create a trait named Delimiter with the following definition:
#![allow(unused)]
fn main() {
pub trait Delimiter {
    fn find_next(&self, source_string: &str) -> Option<(usize, usize)>;
}
}
Where &self is the delimiter. The Result should be the beginning and end index of the delimiter within
the string, or None if delimiter is not found in the string.
Implement it for both &str and char and modify your TokenIterator to use
accordingly.
Afterwards, you should be able to do this:
fn main() {
    let iterator = TokenIterator::new("My name is, chka-chka, Slim Shady", ' '); // <- CHAR here

    for word in iterator {
        println!("{}", word);
    }

    // Output:
    //
    // My
    // name
    // is,
    // chka-chka,
    // Slim
    // Shady
}
4. until_char()
Next, create an until_char() free-standing function with the following declaration:
#![allow(unused)]
fn main() {
/// Return slice from beginning until char `c` is encountered or the entire string slice
pub fn until_char(s: &str, c: char) -> &'_ str;
}
And implement it accordingly using your TokenIterator, then write a test that verifies its usage.
5. Extend str
Let's finish this by providing a better syntax for creating a token iterator.
Create a trait called TokensExt, which contains the method tokens(&self, delim) that creates
a new TokenIterator from &self, then implement it for &str, so that we can do this:
fn main() {
    for word in "My name is, chka-chka, Slim Shady".tokens(' ') {
        println!("{}", word);
    }
}
6. End product
In the end you should be left with a well prepared project, that has the following:
- implementation of the TokenIterator itself
- usable and safe Public API
- appropriately documented code
- tests
- clean git history that does not contain fix-ups, merge commits or malformed/misformatted commits
Your Rust code should be formatted by rustfmt / cargo fmt and should produce no
warnings when built.
Traits in Rust 1: Traits of our own
Disclaimer: This section assumes you have at least read the chapter about ownership and string slices
If not, check it out, and also make sure you get some hands-on experience with Rust
Alternatively, for hands-on experience you can also try writing a grep clone:
- program accepts two parameters,
file pathandstring- the file in question is read line by line
- print to standard output every line that contains string
Your program should gracefully handle errors and invalid input, ie. don't do things that can panic, don't use
.unwrap()or.expect(). The grep clone should not crash if parameters are missing, file does not exist, or is unreadable as text.Design your program in such a way that you can write some tests.
Prerequisites
- All of the previous chapter
- Rust modules
- Tuples
- .expect() and .unwrap()
- Generic / trait bound syntax
One of the biggest culture shocks when first getting into Rust is its approach to Object-Oriented Programming and its memory management model.
Rust follows a (mostly)-lexical [RAII-like] memory management model, wherein declaration means allocation and value going out of scope means de-allocation. No garbage collector is involved, which allows greater control over memory and makes Rust more suitable in embedded and performance-critical applications.
To read up on Rust's memory management, check out the relevant section of Ownership and string slices.
According to Statista, some of the most widely used programming languages are:
- JavaScript
- Python
- Java
- TypeScript
- C#
- C++
- PHP (yuck :))
These all have object-oriented programming on basis of types, most often they also use a class-based inheritance model. They are built from ground up around this paradigm and foster idioms specific to it.
Rust teeters on the edge of OOP and Functional Programming, and so it uses a different model.
Object-oriented features in Rust
OOP in Rust is one of the biggest culture shocks newcomers experience:
- Rust does not have classes
- Rust does not have type inheritance
Visibility and privacy
Just like you might be used to from your other languages, Rust has methods and visibility modifiers to facilitate encapsulation and information hiding.
For instance:
#![allow(unused)]
fn main() {
#![allow(unused_code)]
pub fn public_function() {
    println!("Available from everywhere");
}

fn private_function() {
    println!("Only accessible by this module and its descendants");
}

pub(crate) my_public_in_crate_function

/// This is roughly equivalent to the following file structure
///
/// my_module.rs
/// my_module/
///     - child_module.rs
///     - child_module/
///         - grand_child_module.rs
///     - other_child.rs
mod my_module {
    pub mod child_module {
        pub mod grand_child_module {
            pub(super) fn public_in_grand_child_() {
                println!("This function is only accessible from this module (and its descendants) and its parent (super)");
            }
            pub(self) fn public_in_self() {
                println!("Only accessible by this module and its descendants, effectively same as private");
            }
            pub(in crate::my_module) fn public_in_my_module() {
                println!("Public from my_module onwards");
            }
        }
    }
    pub mod other_child {
        pub(super) fn public_in_my_module() {
            println!("Accessible from my_module onwards");
        }
    }
}
}
As you can see, Rust allows a fair a mount of controls over visibility and privacy. You can read up on it more here: https://doc.rust-lang.org/reference/visibility-and-privacy.html
Methods
Methods are split from data via an implementation block:
#![allow(unused)]
fn main() {
pub struct AveragedCollection {
    list: Vec<i32>,
    average: f64,
}

impl AveragedCollection {
    pub fn add(&mut self, value: i32) {
        self.list.push(value);
        self.update_average();
    }

    pub fn remove(&mut self) -> Option<i32> {
        let result = self.list.pop();
        match result {
            Some(value) => {
                self.update_average();
                Some(value)
            }
            None => None,
        }
    }

    pub fn average(&self) -> f64 {
        self.average
    }

    fn update_average(&mut self) {
        let total: i32 = self.list.iter().sum();
        self.average = total as f64 / self.list.len() as f64;
    }
}
}
(taken from rust book [17.2])
User-defined types (structs and enums)
In place of classes, Rust's user-defined types fall into these two categories:
- structures - can be C-like structs or tuples. Rust also allows empty, zero-sized structs (also called unit structs) as a useful abstraction for working with traits
- enums - essentially algebraic data types you might be used to from Haskell / ML / OCaml / Scala and so on. In Rust, they are implemented as tagged unions
BTW: Rust also supports plain C-like unions, however, these are very rarely used, and their handling requires unsafe code, since the compiler can't always guarantee you select the correct union member. (Compare with enums where the valid union member is stored in the tag, so it is always known to the compiler)
There are certain conventions observed when working with structs and enums, which you can read about here:
Traits
The heavy lifter of Rust's OOP story are not structs or enums, but rather traits. A trait describes common behavior, in less abstract terms, it is essentially a set of methods a type is expected to provide, if it implements (satisfies) the trait. There is no such thing as duck typing in Rust, so you have to pledge allegiance to a trait manually:
#![allow(unused)]
fn main() {
trait Quack {
    fn quack(&self);
}

struct Duck;

// Duck implements Quack
// it has the trait method quack()
impl Quack for Duck {
    fn quack(&self) {
        println!("quack");
    }
}

struct Human;

// Human does not implement Quack
// it has a **type** method quack()
// but that is no substitute for the real
// art
impl Human {
    fn quack(&self) {
        println!("I quack, therefore I am");
    }
}
}
TIP: A trait may also have zero methods. We refer to these as marker traits. Several of these are found in the compiler and they are usually ascribed special meaning, for example, the std::marker::Copy trait enables copy semantics for a type, as mentioned in the chapter about ownership
The standard library has many traits in it, some of which
are special, and describe specific behavior, such as Send
and Sync, which denote the safety (or lack thereof) of
moving and accessing type between threads, or Copy, which
switches the semantics for a type from move to copy semantics
(e.g. all primitive types are Copy).
You can see some of the commonly used traits in the following links:
- https://stevedonovan.github.io/rustifications/2018/09/08/common-rust-traits.html
- https://blog.rust-lang.org/2015/05/11/traits.html
As especially the second link elaborates, traits are the cornerstone of Rust generics, for which Rust provides two models, static and dynamic dispatch.
Static dispatch
Here is how we can use our quackers with static
dispatch by expanding on our previous example with a new duck and a generic
function called ducks_say():
trait Quack {
    fn quack(&self);
}

struct Duck;

// Duck implements Quack
// it has the trait method quack()
impl Quack for Duck {
    fn quack(&self) {
        println!("quack");
    }
}

struct Human;

// Human does not implement Quack
// it has a **type** method quack()
// but that is no substitute for the real
// art
impl Human {
    fn quack(&self) {
        println!("I quack, therefore I am");
    }
}
struct FormalDuck {
    name: String
}

impl FormalDuck {
    // create a new duck
    fn new(name: String) -> Self {
        Self {
            name
        }
    }
}

impl Quack for FormalDuck {
    fn quack(&self) {
        println!(
            "Good evening, ladies and gentlemen, my name is {}. Without further ado: quack",
            self.name
        );
    }
}

// You could also write
// fn ducks_say<T>(quacker: T)
// where
//     T: Quack
//
// Longer trait bounds are generally more suitable in the where block for readability reasons
fn ducks_say<T: Quack>(quacker: T) {
    quacker.quack()
}
// the T: Trait (+ Othertrait...)* syntax is called a trait bound

fn main() {
    let duck = Duck;
    let human = Human;
    let formal = FormalDuck::new("Ernesto".to_string());

    ducks_say(duck);
    //ducks_say(human); <-- this won't compile because Human does not implement Quack
    ducks_say(formal);
}
Functions that don't specify any trait bounds are seldom useful and you'll rarely see them in Rust.
However, you might be surprised to learn that this will not compile:
fn no_param<T>(_: T) {}

fn main() {
    let my_str = "Hello, Braiins!";

    no_param(*my_str); // calling no_params<str>
}
If you look at the error clicking Run on this example prints, you will see ?Sized
mentioned.
The trick here is that
even generic parameters without any written trait bounds have a hidden trait bound, which
is T: Sized, where Sized means "This type's size is known at compile time".
Rust has support for dynamically-sized types, but if you want to work with them
directly, you need to opt out of this implicit trait bound with the T: ?Sized syntax.
This syntax and behavior is at the time of this writing unique for Sized trait.
The benefit of static dispatch is that it is a form of generics which utilizes monomorphization. This means that a method is generated for each type configuration required, and no such thing as these generics exists at runtime. This is a pathway to other optimizations, as after monomorphization, you only have ordinary static code. Static dispatch tends to be fast, but increases binary sizes.
Generic param bounds
Keep in mind that trait bounds can be added to generic params on types, generic params of traits and traits themselves. For traits, we call the traits specified in the bound supertraits. For example:
#![allow(unused)]
fn main() {
use std::path::Path;
use std::fs::File;
use std::io::Write; // <- to be able to use methods from a trait
                    //    implementations, you have to import it
                    //    many traits in standard lib are imported
                    //    automatically
use std::fmt::Display;

// Display is the supertrait of Saveable
// Saveable can only be implemented on types which implement Display
// Trait ToString is implemented for every type T such that T: Display
trait Saveable: Display {
    // try to save the type implementing this to a type specified by Path
    fn save<P>(&self, path: P) -> std::io::Result<()>
    where
        P: AsRef<Path>  // accept any type that we can infallibly convert to &Path
    {
        let mut file = File::create(path.as_ref())?;
        writeln!(file, "{}", self.to_string())?;

        Ok(())
    }
}
}
Dynamic dispatch
The other option is dynamic dispatch. Dynamic dispatch represents a model of generics you might be more familiar with from languages like C#, Java and so on. There is no monomorphization being done and data is instead passed as a pair of virtual method table (also known as dispatch table) and pointer to data.
While this is in other languages often completely behind the scenes, Rust requires you to explicitly
represent this by actually passing your data behind a pointer of your choosing
In most cases, a simple borrow reference is enough. Here is an alternative implementation
of ducks_say():
trait Quack {
    fn quack(&self);
}

struct Duck;

// Duck implements Quack
// it has the trait method quack()
impl Quack for Duck {
    fn quack(&self) {
        println!("quack");
    }
}

struct Human;

// Human does not implement Quack
// it has a **type** method quack()
// but that is no substitute for the real
// art
impl Human {
    fn quack(&self) {
        println!("I quack, therefore I am");
    }
}
struct FormalDuck {
   name: String
}

impl FormalDuck {
   // create a new duck
   fn new(name: String) -> Self {
       Self {
           name
       }
   }
}

impl Quack for FormalDuck {
   fn quack(&self) {
       println!(
           "Good evening, ladies and gentlemen, my name is {}. Without further ado: quack",
           self.name
       );
   }
}

// dynamically dispatching ducks_say()
fn ducks_say(quacker: &dyn Quack) {
    quacker.quack()
}

fn main() {
    let duck = Duck;
    let formal = FormalDuck::new("Ernesto".to_string());

    ducks_say(&duck);
    ducks_say(&formal);
}
When data is passed through dynamic dispatch, we call objects
of the type dyn Trait trait objects. Trait objects have
no known size, so they have to be behind a pointer.
The benefit of dynamic dispatch is that it makes for smaller binaries, and is, well, more dynamic. Since the actual information of the type is lost, you can re-assign a trait object variable to a trait object made from a different type, or you can use trait objects to model heterogeneous collections.
TIP: If you ever need to store a trait object somewhere, consider using
a smart pointer such as Box
(plain heap-stored pointer)
or Rc (reference-counted heap-stored single-threaded pointer).
We have already seen an example of polymorphism in Rust. On a more theoretical level, Rust uses, instead of subclasses and inheritance, generics over types with certain trait bounds, this model is called bounded parametric polymorphism.
To learn more about OOP and traits in Rust, check out the following links:
- https://doc.rust-lang.org/book/ch17-01-what-is-oo.html
- https://web.mit.edu/rust-lang_v1.25/arch/amd64_ubuntu1404/share/doc/rust/html/book/second-edition/ch19-03-advanced-traits.html
- https://blog.logrocket.com/rust-traits-a-deep-dive/
The Task: Sequence generators
You are likely to meet many numeric sequences. Common ones you might encounter can be the powers of two, the fibbonaci series, factorials, or for example, the triangular numbers.
For this project, it will be your task to implement a trait called Sequence with the following methods:
n(), returning the number of the element in the sequence, zero-indexed (ie. for first element return 0, second return 1, third return 2)generate() -> Option<u128>, returning the next element in the sequence, advancing it. It should returnNoneif generating the next element would overflowu128reset(), resetting the sequence
Consider which ones of these should borrow self mutably and which immutably.
Next, create types and implement Sequence for the following sequences:
- fibbonaci
- factorial
- powers of two
- triangular numbers
Also add a new method for every of these types which properly instantiates the structures.
When you are done, it should be possible to put an instance of any of these types as parameter into the following function:
#![allow(unused)]
fn main() {
fn first_five<S>(s: &mut S) -> (u128, u128, u128, u128, u128)
where
    S: Sequence
{
    if let (Some(first), Some(second), Some(third), Some(fourth), Some(fifth)) = (s.generate(), s.generate(), s.generate(), s.generate(), s.generate()) {
        (first, second, third, fourth, fifth)
    } else {
        panic!("All of the sequences should be able to produce five elements")
    }
}
}
Use this function to construct a test verifying your sequences against the correct outputs:
- fibbonaci:
(0, 1, 1, 2, 3) - factorial:
(1, 2, 6, 24, 120) - powers of two:
(1, 2, 4, 8, 16) - triangular numbers:
(1, 3, 6, 10, 15)
End product
In the end you should be left with a well prepared project, that has the following:
- documented code explaining your reasoning where it isn't self-evident
- optionally tests
- and an example or two where applicable
- clean git history that does not contain fix-ups, merge commits or malformed/misformatted commits
Your Rust code should be formatted by rustfmt / cargo fmt and should produce no
warnings when built. It should also work on stable Rust and follow the Braiins Standard
Traits in Rust 2: Foreign Traits
Disclaimer: This section assumes you have some familiarity with Rust, and that you have already tried writing some code of your own.
If you haven't or if you are out of inspiration, try writing a grep clone:
- program accepts two parameters,
file pathandstring- the file in question is read line by line
- print to standard output every line that contains string
Your program should gracefully handle errors and invalid input, ie. don't do things that can panic, don't use
.unwrap()or.expect(). The grep clone should not crash if parameters are missing, file does not exist, or is unreadable as text.Design your program in such a way that you can write some tests.
Prerequisites
- All of the previous chapter
- Rust modules
- Tuples
- .expect() and .unwrap()
- Generic / trait bound syntax
In Part 1 of this chapter, we implemented a list. However, well written libraries do not have types that exist in a vacuum, we need to enhance our previous creation to ensure it integrates well with the rust standard library and, by extension, foreign code.
As we mentioned earlier, traits are the cornerstone of Rust development. It is only natural that many things which are in other languages represented by attributes, pragmas or type inheritance are represented by traits in Rust.
This also includes common syntactic sugars such as:
- Indexing
- Operator overloading
- Deep copy-ing
- Comparisons
- Callability (think
functorsfrom C++) - Printability
And important type qualities and behaviors:
- Conversions
- Dereferencing
- Copy vs Move semantics and destructors
- Compatibility as an iterator and by extension usage in loops
- Presence of default value
- Thread-safety
- Constant sizing (ie "Is this a statically or dynamically sized type?")
Some of these more low-level / intrinsic traits are implemented automatically
by every type if applicable, and have a more descriptive nature useful for
restricting which types can be put into which generic parameter place, and
implementing them manually (which generally requires unsafe code if it is possible at all)
will not alter the type's behavior in any way but may introduce the possibility of
blowing your leg off in a spectacular manner.
Most notable of these auto-traits are Sized (this type is statically sized, TIP: pointer to every type is sized),
Send (this type can be sent/moved to another thread), Sync (this type can be shared between threads).
#![allow(unused)]
fn main() {
type Priority = ();
type JobId = usize;
fn send_to_worker<T>(_: T, _: Priority) -> JobId { 0 }

trait Job {
    // trait for job objects which can be executed by worker threads
    fn is_completed(&self) -> bool;
    // other items here...
}

pub fn safety_first<T>(job: T, prio: Priority) -> Result<JobId, String>
where
    T: Job + Send + Sync
{
    if !job.is_completed() {
        let job_id = send_to_worker(job, prio);
        Ok(job_id)
    } else {
        // Please don't use strings as error in production 🙈
        Err("Cannot start a job which is already completed!".into())
    }
}
}
Derivable traits
To eliminate boilerplate and work needed to implement some of these traits on these types,
it is possible to use the #[derive(...)] attribute on structures to make Rust create implementations
for you automatically.
#![allow(unused)]

fn main() {
#[derive(Debug, Default, Eq, PartialEq, Ord, PartialOrd, Copy, Hash)]
struct MyUInt(usize);
}
By deriving all of these traits, MyUInt is now a tuple-struct type with a default value
(MyUInt::default() == MyUInt(usize::default()) == MyUInt(0)), which can be printed with the
debug format ("{:?}"), can be compared for equality and for order, and those comparisons are definitive,
is copied automatically wherever required and can be used as an index for HashMap etc.
Implementing these by hand hand would probably add a couple dozen to over a hundred lines.
TIP: Only derive traits you need to make sure you don't let users do anything with your type that you
don't want them to do. However, it is useful - for debugging reasons - to derive (or implement) Debug
on every type.
NOTE: the struct ANewType(OtherType) is seen commonly Rust. Called the newtype pattern, it is a
means to implement traits from Dependency A over types from Dependency B. You can't directly
do a impl dep_a::Trait for dep_b::Type because that would violate orphan instance rules as elaborated
on in chapter Advanced Rust traits.
Short foray into the world of macros
You might or might not be surprised to learn that the derives are actually macros in disguise.
If you are coming from languages other than C, C++, Nim, or Lisp, you may not be familiar with the concept of a macro. A macro is a form of meta-programming utilizing input mapping. In layman's terms, a macro transforms tokens into other tokens, that is, code into other code.
Macros work solely on the level of source code and are not aware about semantics of the code they process, this is what makes them different from for example generics, templates or reflection.
A macro may or may not parse the input it processes, and based on its input produces more source code. Nowadays, macros are used for things such as reducing boilerplate, implementing Domain-Specific-Languages (for example HTML templates), imitating functions, or adding new syntax to a language.
Rust has support for two types of macros:
- declarative - these utilize token patterns and resemble a
match. They are declared with themacro_rules!keyword and are considerably simpler. - procedural - these are either functions or programs which programmatically process streams of tokens, generating new token streams. They are far more powerful, at the cost of increased complexity
The community sometimes uses abbreviated terms decl macro and proc macro.
Furthermore, macros fall into three categories:
- Aforementioned
#[derive]macros - Attribute-like macros that define custom attributes on any item, written
#[my_attribute] - Function-like macros that look like function calls but operate on tokens specified as their arguments,
written
my_macro!(),my_macro![]ormy_macro!{}
// This is a simple macro named `say_hello`.
macro_rules! say_hello {
    // `()` indicates that the macro takes no argument.
    () => {
        // The macro will expand into the contents of this block.
        println!("Hello!");
    };
}

fn main() {
    // This call will expand into `println!("Hello");`
    say_hello!()
}
example taken from https://doc.rust-lang.org/rust-by-example/macros.html
NOTE: For function-like macros, brackets are freely interchangeable. Traditionally,
one uses round brackets / parentheses () for macros that work like a function call,
square brackets [] for macros that produce collections and curly brackets / braces {}
for macros that produce items or introduce new syntax, but nothing is stopping you from
doing something like this:
fn main() {
    let _ = vec!(0, 1, 2);
    println!["hello, {} and {}", "Bob", "Anne"];
    let _ = line! {}; // returns line number in file
}
The task: Integrating the previous project
Much like this chapter is a continuation of the first chapter about traits, this project builds on top of the previous one. If you haven't done it yet, you should, they are intrinsically linked and it shouldn't take too long.
This time, it will be your task to implement foreign traits.
Step 1: Iterator
The most handy thing we can do for starters is to implement the Iterator trait for our sequences.
Look at the trait here:
https://doc.rust-lang.org/std/iter/trait.Iterator.html
If you look closely, you see you only need to provide two things:
- the
Itemassociated type - the
next()method
Implement Iterator for all Sequence types.
You can use the following helper struct and trait:
#![allow(unused)]
fn main() {
struct SequenceIter<'a, T: Sequence>(&'a mut T);

trait SequenceExt<'a>
where
    Self: Sequence,
{
    fn iter(&'a mut self) -> SequenceIter<'a, Self>
    where
        Self: Sized;
}
}
Step 2: Add
What if we wanted to combine sequences to create new sequences? Well, it would be cool if we could do that
using regular operators, such as +.
Let's implement just that.
https://doc.rust-lang.org/std/ops/trait.Add.html
Implement this trait for any combination of Sequence types, such that:
- Any two
Sequencescan be added - Adding two sequences will produce a sequence of type
Combined, which returns elements from one sequence added up with elements from second sequence - Both sequences should be reset
- Calling
.reset()on the combined sequence should reset both sequences - If one sequence would start returning
None, the combinedSequenceshould also return one
Depending on when you are writing this, you might have to add an Add implementation for each left-hand type (ie. "impl for Fibonacci + Any Sequence"). That would be five times (impl Add for Combined as well). The implementation of combined should be valid for any combination of Rhs, and the two sequences contained in the Combined.
End product
In the end you should be left with a well prepared project, that has the following:
- documented code explaining your reasoning where it isn't self-evident
- optionally tests
- and an example or two where applicable
- clean git history that does not contain fix-ups, merge commits or malformed/misformatted commits
Your Rust code should be formatted by rustfmt / cargo fmt and should produce no
warnings when built. It should also work on stable Rust and follow the Braiins Standard
Traits in-depth
Prerequisites
- All of the previous chapter
- constants
- Debug and Display
Anytrait- Brief look at what Arc and Rc is (more in-depth in next chapter)
Traits are the cornerstone of Rust programming. Let's take a more in-depth look.
A trait describes an abstract behavior that types can provide, you can compare it with an interface in different programming languages.
In Rust, we call the members of a trait associated items and they come in three forms:
- associated types
- associated functions (also called trait methods)
- associated constants
Here is an example of a simple trait with all of these:
#![allow(unused)]
fn main() {
// Examples of associated trait items with and without definitions.
trait Example {
    const CONST_NO_DEFAULT: i32;
    const CONST_WITH_DEFAULT: i32 = 99;
    type TypeNoDefault;
    fn method_without_default(&self);
    fn method_with_default(&self) {}
}
}
As you can see, associated items can have a default, this is commonly used as a pattern, where the end programmer has to only provide a small number of trait methods and gets the benefit of a number of methods that are implemented using the ones they had to provide.
The most common example of this is the Iterator trait, which only requires an implementation
of fn next(&mut self) -> Option<Self::Item>; but in return provides (at the time of this writing) 69
other methods.
Given Rust's approach towards Object-Oriented programming being one that strongly favors composition over inheritance, it is seldom seen that a large trait inheritance hierarchy would be built, however, Rust still provides facilities for inheritance in the form of supertraits.
Supertraits and inheritance
The supertrait syntax allows defining a trait as being a superset of another trait, for example:
#![allow(unused)]
fn main() {
trait Person {
    fn name(&self) -> String;
}

// Person is a supertrait of Student.
// Implementing Student requires you to also impl Person.
trait Student: Person {
    fn university(&self) -> String;
}

trait Programmer {
    fn fav_language(&self) -> String;
}

// CompSciStudent (computer science student) is a subtrait of both Programmer
// and Student. Implementing CompSciStudent requires you to impl both supertraits.
trait CompSciStudent: Programmer + Student {
    fn git_username(&self) -> String;
}

fn comp_sci_student_greeting(student: &dyn CompSciStudent) -> String {
    format!(
        "My name is {} and I attend {}. My favorite language is {}. My Git username is {}",
        student.name(),
        student.university(),
        student.fav_language(),
        student.git_username()
    )
}
}
example taken from https://doc.rust-lang.org/rust-by-example/trait/supertraits.html
In trait implementations of subtraits, you can use all trait associated items of all supertraits.
This also applies to default implementations in trait {} block.
#![allow(unused)]
fn main() {
use std::fmt::Display;

// can only be implemented for types implementing debug
trait MyTrait: Display {
    const NAME: String;

    fn print_self(&self) {
        // I can do this because I know Self: Display holds
        println!("{} = {}", Self::NAME, &self);
    }
}
}
Although it is seldom used in Rust, supertraits can be used to model an inheritance hierarchy similar to what you would use classes for in languages like C# or Java. However, the preferred approach in Rust is to use OOP composition over OOP inheritance.
Instead of modeling a type (or in Rust's case trait) hierarchy, you create traits for behaviors and
in applicable parameters or generic struct fields you insert appropriate trait bounds which list all
required traits such as T: Renderable + TakesInput + CanMove.
This composition pattern is utilized all over Rust code, including game development where it meshes nicely with the currently popular ECS - Entity Component Model architecture.
Bounds and type parameters
Further continuing on the topic of trait bounds, just like structs and functions (and by extension methods), traits can have parameters and trait bounds.
These can be used for two things:
- to facilitate providing multiple non-conflicting implementations of a trait on a single type, each with different parameters
- to model relationships between types and traits
Rust is fairly lax with trait bounds (provided you don't create a bound that isn't recursive and unresolvable), so you can do even things like this, which do not make much sense on first sight:
#![allow(unused)]
fn main() {
use std::fmt::Debug;

trait Test
where
    i32: Debug
{}
}
This is a constant bound, it is either always true or always false, possibly rendering the entire trait useless. While this may seem non-sensical, it is sometimes used in macros.
Trait bounds can make requirements on implemented type as well by referencing Self in terms of different traits,
such as:
#![allow(unused)]
fn main() {
trait Example
where
    <Self::AssociatedType as Trait2>::Trait2AssociatedType: Add<Rhs = <Self as Trait3>::Trait3AssociatedType>
{
    type AssociatedType;
}
}
Which can be read as following:
It holds that I have an associated type
AssociatedTypewhich implementsTrait2such that the associated typeTrait2AssociatedTypeof said implementation satisfies the traitAddwhere where theRhsassociated type equals the associated typeTrait3AssociatedTypefrom theTrait3implementation onSelf(sort of implicitly creating a requirement thatSelf: Trait3)
So, as you can see, trait bounds can be quite extensive.
Orphan instances and trait coherence
In Rust, trait implementations must uphold trait coherence. In layman's terms, coherence is a property that there exists at most one implementation of a trait for any given type.
Languages with features like traits must either:
- Enforce coherence by refusing to compile programs with conflicting implementations
- Or embrace incoherence and give programmers a way to manually choose an implementation in case of a conflict
Rust chooses the former option.
However, you may have seen something like this in Rust nightly libraries:
#![allow(unused)]
fn main() {
#![feature(min_specialization)]
trait TestTrait<T> {}
impl<T, I: Iterator<Item=T>> TestTrait<T> for I {/* default impl */ }
impl<T> TestTrait<T> for std::vec::IntoIter<T> { /* specialized impl */ }
}
This is called specialization: for a given type, only the more specialized implementation is considered. Specialization is however to a large degree a nightly-only feature (broader specialization is actually used on a number of places in the standard library, but not available to end programmers outside nightly, only a very limited subset of specialization is merged to stable).
Overlapping is also forbidden, you can't write impl<T: Trait1> Trait for T and impl<T: Trait2> Trait for T because
T: Trait1 + Trait2 might exist and satisfies both trait bounds and that would lead to conflicting implementations.
Trait coherence is related to another concept, and that is orphan instances.
An orphan instance is a trait implementation that does not have an tangible enough link to your crate. In essence,
you cannot create an impl where both the trait and the type are defined outside your crate.
#![allow(unused)]
fn main() {
// You can't do this
use dependency::CoolTrait;

impl CoolTrait for String {
    // invalid, neither String nor CoolTrait comes from your crate,
    // so when your crate (a library) would disappear from the dependency graph of a project
    // there would be a change to the type system that does not have a straightforward explanation
    // ("Why did removing Dep 3 change how Dep 1 and 2 behave when neither of them depend on Dep 3?")
}

// more insidious example
use dependency::CoolTrait;

trait MyTrait {

}

impl<T> Coolrait for T
where
    T: MyTrait
{
    // This might seem like it has
    // a tangible link to your crate,
    // however, it is still an orphan instance,
    // as T might come from a foreign crate
    // and:
    //
    // for Dep 1 which contains T,
    //     Dep 2 which contains CoolTrait,
    //     Dep 3 which contains MyTrait and this blanket implementation
    //
    // Another dependency might have another unclear behavior change upon removing
    // Dep 3 when it only works with Dep 1 and 2 to work generically with types implementing CoolTrait
}
}
You are much more likely to run into a variation on the second example once you start paying attention to the issue, however as long as you remember that you shouldn't try to tie foreign traits and foreign types if there is no concrete type of yours involved, you should be fine.
The precise so-called "orphan rules" are rather complex, but if you try to avoid the above, you will generally not run into them.
At the time of this writing, it appears the most precise description of the current orphan rules is in RFC 2451, feel free to check it out.
Object safety and trait objects
As stated in The Case of the Strange Linked List, Rust also supports dynamic dispatch by way of trait objects.
A trait object is an opaque value of a type that implements a set of one or more traits. The set must be made of an object-safe base trait plus any number of auto traits.
For brevity, think of auto traits as memory-safety describing marker (ie. without associated items) traits from the standard library, these are:
SyncSendUnpinUnwindSafeRefUnwindSafe
(You can think of Sized as an auto-trait as well, but it is actually not implemented like one)
The trait object opaque value is made up of a fat pointer, which contains both a pointer to the underlying type instance and a table of virtual functions lookup in which leads to the corresponding trait method implementations.
This feature makes comparing trait object tricky, as the same trait object might have different vtable pointers in different parts of code, across codegen unit boundary.
The trick to comparison is to cast to raw pointer of any type to drop the vtable part of the fat pointer:
#![allow(unused)]
fn main() {
&*trait_obj as *const _ as *const ()
}
and that can then be compared and produce sane results.
You can see examples of trait objects in The Case of the Strange Linked List 1.
A couple paragraphs back, it was mentioned that for a trait to be a valid trait-object producing candidate, it must be object-safe.
The following are the conditions for object safety:
- All supertraits also must be object safe.
- Sized must not be a supertrait. In other words, it must not require Self: Sized.
- It must not have any associated constants.
- All associated functions must either be dispatchable from a trait object or be explicitly non-dispatchable:
- Dispatchable functions require:
- Not have any type parameters (although lifetime parameters are allowed),
- Be a method that does not use Self except in the type of the receiver.
- Have a receiver with one of the following types:
&Self(i.e.&self)&mut Self(i.e&mut self)Box<Self>Rc<Self>Arc<Self>Pin<P>where P is one of the types above
- Does not have a
where Self: Sizedbound (receiver type of Self (i.e. self) implies this).
- Explicitly non-dispatchable functions require:
- Have a
where Self: Sizedbound (receiver type of Self (i.e. self) implies this).
- Have a
- Dispatchable functions require:
Sizedness
As you might have already noticed at this point, in Rust, we speak about types that are sized and unsized.
Unsized types are generally seen behind pointers, you may have encountered str, Path, or trait objects.
There is one thing to be known: &SizedType is not the same as &UnsizedType. In the latter case, the pointer
becomes a so-called fat pointer and it contains not only the in-memory location of the instance of the
type, but also its size.
You can verify this quickly by using the mem::size_of::<T>() function in Rust.i
use std::mem;

fn main() {
    println!("size of string pointer: {}", mem::size_of::<&String>());
    println!("size of str pointer: {}", mem::size_of::<&str>());
}
If all goes well, something like this should be the result:
size of string pointer: 8
size of str pointer: 16
A common mistake people make is thinking that pointers to arrays are fat pointers (because pointers to slices are). However, we don't need to store the size of an array in a pointer, since it is constant and always known. There is no such thing in Rust as a variable length array.
If you are writing generic bounds, they expect Sized types by default (meaning either Sized types, or Unsized types behind a pointer).
However, if you want to accept them also, you can do it by manually opting out of the where: Sized thread bound.
#![allow(unused)]
fn main() {
fn my_function<T>(_: &T)
where
    T: ?Sized
{}
}
The question mark syntax is a special syntax that is currently only used with Sized.
The implicit Self type in a trait does not have this bound, although it can be added manually.
You can also use Sized in a supertrait:
#![allow(unused)]
fn main() {
trait MyTrait: Sized {}
}
This will make it impossible to ever construct a trait object of said trait with *any type, preventing the use of dynamic dispatch with this trait.
Implementing trait objects
You can implement methods on trait objects just like you can do it with structures. This comes in handy, if you want to do some things that are forbidden on object-safe traits, such as generic methods.
#![allow(unused)]
fn main() {
impl dyn Trait {
    fn my_generic<T>(&self, _: T) {}
}
}
This feature is heavily utilized by std::any::Any to provide its downcasting-to-concrete-type functionality.
The First Task: Table traits
Imagine the following scenario:
Your project uses a table internally, which is stored on disk, and a cache of the table.
The cache and the table share many features, in fact, they have to so that the cache description matches the table.
You need to uphold that for a given table type, a cache implementation matches the table implementations.
Do the following:
- Create a trait
Innerwith a further unspecified associated type - Create traits
TableandMemory, which both contain an associated type satisfyingInner - Create a trait
Cachewhich contains an associated type satisfyingTableand an associated type satisfyingMemory - Add a trait bound to
Cache(or perhaps its associated type(s)) such that the associated type inInnerofTableis the same as the associated type inInnerofMemory
Ensure your code is properly formatted, produces no warnings, works on stable Rust and follows the Braiins Standard
The Second Task: Super and subtrait casting in trait objects
Consider the following functions:
fn wants_super(arc: Arc<dyn SuperTrait>) {
    arc.hello();
}
fn wants_sub(arc: Arc<dyn SubTrait>) {
    wants_super(/* your code here */)
}

fn main() {
    wants_sub(Arc::new(MyStruct))
}
- Create
SuperTraitsuch thatfn hello(&self)prints something nice - Create
SubTraitsuch that you can cast it toSuperTrait - Implement the traits on a unit structure called
MyStruct
End product
In the end you should be left with a well prepared project, that has the following:
- documented code explaining your reasoning where it isn't self-evident
- optionally tests
- and an example or two where applicable
- clean git history that does not contain fix-ups, merge commits or malformed/misformatted commits
Your Rust code should be formatted by rustfmt / cargo fmt and should produce no
warnings when built.
Rust's Many Pointers
Prerequisites
Rust is a strange hybrid among programming languages in that it combines low-level features allowing a great degree of control over the memory layout of your program with functional features find in more high-level programming languages that generally don't worry themselves with the memory at all or other implementation details at cost of performance without becoming a behemoth like C++ has become in recent years.
A hallmark of lower level control in a programming language is that pointers are not abstracted away. If you are coming from C, you are likely familiar with plain pointers, if you used C++ in the past, you will know that there are many kinds of pointers.
Rust features both plain and smart pointers. Smart pointers either have extended functionality over plain pointers or carry semantics.
The Rust standard library and more broadly speaking, Rust ecosystem features a number of pointers. In this part, we will examine the common use cases of the built-in pointer types and smart pointers from the standard library.
If you happen to be unfamiliar with the concept of pointers, you can check out the Wikipedia or a relevant C tutorial section, these tend to explain the concept of pointers quite well.
Raw Pointers (*const T and *mut T)
The simplest pointers in Rust are the raw pointers. They
are roughly equivalent to C's pointers. In Rust, usage of these
pointers teeters on the edge of unsafe.
As a rule of thumb, you don't need to use the unsafe {} block to create them,
but you need it to be able to de-reference them.
This is because raw pointers are, as the name suggests, raw and simple, and are not subject to Rust's safety nets. A raw pointer does not have a lifetime, is not subject to the the borrow checker and thus can be a pathway to serious memory safety errors commonly found in C code.
#![allow(unused)]
fn main() {
let number: usize = 14;

// it is safe to create a raw pointer
// you generally do this by casting an appropriate borrow with the `as` keyword
let ptr: *const usize = &number as *const usize;

// however, dereferencing a raw pointer requires an unsafe block
unsafe {
    let number_from_ptr: usize = *ptr;
    println!("{}", number_from_ptr);
}
}
One should be wary when using raw pointers, as Rust does not prevent you from doing something like this:
#![allow(unused)]
fn main() {
let string: String = String::from("Morituri te salutant");
let ptr: *const String = &string as *const String;


drop(string); // string dropped and de-allocated here

// ptr is now a dangling pointer
// dereferencing it is UB and in the better case,
// will cause your program to crash
//
// also note that we have to cast to &String,
// unlike the previous example, where `usize: Copy + Clone`,
// we can't move out of a string pointer, as it is only Clone
unsafe {
    let string_from_ptr: &String = &*ptr;
    println!("{}", string_from_ptr);
}
}
Raw pointer usage
Usage of raw pointers in Rust is rather limited and they should be used as infrequently as possible. They do not provide safety guarantees and it is easy to make a mistake in their usage when meshed together with Rust's ownership system.
If it is necessary to use raw pointers, they should only be kept within structures, used as scarcely as possible and great care should be taken they do not cause undefined behavior or memory corruption.
Safe API should never expose raw pointers to the end-users of your code.
FFI
The primary domain of raw pointers is FFI (Foreign Function Interface),
or in other words, Rust's interop story. Other languages don't have
the notion of Rust's pointers and, thus, plain pointers remain the common
denominator when talking to foreign code.
Several precautions need to be taken:
- You should be wary how you handle owned values you pass raw pointers to around. Make sure no pointers exist when the owned pointee is
dropped. - Rust's standard types likely make little sense to foreign code. One must generally use C-specific types for which the standard library contains
bindings and/or zero-cost wrappers, namely for example
CStringandCStr(as mentioned in the chapter on ownership). There is also a maintained and blessed binding library forlibc, which provides type and other items' definitions from the C standard library. It is considered a poor practice to use even Rust's native primitive types instead oflibcones, as the Rust ones' memory representation may change on different platforms, rendering your code incompatible or prone to undefined behavior - Unsafe code should be properly wrapped, encapsulated and hopefully isolated from other parts of your project. Conventionally, bindings to C/C++ libraries are split into two or more crates with one of them actually binding to the library and produces raw unsafe bindings, whereas another provides a safe Rustic API on top of it.
Black magic
Raw pointers are also used for some advanced Rust tricks, such as exploiting implementation details or implementing code that circumvents Rust's ownership model in one way or another.
In Rust, you will find Raw pointers for instance in the implementations of Iterators or containers providing interior mutability. As
interior mutability allows you to mutate data inside a container that you only have access through &Container<T>, it is necessary to bypass
the fact that you can't mutate safe Rust data through an immutable borrow.
Several other techniques are used, but they are beyond the scope of this chapter. A particular case we encountered in the past is how to properly compare pointers to trait objects.
As shown in the object safety chapter of Advanced Rust Traits, the correct solution ended up being this:
#![allow(unused)]
fn main() {
&*trait_obj as *const _ as *const () == &*trait_obj2 as *const _ as *const ()
}
Borrows (&'a T and &'a mut T)
Borrow pointers are the most commonly encountered type of pointers in Rust. They are one of the cornerstones of Rust's ownership model, as explained in Ownership and string slices.
Each borrow has an explicit lifetime which is in safe Rust dictated by the value it points to. This is an upper limit however, as Rust allows (and often does) shortening of lifetimes.
#![allow(unused)]
fn main() {
fn foobar<'a, 'b>(x: &'a i32, _y: &'b i32) -> &'b i32
where
    'a: 'b
{
    x
}
}
This code example illustrates the shortening of lifetimes and roughly reads as
For a pair of lifetimes
'aand'b, such that'ais a lifetime at least as long as'b, take two parameters of types&'a i32and&'b i32and return the first the'areference shortened to lifetime&'bNotice that if you swap the lifetimes in thewhereclause, Rust will complain as lengthening a lifetime is not a safe operation.
Also keep in mind that lifetime on a reference only dictates the certain validity of said reference, not
when the pointee will be freed or moved. An owned value may well end up being thrown into mem::forget()
(which is a safe operation as memory leaks do not cause undefined behavior or memory corruption), never being freed at all.
Borrow usage
Borrows are used all over Rust code practically everywhere. As they are faster and less resource intensive (it costs to move a value and it may end up copying anyway), they should be preferred unless semantics of your program require something else.
It is also important to note that not all borrows are made equal. &T might, under the hood, either be
a raw pointer or a fat pointer. A fat pointer contains the size of the pointee and in Rust,
pointers to slices and trait objects are fat pointers.
In general, all dynamically-sized types (with the exception of interop extern types), such as Path,
are used behind fat pointers.
// sizes in bytes on my 64-bit system
fn main() {
    /*  8 */ println!("{}", std::mem::size_of::<&usize>());
    /*  8 */ println!("{}", std::mem::size_of::<&mut usize>());
    /* 16 */ println!("{}", std::mem::size_of::<&[usize]>());
    /* 16 */ println!("{}", std::mem::size_of::<&dyn std::fmt::Display>());
    /* 16 */ println!("{}", std::mem::size_of::<&std::path::Path>());
}
Boxes (Box<T>)
Boxes are the first actual smart pointer type encountered in Rust. A box is a pointer
type for heap allocation. Whereas &T can point anywhere, and more often than not points
to stack, as that is the default for Rust allocations, a Box is definitely on the heap.
Box is owned (as you can see, its - although simplified - declaration in the heading does not contain a generic lifetime parameter), which makes it an ergonomic means of storage for when you do not want to mess with lifetimes and the little extra cost is alright.
Box usage
This is probably the most commonly used pointer types right after borrows. In general, use it wherever you need heap allocation or lifetime magic goes over your head. However, a couple use cases stand out.
Large objects
As Rust by default puts everything on the stack, Box is the simplest suitable means of storage
for large objects, such as very large arrays.
This won't work on pretty much any system unless you have increased your system's stack size to a very high value:
fn main() {
    // 1024 * 1024 * 8 bytes
    let _stack_be_gone_ = [0u64; 1024 * 1024];
}
The previous code example will blow your stack, and this might seem fine:
fn main() {
    // 1024 * 1024 * 8 bytes
    let _stack_be_gone_ = Box::new([0u64; 1024 * 1024]);
}
However, the result will be the same, as what this does is create a big array on stack, then move it into the box.
The correct solution is rather clunky, and requires some unsafe code:
#![feature(iter_intersperse)]
// const generics come to the rescue!
fn boxed_array<T: Copy, const N: usize>(val: T) -> Box<[T; N]> {
    // first, we need to create an equal Vec, and extract it into a boxed slice, ie. Box<[T]>
    let boxed_slice = vec![val; N].into_boxed_slice();
    // by casting it to a raw pointer, we can then retype it to include the size of the array
    let ptr = Box::into_raw(boxed_slice) as *mut [T; N];
    // of course, creating a box from a raw pointer requires unsafe
    unsafe { Box::from_raw(ptr) }
}

fn main() {
    let heap_chungus: Box<[u64; 1024 * 1024]> = boxed_array(0);
   heap_chungus
       .chunks(1024)
       .map(|row| row
               .iter()
               .map(|n| char::from_digit(*n as u32, 10).unwrap())
               .intersperse(' ')
               .collect::<String>())
       .enumerate()
       .for_each(|(i, line)| println!("{:4}: {}", i, line));
}
Owned trait objects
In the chapter on advanced traits, we took a look at trait objects,
however, only under a borrow pointer as &dyn Trait. That is a very lightweight solution
and comes in handy, if we want to keep the original object around as a concrete object.
Other times, however, we only care about the trait qualities of a particular object, and
Box<dyn Trait>, being an owned value is the most simplest solution.
This can for example be used to have a queue of commands, stored as a vector of trait objects.
use std::fmt::Display;

fn main() {
    // a vec of anything printable really
    let mut v: Vec<Box<dyn Display>> = vec![];

    v.push(Box::new(8));
    v.push(Box::new('c'));
    v.push(Box::new("Hello Braiins"));
    v.push(Box::new(false));
    v.push(Box::new(3.1415));

    for printable in v {
        println!("{}", printable);
    }
}
A boxed trait object is handy for building owned heterogenic collections!
Efficient static length string and collection storage
This is a more niche use-case than the previous ones, but it has been discussed in the Rust community.
Sometimes, you might end up with a String or a Vector, which will not be mutated and its length won't change.
A String is essentially a Vec<char> (terms and conditions may apply), and they each store three usizes:
- Pointer
- Length
- Capacity
Turning these into a Box<str> and Box<[T]> respectively essentially strips away the capacity part and makes the
value more limited, whether you want this is up to you.
use std::mem;

fn main() {
    println!("{}", mem::size_of::<String>());    // 24
    println!("{}", mem::size_of::<Box<str>>());  // 16
    println!("{}", mem::size_of::<Vec<()>>());   // 24
    println!("{}", mem::size_of::<Box<[()]>>()); // 16
}
8 bytes less is a 1/3 save on what could be stack memory, depending on your use case, however it is only 8 bytes and is well often not worth the hassle.
Recursive data structures
Implementing recursive data-structures and hitting a brick wall doing so has become a common meme in the Rust community, to the point that a book was written exploring the topic as a means of teaching Rust.
The most common pitfall looks roughly like this:
#![allow(unused)]
fn main() {
struct MyList<T> {
    next: Option<MyList<T>>,
    value: T
}
}
This is a type that has infinite size. A similar syntax might work in a different language, where
user-defined structures are handled by-reference by default, as is often the case in garbage-collected languages.
The Option<T> enum does not introduce indirection either, and has size of size_of::<T>() + 1
(the extra byte denoting presence or lack thereof), so the size of this structure is size_of::<T>() + size_of::<MyList<T>>() + 1,
which is obviously recursive, leading to infinity.
If you try to run this code example, rustc helpfully suggests introducing a Box into the fray. Box has a constant size - being a pointer -
and thus your structure as a whole now has a resolvable size.
#![allow(unused)]
fn main() {
struct MyList<T> {
    next: Option<Box<MyList<T>>>,
    value: T
}
}
I prefer to keep the Box inside the Option (whereas the error text at the time of this writing suggests the opposite),
as it definitely avoids making a heap allocation for an empty Option.
NOTE: As fun fact, if you look at the extended hint for this error (E0072), it basically says "you are trying to implement a linked-list, aren't you?
here's how to do it correctly:" ;-)
ANTIPATTERN: Boxed Vec / String
To finish this off, there is actually one thing you shouldn't do, and yet it commonly appears in newbie code.
A newcomer to Rust, but not to the world of more low-level programming, wary of the capacity limitations of the stack,
the savvy programmer preemptively puts a vector or a very large string into a Box to avoid filling up the stack.
However, this is actually an anti-pattern as Vec<T> is already on the heap and String is backed by a vector.
clippy already has a lint for this called box_collection.
Per the lints example, this is not to do:
#![allow(unused)]
fn main() {
struct X {
    values: Box<Vec<Foo>>,
}
}
It only adds another level of indirection at no benefit whatsoever and the cost of an extra allocation and needing to go through an extra pointer when accessing your data.
Reference-counted pointer (Rc<T>)
Further moving down the list of Rust's common smart pointers, we got Rc, the reference-counted pointer.
Many years ago, a long time before 1.0, Rust used to have a garbage collector, which was later minimized into what
was at the time called managed pointers.
These were later removed as a language primitive and Rc<T> was added with the same functionality to the standard
library instead.
Rc usage
Reference-counted pointers are much like Box stored on the heap. The major difference is that they keep a counter internally,
that tracks how many references there are to the contained object, which literally means how many clones of the Rc still exist
undropped.
Once the counter reaches zero, the pointee is dropped as well.
A common newbie mistake is to use Rc<T> as a way around *"I need T: Clone, but my T is not, so I will just wrap it in an Rc<T> which is Clone",
but it is still important to know that all copies point to the same object.
As the counter is a plain usize in a Cell, it is not thread-safe and therefore Rc: !Send + !Sync.
#![allow(unused)]
fn main() {
use std::rc::Rc;
use std::ops::Drop;

struct TestStruct;

impl Drop for TestStruct {
    fn drop(&mut self) {
        println!("Even in death, I serve the Omnissiah");
    }
}

fn helper_fn(instance: Rc<TestStruct>) {
    println!("Copy again");
    let copy_of_a_copy_of_a_copy = instance.clone();
    println!("Dropping instance (copy)");
    drop(instance);
    println!("Final instance is dropped here");
}

let test_struct = TestStruct;

// both rc and copy point to the same string
println!("Create Rc, clone it and drop original immediately");
let rc = Rc::new(test_struct).clone(); // so long as we have at least one Rc existing, it won't be dropped
                                       // this creates a clone that will immediately be dropped
println!("Create Copy");
let copy = rc.clone();
println!("Original Rc will be dropped here");
helper_fn(copy);
}
As you can see, the Drop message of TestStruct was only printed once, indicating that no copies of TestStruct have been made.
Self-referential types
Much like Box, Rc is also suitable for self-referential types. Reference-counted pointer in
a self-referential type has merit if you need the option of having multiple pointers to the same instance.
Care should be taken not to create an Rc loop that keeps itself alive and leaks memory. Rc supports having
a weak reference via the Weak pointer, which is the non-owning
counterpart of Rc in that it does not increase the counter and must be upgraded before getting to the data inside, which
may return None if the underlying Rc no longer exists due its ref count reaching zero:
#![allow(unused)]
fn main() {
use std::rc::Rc;

let five = Rc::new(5);

let weak_five = Rc::downgrade(&five);

let strong_five: Option<Rc<_>> = weak_five.upgrade();
assert!(strong_five.is_some());

// Destroy all strong pointers.
drop(strong_five);
drop(five);

assert!(weak_five.upgrade().is_none());
}
Example taken from the
WeakRust doc site linked above
Rc<RefCell>
A common pattern of usage of Rc is in conjunction with the RefCell<T> container.
RefCell<T> is a type facilitating interior mutability, which is touched upon above.
This allows passing around data that can be mutated even if you only have read-access to the Rc.
#![allow(unused)]
fn main() {
use std::rc::Rc;
use std::cell::RefCell;

let data = Rc::new(RefCell::new(vec![]));
data.borrow_mut().push(42);
println!("{:?}", data.borrow().last());
}
Using Rc is a perfectly appropriate way to sync two 'static parts of your program on one thread.
However, things get complicated if we wanted to do this across threads.
Atomic reference-counted pointer (Arc<T>)
That's where the Arc steps in. Just like Rc, it is a reference-counted pointer with pretty much the
same behavior, however, the counters in it are atomic, and thus it is safe to use across thread boundary,
so Arc: Send + Sync.
Arc usage
Functionally, it is pretty much the equivalent of the Rc, just thread-safe. However,
this safety comes at a cost, and Arc is significantly slower than Rc, reportedly,
on some systems and platforms, it can be 10-100x slower, but your mileage may vary.
It can also
only contain T: Send + Sync, which may seem counter-intuitive, but imagine the situation
of someone doing a Arc<Rc<T>> or Arc<RefCell<T>>, these types have non-thread-safe components,
and carrying them across the thread boundary could cause trouble.
Sharing state between threads
Just like Rc is ideal for sharing state between two different static parts of your program
on a single thread, an Arc is great for sharing data across threads.
#![allow(unused)]
fn main() {
use std::thread;
use std::sync::Arc;

let x = Arc::new(5);
let clone = x.clone();

let thread = thread::spawn(move || {
    println!("clone: {}", clone);
});

println!("main thread: {}", x);
thread.join().unwrap(); // otherwise, we might end earlier before thread gets its turn and its message wouldn't be printed
}
Thread-safe self-referential types
Self-referential types implemented using Rc are not thread-safe, and so they by default will not implement
Send and Sync (it's infectious, a single component will prevent these auto-traits from being implemented).
If you want to pass your self-referential structures to other threads, Arc is required.
#![allow(unused)]
fn main() {
use std::sync::Arc;

struct MySelfRef<T> {
    next: Option<Arc<MySelfRef<T>>>,
    value: T,
}

fn are_we_happy<T>(_: T)
where
    T: Send + Sync
{
    println!("Oh, we happy - Vincent Vega");
}

let x = MySelfRef { next: None, value: () };

are_we_happy(x);
}
Arc<Mutex> or Arc<RwLock>
In another parallel with the non-atomic counterpart, the only way
to mutate data inside an Arc is by using something that facilitates
interior mutability.
As mentioned previously, RefCell<T> is not an option, as it contains
non-atomic components.
To this end, Mutex and RwLock are used.
These ensure that only one thread can possibly write into the contained data and that no reads happen in parallel to writes (since data races are one of the common issues safe Rust is guaranteed to prevent).
#![allow(unused)]
fn main() {
use std::thread;
use std::sync::{Arc, Mutex};

let x = Arc::new(Mutex::new(5));
let clone = x.clone();

let thread = thread::spawn(move || {
    let lock = clone.lock().unwrap();
    println!("clone: {}", lock);
    *lock = 12;
});

let lock = x.lock().unwrap();
println!("main thread: {}", lock);
thread.join().unwrap();
}
Depending on luck, that is, which thread wins and gets ahold of a Mutex lock earlier,
you might either see main thread print 12 or 5. If you are consistently only getting one result, try using thread::sleep()
to tip the balance the other way.
NOTE: It is important to draw a distinction between race conditions and data races. What we created in the previous example is a race condition, not a data race (which is essentially data corruption). Race conditions are not prevented by Rust and they are not considered unsafe, just poor programming.
Clone-on-write pointer (Cow<T>)
The final entry on our list is the oft-forgotten Clone-on-write pointer. This smart pointer encloses and provides immutable access to borrowed data, and clones the data lazily when mutation or ownership is required.
It works with any borrowed data, so long as it implements the ToOwned
trait, which generally comes in tandem with Borrow.
Cow usage
Cow<T> is best utilized on data, which are unlikely to change in most cases, if we then use cow with some constant,
static or a literal, we can save resources of needless allocations and constructions of owned values, which are generally
necessary for any sort of data mutations.
It is important to know that Cow isn't fully owned, and it contains a lifetime in its definition, fully written as
Cow<'a, B> (B for Borrowed).
Avoiding allocation when storing either a string literal or dynamic string (Cow<'static, str>)
A lot of the usage of Cow revolves around strings. One common use case is having many strings, which may
mostly be a literal, that is &'static str, but sometimes may be a dynamically procured string, which in all
likelihood is of type String. Cow helps here prevent creating a String (which involves an allocation) for all
of the cases where we would use the literal
Efficient storage for borrowed strings unlikely to mutate
#![allow(unused)]
fn main() {
let some_str = "hello";
let s = Cow::Borrowed(some_str);
}
This is a similar scenario, only for non-static borrowed strings.
The benefits of Cow are perhaps best explained by Pascal Hertleif in
his post from 2018 titled "The Secret Life of Cows"
The Task - A multi-threaded reverse polish notation calculator
A reverse-polish notation calculator is a calculator, which uses the operands-then-operator syntax,
for example, the expression 2 + 7 * 4 would be written as:
2 7 4 * +
You can see more about the syntax here https://en.wikipedia.org/wiki/Reverse_Polish_notation.
The major benefit of this is that you don't need parenthesis and you can handle your operands as a stack data structure.
In this project, the goal is to implement a multi-threaded calculator using this, where:
- one thread handles input and fills a queue of command
- one thread processes the commands periodically
- and the last thread periodically prints the content of the stack/memory, so we can see the results of our math.
To do this, we will use trait objects and appropriate pointer types.
1. Input reading
Let's start with the input thread.
In the main function, create a loop which reads a line of input, converts it into the appropriate string type, if necessary, then cuts it up into the tokens.
From an input like this:
2 7 4 * + 3 -
You should be able to get the tokens [2, 7, 4, *, +, 3, -]. To ensure you got it correctly, you can print them
to stdout.
2. Input parsing
Create a structure for each of the following operations:
- insertion (
a number literal) - addition (
+) - subtraction (
-) - multiplication (
*) - division (
/) - exit (
q)
Next create a trait Command, which looks a bit like this:
#![allow(unused)]
fn main() {
pub trait Command {
    fn execute(&self, stack: <...some way to mutably access a Vec<i64>...>);
}
}
And implement it accordingly for each of the structures. If the operation is invalid (perhaps because there is not enough numbers on the stack), consider it a no-op.
You can extend or modify this trait, however, make sure it remains object-safe so you can make trait-objects out of it.
3. Shared state and other threads
In your main thread, spin up two more threads.
Also create a structure for your State, which should contain the following:
- The stack, which should be a list of
i64 - A queue of commands, which should be a list of
dyn Command
Both may be wrapped pointers and/or containers, and that applies to the contents of these lists as well. Refer to the text above to make appropriate choices in this matter.
Now, add two constants to your program:
PRINT_INTERVAL- a duration of how long between prints, set to 15sÈVAL_INTERVAL- a duration of how long before the executing thread next tries to go through the queue of the Commands, set to 10s
Lastly, create an instance of your state in main(), wrapped appropriately into the correct smart pointer and perhaps container.
4. Putting it all together
Share your instance between all three threads, and implement functionality such that:
- Input thread parses text input into the correct
T: Commandstructures and inserts them as trait objects into the queue in state - Worker thread pops off commands from the queue and executes them, modifying the stack in the process every
EVAL_INTERVAL - Print thread prints the contents of the stack every
PRINT_INTERVAL
For development, you can of course adjust the length of these intervals
5. End product
In the end you should be left with a well prepared project, that has the following:
- documented code explaining your reasoning where it isn't self-evident
- optionally tests
- and an example or two where applicable
- clean git history that does not contain fix-ups, merge commits or malformed/misformatted commits
Your Rust code should be formatted by rustfmt / cargo fmt and should produce no
warnings when built. It should also work on stable Rust and follow the Braiins Standard
Common Rust std Traits
Prerequisites
- All of the previous chapter
- File operations
- writeln!() and write!() macro
- Strings
- Splitting strings
- Reading from Standard input
Following from our more concrete look at Rust's pointers in the previous chapter, it is time to do the same for the essential traits in the standard library. As stated previously on a couple occasions, traits are the cornerstone of Rust.
In fact, the mere existence of certain traits is a hard requirement by the compiler.
In extremely limited hardware circumstances, it is possible to not program without
the standard library (crate-level attribute #![no_std]), but also without the
completely platform- and allocator independent core library (crate-level attribute #![no_core]),
this however requires you to provide implementations of certain traits such as Sized and
mark them for the compiler.
For this chapter, we felt that we can build off already existing free resources available on the internet. Please start by reading through the following two links:
All in all, the list of essential traits is pretty much the following:
- From/Into
- Debug/Display
- Fn traits: Fn, FnMut, FnOnce
- Iterator traits: mostly Iterator, IntoIterator, FromIterator, ExactSizeIterator
- Borrowing/Ownership traits - Deref, AsMut, AsRef, Borrow, BorrowMut, ToOwned
- Drop
- Any
- Clone, Copy
- (Partial)Eq, (Partial)Ord
- Arithmetic/other operator traits
- Error
- IO traits: Read, Write
- Hash
- Default
Some of these traits are mentioned in part 2 of the Strangely Linked List, make sure to check it out. You also don't need to know all about all of these, the most important ones are mentioned in the articles, but it's nice to have an overview.
Notes
The articles listed at the top of the page are a bit outdated. While due to Rust's backwards- and forwards-compatibility guarantees, everything in them is absolutely correct, there was a couple development in recent years which are useful to know to be able to produce top-notch 2022 Rust ;-)
try!()syntax is now obsolete and its function is completely covered by the?operator, it does the same thing&Traitsyntax for trait objects has been deprecated in favor of&dyn Trait, that makes it clear that we are dealing with a trait object and not a reference to a concrete type- Many traits now have a fallible counterpart, such as
TryFrom, if the operation can fail, prefer using these and properly propagating the error in favor of panicking. That makes your code much more friendly for library users, and makes it also easier for you to build more robust applications - Function-like format macros such as
(e)println!()now take their arguments by reference by default, soprintln!("{}", &thing)is an anti-pattern. Keep in mind that this is not the case fordbg!(), which is a pass-through macro and returns its parameter(s) - More of these basic traits are now included in the standard library
preludemodule and are imported automatically. Consultclippyafter running your code to ensure no line of code is wasted
ToString trait
This trait is mentioned in the article by Steve Donovan, it is used to turn things into String explicitly
via the .to_string() method. However, you usually don't want to implement this trait by hand.
There exists a blanket implementation of:
#![allow(unused)]
fn main() {
impl<T> ToString for T
where
    T: Display + ?Sized
}
This means that ToString is automatically implemented for every type that has a Display implementation.
Therefore, writing format!("{}", variable) is an anti-pattern. It is the same as variable.to_string(), however, it comes at a cost
to performance, as each format is pretty slow and you want to keep nested formats to a minimum (and remember that since it's derived
from Display, the .to_string() blanket implementation already has a format usage insider it)
new(), from_* and Default
Rust does not have constructor methods you might be used to from languages like C++, C# or Java.
You may have seen Type::new() a lot in Rust code, however, it is just a plain method that we use by convention.
The entire convention is as such:
fn new() -> Selfshould create a new instance of the type. It should not take any parameters, unless it is impossible to create the type without any other inputfn from_something(param1: ..., param2: ...)to create types from input, when you can also do it with default values vianew(). If you can, you should prefer implementingFrom. This approach should only be preferred when it's from several parameters, or if you for some reason don't want to implementFrom
But you may also remember that you can construct new instances of types via the Default trait, which serves to provide
a default value.
Default can be derived:
#![allow(unused)]
fn main() {
#[derive(Default)]
struct Point {
    x: i32,
    y: i32,
}
}
(You can only derive Default if all member types also implement Default)
For types which can derive Default, you should just call it from the new function:
#![allow(unused)]
fn main() {
#[derive(Default)]
struct Point {
    x: i32,
    y: i32,
}

impl Point {
    fn new() -> Self {
        Default::default()
    }
}
}
clippy actually has this convention as a lint and will complain if it's not like this and can be.
From and Into
From is the reciprocal trait of Into.
There are two generic implementations:
Into<U> for T where From<T> for UFrom<T> for <T>andInto<T> for T
As such, it is considered an anti-pattern to implement Into when From can be implemented.
The only reason where you might have to implement Into is if orphaning rules don't allow otherwise,
see the relevant section of Advanced traits
Closures and Fn traits
Fn, FnMut, FnOnce
When it boils down to implementation details, closures are actually structures containing values or references to values of the environment they close over and a single method that actually manipulates these. And because The environment and the action generally differ between each closure, each closure is its own type and you can't make conversions. In fact, the type itself is actually anonymous.
To the rescue come the aforementioned traits. These allow us to elegantly handle different closures that have the same signature, and it even comes with a bit of syntax sugar to make writing trait bounds easier:
#![allow(unused)]
fn main() {
fn execute_closure<F>(closure: F, string: String) -> (i32, i32)
where
    F: Fn(String) -> (i32, i32)
{
    closure(string)
}
}
Consider the traits to be restraints:
- a
Fnclosure only accesses its environment by reference, and thus is valid in any context - a
FnMutclosure accesses its environment mutably by reference, and so it is only valid inFnMutandFnOncepositions - a
FnOnceclosure moves the values into itself, and so you can only use it in aFnOncecontext
This is important to know when choosing what trait bounds you need in your code.
The Task: The most generic file-backed Shopping list
In this project, you will be developing a shopping list as a library and as a cli tool.
Every Rust crate can have several targets, a single library, and many binaries. Each of these have different entry-points (that is, root modules), and to use items from the library part of your project, you need to import it just like any other library.
- For the main executable target, the root Rust file is
main.rs - For the library target, the root is
lib.rs - For the sake of completeness, other executable targets are modules located under
src/bin
You can see an overview of how Cargo targets are specified here
Our shopping list will be backed by a file and thus, we will be able load and save it to disk.
While the on-disk format is completely up to you, you may want to do something like this:
item name:amount
item name:amount
item name:amount
...
Whatever you will consider easy to parse is fine, we will assume the input will never contain any
whitespace other than a space and that it will not contain the delimiter.
1. Basic API
Create a structure called ShoppingList,
and create implementations of the following methods on it (consider this pseudo-code, it is up to you to
decide self parameters and concrete types):
fn new(path: String) -> Self- create a new shopping list bound to the path specified by string. If the path exists, open, load and parse the filefn insert(item, amount)- Add a new item of a specified amount to the shopping list. It doesn't matter if the item is already in the list, just add a new entry even if it's duplicatefn update(item, amount)- Modify first occurrence of item to have new amountfn remove(item) -> (item, amount)- Remove first occurrence of item, returning it and its amountfn get(item) -> amount- Find the first occurrence of item, returning its amountfn save()- Save list to its internally stored pathfn save_to(path: String)- Save list to path specified by parameter
TIP: Using Option or Result is generally preferred to panicking, which should only be reserved
for fatal irrecoverable errors
Derive traits that you consider will be useful to you for development.
Try that the list works as expected. As stated previously, duplicates are fine.
2. Generics
It is generally bad optics to use just Strings for paths. In Rust, the pattern is to use
every type that can be referenced as Path. Adjust the relevant functions to that instead.
If you do it correctly, all of these should be valid:
#![allow(unused)]
fn main() {
ShoppingList::new("myfile")
ShoppingList::new(String::from("myfile"))
ShoppingList::new(Path::new("myfile"))
}
Conversely, it might also be useful if we could look at the shopping list as a Vec of pairs of item and amount,
Implement the same trait for ShoppingList, so do that next.
Remember that Path is not an owned type, and you might have to store its owned equivalent, or be prepared to deal
with lifetimes.
If you have time on your hands, do the same for the item: String params. In some places, we don't need to pass
an owned String, it is wasteful for memory, an so getting something that can be referenced as str would
be optimal. In places where an owned string better, let's make it generic taking something convertible to string.
3. Conversions and Equality
What if we already have a File lined up and ready? Furthermore, what if we don't know the path to said file? Well, in that case, for maximum flexibility, we might want to implement a conversion from a file.
Choose the most appropriate trait and implement it for ShoppingList. Keep in mind that parsing or even reading
the File given might fail.
Also, now you are in a situation where you might not have any path available, so .save() should fail until
a path is set with a new method called .set_path(new_path).
Finally, implement the Eq traits such that:
- Lists with the same path are considered the same
- Lists with a different path are considered the same only if their contents are the same
4. Sorting and de-duplication
Without using loops and doing this manually, add methods .sort() and .dedup(), where
.sort()will sort the elements alphabetically by item name (ignoring the amount).dedup()will remove same consecutive elements
For the de-duplication operation, make sure that the total amount of items is preserved.
What might come in handy is that .dedup_by() on Vec hands mutable references to elements.
5. Memory
Add a function called .save_on_drop(), which determines whether the ShoppingList should try
saving itself before going out of scope.
Look into the Drop trait
6. CLI
Write a simple cli that allows:
- reading and printing a list nicely (implement the correct trait for printing to
stdout), - inserting and removing elements
- sorting and de-duplication
- saving or discarding the modified list
Whether you do this via cli parameters or interactively is up to you. You may also use a third party
library. For Braiins, the most useful cli argument parsing libraries are clap and structopt / argh.
7. End product
In the end you should be left with a well prepared project, that has the following:
- documented code explaining your reasoning where it isn't self-evident
- tests where you see fit
- clean git history that does not contain fix-ups, merge commits or malformed/misformatted commits
Your Rust code should be formatted by rustfmt / cargo fmt and should produce no
warnings when built.
Asynchronous programming in Rust
Prerequisites
- All of the previous chapter
TcpStreamandTcpListenerfs::read_to_string- async syntax is presented in this chapter, but you can also check out this
Two chapters ago (in Rust's Many Pointers), the task was to write a multi-threaded calculator application, one that was rather contrived but served to illustrate the issue of sharing data across thread boundary.
However, threads are expensive, it's not a good idea to spin up many threads, since it takes up resources and context-switching takes time. Writing multi-threaded sync code is best suited to a small number of expensive computational tasks, or alternatively, if you are writing low-level OS code which allows you to schedule tasks precisely and gives you a great amount of control. Using threads directly might also be preferred in real-time computing.
For many applications, we need a handy way to avoid spawning many threads. A thread-pool alleviates the issue partially, but you still spin-up threads, and it's not easy to manage a multi-threaded application. Furthermore, what if you only have one thread available?
In comes concurrent programming. Concurrent programming is a general term for an approach which allows having more than one task in progress at once. The difference between concurrent, parallel and distributed programming is that in concurrent, tasks can all run on one thread, and a mechanism exists for switching between them, in parallel programming, tasks run simultaneously, whereas distributed programming uses multiple processes, often each running on a separate machine.
There is a number of mechanisms that facilitate concurrent programming (apart from using threads), for example event-driven programming, co-routines, or actor architecture. It is possible to utilize all of these in Rust by way of specialized libraries, however, Rust has native support for only one approach -> asynchronous programming.
If you've been involved with Rust materials, you might have seen the keywords async/await
mentioned, these are the ones we use for asynchronous programming.
Futures and promises
The Rust's async models revolves around the abstract concept of a *Future, also called a promise. You might have heard about the Promise type from Javascript.
A Future is the promise that at some point in the future, a value of a given type will be available.
In Rust, Future is a trait, there is nothing stopping you from implementing it on
your own custom type, although you are unlikely to want to do that unless you are writing
low-level async libraries. Most of the times, you will use the trait as a handy-dandy way
to abstract from the opaque type Rust generates for each future.
Here is how you can create a future in Rust:
async fn give_me_a_number() -> usize {
    20090103
}

fn main() {
    let x = give_me_a_number();
}
The async keyword serves to provide a tiny bit of syntactic sugar, under the hood,
the function definition is transformed to this:
use std::future::Future;
fn give_me_a_number() -> impl Future<Output=usize> {
    async {
        20090103
    }
}
The impl Trait syntax
In the previous example, you see a curious new piece of syntax, called the impl Trait syntax. This may look like another way to do generics, but it is in fact Rust's first foray into the world of existential types. Existential type, alternatively also called "existentially-quantified type" is a type that represents any one type satisfying some property or behavior. When talking Rust, we mean "any one type implementing some trait".
The important thing is we mean one type precisely. This function is not generic over all types
implementing Future, instead, it produces one concrete type implementing Future, we just don't
know, what that type is, since it is a compiler generated opaque type.
In this aspect, we can liken static generics to a universal quantifier (∀) and the expression
"for each type such that", whereas impl Trait is similar to an existential (hence existential types)
quantifier (∃) and the expression "there exists a type such that".
There are at least three common usages of impl Trait:
0. Futures
- Iterators (since iterators create known, but massively compounded types, which can reach thousands of characters very quickly)
- You want to employ as much information hiding in your crate's API as possible
Here's an example with Iterators:
fn double_iter(iter: impl Iterator<Item=usize>) -> impl Iterator<Item=usize> {
    iter.map(|x| x * 2)
}

fn main() {
    println!("{:?}", double_iter((0..=10)).collect::<Vec<_>>());
}
Also notice that I've included the impl Trait syntax in argument position.
This is not an existential type, it is generics. This alternative syntax was
included for parity, and is functionally equivalent except for one thing. It
is not possible to specify the concrete generic type of this parameter by hand,
since there is no named generic argument. In this case, it doesn't matter since
Rust should not have any hardship inferring the types, but keep this limitation
in mind if using it elsewhere.
It is helpful to think that for a function call, existential types are determined by the callee, whereas generics are determined by the caller. This means that the existential type is deduced from the function body.
Back to the Future
Rust futures and async code exhibit some behavior that you might not be used to when coming from other languages.
Rust Futures are inert
Creating a future will not run its code, it is lazy evaluated and the future won't
start until it's first polled, or, in other words, .awaited.
Consider the following example:
async fn foobar() {
    println!("Back to the future");
}

fn main() {
    println!("Hello");
    let x = foobar();
    println!("What's your favorite movie?");
}
As you can see, we will never get the answer we so desire. This future was never polled
or awaited, so the code never got executed. We ca fix this easily by using the futures
crate.
async fn foobar() {
    println!("Back to the future B-)");
}

fn main() {
    println!("Hello");
    let x = foobar();
    println!("What's your favorite movie?");

    futures::executor::block_on(x);
}
Now you should see the message. The futures crate provides the most basic tools for
working with asynchronous code, and it is highly recommended you check it out.
It is an official crate, but it is not built in.
In the previous example, we used something called an executor. An executor is a tool for running
asynchronous code. We can't just declare main() as async, since that posits the problem of what
would execute the Future it would become.
Rust does not have a built-in or default executor, and users are encouraged to use different implementations depending on their particular use case, whether it be single-threaded or multi-threaded. This allows for a great degree of flexibility.
Some crates, such as tokio also provide macros in the form of attributes for declaring an async main().
This also results in syntactic sugar, and an executor is spun up behind the scenes, but the specifics of
that are beyond the scope of this text.
The term executor is also sometimes confused with the terms reactor and runtime. A reactor
is a means of providing subscription mechanisms for events like IO, inter-process communication and
timers. Executors only handle scheduling and execution of tasks. The term runtime describes
reactors bundled with executors.
For reactors, you will find them in places where the program is supposed to interact with the outside world
or interact with things which may not be ready yet. In most async libraries, the common reactors are types
for files and file manipulation, and all sorts of sockets. A future to sleep the task may also be considered
a reactor (it reacts to a time duration elapsing).
No built-in runtime
As just mentioned, Rust does not come with any built-in runtime. Most commonly used are:
tokiofutures(very primitive)async_stdsmolbastion(facilitates distributed programming)
Mixing executors
The gist of this is - don't do it. It might be tempting when you run into a situation like this:
- Your program is async, using a serious executor like Tokio
- You are in a blocking concept, unavoidably
- You really need to await a future inside this blocking context
What you might think of in this case is using something like futures::executors::block_on. This might
work, but usually doesn't:
- Async runtimes don't necessarily have cross-compatible types, and might panic when used with a different executor
- The runtime will mess up the amount of threads your program has and likely will block the thread you are currently on.
- If your async action depends on input from other async tasks, it will therefore never advance
So just don't do it.
Rust async is zero-cost
Rust async does not have very many requirements and fairly efficient code is generated (although async binaries tend to be larger than non-async). In fact, you don't even need dynamic dispatch or heap allocations, so Rust async can be used in embedded environments without a hitch.
Async workings
As mentioned earlier, the impl Future syntax conceals a type generated by the compiler.
Understanding this is key to writing the most efficient async code.
Consider the following example:
#![allow(unused)]
fn main() {
async fn foo() {}

async fn bar() {}

async fn run_both() {
    let x = 2;
    dbg!(x);
    println!("starting foo");
    foo().await;
    println!("starting bar");
    let y = 3;
    println!("{:?}", y);
    bar().await;
    println!("{:?}", x);
    println!("both functions should be over by now");
}
}
Rust will take this, and for each of those functions, it will generate a type resembling
an enum (actually, we can think of it exactly as an enum). It has a number of states,
and these are delimited by the usages of the .await keyboard, which yields back to the
runtime and gives opportunity to other async tasks to run. The executor will then poll
the futures until execution can be resumed.
We can visually separate these blocks:
#![allow(unused)]
fn main() {
async fn run_both() {
    {
        let x = 2;
        dbg!(x);
        println!("starting foo");
        foo().await;
    }

    {
        println!("starting bar");
        let y = 3;
        println!("{:?}", y);
        bar().await;
    }

    {
        println!("{:?}", x);
        println!("both functions should be over by now");
    }
}
}
Of course, this pseudo-code wouldn't compile, since we are referencing a variable from the first block in the last black. But this brings us to an important issue. How do we deal with it in the compiler generated code? Rust variables are on the stack by default, and of course, stack is not preserved between continuations of the future.
Well, Rust solves this by checking which variables can't be just on the stack (as they are referenced
across the .await boundary), and it moves them into the future. In our case, y can be on the
stack willy-nilly, but x cannot, we reference it in the last block.
Important!
If you use very large variables across
.awaitboundary, the underlying type of the future can grow greatly. Keep in mind that a future also stores all of the underlying futures, further increasing the total size of the type. Improperly written async code can grow into gargantuan proportions in the department of type-size and if you have the unfortunate idea to store futures in a memory-limited environment, such as embedded devices, you might run into issues with memory capacity.
We can also illustrate the waiting mechanism of a future to make it clearer without any syntax sugar:
#![allow(unused)]
fn main() {
fn run_both() -> impl Future<Output = ()> {
    async {
        let first = foo();
        while !foo.is_ready() {
            yield_now();
            foo.try_complete();
        }

        let second = bar();
        while !bar.is_ready() {
            yield_now();
            bar.try_complete();
        }
    }
}
}
Once again, this is pseudo-code and is of course not runnable.
Storing futures
Two paragraphs ago, I said "don't do it", so now, let me tell you how to do it. It is not possible to
just store futures as they are, since the type is opaque and unknown, the compiler generates it. We only
know that it implements Future<Output=T>, we don't even know if the type is Sized. This means that
we can't store it directly, but we need to use a trait object.
Apart from using & and &mut, as the usual suspects, we can also use Box, Rc or Arc. However,
a special care must be taken, as we need to pin the value.
use std::pin::Pin;
use std::future::Future;
async fn print_async(string: &'static str) {
    println!("{}", string);
}

let boxed: Pin<Box<dyn Future<Output=()>>> = Box::pin(print_async("hello from box"));
futures::executor::block_on(boxed);
It is usually not necessary to type out the type at all, this is for illustrative purposes. These boxes are
stored on the heap like any other box, the Pin signifies that a value cannot be moved in memory. Pinning is
an important concept in Rust, but going into detail is beyond the scope of this chapter.
Common futures' operations
There is a couple things that you can do with Futures that are more common with asynchronous programming than with the synchronous approach.
canceling a future
Sometimes, you might need to cancel a future, a different part of your program has determined that you no
longer need to finish a certain computation, and doing it would either waste resources, fail, or produce
irrelevant results. In Rust, cancelling a future is really simple - just Drop it. You can either let it go
out of scope, or explicitly drop it with std::mem::drop(), which is in Rust 2021 automatically imported.
select and select_biased
Select and its biased counterpart are common future operations. A select! is a control structure similar
to match, however, instead of matching a value on a pattern, we are "matching" on the first future that
resolves.
futures::executor::block_on(async {
use futures::future::FutureExt;
use futures::select;

async fn async_identity_fn(arg: usize) -> usize {
    arg
}

let res = select! {
    a_res = async_identity_fn(62).fuse() => a_res + 1,
    b_res = async_identity_fn(13).fuse() => b_res,
};
assert!(res == 63 || res == 13);
println!("{}", res);
});
Note: The futures crate implementation of select! requires futures to be fuse futures, which is to
say that after being completed, they will never be polled again. In practice, you may want to fuse your futures
outside of select. Check the relevant page in futures doc
A select is handy when you want to select from a number of possible event. Consider the following scenario:
- Your app reads data from the network
- Your app accepts input from the command-line
In this situation, using async is ideal and it can help you avoid constructing a multi-threaded headache. Simply use async primitives for reading stdin() and reading sockets, and in your event loop, spin on a select between futures from reading stdin and reading the socket.
If the term select is confusing for you, you can also think of it as a race, whoever is ready first, wins.
The difference between select and select_biased is that if multiple futures are ready, select chooses pseudo-randomly,
whereas select_biased takes the first one by order of declaration. Generally, you might want to prefer the former over the
latter, as it is entirely possible for one operation to completely starve the rest by just being faster.
join
This operation is very similar to its multi-threaded namesake. Just like we can join multiple threads and wait for them
to finish, the join! macro from the futures library allows us to wait for multiple futures at once, returning their
results together.
The implementation from this library is variadic and can take any number of parameters, returning the results of the futures passed into it as a tuple. Here is an example borrowed from the library's documentation:
futures::executor::block_on(async {
use futures::join;

let a = async { 1 };
let b = async { 2 };
assert_eq!(join!(a, b), (1, 2));

let c = async { 3 };
let d = async { 4 };
let e = async { 5 };
assert_eq!(join!(c, d, e), (3, 4, 5));
});
stream_select!
This macro combines several streams, provided all of which produce values of the same type. Much like
select!, if multiple streams are ready at once, one is selected pseudo-randomly to prevent streams
being starved
Here is an example of how to use stream_select!:
futures::executor::block_on(async {
use futures::{stream, StreamExt, stream_select};
let endless_ints = |i| stream::iter(vec![i].into_iter().cycle()).fuse();

let mut endless_numbers = stream_select!(endless_ints(1i32), endless_ints(2), endless_ints(3));

for _ in 0..10 {
    match endless_numbers.next().await {
        Some(1) => println!("Got a 1"),
        Some(2) => println!("Got a 2"),
        Some(3) => println!("Got a 3"),
        _ => unreachable!(),
    }
}
});
From this example, you can see how the algorithm chooses futures in this case, illustrating its pseudo-random nature.
NOTE: You can think of streams as async iterators. They are commonly seen across Rust async code.
Finally, let's look into some cans of worms.
Mutex in async
Usage of mutexes and other safe synchronization mechanisms is quite common in Rust, however, special care
needs to be taken when using std or similar implementation of Mutex (as opposed to eg. tokio implementation,
which is async).
Synchronous Mutexes or RwLocks should never preserve locks across .await boundary. This is because you
might be cooperating with another future that needs this lock, perhaps creating a non-obvious deadlock. Considering
the random nature of choosing the next future, the deadlock bug might not always occur, or may even occur very
infrequently depending on how your application is constructed, making it very difficult to debug.
For example, this is a likely source of deadlock:
#![allow(unused)]
fn main() {
loop {
    let x = some_mutex.lock();
    async_read_to_string("file").await;
    *x += 1;
}
}
Thread locality/confinement
When what you are awaiting isn't ready, the future yields, returning control back to the executor, allowing it
to poll another future. While some executors are single-threaded, many are multi-threaded. Rust makes no guarantees
about futures (or other types) being confined to one thread so long as the appropriate selection of Send & Sync
traits is implemented . Generally, a fast way to not have that is to have any sort of Cell type involved, Rc,
or raw pointers involved.
Because thread confinement is not guaranteed for Rust futures (and frankly, if we are after performance, is downright undesirable), it is unwise to behave as if you had it. Namely, don't use thread_local storage, it will end poorly, and can lead to another Heisenbug, which will likely once again be a pain to debug.
This also means that you should make use you don't use libraries which depend on thread_local storage. For example, some logging frameworks might do that.
Send and sync futures
Futures desugar into an enum whose variants carry local variables that are used across .await points. Otherwise,
pretty much the same rules apply as for types that you might write by hand. In other words, a future is Sync and Send
if its contained types are:
- A type is Send if it is safe to send it to another thread.
- A type is Sync if it is safe to share between threads (T is Sync if and only if &T is Send).
If you are dealing with troublesome types that do not have this feature, make sure to either contain them in something
that is Send + Sync, or that you do not carry them across .await points.
Async traits
The white whale at the end of the road. If you are already well versed with the nuances of traits, you might have already arrived at the question of "How do futures mesh together with traits?". The simple answer is: quite poorly.
As a naive attempt, we can try something like this:
use std::future::Future;
trait MyTrait {
    fn my_function() -> impl Future<Output = u8>;
    // alternatively written as
    // async my_function() -> u8;
}
If you try to run this example, you will find that Rust complains that impl Trait is not allowed here.
When we introduced existential types earlier, we posited a simplification in saying that the underlying type is determined by the function body rather than the context of the caller. This is not possible here, it has no body in the trait definition.
If we consider implementing this trait, it is also a no-go, since each of the implementations will create
a different Future-implementing type, and that is likely to have a different size, and won't mesh together
with the other implementations.
Furthermore, for this same reason, you can't use the trait for dynamic dispatch either, because the size needs to be known.
The solution is provided by the async-trait crate. By using the attribute provided by this crate (needs to
be both on trait definition and each implementation), you can write async traits like this:
use async_trait::async_trait;

#[async_trait]
trait MyTrait {
    async fn my_function() -> u8;
}
This looks just like what we need.
Behind the scenes, the macro rewrites the code to this:
use std::pin::Pin;
use std::future::Future;
trait MyTrait {
    fn my_function() -> Pin<Box<dyn Future<Output = u8>>>;
}
Because it's a trait object behind a pointer, it suddenly has a known size - the size of the pointer, so it's now completely valid. It's also no longer using an existential type, but that's fine.
However, this adds a level of indirection, requires a heap allocation and because it uses a trait object, it hampers
compiler optimizations. Therefore, it is most suitable to be somewhere at the top of your stack (ie. you have trait Service,
implementors of which comprise your application on the top level), which enables your code to be still well-optimized by the
compiler, as opposed to having traits for many menial things to be async. However, your mileage may vary and the performance
cost might not be significant enough for your use case to avoid async traits entirely.
For the sake of completeness, here's a matching impl for the previously mentioned trait:
use async_trait::async_trait;

#[async_trait]
trait MyTrait {
    async fn my_function() -> u8;
}

struct MyStruct;

#[async_trait]
impl MyTrait for MyStruct {
    async fn my_function() -> u8 {
        // the answer to life, death, universe and everything
        42
    }
}
The Task: Making an HTTP server concurrent
For this chapter's project, we are going to do a bit of an compare-and-contrast. If you've went through the Rust book, it has you create a single-threaded HTTP server, then turn it into a multi-threaded one, and finally have you implement some nice to haves on it.
The relevant chapters are these:
- https://doc.rust-lang.org/book/ch20-01-single-threaded.html
- https://doc.rust-lang.org/book/ch20-02-multithreaded.html
Your task is to take the single-threaded implementation, posted here for ergonomics:
use std::fs;
use std::io::prelude::*;
use std::net::TcpListener;
use std::net::TcpStream;

fn main() {
    // Listen for incoming TCP connections on localhost port 7878
    let listener = TcpListener::bind("127.0.0.1:7878").unwrap();

    // Block forever, handling each request that arrives at this IP address
    for stream in listener.incoming() {
        let stream = stream.unwrap();

        handle_connection(stream);
    }
}

fn handle_connection(mut stream: TcpStream) {
    // Read the first 1024 bytes of data from the stream
    let mut buffer = [0; 1024];
    stream.read(&mut buffer).unwrap();

    let get = b"GET / HTTP/1.1\r\n";

    // Respond with greetings or a 404,
    // depending on the data in the request
    let (status_line, filename) = if buffer.starts_with(get) {
        ("HTTP/1.1 200 OK\r\n\r\n", "hello.html")
    } else {
        ("HTTP/1.1 404 NOT FOUND\r\n\r\n", "404.html")
    };
    let contents = fs::read_to_string(filename).unwrap();

    // Write response back to the stream,
    // and flush the stream to ensure the response is sent back to the client
    let response = format!("{status_line}{contents}");
    stream.write_all(response.as_bytes()).unwrap();
    stream.flush().unwrap();
}
hello.html
<!DOCTYPE html>
<html lang="en">
  <head>
    <meta charset="utf-8">
    <title>Hello!</title>
  </head>
  <body>
    <h1>Hello!</h1>
    <p>Hi from Rust</p>
  </body>
</html>
404.html
<!DOCTYPE html>
<html lang="en">
  <head>
    <meta charset="utf-8">
    <title>Hello!</title>
  </head>
  <body>
    <h1>Oops!</h1>
    <p>Sorry, I don't know what you're asking for.</p>
  </body>
</html>
And turn it into a concurrent one by using the following crates:
- The
smolruntime, and you can usesmol-potatfor runtime initialization by letting you declareasync fn main() - The
futures, which is included insmolasfutures-lite
1. Introducing the async
Start by creating a crate with Cargo and pasting the files above into it. You should verify that you've done it correctly by compiling and running the server, for example with:
cargo run --release
And then cURLing it, simply this should work:
╭[RAM 27%] bos ~ tax:
╰ 23:04 lh-thinkpad magnusi » curl localhost:7878
<!DOCTYPE html>
<html lang="en">
  <head>
    <meta charset="utf-8">
    <title>Hello!</title>
  </head>
  <body>
    <h1>Hello!</h1>
    <p>Hi from Rust</p>
  </body>
</html>
Alternatively, opening it from the browser should also work.
Next, add in the crates above as dependencies, and transform main into an async function, modify handle_connection to be naively async.
2. Streams
If you test your application now, it is quite likely that it will work, but that you can still grind it to a halt with a single Slowloris-like request, that just takes a long time to transmit and complete.
This is because the for loop is not yet async, and is thus it can still block.
Replace TcpListener with its async equivalent provided by smol.
Then, check out the StreamExt trait,
which should allow you to make handling connections concurrent.
You can also use the ever-handy spawn function.
3. Testing and making it parallel
Now, even if you were to get a slowloris like request, your server should not cease responding even though its single-threaded.
You can try verifying that's the case my using netcat to open a TCP connection manually and just slowly typing in your request,
but never finishing it (remember that an HTTP request is terminated by two empty lines, or, in other words, "\r\n\r\n").
If you've used smol-potat, or even if you didn't, it should be now trivial to spin up multiple threads and make your
application both concurrent and multi-threaded. Check out the documentation on how to do just that.
4. End product
In the end you should be left with a well prepared project, that has the following:
- full functionality
- documented code (where applicable)
- clean git history that does not contain fix-ups, merge commits or malformed/misformatted commits
Asynchronous programming using the Tokio framework
Prerequisites
- All of the previous chapter
TcpStreamandTcpListenerfs::read_to_string- async syntax
Using async properly requires a large commitment, and usually requires subscribing to a kitchen-sink type of network. This is because of the nature of IO and networking (and possibly other OS events). An proper async application benefits most when async IO is used, and tasks can react properly to updates on sockets and files.
Blocking IO may defeat many of the benefits of having your application be async.
In Rust, there exist several implementations of non-blocking IO, the most prevalent of which is current mio. However, these libraries are usually low-level, and may not even use futures at all, so async frameworks usually wrap these in a more ergonomic API.
The most mature framework for asynchronous programming in Rust is Tokio, and the Tokio stack forms the backbone of many large Rust projects. In Braiins, we use tokio also.
To get familiarized with the basics of Tokio, you should read the tutorial
Tokio vs std vs async_std
You will see that tokio mirrors many of the APIs found in the standard library. If you are not
sure about a particular use case, it is better to just use the analogues provided by tokio, since
with std, you may run into the aforementioned issues with blocking IO.
There also exists some confusion with async_std. This is a library by one
of the former contributors to Tokio and several others. It aims to mirror std API as much as
possible, but it is still a 3rd party async framework much like Tokio (or smol, which we've briefly
encountered in the last chapter).
It is generally a bad idea to import two or more of these libraries and mix their types, and it may lead to un-performant code or even panics at runtime.
AsyncRead and AsyncWrite
The difference from std is not only in types, but also core traits. This is generally
because std traits also only provide a blocking API, and so non-blocking analogues needed to
be created.
The ones that can be considered universal are located in the futures crate. If you want your code to be as compatible with 3rd party libraries as possible and have as broad audience as possible, you should prefer these to other alternatives.
The two most commonly encountered traits are likely to be AsyncRead
and AsyncWrite. If you click
the links, you will see that they are fairly bare-bones, and do not match much of their std::io
counterparts at all.
Ergonomic IO functionality is provided by their extension traits, AsyncReadExt
and AsyncWriteExt respectively.
Here is an example asynchronously reading bytes from two vectors into another vector.
#![allow(unused)]
fn main() {
use futures::io::{AsyncReadExt, Cursor};

let reader1 = Cursor::new([1, 2, 3, 4]);
let reader2 = Cursor::new([5, 6, 7, 8]);

let mut reader = reader1.chain(reader2);
let mut buffer = Vec::new();

// read the value into a Vec.
reader.read_to_end(&mut buffer).await?;
assert_eq!(buffer, [1, 2, 3, 4, 5, 6, 7, 8]);
}
A Cursor wraps an in-memory buffer and provides it with IO traits implementations,
it has both a futures variant and
a blocking std variant.
Mixing async libraries and mixing executors
Going back to mixing types and traits, this brings us to the broader topic of mixing asynchronous frameworks in general. Simply put, it should be avoided at all costs, and doing that might have unforeseen consequences.
It is a particularly dangerous idea to mix executors (such as, to call async code inside a non-async function
which is called by an async function, it might be tempting to do something like futures::block_on). While
this may work in some cases, it is likely at the cost of a reduced performance. However, it is important to
note that an executor is a blocking task, so if you are, for example, trying to read from an async channel,
which is being fed with a future on another executor, if both of them are on the same OS thread, you will
dead-lock (since the producer future is never advanced).
Multi-threaded executors also often use settings fine-tuned for the host machine (such as, spawning a worker thread for each CPU core or physical thread), so it is better to only run one executor.
Tokio tasks, spawn() and spawn_blocking()
In the previous chapter, we spoke about how spawning OS threads is unsuitable for workloads involving many small tasks because of the overhead involved in thread creation, and how concurrent programming deal with this issue.
Tokio (and other async frameworks) provide means of dividing workload into logical units that the executors schedule. Within the context of tokio, these are called tasks. If you are familiar with the concept of a green-thread, you can liken a task to green-threads.
In Tokio, this is how you create a task:
#![allow(unused)]
fn main() {
use tokio::task;

task::spawn(async {
    // perform some work here...
});
}
Much like std::thread::spawn, the function task::spawn
returns a JoinHandle, which you can use to either ensure a graceful shutdown (making all tasks have ended by joining
all task handles), join a couple finite tasks, or, if your task produces a tangible value, then to capture that value.
Joining a task is fallible, with the JoinError, which
lets you discern, what went wrong, usually, you can run into cancelled tasks or tasks that panicked.
There exists a similar function called task::spawn_blocking.
This is useful for CPU-intensive computations or blocking operations. While the API is pretty much the same, Tokio will
send this task to a special blocking thread, where blocking is acceptable. You can still join it or await a result value
just the same.
If your code in a task can diverge into a blocking path where you are sure that this will be the case until it finishes or program ends, you can opt to have the async worker thread your task is currently running on be transitioned into a blocking thread, which can save you some performance by avoiding context switches:
#![allow(unused)]
fn main() {
use tokio::task;

let result = task::block_in_place(|| {
    // do some compute-heavy work or call synchronous code
    "blocking completed"
});

assert_eq!(result, "blocking completed");
}
The Tokio scheduler is cooperative, as opposed to preemptive, such as the one that schedules threads in your operating
system. This means that a task is never preempted (paused forcefully with the scheduler switching to another), so a Tokio
task will run until it yields, which is an indication to the scheduler that it currently cannot continue executing. Tokio
library functions and types generally have periodical explicit yield points to lessen the risk that a task starves another,
however, if you are in a situation where you want to give absolute priority to a task, you may opt-out of cooperative scheduling
with task::unconstrained:
#![allow(unused)]
fn main() {
use tokio::{task, sync::mpsc};

let fut = async {
    let (tx, mut rx) = mpsc::unbounded_channel();

    for i in 0..1000 {
        let _ = tx.send(());
        // This will always be ready. If coop was in effect, this code would be forced to yield
        // periodically. However, if left unconstrained, then this code will never yield.
        rx.recv().await;
    }
};

task::unconstrained(fut).await;
}
In the unlikely event that you have a future which is not Send, and thus cannot be scheduled on a different OS thread
than the one it has been created on, you can make a task out of it with task::spawn_local():
use std::rc::Rc;
use tokio::task;

#[tokio::main]
async fn main() {
    let unsend_data = Rc::new("my unsend data...");

    let local = task::LocalSet::new();

    // Run the local task set.
    local.run_until(async move {
        let unsend_data = unsend_data.clone();
        task::spawn_local(async move {
            println!("{}", unsend_data);
            // ...
        }).await.unwrap();
    }).await;
}
Rc cannot be used where Send + Sync is required because it contains non-atomic counters,
and sharing it across threads carries the risk of data races.
Tokio console
Just like on a system with many processes running, it may be useful to expect what are these processes doing, it may also be useful to inspect the asynchronous tasks running in a large application. Tokio in this aspect has a clear edge over most other async frameworks by providing tokio-console.
This allows you to inspect tasks, their state, duration they've been running or idle for, and other information.
Check out this link to see how the console works and how to use it with a Tokio project: https://docs.rs/tokio-console/latest/tokio_console/#using-the-console
Shared state patterns
Concurrent and parallel programs both share the headache of properly sharing state between tasks (and/or threads). Luckily, the solution is similar for both:
- Guarding the shared state with synchronization primitives such as Mutex or RwLock
- Using lock-free data structures
- Spawning a task (thread) to manage the task and using message passing via a mpmc or mpsc channels.
Some considerations must be taken:
- Be wary that you don't dead lock your application with Mutexes and RwLocks
- Channels that have an async API work the best for async applications,
flumeis highly-recommended, as Tokio-provided channels have worse performance
Cancelling tasks and destructors
It can often occur in async applications that a future is no longer needed and waiting on it would be a waste of resources. We spoke about this already in the previous chapter.
You might be asking how to do proper cleanup, when a future is cancelled and does not know it is being cancelled. The answer is easy, and that is to follow the RAII pattern, which is ever-present in Rust.
Simply put relevant bits of your cleanup code into the Drop implementations on your types, and you can be sure that it will run.
Sleeping
Much like you can suspend a thread by making it sleep, the same is available for Tokio tasks. The analogue of std::thread::sleep
is tokio::time::sleep.
use tokio::time::{sleep, Duration};

#[tokio::main]
async fn main() {
    sleep(Duration::from_millis(100)).await;
    println!("100 ms have elapsed");
}
A couple considerations need to be taken:
- Setting a duration of 100 milliseconds doesn't mean your task will continue after 100ms precisely. The executor may decide to poll your future later. Therefore, this shouldn't be used for tasks that require high-resolution timers
- This will not sleep the thread the future was running on, but merely make the future claim to be not ready until the time has advanced enough.
Blocking tasks
One of the specifics of Tokio is that its threadpool supports both asynchronous and synchronous threads. As such, it is possible to move an expensive blocking to another thread and await it from a future that is scheduled by the runtime.
The tool for this is tokio::task::spawn_blocking.
This will run a closure on a thread where blocking is acceptable.
However, keep in mind that it is impossible to cancel a blocking task, when you shut down the executor, it will wait
indefinitely for these tasks to finish. You can use a timeout to not do that. All in all, it is a good idea to not run
indefinite tasks with spawn_blocking
#![allow(unused)]
fn main() {
use tokio::task;

let res = task::spawn_blocking(move || {
    // do some compute-heavy work or call synchronous code
    "done computing"
}).await?;

assert_eq!(res, "done computing");
}
When not to use Tokio
There are a couple domains, where Tokio is not the optimal solution, or simply provides little benefit.
In general, Tokio is best suited for places where you need to do many things at the same time, and inversely, least suitable for tasks, where you need to do one thing at once with optimal performance. This includes many utility type programs, mathy applications, or domains such as text processing.
Speaking of performance, Tokio is unsuited for speeding up CPU-bound tasks by spreading them across multiple threads.
You are better of using rayon or another thread-pool computation library.
Also, you need to evaluate the fact that using async may introduce extra complexity in very simple programs, so you should weigh the benefits of introducing Tokio into your project before jumping in head first.
The Project - A KV store client
For this project, we are going to draw inspiration from the tutorial one provided by Tokio itself, which already serves as a great example:
https://tokio.rs/tokio/tutorial/setup
Your task is to implement the client according to the tutorial. For this project, try to at least get down these two server commands:
GETSET
If the project is too time consuming, it is okay to skip the PUBLISH and SUBSCRIBE commands.
1. The Braiins spin
Your project should be developed in accordance with the Braiins standard, and in accordance with the best developer practices:
- Code should be cleanly organized
- Add logging with tracing to what is happening clear
- Formatted with rustfmt, and producing no lints when ran through clippy
2. The Final product
In the end you should be left with a well prepared project, that has the following:
- full functionality
- documented code (where applicable)
- clean git history that does not contain fix-ups, merge commits or malformed/misformatted commits
Closures
Prerequisites:
- Chapter about ownership
- Trait syntax
- A cursory knowledge of rust async/await, as it is mentioned
Closures are a way to delegate an action for later or for elsewhere, or to allow passing actions to code that provides context. They are very similar to anonymous functions, lambda expressions, or function literals you may be used to from other languages, such as JavaScript, C#, or pretty much all functional programming languages.
The main defining feature of closures in comparison to inline functions is that they allow capturing variables, or references to variables, from the function they were defined in. We call this mechanism closing over its environment, hence the name closure.
Their syntax slightly differs from functions:
- Parameters are enclosed in vertical bars (
|) instead of parenthesis - The types of parameters and return types are inferred, if possible
- If the body of a closure is a single expression, it does not need to be
enclosed in brackets (
{})
BTW: Assignments and any other expressions trailed with a semicolon are not considered expressions for the last rule, and you always have to enclose them in brackets
Here is how a closure looks and works, in simplest terms:
fn main() {
    let x = 2;

    // let's take two parameters and add them up
    // with an outside variable and a literal
    // just like in functions, the final expression
    // in a closure is considered the return value
    let my_closure = |a, b| x + a + b + 5;
    // we could also specify the types, ie. |a: i32, b: i32|

    // you call a closure like you would call a function
    println!("result: {}", my_closure(5, 10));
}
A closure that takes mutable arguments does not need to be declared as mutable.
However, let's first try a naive attempt:
#![allow(unused)]
fn main() {
let mut x = 2;

let my_closure = |mut a| { a += 5 };

my_closure(x);

println!("result: {}", x);
}
If you run this you will see that the result is 2, not 7. What gives?
Well, to get the answer, we need to go back and consider what we know about ownership.
The way we have declared our closure implies it takes arguments by ownership. If the
integer was not a Copy type, it would have been inaccessible after calling my_closure,
since it would be moved into it and then dropped after the assignment.
However, since all primitive numeric types are Copy, a copy of x is created in the
third statement my_closure(x), and it is this copy that gets assigned to and dropped
immediately.
We need to amend our code to take a mutable reference to x instead:
#![allow(unused)]
fn main() {
let mut x = 2;

// we need to deref to asign to it
// Rust also requires us to specify the type here
let my_closure = |a: &mut i32| { *a += 5 };

my_closure(&mut x);

println!("result: {}", x);
}
This work as expected, and as you can see, my_closure still needs to be declared
as immutable.
However, a closure needs to be declared as mutable if it mutates the environment it closes over:
fn main() {
    let mut x = 2;

    // this time we don't take x as parameter,
    // but close over it;
    let mut my_closure = || { x += 5 };

    my_closure();

    println!("result: {}", x);
}
If you try removing the mut keyword, it will stop compiling.
This is due to the way that closures work internally.
In reality, a closure is a unique, anonymous type that cannot be written out. It is roughly equivalent to a struct which contains the captured variables.
Consider the following closure:
#![allow(unused)]
fn main() {
let x = 3;
let y = 5;

let my_closure = || { x + y };

println!("result: {}", my_closure());
}
Rust will transform this into a structure that looks (roughly) like this:
#![allow(unused)]
fn main() {
struct Closure<'a> {
    x: &'a i32,
    y: &'a i32,
}
}
And then it will implement all three of the following traits:
#![allow(unused)]
fn main() {
pub trait FnOnce<Args> {
    type Output;
    extern "rust-call" fn call_once(self, args: Args) -> Self::Output;
}

pub trait FnMut<Args>: FnOnce<Args> {
    extern "rust-call" fn call_mut(
        &mut self,
        args: Args
    ) -> Self::Output;
}

pub trait Fn<Args>: FnMut<Args> {
    extern "rust-call" fn call(&self, args: Args) -> Self::Output;
}
}
Where Args: ().
As you can see, there are some dependencies between these traits. Every closure is at least
FnOnce, meaning in can be called at least once, wherein the structure is consumed and the
closure body can use captured variables by value/ownership.
A closure is FnMut, if it is also valid in a context, where only accessing captured environment
by at most mutable references.
And finally, the Fn trait is the most restrictive, closures that implement it must also be valid
in a context where only immutable references are allowed on captured variables.
Since our closure from the previous example only needs immutable references, it implements all of the above.
We can kill two birds in one stone and show how we can take closures as a function parameter and also verify that the closure above satisfies all three categories:
fn verify_fn<T>(_: T)
where
    T: Fn() -> i32
{

}

fn verify_fn_mut<T>(_: T)
where
    T: FnMut() -> i32
{

}

fn verify_fn_once<T>(_: T)
where
    T: FnOnce() -> i32
{

}

fn main() {
    let x = 3;
    let y = 5;

    let my_closure = || { x + y };

    // note that we are only passing this closure,
    // not calling it by appending () after its identifier
    verify_fn(my_closure);
    verify_fn_mut(my_closure);
    verify_fn_once(my_closure);

    println!("result: {}", my_closure());
}
As you can see, our code compiled and so the closure satisfies all three categories.
What happens, if we were to mutate one of their variables?
fn verify_fn<T>(_: T)
where
    T: Fn() -> i32
{

}

fn verify_fn_mut<T>(_: T)
where
    T: FnMut() -> i32
{

}

fn verify_fn_once<T>(_: T)
where
    T: FnOnce() -> i32
{

}

fn main() {
    let mut x = 3;
    let y = 5;

    let mut my_closure = || { x += 1; x + y };

    // note that we are only passing this closure,
    // not calling it by appending () after its identifier
    verify_fn(my_closure);
    verify_fn_mut(my_closure);
    verify_fn_once(my_closure);

    println!("result: {}", my_closure());
}
Well, as the error indicates, calling verify_fn fails with the message:
expected a closure that implements the 'Fn' trait,
but this closure only implements 'FnMut'
And further in the description:
closure is `FnMut` because it mutates the variable `x`
This tells you all you need to know. This closure is FnMut and by extension FnOnce, so it is only valid in their respective contexts.
TIP: When requiring users of your code to pass in a closure, select the trait that's the most restrictive for you and most flexible for the user. Ie. if you will be calling a closure only once, require
FnOnce, if you don't need it to be immutable, useFnMut
What happens if we got rid of the verify_fn() call?
fn verify_fn<T>(_: T)
where
    T: Fn() -> i32
{

}

fn verify_fn_mut<T>(_: T)
where
    T: FnMut() -> i32
{

}

fn verify_fn_once<T>(_: T)
where
    T: FnOnce() -> i32
{

}

fn main() {
    let mut x = 3;
    let y = 5;

    let mut my_closure = || { x += 1; x + y };

    verify_fn_mut(my_closure);
    verify_fn_once(my_closure);

    println!("result: {}", my_closure());
}
You will see that now rustc has a different issue, and that is one of ownership.
We could pass the previous closure to three functions and then call it because it was Copy.
This is because all of its members are Copy (because immutable borrows are Copy as mentioned in Chapter 1).
When we went and mutated x, the structure is now capturing a mutable reference for x. You
can play around with the above example to figure out how to make it compile and run.
Move closure
When defined, a closure can be optionally pre-pended by the keyword move. If this keyword is used,
a closure captures all of the values by ownership instead of by reference, regardless of what is at most
needed in the closure. This has no bearing on whether a closure is at most Fn, FnMut or FnOnce,
but it does have a bearing on ownership.
Because all variables are captured by value, the closure can (usually) outlive the function it was defined in, which can help it become more flexible.
Let's quickly remember what makes a closure Copy. A move closure can also be Copy if all of the captured
variables are Copy.
Consider the following example:
fn foo(mut f: impl FnMut()) {
    f();
}

fn bar(mut f: impl FnMut() + Copy) {
    f();
    foo(f);
    f();
    foo(f);
}

fn main() {
    let mut i = 0;
    bar(move || {
        i += 1;
        println!("{}", i);
    });
}
What do you think the output is? Try to apply the rules we've just presented and deducing the output to stdout without running the code.
Once you have an educated guess, you can either run the code or peep the answer here:
We need to differentiate between when a closure is copied and when it is modified.
The one really important function we need to focus on in this example is bar().
Here it is annotated with what's happening, which you can use to check if your reasoning was correct, regardless of answer.
#![allow(unused)]
fn main() {
// The Copy trait bound here is key,
// since we need to Copy f into foo()
fn bar(mut f: impl FnMut() + Copy) {
    f();     // i += 1, when i = 0, -> print 1
    foo(f);  // f is copied into bar(), copy of i += 1, when i = 1 -> print 2
    f();     // the original i is unmodified, therefore i += 1, when i = 1 -> print 2
    foo(f);  // f is copied into bar(), copy of i += 1, when i = 2 -> print 3
}
}
Keep the rules of ownership, copying and moving in mind.
Async and closures
What if you need an async closure? Well, despite async/await having some years under its belt already,
asynchronous closures haven't been stabilized yet.
You can enable them with #![feature(async_closure)] in crate root (ie. lib.rs or main.rs), at which
point they can be used with a rather familiar syntax:
#![feature(async_closure)]

fn main() {
    let closure = async || {
         println!("Hello from async closure.");
    };
    println!("Hello from main");
    let future = closure();
    println!("Hello from main again");
    futures::executor::block_on(future);
}
One could argue that an async block would behave the exact same way in this very limited use case:
fn main() {
    let future = async {
         println!("Hello from async future.");
    };
    println!("Hello from main");
    futures::executor::block_on(future);
}
However, there is a couple important differences:
- An async closure can take parameters
- You can only await a future once, but you can (unless
FnOnce) call an async closure multiple times, producing multiple futures.
To take an async closure as a parameter, you need to be generic both over the closure and the future, meaning at least two generic params are required.
TIP: It might be tempting to try the
impl Traitsyntax, but remember that it is not possible here. **Existential types are not generics, but instead refer to a single concrete type derived from function/block body. We don't have this information when specifying a parameter
Let's be generic over the Future's output to display something you might encounter:
#![allow(unused)] fn main() { use std::future::Future; async fn await_it<T, F, O>(closure: T) -> O where T: Fn() -> F, F: Future<Output = O> { closure().await } }
As you can see, we don't need to mention the fact that it's an async closure anywhere in T's trait bound. Once again, async closures are syntactic sugar, and without having to enable the aforementioned nightly feature, you can create them with async blocks:
use std::future::Future; async fn await_it<T, F, O>(closure: T) -> O where T: Fn() -> F, F: Future<Output = O> { closure().await } fn main() { let closure = || async { println!("Hello from async closure."); }; println!("Hello from main"); let future = await_it(closure); println!("Hello from main again"); futures::executor::block_on(future); }
Non-capturing closures
A non-capturing closure is a closure that does not capture any of its environment, and only works with its parameters.
Such closure can be coerced into an fn() pointer with matching signature:
fn main() { fn internal(x: i32, y: i32) -> i32 { x + y } // a fn pointer for comparison let add_fn = internal; // a non-capturing closure let add_closure = |x, y| x + y; let mut x = add_closure(5,7); type Binop = fn(i32, i32) -> i32; let bo: Binop = add_fn; let bo: Binop = add_closure; x = bo(5,7); }
Other "automatic" traits
We have already seen that closures can be Copy.
There are three other traits that can be satisfied by closures:
CloneSyncSend
Similarly to Copy, a closure is Clone if all of its captured variables are
either captured by immutable reference, or by value if the types of all variables are Clone.
Because all Copy types also implement Clone, all Copy closures satisfy Clone also.
A closure is Sync if all of its captured variables are Sync, meaning references to them are safe to be
shared across threads. A type T is Sync if and only if &T is Send.
From this we can also deduce, that a closure is Send, if all of the types that are captured by reference
are at least Sync, and all of the types captured by value are Send.
The task: Pipeline Programming
Sometimes, science is too pre-occupied with whether or not we could, that we do not stop to think if we should.
For this project, it will be your task to implement three traits, that will cover all types:
#![allow(unused)] fn main() { trait Pipe { /// take Self by ownership, returning T fn pipe<F, T>(self, apply: F) -> T where F: /* select correct Fn trait */ -> T; } trait PipeMut { /// take Self by &mut, returning T fn pipe_mut<F, T>(&mut self, apply: F) -> T where F: /* select correct Fn trait */ -> T; /// take Self by &mut, ignoring the result of the closure, returning &self fn pipe_ignore_mut<F, T>(&mut self, apply: F) -> &mut self where F: /* select correct Fn trait */ -> T; } trait PipeRef { /// take Self by &, returning T fn pipe_ref<F, T>(&self, apply: F) -> T where F: /* select correct Fn trait */ -> T; /// take Self by &, returning &self fn pipe_ignore<F, T>(&self, apply: F) -> T where F: /* select correct Fn trait */ -> T; } }
Complete the definitions of these traits with correct closure trait bounds;
Implement these three traits on types, such that this program will run:
use std::env::args; fn main() { args() .skip(1) .next() .pipe(|o| o.unwrap()) .pipe_ignore(|s| println!("received string: {}", s)) .pipe(|s| s.chars().map(|c| c as u8 as usize).sum::<usize>()) .pipe_ignore_mut(|s| println!("magic number: {}", s)) .pipe(|s| *s + 1) .pipe_ignore(|s| println!("incremented: {}", s)); }
For braiins, the output should be:
received string: braiins
magic number: 744
incremented: 745
Iterators and laziness with types
Prerequisites:
- Chapter about ownership
- Description of generics from trait chapter
- Existential types from the async chapter
- Knowledge of vectors and types of loops in Rust
Collections are some of the most commonly encountered data structures in most programs, in fact, some, such as the basic filters known from the common Linux/Unix userland can be described as programs that merely manipulate a list of strings, that is, the lines of a file.
From more imperatively-oriented programming languages, you might be used to using
loops to process lists, most commonly with one of the incarnations of the for
loop.
In functional programming languages, recursion tends to be the preferred method of list processing, however, in some cases, recursion might be awkward to type out and may end up being hard to read. Furthermore, the recursive approach limits the maximum amount of iterables in programming languages that do not have Tail Call Optimization, as each iteration will insert a new stack frame to the call stack, so you will eventually run out of stack.
Rust is one of the languages that do not have TCO, and so you will eventually blow your stack. You can see how many calls deep can you go by running the following code example on your machine:
#[allow(unconditional_recursion)] fn recurse(x: usize) -> ! { println!("{}", x); recurse(x + 1) } fn main() { recurse(1); }
On my machine, this program can go 104756 levels deep in a --release build before running
out of space on the stack.
These two limitations necessitate the need for an abstract and declarative solution. That would be iterators and operations on iterators.
Iterators in Rust
An iterator is a type that facilitates iteration on an iterable, producing an item every iteration. This is by done by implementing the iterator traits.
The main traits are the following:
- Iterator - must be implemented by all iterators, the "main trait"
- IntoIterator - to convert a type into an iterator, consuming
the type in the process (this is usually needed if you want to iterate over
Itemtype directly and not a reference without cloning or copying)
Then there is a couple secondary traits:
- DoubleEndedIterator - allows taking from the back of an iterator
- ExactSizeIterator - signifies this iterator has an exact size. It is a good idea to implement this traits as it makes way for optimizations by the compiler
- FusedIterator - signifies that the iterator will always continue to
yield
Nonewhen first exhausted. This marker trait should also be implemented by all iterators that behave this way because it allows optimizingIterator::fuse
In Rust, the convention is to choose one of the following two approaches:
1. Implement one or more iterator traits directly on your type
This is the approach you should take when the iterability of your type is limited (ie. only one of &Item, &mut Item and Item makes
sense for the iterator to produce) and/or when the iterator itself is capable of keeping track of the next element it should produce,
either because it is some sort of a FIFO or LIFO structure, or because it contains a counter for current element.
Keep in mind that the Iterator trait requires mutable access to the implementor, so you will have to choose the second approach
if that is not possible
You might also choose this approach, if the items are generated somewhere else, for example, imagine you implement an abstraction
over a network protocol as an iterator over received messages, which only starts returning None when the connection is closed.
Implementing an iterator on a structure is not a difficult endeavor:
#![allow(unused)] fn main() { /// a simple iterator producing the Fibonacci sequence struct Fibonacci(usize, usize); impl Fibonacci { fn new() -> Self { Self(0, 1) } } impl Iterator for Fibonacci { type Item = usize; fn next(&mut self) -> Option<Self::Item> { let res = self.0; self.0 = self.1; self.1 = res + self.1; Some(res) } } }
This simple iterator can then be used just like any other:
/// a simple iterator producing the Fibonacci sequence struct Fibonacci(usize, usize); impl Fibonacci { fn new() -> Self { Self(0, 1) } } impl Iterator for Fibonacci { type Item = usize; fn next(&mut self) -> Option<Self::Item> { let res = self.0; self.0 = self.1; self.1 = res + self.1; Some(res) } } fn main() { for i in Fibonacci::new().take(20) { println!("{}", i); } }
The .take(n) method will only take the first n items of the iterator, producing None after the nth one. Otherwise,
this would run infinitely depending on whether debug assertions are enabled and overflow would or would not cause a panic.
2. Use intermediary structures for iterators
When you want to allow multiple Item types, more than one of &Item, &mut Item and Item, and if the implementor itself
is not capable of keeping track of the current element, or it cannot be used in a mutable context (for instance, because it is
shared across threads), then you need to use an intermediary struct.
This is usually done like this:
- implement methods
.iter(),.iter_mut()(and optionally.into_iter()if you can't implement theIntoIteratortrait for some reason) directly as methods on the type - each of these produces an instance of their respective iterator types, which you implement the iterator traits on
You can first see this pattern on the Vec type:
Vecitself does not implement only implementsIntoIteratora couple times- The type itself has the methods
.iter()and.iter_mut() .iter()returnsstd::slice::Iter.iter_mut()returns [https://doc.rust-lang.org/std/slice/struct.IterMut.html]- the
IntoIteratorowned impl returnsstd::vec::IntoIter
And the iterator traits are implemented on slice::Iter, slice::IterMut, vec::IntoIter respectively.
BTW: The first two methods make use of the fact that a vector implements
AsRefandAsMutinto slice, indicating a vector can be interpreted as a slice. This allowsVecto make use of a lot of methods and functionality already implemented on slices, such as in this case.
Note that implementing this approach takes significantly more code, however, the benefit is increased flexibility.
This is how an implementation on a simple iterator might look (only immutable iter implemented):
/// a simple iterator that alternates taking elements from both ends struct Converging(Vec<usize>); impl Converging { fn iter<'a>(&'a self) -> Iter<'a> { Iter(0, self.0.len(), false, self) } } /// start, end, take_from_end struct Iter<'a>(usize, usize, bool, &'a Converging); impl<'a> Iterator for Iter<'a> { type Item = &'a usize; fn next(&mut self) -> Option<&'a usize> { self.2 = !self.2; if self.2 && self.1 != self.0 { self.0 += 1; self.3.0.get(self.0 - 1) } else if self.1 != self.0 { self.1 -= 1; self.3.0.get(self.1) } else { None } } } fn main() { // type of i is &usize for i in Converging(vec![0, 1, 2, 3, 4, 5, 6, 7, 8, 9, 10]).iter() { println!("{}", i); } }
The iterator structures generally have to have some link to the structure they come from, so it is often
necessary to hold a reference. As the iterators are types like any other, ownership rules are still upheld
and you need to be generic over the lifetime of the underlying structure whose iteration you are facilitating,
hence the 'a' lifetime param.
When implementing a mutable iterator, it is sometimes possible that you are technically trying to hand out
mutable references to the same object, even though you know that the references are disjoint and no issues
with aliasing, memory corruption or data races should occur. Rust is not yet smart enough to be able to identify
these cases and so iterators over mutable references often contain a smidgen of unsafe {} Rust to bypass the
strict ownership rules.
Inner workings of iterators
Iterators in Rust are lazy, and don't do anything until they are consumed by one of the consumer methods, or a for-loop. For example, one might make a naive attempt to mutate a collection with iterators like this:
fn main() { let mut v = vec![1, 2, 3, 4, 5]; v.iter_mut() .map(|i| *i *= 2); println!("{:?}", v); }
However, if you try running this example, you will see that the printed vector is the same as the original one.
You will also get the following warning:
#![allow(unused)] fn main() { Compiling playground v0.0.1 (/playground) warning: unused `Map` that must be used --> src/main.rs:4:5 | 4 | / v.iter_mut() 5 | | .map(|i| *i *= 2); | |__________________________^ | = note: `#[warn(unused_must_use)]` on by default = note: iterators are lazy and do nothing unless consumed }
Apart from .map() not being exactly the correct method to use, the second note tells you exactly what you need to know,
nothing has consumed this iterator and so it didn't execute.
In Rust, iterators that have operations on them such as .map, .filter, .inspect, .filter_map create large and complex
types, and then all of the actions are stacked on top of one another for each element as opposed to the first action being processed
on all elements first, then the second action on all elements... and so on. The latter approach would actually be quite problematic
if you remember that some iterators are endless or not fused, and so you can't be certain about the total amount of elements.
This makes iterators quite effective and about as performant (or even more performant) as loops, as they only have to iterate through the collection once.
Consider the following example:
#![allow(unused)] fn main() { // ranges are already iterators let number_string = (0usize..20usize) .map(|x| x * 2) .filter(|x| x % 3 == 0) .take(6) .skip(3) .map(|x| x.to_string()) .collect::<String>(); println!("{}", number_string); }
You should see the output 182430.
Here is a table indicating how the elements were processed (x indicates that an element was eliminated in this step):
| start | 0 | 1 | 2 | 3 | 4 | 5 | 6 | 7 | 8 | 9 | 10 | 11 | 12 | 13 | 14 | 15 | 16 | 17 | 18 | 19 |
|---|---|---|---|---|---|---|---|---|---|---|---|---|---|---|---|---|---|---|---|---|
| .map | 0 | 2 | 4 | 6 | 8 | 10 | 12 | 14 | 16 | 18 | 20 | 22 | 24 | 26 | 28 | 30 | 32 | 34 | 36 | 38 |
| .filter | 0 | x | x | 6 | x | x | 12 | x | x | 18 | x | x | 24 | x | x | 30 | x | x | 36 | x |
| .take | 0 | 6 | 12 | 18 | 24 | 30 | x | |||||||||||||
| .skip | x | x | x | 18 | 24 | 30 | ||||||||||||||
| .map | "18" | "24" | "30" | |||||||||||||||||
| .collect | "18" | "24" | "30" |
Once an element is eliminated, no further operations are attempted on it.
The type of the iterator is this monstrosity:
#![allow(unused)] fn main() { Map<Skip<std::iter::Take<Filter<Map<std::ops::Range<usize>, [closure@src/main.rs:3:14: 3:23]>, [closure@src/main.rs:4:17: 4:31]>>> }
Longer iterator operations, with more closures get much worse. As you remember from the closure chapter, these closure types are anonymous types, and their definitions can get pretty long. In older Rust, it was common to reach the type length limit with iterator operations.
There is no easy way to type the type out exactly, and it is outright impossible if there are closures involved, such as in this case. Not even generics help:
#![allow(unused)] fn main() { use std::iter::{ Map, Skip, Take, Filter, }; use std::ops::Range; fn return_iter<T, U, V>() -> Map<Skip<Take<Filter<Map<Range<usize>, T>, U>>>, V> where T: Fn(usize) -> usize, U: Fn(usize) -> usize, V: Fn(usize) -> String, { (0usize..20usize) .map(|x| x * 2) .filter(|x| x % 3 == 0) .take(6) .skip(3) .map(|x| x.to_string()) } }
This returns an error about mismatched types, and it hinges on the closures.
Existential types in iterators
As mentioned in the chapter on closures, existential traits, AKA the impl Trait syntax is also commonly used
for when functions need to return an Iterator, as it allows you to avoid the closure problem and also avoid
having to write out the very long concrete type.
It is also much handier when you decide to change the iterator later on.
Here is how you would fix the previous example with existential types:
#![allow(unused)] fn main() { fn return_iter<T, U, V>() -> impl Iterator<Item=String> { (0usize..20usize) .map(|x| x * 2) .filter(|x| x % 3 == 0) .take(6) .skip(3) .map(|x| x.to_string()) } }
The syntax is much cleaner and you only need to adjust the return type if the final item type is different after your changes.
Once again, keep in mind that existential types are not generics, and you can only use them in return types of functions.
Itertools and rayon
Iterators are commonly implemented for types in many 3rd libraries, as they provide a handy interface to access things that can be even vaguely thought of as collections or as something producing values (ie. think of the receiving end of some communication -> unbounded iterator over messages that only stops when the connection closes). However, there is at least two libraries worth mentioning that focus on iterator usage specifically.
The first of them is itertools, a library focused on extending the functionality of iterators by adding a number of combinators
and utils.
https://docs.rs/itertools/latest/itertools/index.html
Using it is as easy as importing the Itertools trait:
#![allow(unused)] fn main() { use itertools::Itertools; let it = (1..3).interleave(vec![-1, -2]); itertools::assert_equal(it, vec![1, -1, 2, -2]); }
It also contains a couple of handy macros, such as chain, which can improve the readability of your code:
#![allow(unused)] fn main() { use std::{iter::*, ops::Range, slice}; use itertools::{assert_equal, chain}; // e.g., this: let with_macro: Chain<Chain<Once<_>, Take<Repeat<_>>>, slice::Iter<_>> = chain![once(&0), repeat(&1).take(2), &[2, 3, 5],]; // ...is equivalant to this: let with_method: Chain<Chain<Once<_>, Take<Repeat<_>>>, slice::Iter<_>> = once(&0) .chain(repeat(&1).take(2)) .chain(&[2, 3, 5]); assert_equal(with_macro, with_method); }
On the other hand, rayon is solely focused on one thing - parallel execution. And it uses iterators as a natural
way to represent parallelized tasks.
https://crates.io/crates/rayon
This leans into a very useful thing, wherein you can often make an operation on an iterator parallel simply by simply
replacing .iter() et al. with .par_iter().
#![allow(unused)] fn main() { use rayon::prelude::*; fn sum_of_squares(input: &[i32]) -> i32 { input.par_iter() .map(|i| i * i) .sum() } }
Although it is not used as commonly by end users, rayon also supports scheduling tasks on your own without the use of iterators.
Composing types pattern
Related RustConf talk: https://www.youtube.com/watch?v=wxPehGkoNOw
Iterators are an example of a common pattern in Rust, that is the pattern of encoding information and actions into type in a more elaborate manner than most commonly seen in imperatively oriented programming languages, which more corresponds to functional programming.
Another example of this that we've seen are the async futures from the previous chapters, although the types involved are
not directly visible and accessible to us. You can take a look at the [FuturesExt] trait and all the operations similar in
setup to the iterators' operations found in its methods:
https://docs.rs/futures/latest/futures/future/trait.FutureExt.html
If you have worked with the Diesel ORM and query builder, it uses the same pattern for building queries.
In more abstract terms, the pattern can be described as such:
- Create a number of composable types bound together by a trait
- The trait should contain methods that allow composing, alternatively such methods can be on the composable types themselves
- By using the methods, the user can declaratively describe what they need to do, the result of said calls being a complex type
- No action happens until something consumes or uses said complex type (it can be reusable)
This approach has several benefits:
- It leads itself to more declarative code, which makes it easier to understand from the user perspective
- The complex type can be reused, saving work and resources
- In the context of Rust, complex concrete types are very optimization friendly, and can result in better performance
I believe that this concept is best understood by practicing it on an exercise.
The Task: Type-encoded filter
For this project, the task is to implement a type-encoded filter, such that:
- no dynamic dispatch is used
- closures are stored directly without being in a box or similar container
The exercise is complete when the following code snippet works correctly:
fn main() { let tester = AllOf( ( Negate(Simple(|x: i32| x % 2 == 0, PhantomData), PhantomData), Simple(|x: i32| x % 3 == 0, PhantomData), Simple(|x: i32| x > 10, PhantomData), Simple(|x: i32| x < 100, PhantomData), ), PhantomData, ); for i in (0..1200).filter(|x| tester.test(*x)) { println!("matches: {}", i); } }
As you can see, there is a lot of PhantomData. These are left here instead of being hidden in some sort of
a ::new() associated function to help you figure the types out. You can make small adjustments to the code
snippet above, so long as its essential nature is preserved.
PhantomData, which you might be familiar with from the trait chapters, is a zero-sized type which you
can use to plant a generic parameter or a lifetime in your struct which would otherwise remain unused by struct
members, which is not allowed in Rust.
It is most commonly used to represent something like this:
struct MyStruct<T, U> where T: MyTrait<U> { //... something_cool: T, _phantom: PhantomData<U>, }
Without the PhantomData, the U type param would not be used inside the struct and so rust would complain.
The example is editable so you can try it out.
1. Traits and types
Start by creating a Filter trait generic over any type T, with the single method of:
#![allow(unused)] fn main() { fn test(&self, t: T) -> bool; }
Next create the following four types:
Simple, containing anFn(T) -> bool, which uses the given closure to test if a T satisfies a conditionNegate, containing any type that implementsFilter, which negates the boolean result of the contained filterAllOf, containing any tuple between 2 and N elements of any type implementingFilter, which returns true only if the tests of all of its elements return trueOneOf, containing any tuple between 2 and N elements of any type implementingFilter, which returns true if any of the tests of its elements returns true
Implement the trait Filter for all of these types, with the trait bound of T: Copy.
For the tuples, N is 4 if you decide to do it by hand, and 10 if you use the impl_trait_for_tuples crate
To handle the tuples, we need to add another trait, which we can for example call TestTuple also generic over T, with the
following single method:
#![allow(unused)] fn main() { fn test_tuple(&self, t: T) -> Vec<bool>; }
Which returns a vector of test results of all of its elements.
To implement it on all tuples between such and such amount of elements, you can use the impl_trait_for_tuples crate.
With it, you can create a blanket implementation such as the following:
#![allow(unused)] fn main() { use impl_trait_for_tuples::impl_for_tuples; #[impl_for_tuples(2, 10)] #[tuple_types_custom_trait_bound(Filter<T>)] impl<T> TestTuple<T> for Tuple where T: Copy, { // your code here } }
Make sure to read the documentation to learn how to use for_tuples! properly, if you decide to go this way:
https://docs.rs/impl-trait-for-tuples/latest/impl_trait_for_tuples/#semi-automatic-syntax
2. Testing and more
OneOf remains untested, so create a test for OneOf, which demonstrates its usage.
You are also welcome to run a thought experiment, or perhaps try to make it a reality if time allows,
how would you modify the code to allow for T: !Copy.
3. Final product
In the end you should be left with a well prepared project, that has the following:
- full functionality
- documented code (where applicable)
- clean git history that does not contain fix-ups, merge commits or malformed/misformatted commits
Protocol buffers and gRPC
Prerequisites:
- You should be familiar with Rust
- async
Communication between different parts of an ecosystem is a key feature of large, non-monolithic or even distributed projects. Historically, using REST/HTTP or SOAP were some of the most common solutions. Nowadays, another option is using GraphQL or, in the case of embedded devices, mqtt.
In Braiins, we opted for gRPC. This is because it has several benefits:
- great tooling and language support (even though the Rust implementation is considered "community" and not official)
- it uses Protocol buffers to specify message types and is a binary protocol
- no need to worry about the underlying wire protocol
- simple to use, with good performance and low latency
- native support for bi-directional streaming, encryption
- focus on forward and backward compatibility
- layered design
Protocol buffers
Protocol buffers are the de/serialization format used by gPRC.
There are two major versions used out in the wild, version 2 and version 3.
The latter features simplified syntax, has useful new features and supports
more languages, so it is recommended you use it.
In fact, gRPC service APIs themselves are specified in Protobufs' .proto files,
and are generated by a plugin to the protoc compiler.
Order of fields is important in protocol buffers, and is explicitly specified for each field:
syntax = "proto3";
message SearchRequest {
string query = 1;
int32 page_number = 2;
int32 result_per_page = 3;
}
The first line is required to enable version 3 syntax, the older version is still the default otherwise
Each field number can only be specified once, field numbers between 1-15 only take one byte to encode and so should they be used up first, and field numbers between 19000 and 19999 are reserved by the implementation and thus you cannot use them.
List-like behavior is supplanted by using repeated fields:
syntax = "proto3";
message TheBoys {
repeated string names = 1;
}
For other types and rest of the syntax, you can check out this cheat-sheet: https://gist.github.com/shankarshastri/c1b4d920188da78a0dbc9fc707e82996
gRPC service specifications
You might have noticed the following snippet at the end of the protobuf cheat-sheet gist linked above:
service SearchService {
rpc Search (SearchRequest) returns (SearchResponse);
}
This is the service definition used by gRPC. It defines a single API call
called Search which takes a parameter SearchRequest, returning a SearchResponse.
Further information can be found here: https://www.grpc.io/docs/what-is-grpc/core-concepts/
Streams
Streams are an important concept in gRPC. Since bi-directional streams are supported, you can effortlessly do the following:
- have an RPC call take a stream of parameters, producing an unary response
- have an RPC call take an unary parameter, producing a stream response
- take a stream, return a stream
Streams are declared by using the stream keyword:
service SearchService {
rpc Search (stream SearchRequest) returns (stream SearchResponse);
}
This declaration takes a stream and returns a stream.
gRPC in Rust
In Rust, there are two options for gRPC:
In Braiins, we prefer tonic, as it is a part of the hyper ecosystem
and integrates well with it and tokio, and linking to OpenSSL is a nightmare
of incompatibilities further down the line.
Building protobuf files
The main library used in the Rust ecosystem for Protocol buffers is prost. Tonic depends on it and uses it.
Protobuf files need to be built ahead of time, so you can include the generated Rust files and can actually implement the API.
For this, you will need to use a Cargo build script. These are small Rust programs
contained in the build.rs file in crate root. Their dependencies are specified
in the [build-dependencies] section. A build script runs at most every build,
but can be specified to run fewer times:
// Example custom build script. fn main() { // Tell Cargo that if the given file changes, to rerun this build script. println!("cargo:rerun-if-changed=src/hello.c"); // Use the `cc` crate to build a C file and statically link it. cc::Build::new() .file("src/hello.c") .compile("hello"); }
See, further information here: https://doc.rust-lang.org/cargo/reference/build-scripts.html
To build the gRPC files, we need the tonic-build crate.
Specify your Cargo.toml suchly:
[dependencies]
tonic = "<tonic-version>"
prost = "<prost-version>"
[build-dependencies]
tonic-build = "<tonic-version>"
Then you can use build.rs to build your protobuf files:
fn main() -> Result<(), Box<dyn std::error::Error>> { tonic_build::compile_protos("proto/service.proto")?; Ok(()) }
You can then include it in your Rust crate:
#![allow(unused)] fn main() { pub mod service { // name of the grpc package tonic::include_proto!("service"); } }
Implementing the server-side
In most languages, the gRPC framework might generate something like a
stub method for each API call, in Rust, it generates an async_trait
for each service, which you need to implement.
Whether the struct you implement it on contains inner state or is a unit struct is your prerogative:
use tonic::{transport::Server, Request, Response, Status}; pub mod service { // name of the grpc package tonic::include_proto!("service"); } use service::search_service_server::{SearchService, SearchServiceServer}; use service::{SearchRequest, SearchResponse}; #[derive(Default)] pub struct MySearch; #[tonic::async_trait] impl SearchService for MySearch { async fn search( &self, request: Request<SearchRequest> ) -> Result<Response<HelloReply>, Status> { unimplemented!("this is where I would put my search implementation, if I had one!!!") } } #[tokio::main] async fn main() -> Result<(), Box<dyn std::error::Error>> { let addr = "[::1]:50051".parse().unwrap(); let search = MySearch::default(); Server::builder() .add_service(SearchServiceServer::new(search)) .serve(addr) .await?; Ok(()) }
Interceptors
To facilitate features such as authentication by way
of checking, modifying or adding metadata and cancelling
requests with a status, gRPC supports a concept called
interceptors.
As such, interceptors are similar to middle-ware, but they are much less flexible.
Interceptors are added by using the with_interceptor() method
on your Service trait.
#[tokio::main] async fn main() -> Result<(), Box<dyn std::error::Error>> { let addr = "[::1]:50051".parse().unwrap(); let greeter = MyGreeter::default(); // See examples/src/interceptor/client.rs for an example of how to create a // named interceptor that can be returned from functions or stored in // structs. let svc = GreeterServer::with_interceptor(greeter, intercept); println!("GreeterServer listening on {}", addr); Server::builder().add_service(svc).serve(addr).await?; Ok(()) } /// This function will get called on each inbound request, if a `Status` /// is returned, it will cancel the request and return that status to the /// client. fn intercept(mut req: Request<()>) -> Result<Request<()>, Status> { println!("Intercepting request: {:?}", req); // Set an extension that can be retrieved by `say_hello` req.extensions_mut().insert(MyExtension { some_piece_of_data: "foo".to_string(), }); Ok(req) }
For real middle-ware, look into the tower
crate with the concept of layers. These allow you to modify and further process the
data passing through and you can also use it to collect metrics.
Here is an example of a logger layer:
#![allow(unused)] fn main() { use tower::Layer; In production, consider using something like [`tracing`](https://docs.rs/tracing/latest/tracing/index.html) instead of `println!` for logging. Layers are also a very handy way to record metrics, for example with [Prometheus](https://prometheus.io/docs/introduction/overview/) pub struct LogLayer { target: &'static str, } impl<S> Layer<S> for LogLayer { type Service = LogService<S>; fn layer(&self, service: S) -> Self::Service { LogService { target: self.target, service } } } // This service implements the Log behavior pub struct LogService<S> { target: &'static str, service: S, } impl<S, Request> Service<Request> for LogService<S> where S: Service<Request>, Request: fmt::Debug, { type Response = S::Response; type Error = S::Error; type Future = S::Future; fn poll_ready(&mut self, cx: &mut Context<'_>) -> Poll<Result<(), Self::Error>> { self.service.poll_ready(cx) } fn call(&mut self, request: Request) -> Self::Future { // Insert log statement here or other functionality println!("request = {:?}, target = {:?}", request, self.target); self.service.call(request) } } }
In production, consider using something like tracing
instead of println! for logging.
Layers are also a very handy way to record metrics, for example with Prometheus
The project: Server calculator
For this project, we will be developing a very simple server-client calculator over gRPC.
1. Start by creating the protobuf file
Define two types:
CalcInput, which contains integersaandbCalcOutput, which contains a single number with result and boolerror
Define a service Calculator with four calls, all of which will take CalcInput and produce CalcOutput:
Addfor additionSubfor subtractionDivfor divisionMulfor multiplication
2. Server implementation
Implement the service above accordingly, the error param of the output should be true if the operation is invalid (ie. undefined).
Per the examples above, you will need to do the following: 0. Create a build.rs script
- Declare the module in your Rust code (probably main.rs or something like server.rs depending on how you structure your project)
- Import server and message types from the module
- Import server tools from tonic
- Implement the calculator service trait
- Run the server in main()
That's as much as you need for the server
3. Client implementation
For client you need to just use the API. Here is a short example for how the usage of a simple hello world might look:
use hello_world::greeter_client::GreeterClient; use hello_world::HelloRequest; pub mod hello_world { tonic::include_proto!("helloworld"); } #[tokio::main] async fn main() -> Result<(), Box<dyn std::error::Error>> { let mut client = GreeterClient::connect("http://[::1]:50051").await?; let request = tonic::Request::new(HelloRequest { name: "Tonic".into(), }); let response = client.say_hello(request).await?; println!("RESPONSE={:?}", response); Ok(()) }
4. Putting it all together
You will need to implement a reasonable API to allow using the client as a cli tool. Whether you opt for parsing numbers from the stdin and make your project work like a REPL, or whether you will make it a one-shot that takes the numbers and operation as command-line argument is up to you.
Remember that your server should not crash.
5. Final product
In the end you should be left with a well prepared project, that has the following:
- documented code explaining your reasoning where it isn't self-evident
- optionally tests
- and an example or two where applicable
- clean git history that does not contain fix-ups, merge commits or malformed/misformatted commits
Your Rust code should be formatted by rustfmt / cargo fmt and should produce no
warnings when built. It should also work on stable Rust and follow the Braiins Standard
Options and Results
Prerequisites:
- You should be familiar with Rust
- iterators
- from the iterators chapter (also explained in async), make sure you read the existential types part
Not everything is perfect in this world, and not every operation has to always succeed and produce a value. If you are familiar with other programming languages, the concepts of nullability, or optionally present values, and fallibility, or in other words, that an operation might fail with an error, should not be foreign to you.
Maybe you have noticed that already, but neither can values in Rust be null, nor are there exceptions in Rust. These are both considered concepts that harm the type system by being hidden behavior, if you have the following function:
#![allow(unused)] fn main() { fn my_function() -> bool { unimplemented!() } }
Just from the signature, it is easy to recognize that it can either return
true or false, but also having to have to count with the fact that it
could return a null or throw an exception is non-trivial.
To leverage the power of the type system, Rust elected to forgo null and
exceptions completely, and instead encode this information into types.
Now, if you want to indicate an operation might not return a value, you use
the Option type:
#![allow(unused)] fn main() { fn my_function() -> Option<bool> { unimplemented!() } }
And if you want to indicate that an operation might fail, you use the
Result type:
#![allow(unused)] fn main() { fn my_function() -> Result<bool, MyErrorType> { unimplemented!() } }
The great thing about Option and Result is that they are in no way
special. They are merely enums.
#![allow(unused)] fn main() { enum Option<T> { Some(T), None, } enum Result<T, E: Error> { Ok(T), Err(E), } }
This is roughly how the types look. The best part is that they are very effective.
Result is a very thin wrapper and Option is optimized into being a nullable
pointer to T.
Errors in Result
You may have noticed that Result takes two type parameters, the second one being
E: Error. It is required that the second type in a Result implements
std::error::Error, which is essentially a fancy display trait that can optionally
allow pointing at another instance of an Error-implementing type as the root cause:
#![allow(unused)] fn main() { pub trait Error: Debug + Display { fn source(&self) -> Option<&(dyn Error + 'static)> { ... } fn backtrace(&self) -> Option<&Backtrace> { ... } fn description(&self) -> &str { ... } fn cause(&self) -> Option<&dyn Error> { ... } } }
As you can see, all of the trait methods have a default implementation, and,
as a matter of fact, description() and cause() are further marked as deprecated,
so, if your type implements Debug + Display, implementing the Error trait is
usually as easy as:
#![allow(unused)] fn main() { impl Error for MyType {} }
Traditionally, you do not type out the error type at every step, but create an aliased Result type for your library, a particular module, or another section of your code at your discretion:
#![allow(unused)] fn main() { use std::result; type Result<T> = result::Result<T, MyError>; fn my_function() -> Result<bool> { unimplemented!() } }
This pattern is used many times in the standard library:
https://doc.rust-lang.org/std/index.html?search=Result
If you need to have two or more different aliased Result types in scope,
you can always use a renaming import:
#![allow(unused)] fn main() { use std::io::Result as IoResult; use std::thread::Result as ThreadResult use std::result; type Result<T> = result::Result<T, MyError>; fn my_function() -> Result<bool> { unimplemented!() } }
Options to results, Results to options
Often, you need to convert one to the other. This is quite easy in Rust,
especially if you need to convert from Result to Option.
There are two possible conversions:
Result<T, E> -> Option<T>to extract the contained value, use.ok()Result<T, E> -> Option<E>to extract the contained error, use.err()
https://doc.rust-lang.org/std/result/enum.Result.html#method.ok
https://doc.rust-lang.org/std/result/enum.Result.html#method.err
#![allow(unused)] fn main() { let x: Result<u32, &str> = Ok(2); assert_eq!(x.ok(), Some(2)); let x: Result<u32, &str> = Err("Nothing here"); assert_eq!(x.ok(), None); let x: Result<u32, &str> = Ok(2); assert_eq!(x.err(), None); let x: Result<u32, &str> = Err("Nothing here"); assert_eq!(x.err(), Some("Nothing here")); }
To do the conversion the other way around, you use either .ok_or(err) or
.ok_or_else(err_closure):
https://doc.rust-lang.org/std/option/enum.Option.html#method.ok_or
https://doc.rust-lang.org/std/option/enum.Option.html#method.ok_or_else
#![allow(unused)] fn main() { let x = Some("foo"); assert_eq!(x.ok_or(0), Ok("foo")); let x: Option<&str> = None; assert_eq!(x.ok_or(0), Err(0)); let x = Some("foo"); assert_eq!(x.ok_or_else(|| 0), Ok("foo")); let x: Option<&str> = None; assert_eq!(x.ok_or_else(|| 0), Err(0)); }
For these, you need to provide the instance of the Error type, as you can see.
Flattening
Sometimes, it is possible to get into a situation where you have a nested result or a nested option. While nested options are far more common, you are likely to encounter both.
Instead of going through hoops with pattern matching, you can flatten an option:
#![allow(unused)] fn main() { let x: Option<Option<u32>> = Some(Some(6)); assert_eq!(Some(6), x.flatten()); let x: Option<Option<u32>> = Some(None); assert_eq!(None, x.flatten()); let x: Option<Option<u32>> = None; assert_eq!(None, x.flatten()); }
The same functionality is available for Result, but it is nightly as of yet.
Keep in mind, that the E type has to match:
#![allow(unused)] #![feature(result_flattening)] fn main() { let x: Result<Result<&'static str, u32>, u32> = Ok(Ok("hello")); assert_eq!(Ok("hello"), x.flatten()); let x: Result<Result<&'static str, u32>, u32> = Ok(Err(6)); assert_eq!(Err(6), x.flatten()); let x: Result<Result<&'static str, u32>, u32> = Err(6); assert_eq!(Err(6), x.flatten()); }
Transposition
In other cases, you might run into a situation, where you either have a result containing an option or an option containing a result, and you need the opposite.
For this, .transpose() is available on both Result and Option
#![allow(unused)] fn main() { #[derive(Debug, Eq, PartialEq)] struct SomeErr; let x: Result<Option<i32>, SomeErr> = Ok(Some(5)); let y: Option<Result<i32, SomeErr>> = Some(Ok(5)); assert_eq!(x.transpose(), y); let x: Result<Option<i32>, SomeErr> = Ok(Some(5)); let y: Option<Result<i32, SomeErr>> = Some(Ok(5)); assert_eq!(x, y.transpose()); }
Checking the status
While it is your prerogative to match on an option or result simple to figure out its state, such as like this:
#![allow(unused)] fn main() { if let Some(_) = my_option { println!("Hello!"); } }
This is considered an anti-pattern, and you are much better off using the
.is_some() method:
#![allow(unused)] fn main() { if my_option.is_some() { println!("Hello"); } }
For result, there is once again two methods for checking for value and error each:
- https://doc.rust-lang.org/std/result/enum.Result.html#method.is_err
- https://doc.rust-lang.org/std/result/enum.Result.html#method.is_ok
The try operator
With many operations being fallible, it can be handy to terminate execution early, returning an error in case an operation fails.
In Rust, this was previously done via the try!() macro, which is now considered
obsolete, and nowadays, is done using the ? operator, known as the try operator.
The try operator is in no way special, or exclusive to Result and Option, you
can implement the std::ops::Try trait on any type you desire.
Some implementors, such as the ones found in the anyhow error-handling crate
feature conversions from both Option and Result with any Error type, allowing
for maximum ergonomics.
#![allow(unused)] fn main() { fn find_char_index_in_first_word(text: &str, ch: &char) -> Option<usize> { let first_word = text.split(" ").next()?; let index = first_word.find(|x| &x == ch)?; Some(index) } }
In the future, Rust will also feature try {} blocks:
#![allow(unused)] #![feature(try_blocks)] fn main() { use std::num::ParseIntError; let result: Result<i32, ParseIntError> = try { "1".parse::<i32>()? + "2".parse::<i32>()? + "3".parse::<i32>()? }; assert_eq!(result, Ok(6)); let result: Result<i32, ParseIntError> = try { "1".parse::<i32>()? + "foo".parse::<i32>()? + "3".parse::<i32>()? }; assert!(result.is_err()); }
A try block creates a new scope one can use the ? operator in.
As iterator
Both Option and Rust can be used as iterators of 0 or 1 elements.
#![allow(unused)] fn main() { let x = Some(4); assert_eq!(x.iter().next(), Some(&4)); let x: Option<u32> = None; assert_eq!(x.iter().next(), None); let mut x = Some(4); match x.iter_mut().next() { Some(v) => *v = 42, None => {}, } assert_eq!(x, Some(42)); let mut x: Option<u32> = None; assert_eq!(x.iter_mut().next(), None); let x: Result<u32, &str> = Ok(7); assert_eq!(x.iter().next(), Some(&7)); let x: Result<u32, &str> = Err("nothing!"); assert_eq!(x.iter().next(), None); let mut x: Result<u32, &str> = Ok(7); match x.iter_mut().next() { Some(v) => *v = 40, None => {}, } assert_eq!(x, Ok(40)); let mut x: Result<u32, &str> = Err("nothing!"); assert_eq!(x.iter_mut().next(), None); }
Panics! and alternatives
If you do not care about handling (and/or propagation) of an error, or the lack of a value, there are two methods you can use to quickly extract the underlying value:
.expect("msg").unwrap()
The first one will include a message of your choosing in the resulting panic and stacktrace:
#![allow(unused)] fn main() { let x: Result<u32, &str> = Err("emergency failure"); x.expect("Testing expect"); // panics with `Testing expect: emergency failure` }
Whereas .unwrap() will use a default message for the particular container
type:
#![allow(unused)] fn main() { let x: Result<u32, &str> = Ok(2); assert_eq!(x.unwrap(), 2); // ok let x: Result<u32, &str> = Err("emergency failure"); x.unwrap(); // panics with `emergency failure` }
There are more unwrapping methods that do not panic:
.unwrap_or_default(), which is available forT: Defaultwill return the default value in case the result is an error or the option is none.unwrap_or(alt)will return the alternative value your provided.unwrap_or_else(|| produce_alt())will return an alternative value constructed with the closure or function you provide. Use this if creating the value is expensive. In the case ofResult, the closure takes a single parameter containing the error.
Finally, in the case of Result, if you are looking for the error in particular, you can use .unwrap_err().
Taking references
It is sometimes handy to take references to the contents of an option or a result without having to deconstruct it.
For this, option and result provides .as_ref() and .as_mut() methods, which transform a reference to an option/result of T
into an option/result of &T (and optionally &E)
#![allow(unused)] fn main() { let x: Result<u32, &str> = Ok(2); assert_eq!(x.as_ref(), Ok(&2)); let x: Result<u32, &str> = Err("Error"); assert_eq!(x.as_ref(), Err(&"Error")); fn mutate(r: &mut Result<i32, i32>) { match r.as_mut() { Ok(v) => *v = 42, Err(e) => *e = 0, } } let mut x: Result<i32, i32> = Ok(2); mutate(&mut x); assert_eq!(x.unwrap(), 42); let mut x: Result<i32, i32> = Err(13); mutate(&mut x); assert_eq!(x.unwrap_err(), 0); }
Other handy methods
pub fn and<U>(self, res: Result<U, E>) -> Result<U, E>pub fn and_then<U, F>(self, op: F) -> Result<U, E>pub fn or<F>(self, res: Result<T, F>) -> Result<T, F>pub fn or_else<F, O>(self, op: O) -> Result<T, F>
The same methods exist for Option as well.
Note that some of the iterator-ish methods exist directly on types as well, such
as map or filter
The task: Disjoint function
For this exercise, write functions doing the following conversions:
fn<E> Result<String, E> -> Option<i32>which tries to convert a string into an i32fn<T> a, b, c: Option<T> -> Iterator<Item=T>which takes three options and returns an iterator over all of themfn<T, E> Option<Result<Option<T>, E>> -> Option<Result<T, E>>doesn't modify the internal value of type T in any wayfn<T, E> Option<Result<Option<T>, E>> -> Result<Option<T>, E>same as previousfn<T, E> Option<Result<Option<T>, E>> -> Option<T>same as previous, error is ignored
Final product
In the end you should be left with a well prepared project, that has the following:
- documented code explaining your reasoning where it isn't self-evident
- optionally tests
- and an example or two where applicable
- clean git history that does not contain fix-ups, merge commits or malformed/misformatted commits
Your Rust code should be formatted by rustfmt / cargo fmt and should produce no
warnings when built. It should also work on stable Rust and follow the Braiins Standard
Testing and benchmarking
Prerequisites:
- You should be familiar with Rust
- check out the results and options chapter
One of the often cited features of Rust is built-in support for testing. It allows you to write both integration and unit tests easily, as well as facilitating benchmarking and helping you keep your documentation up to date.
Tests in the code
The testing syntax is pretty simple, you use the #[test] attribute,
#![allow(unused)] fn main() { #[test] fn this_test_will_fail() { panic!("good bye"); } }
Tests that you expect to panic! (ie. testing functionality that should panic) are
marked with the #[should_panic] attribute:
#![allow(unused)] fn main() { #[should_panic] #[test] fn this_test_will_fail_but_thats_okay() { panic!("farewell"); } }
Tests can be temporarily (or conditionally, if combined with the appropriate attribute) disabled
via the #[ignore] attribute:
#![allow(unused)] fn main() { #[ignore] #[test] fn this_test_wont_run() { panic!("i am not talking"); } }
Putting unit tests into a module
It is a common practice to put tests into their own module, named so, and making it conditionally compiled:
#![allow(unused)] fn main() { pub fn add(a: i32, b: i32) -> i32 { a + b } // This is a really bad adding function, its purpose is to fail in this // example. #[allow(dead_code)] fn bad_add(a: i32, b: i32) -> i32 { a - b } #[cfg(test)] mod tests { // Note this useful idiom: importing names from outer (for mod tests) scope. use super::*; #[test] fn test_add() { assert_eq!(add(1, 2), 3); } #[test] fn test_bad_add() { // This assert would fire and test will fail. // Please note, that private functions can be tested too! assert_eq!(bad_add(1, 2), 3); } } }
Check out the assert_eq and assert macros, they are handy for panicking on condition false
or inequality of values, you might be familiar with asserts from C/C++.
Benchmarks
For performance-critical sections of your project, Rust also provides support for benchmark tests. Keep in mind that at the time of this writing, benchmarking is a nightly feature but should be stabilized relatively soon.
#![allow(unused)] #![feature(test)] fn main() { extern crate test; pub fn add_two(a: i32) -> i32 { a + 2 } #[cfg(test)] mod tests { use super::*; use test::Bencher; #[test] fn it_works() { assert_eq!(4, add_two(2)); } #[bench] fn bench_add_two(b: &mut Bencher) { b.iter(|| add_two(2)); } } }
Thanks to integration with tests, as you can see above, you can use a test both as a benchmark and as a means to verify correctness.
If you want to benchmark an entire program, check out a Rust tool called hyperfine.
Integration tests
Rust also has a support for integration tests. While syntactically, they are the same, their location is different.
- Unit tests are either situated right by the code they are testing, or typically under
src/tests/ - Integration tests are typically under
tests/and are freestanding Rust files
Rust files containing integration tests view the library of your crate as an external library and you have to import the items you are testing accordingly.
Additionally, you can use dev-dependencies in integration tests, which have their own section in Cargo manifest of
the same name.i
Doc tests
Rust has a first-class support for in-code documentation, which will be no doubt featured in another future chapter. Part of it is support for runnable code examples.
Rust considers these code examples to be so called doc-tests and whenever you use cargo test,
they will be automatically tested.
#![allow(unused)] fn main() { /// # Examples /// /// ``` /// let x = 5; /// ``` }
Please note that by default, if no language is set for the block code, rustdoc assumes it is Rust code. So the following:
```rust
let x = 5;
```
is strictly equivalent to:
```
let x = 5;
```
Sometimes, you need some setup code, or other things that would distract from your example, but are important to make the tests work. Consider an example block that looks like this:
/// ```
/// /// Some documentation.
/// # fn foo() {} // this function will be hidden
/// println!("Hello, World!");
/// ```
Assortment of handy notes and tips
- This is a good practice in general kinda tip, but if you have initialization code that has to be run all over,
consider placing it into a function within the
testsmodule
Next, if you run tests via the cargo test command, keep in mind that this builds a runnable program with
a wide assortment of command-line arguments:
» cargo test -- --help
Compiling what v0.1.0 (/home/magnusi/braiins-university-projects/what)
Finished test [unoptimized + debuginfo] target(s) in 0.68s
Running unittests (target/debug/deps/what-6e58141455fd2a6d)
Usage: --help [OPTIONS] [FILTERS...]
Options:
--include-ignored
Run ignored and not ignored tests
--ignored Run only ignored tests
--force-run-in-process
Forces tests to run in-process when panic=abort
--exclude-should-panic
Excludes tests marked as should_panic
--test Run tests and not benchmarks
--bench Run benchmarks instead of tests
--list List all tests and benchmarks
-h, --help Display this message
--logfile PATH Write logs to the specified file
--nocapture don't capture stdout/stderr of each task, allow
printing directly
--test-threads n_threads
Number of threads used for running tests in parallel
--skip FILTER Skip tests whose names contain FILTER (this flag can
be used multiple times)
-q, --quiet Display one character per test instead of one line.
Alias to --format=terse
--exact Exactly match filters rather than by substring
--color auto|always|never
Configure coloring of output:
auto = colorize if stdout is a tty and tests are run
on serially (default);
always = always colorize output;
never = never colorize output;
--format pretty|terse|json|junit
Configure formatting of output:
pretty = Print verbose output;
terse = Display one character per test;
json = Output a json document;
junit = Output a JUnit document
--show-output Show captured stdout of successful tests
-Z unstable-options Enable nightly-only flags:
unstable-options = Allow use of experimental features
--report-time Show execution time of each test.
Threshold values for colorized output can be
configured via
`RUST_TEST_TIME_UNIT`, `RUST_TEST_TIME_INTEGRATION`
and
`RUST_TEST_TIME_DOCTEST` environment variables.
Expected format of environment variable is
`VARIABLE=WARN_TIME,CRITICAL_TIME`.
Durations must be specified in milliseconds, e.g.
`500,2000` means that the warn time
is 0.5 seconds, and the critical time is 2 seconds.
Not available for --format=terse
--ensure-time Treat excess of the test execution time limit as
error.
Threshold values for this option can be configured via
`RUST_TEST_TIME_UNIT`, `RUST_TEST_TIME_INTEGRATION`
and
`RUST_TEST_TIME_DOCTEST` environment variables.
Expected format of environment variable is
`VARIABLE=WARN_TIME,CRITICAL_TIME`.
`CRITICAL_TIME` here means the limit that should not
be exceeded by test.
--shuffle Run tests in random order
--shuffle-seed SEED
Run tests in random order; seed the random number
generator with SEED
The FILTER string is tested against the name of all tests, and only those
tests whose names contain the filter are run. Multiple filter strings may
be passed, which will run all tests matching any of the filters.
By default, all tests are run in parallel. This can be altered with the
--test-threads flag or the RUST_TEST_THREADS environment variable when running
tests (set it to 1).
By default, the tests are run in alphabetical order. Use --shuffle or set
RUST_TEST_SHUFFLE to run the tests in random order. Pass the generated
"shuffle seed" to --shuffle-seed (or set RUST_TEST_SHUFFLE_SEED) to run the
tests in the same order again. Note that --shuffle and --shuffle-seed do not
affect whether the tests are run in parallel.
All tests have their standard output and standard error captured by default.
This can be overridden with the --nocapture flag or setting RUST_TEST_NOCAPTURE
environment variable to a value other than "0". Logging is not captured by default.
Test Attributes:
`#[test]` - Indicates a function is a test to be run. This function
takes no arguments.
`#[bench]` - Indicates a function is a benchmark to be run. This
function takes one argument (test::Bencher).
`#[should_panic]` - This function (also labeled with `#[test]`) will only pass if
the code causes a panic (an assertion failure or panic!)
A message may be provided, which the failure string must
contain: #[should_panic(expected = "foo")].
`#[ignore]` - When applied to a function which is already attributed as a
test, then the test runner will ignore these tests during
normal test runs. Running with --ignored or --include-ignored will run
these tests.
Pay particular heed to --nocapture, which comes in handy if you want to see the standard and error
output of your application, and --test-threads n_threads if you want to run the tests single-threaded,
suspecting a race condition type error.
Being particular about should_panic
You can make should_panic expect a specific reason for panicking, for example:
#[test]
#[should_panic(expected = "assertion failed")]
fn it_works() {
assert_eq!("Hello", "world");
}
This can make should_panic tests less fragile, since it will catch instances where the test fails for an
unrelated reason. The test harness will make sure that the failure message contains the provided text.
Architecture/Platform specific tests
Tests, just like any other item in Rust, can be adorned with attributes for conditional compilation, which allows for having platform-specific tests (or conversely, disabling tests on a particular platform).
Here is a couple handy attributes:
#![allow(unused)] fn main() { #[cfg(target_arch = "arm")] // only compile this in on arm #[cfg(not(target_arch = "x86_64"))] // compile this anywhere else but x64 #[cfg(target_family = "unix")] // compile on all unix systems #[cfg(target_env = "musl")] // compile if using musl libc }
The task: Testing the previous and standard library
For this project, you will need at least three of the functions from the final exercise of the chapter on Results and Options.
Part 1: Unit testing
Write tests (as unit tests) for the functions you have selected.
It is up to you how many, and if you will write any #[should_panic] tests also.
Part 2: Integration testing
In this part, we can pretty much test anything. Write tests for the following scenarios:
- Accessing an element outside of slice bounds should panic
- Replacing "_" with "-" in a string should actually do that
- Using the saturating add on usize should not wrap around
Final product
In the end you should be left with a well prepared project, that has the following:
- documented code explaining your reasoning where it isn't self-evident
- optionally tests
- and an example or two where applicable
- clean git history that does not contain fix-ups, merge commits or malformed/misformatted commits
Your Rust code should be formatted by rustfmt / cargo fmt and should produce no
warnings when built. It should also work on stable Rust and follow the Braiins Standard
Error handling's bizarre adventure: Battle Tendency
The fact that some operations fail, errors occur and need to be processed is axiomatic
in programming. Over the history of computing, we have had several different models of
error handling. With early languages, there was no set standard, and you had to work with
what you got from a particular library, in C, there is a special thread-local global variable
mechanism via errno that you have to check manually, some languages have the concept of an Error
built into them, other follow the exception model.
If you are PHP, you have all of the aforementioned, everything burns, this is hell, God has abandoned us.
Rust sought to eliminate the mess that exceptions and other forms of error-handling can be. This is done by having none of these models, instead leveraging the type system Rust offers.
This eliminates perhaps one of the more important issues of some error-handling models: that you have no way of knowing if an operation is fallible without looking into the source code itself in many cases. That is, the fallibility of an operation (or nullability) is not included in the type information of a function.
To speak less in theoretical, let's address the two main facilities of failure Rust offers.
Panics
You have likely already encountered a panic. C programmers I have met are sometimes tempted to equate a panic with a segmentation fault, but that is not actually true. Segmentation fault necessarily indicates a memory error, attempt to write where you shouldn't or attempt to read where you cannot read from. Some segmentation faults may occur seemingly randomly because the illegally accessed memory may or may not be available depending on a number of factors. Segfaults are difficult to debug and do not by default come with a stacktrace - you have to use a debugger.
A panic is a controlled termination of a program (or a particular thread) on the basis of a failure deemed irrecoverable.
By default, execution will not just cease, but instead, the stack is unrolled and all values are dropped properly, ensuring that proper cleanup has been done and all resources have been returned to the operating system.
Only then will execution cease with a specialized error message and stacktrace, the display
of which can be controlled with the RUST_BACKTRACE environment variable.
env RUST_BACKTRACE=full cargo run
This will show the full backtrace if the program panics
What is considered an irrecoverable failure depends on you. In general, Rust considers things
that would create illegal memory access, such as indexing indexable structures out of bounds
with the [] operator (use .get() instead if you do not know the length ahead and cannot ensure
you are indexing with a legitimate index), or electing to not handle the possibility of
a None in Option or Err in Result.
In general, you can cause panics easily with the following methods and macros:
Option::unwrap(),Result::unwrap()Option::expect(msg),Result::expect(msg)- lets you add a custom messagepanic!(optional_msg)- formatted likeprintln!()etc.unimplemented!()- same as abovetodo!()- same as above, is an alias forunimplemented!()unreachable!()- same as above
There are other ways of causing panics, but none are as common as the above.
TIP: Keep in mind that overflowing math panics in debug builds due to debug asserts, but silently overflows in release builds. It is always a good idea to handle the possibility of an overflow with the appropriate safe mathematical method such as
.overflowing_add()which let you control the behavior in case an overflow might occur.
However, panics do not necessarily look good, so it is a good idea to handle them if possible.
Result and Error
When something is fallible in a way that can be handled or considered recoverable, then by
convention, the Result type is used.
You should be familiar with this type from the chapter on Results and Options. If not, check it out.
Errors are any type that implements the std::error::Error trait. The error trait is a supertrait of both Debug
and Display, so your type has to implement these also.
Errors must describe themselves through the Display and Debug traits. Error messages are typically concise lowercase sentences without trailing punctuation:
#![allow(unused)] fn main() { let err = "NaN".parse::<u32>().unwrap_err(); assert_eq!(err.to_string(), "invalid digit found in string"); }
Errors may provide cause chain information. Error::source() is generally used when errors cross “abstraction boundaries”.
If one module must report an error that is caused by an error from a lower-level module,
it can allow accessing that error via Error::source(). This makes it possible for the high-level module to
provide its own errors while also revealing some of the implementation for debugging via source chains.
In the most minimal case, if your Error does not require a special description beyond its Display implementation,
it is enough to provide an empty impl block to turn your type into an Error:
#![allow(unused)] fn main() { use std::fmt; // most laconic error #[derive(Debug)] struct MyError; impl fmt::Display for MyError { fn fmt(&self, f: &mut fmt::Formatter<'_>) -> fmt::Result { // this is all the error text you get in ***ED, THE STANDARD EDITOR*** write!(f, "?") } } impl std::error::Error for MyError {} }
Error types
Many libraries provide their own error types, and the standard library is no different. For example, this is the IO Error type that's returned by much of the IO, networking and Filesystem functionality:
https://doc.rust-lang.org/std/io/struct.Error.html
This one does not fit the mold, by Errors are typically enums which group all the possible scenarios that might go wrong.
It stands to reason that implementing custom errors all the time and all the required handling (because it is an enum) could get slightly tedious, so a number of error-handling frameworks have been popping up in Rust over the time.
Before we jump into them let's first consider error conversions, as it is an important topic.
Error conversions
In the chapter on Options and Results we mentioned the try ? operator. This allows a function to cease its
execution early returning an error that was encountered, otherwise continuing execution with the operations'
value unwrapped from the Option or Result.
An Option is not the same type as Result, and a Result with one combination of Ok and Error types is different type from a Result with a different combination.
The operator would be quite unwieldy if we first had to make cumbersome conversions to either Option or
a one specific combination of Result<T, E>.
Therefore, the operator can facilitate a number of conversions, depending on the target type. All the conversions implemented by the target type (in the case of an Result, it is the Error type that's important) are available.
If you want to be able to convert any error to a result, use Result<YourOutputType, Box<dyn Error>.
It might be interesting to know that even main() can return this Result to make things more ergonomic:
use std::fs::File; fn main() -> Result<(), Box<dyn Error>> { let f = File::open("bar.txt")?; Ok(()) }
It is possible to convert every Error type into a trait object, which is why you can use this.
Anyhow
The first of the frameworks important to us with regards to error handling is anyhow:
https://crates.io/crates/anyhow
It provides a flexible concrete Error type built on std::error::Error. It allows for rather easy idiomatic
error handling in Rust.
Often it is enough to just use anyhow's provided result type:
#![allow(unused)] fn main() { use anyhow::Result; fn get_cluster_info() -> Result<ClusterMap> { let config = std::fs::read_to_string("cluster.json")?; let map: ClusterMap = serde_json::from_str(&config)?; Ok(map) } }
Any Result will be converted to it.
However, you can also attach a context to help the person troubleshooting the error understand where things went wrong. A low-level error like "No such file or directory" can be annoying to debug without more context about what higher level step the application was in the middle of.
use anyhow::{Context, Result}; fn main() -> Result<()> { ... it.detach().context("Failed to detach the important thing")?; let content = std::fs::read(path) .with_context(|| format!("Failed to read instrs from {}", path))?; ... }
Keep in mind that using context is best for user-facing errors, since it is hard to process an opaque type like this.
But, if you really needed to, you can try downcasting to a particular error type anyway:
#![allow(unused)] fn main() { match root_cause.downcast_ref::<DataStoreError>() { Some(DataStoreError::Censored(_)) => Ok(Poll::Ready(REDACTED_CONTENT)), None => Err(error), } }
Downcasting follows the same convention as the std::any::Any trait.
Anyhow works with any type implementing std::error::Error trait. This may not be the case anymore
at the time of this reading, but Options had to be first converted into a Result, for example with
a context.
There are also two very handy macros in anyhow:
- One-off error messages can be constructed using the
anyhow!macro, which supports string interpolation and produces ananyhow::Error.
#![allow(unused)] fn main() { return Err(anyhow!("Missing attribute: {}", missing)); }
- A
bail!macro is provided as a shorthand for the same early return.
#![allow(unused)] fn main() { bail!("Missing attribute: {}", missing); }
In practice, there is very little reason to use anyhow! over bail!.
An easy way to make a concrete Error type for yourself is with thiserror.
Thiserror
This error provides a handy derive you can use on enum of your choosing.
#![allow(unused)] fn main() { use thiserror::Error; #[derive(Error, Debug)] pub enum DataStoreError { #[error("data store disconnected")] Disconnect(#[from] io::Error), #[error("the data for key `{0}` is not available")] Redaction(String), #[error("invalid header (expected {expected:?}, found {found:?})")] InvalidHeader { expected: String, found: String, }, #[error("unknown data store error")] Unknown, } }
Thiserror deliberately does not appear in your public API. You get the same thing as if you had written
an implementation of std::error::Error by hand, and switching from handwritten impls
to thiserror or vice versa is not a breaking change.
Errors may be enums, structs with named fields, tuple structs, or unit structs.
A Display impl is generated for your error if you provide #[error("...")] messages
on the struct or each variant of your enum, as shown above in the example.
The messages support a shorthand for interpolating fields from the error.
#[error("{var}")] ⟶ write!("{}", self.var)#[error("{0}")] ⟶ write!("{}", self.0)#[error("{var:?}")] ⟶ write!("{:?}", self.var)#[error("{0:?}")] ⟶ write!("{:?}", self.0)
These shorthands can be used together with any additional format args, which may be arbitrary expressions. For example:
#![allow(unused)] fn main() { #[derive(Error, Debug)] pub enum Error { #[error("invalid rdo_lookahead_frames {0} (expected < {})", i32::MAX)] InvalidLookahead(u32), } }
A From impl is generated for each variant containing a #[from] attribute.
Note that the variant must not contain any other fields beyond the source error and possibly a backtrace. A backtrace is captured from within the From impl if there is a field for it.i
#![allow(unused)] fn main() { #[derive(Error, Debug)] pub enum MyError { Io { #[from] source: io::Error, backtrace: Backtrace, }, } }
This allows you to very effectively convert from one error to another
The task: Simple grep
If you have been using Linux for any measure of time, you should be familiar with the grep program.
It's most basic functionality is searching for lines that match a (regex) pattern.
For this task, let's write a simple grep clone. This clone will only operate on one file, and it will only print lines matching a regular expression supplied as the first parameter on the command line.
Writing this program is quite easy, the main task here is to properly handle all possible errors. That is to say:
- no
unwrap()s and such
Use anyhow and thiserror at your discretion to handle all errors.
Be mindful of everything that can fail:
- missing cli arguments (consider this an error and quit with the correct usage message)
- missing file
- file cannot be read
- invalid regex
- cannot write into stdout (use
std::io::stdoutto write out the results) - anything else you might think of
Keep in mind that when importing errors, you can always alias them so as to not pollute your namespace with
use std::error::Error as IoError.
End product
In the end you should be left with a well prepared project, that has the following:
- documented code explaining your reasoning where it isn't self-evident
- optionally tests
- and an example or two where applicable
- clean git history that does not contain fix-ups, merge commits or malformed/misformatted commits
Your Rust code should be formatted by rustfmt / cargo fmt and should produce no
warnings when built. It should also work on stable Rust and follow the Braiins Standard
Concurrent and Parallel
One of the most difficult classes of problems to debug, or rather areas to handle correctly, is concurrent and parallel programming. Rust touts fearless concurrency as one of its main selling points, so let's see how this is handled in Rust, and what options are there for commonly used 3rd party libraries to make this easier.
The considerations of sharing state across threads
Sharing state correctly is a very hard thing to do, and shooting yourself in the foot is incredibly easy.
There are two main types of problems we are likely to encounter:
- data races
- race conditions
Quite often, you might get two for the price of one.
Data race
A data race occurs when you have a program with multiple threads, a shared mutable location, and one thread tries to write to said location while another is reading from it.
Three things can occur:
- The old value is read
- The new value is read
- A corrupted value is read
This is undefined behavior, and it may or may not blow up in your face during the execution of your program. What happens in these situations may also be hardware and OS-dependent and a data race might go undiscovered for a long time simply because it "works for me (tm)".
Safe Rust prevents data races as part of its fearless concurrency promise. This guarantee is a combination of the following features:
- Explicit mutability encoded into types of references (you know if a reference is mutable)
- It is forbidden to mutate or use mutable statics in safe Rust
- Whether something can safely be shared across threads is encoded in its type (remember the
Send+Synctraits)
This is pretty strict, but if we really need global mutable state, we have a couple options we will discuss later
Race conditions
This term is often confused with data races, however, no data corruption occurs. A race condition means that your program behaves differently depending on the order parallel scheduled operations run.
Race conditions are not inherently unsafe and because there is no data corruption, Rust does not outright prevent them. However, the fact that Rust requires you to use explicit synchronisation primitives that you cannot opt out of forces you to write your program mindfully and helps prevent some occurrences of race conditions.
You should try to design your multithreaded programs in such a way that race conditions do not occur. This usually means limiting shared state to what is absolutely necessary, being mindful on how data is shared between threads, and using synchronisation primitives.
Threads and tasks
Before we get to synchronisation primitives, it is helpful to compare threads and tasks.
Threads and tasks (such as from Tokio) look quite similar in their API, except for the
fact that tasks use async {} closures.
However, they are orthogonal. An async scheduler may poll the same task on different threads, tasks may be split among threads, and tasks may also run all on one thread.
To broaden our horizons, this chapter mostly uses threads, but you should know about tasks and you will use them in the task.
See the async and tokio chapters for more details if you haven't seen them already.
Synchronisation primitives in Rust
Back in the chapter about Rust's pointer types, we touched on the topic
of Arc<Mutex<T>>.
In safe Rust, you cannot mutate statics (the equivalent of global variables) directly,
and you either have to settle with immutable ones, or use a container type providing
interior mutability.
Interior mutability allows mutating data in what should be an immutable context, such as
a static, the insides of an Arc, or behind an immutable reference &.
Internally, these containers use unsafe {} to bypass mutability and ownership rules,
and it is the responsibility of the author of these types to ensure Rust's safety invariants
remain, well, invariants.
Writing these interior mutability types is not a simple discipline and requires much scrutiny.
In Rust, we encounter two families of types that provide interior mutability:
- thread-unsafe ones based on
UnsafeCell, such asCellorRefCell - thread-safe ones, such as
MutexorRwLock
Why would someone use a thread-unsafe interior mutability type? Well, they are much faster, and so they may be suitable when your program is single-threaded (or the data contained is not shared across threads) when performance is a major concern.
That is the same as the difference between Mutex and RwLock: Mutex is faster,
but RwLock can be more flexible (it mimics borrowing rules, you can have any number of readers or only at most one write-capable
lock exactly).
Check out a little example, kindly borrowed from the Rust standard library documentation:
#![allow(unused)] fn main() { use std::sync::{Arc, Mutex}; use std::thread; use std::sync::mpsc::channel; const N: usize = 10; // Spawn a few threads to increment a shared variable (non-atomically), and // let the main thread know once all increments are done. // // Here we're using an Arc to share memory among threads, and the data inside // the Arc is protected with a mutex. let data = Arc::new(Mutex::new(0)); let (tx, rx) = channel(); for _ in 0..N { let (data, tx) = (Arc::clone(&data), tx.clone()); thread::spawn(move || { // The shared state can only be accessed once the lock is held. // Our non-atomic increment is safe because we're the only thread // which can access the shared state when the lock is held. // // We unwrap() the return value to assert that we are not expecting // threads to ever fail while holding the lock. let mut data = data.lock().unwrap(); *data += 1; if *data == N { tx.send(()).unwrap(); } // the lock is unlocked here when `data` goes out of scope. }); } rx.recv().unwrap(); }
As you can see, we need the Arc to be actually able to pass the mutex to multiple places at once, since it can't inherently be cloned.
Also notice that we used channels in this example.
Chanel no. 5
Channels are data structures which facilitate sending data between two or more decoupled ends. We usually talk about sender and receiver halves.
There is several types of channels:
- SPSC - single producer, single consumer; these have only one sender part and one receiver part, they are the most primitive
- SPMC - single producer, multiple producer; these multiple receiver halves. They are, from my experience, not used often
- MPSC - multiple producer, single consumer; these have multiple sender halves. They are used quite often and built-in into Rust.
- MPMC - multiple producer, multiple consumer; most flexible, can have N senders and M receivers
As mentioned, Rust has native support for mpsc channels, found in the std::sync::mpsc
module.
#![allow(unused)] fn main() { use std::thread; use std::sync::mpsc::channel; // Create a shared channel that can be sent along from many threads // where tx is the sending half (tx for transmission), and rx is the receiving // half (rx for receiving). let (tx, rx) = channel(); for i in 0..10 { let tx = tx.clone(); thread::spawn(move|| { tx.send(i).unwrap(); }); } for _ in 0..10 { let j = rx.recv().unwrap(); assert!(0 <= j && j < 10); } }
Since the Receiver and Sender bits are completely decoupled, channels are a great way of sharing data between threads
Atomics
Atomic types and operations on them form the backbone of many parallel access options. Atomic operations are operations that appear to the rest of the system to have occurred instantaneously, the naming comes from the etymology for atom, meaning indivisible.
Rust provides a number of atomic types:
- AtomicBool
- AtomicI8
- AtomicI16
- AtomicI32
- AtomicI64
- AtomicIsize
- AtomicPtr
- AtomicU8
- AtomicU16
- AtomicU32
- AtomicU64
- AtomicUsize
NOTE: Not all of these types are available on all platforms. Some platforms come without hardware support and atomics are implemented on OS-level. This usually incurs a further penalty to performance.
A simple spinlock:
use std::sync::Arc; use std::sync::atomic::{AtomicUsize, Ordering}; use std::{hint, thread}; fn main() { let spinlock = Arc::new(AtomicUsize::new(1)); let spinlock_clone = Arc::clone(&spinlock); let thread = thread::spawn(move|| { spinlock_clone.store(0, Ordering::SeqCst); }); // Wait for the other thread to release the lock while spinlock.load(Ordering::SeqCst) != 0 { hint::spin_loop(); } if let Err(panic) = thread.join() { println!("Thread had an error: {panic:?}"); } }
As you can see from the exampe, you generally need to specify an explicit atomic memory ordering. Memory orderings specify the way that operations with atomic types should be ordered.
Per the reference for Ordering:
Memory orderings specify the way atomic operations synchronize memory. In its weakest
Ordering::Relaxed, only the memory directly touched by the operation is synchronized. On the other hand, a store-load pair ofOrdering::SeqCstoperations synchronize other memory while additionally preserving a total order of such operations across all threads.
Methods on atomic types generally take &self as param, meaning you can use them in immutable contexts.
Keep in mind that atomics are much slower than their non-atomic counterparts, sometimes several orders of magnitude.
Barrier
A barrier is a synchronisation tool which does not contain any inner type, it merely enables a number of threads to synchronize the beginning of some operation:
#![allow(unused)] fn main() { use std::sync::{Arc, Barrier}; use std::thread; let mut handles = Vec::with_capacity(10); let barrier = Arc::new(Barrier::new(10)); for _ in 0..10 { let c = Arc::clone(&barrier); // The same messages will be printed together. // You will NOT see any interleaving. handles.push(thread::spawn(move|| { println!("before wait"); c.wait(); println!("after wait"); })); } // Wait for other threads to finish. for handle in handles { handle.join().unwrap(); } }
Condvar
Rust also features support for condition variables. Condition variables give you the ability to block a thread in such a way that it does not use the CPU while waiting for an event to occur (a condition to be fulfilled).
Condvars are usually compiled with a boolean predicate and a mutex.
#![allow(unused)] fn main() { use std::sync::{Arc, Mutex, Condvar}; use std::thread; let pair = Arc::new((Mutex::new(false), Condvar::new())); let pair2 = Arc::clone(&pair); // Inside of our lock, spawn a new thread, and then wait for it to start. thread::spawn(move|| { let (lock, cvar) = &*pair2; let mut started = lock.lock().unwrap(); *started = true; // We notify the condvar that the value has changed. cvar.notify_one(); }); // Wait for the thread to start up. let (lock, cvar) = &*pair; let mut started = lock.lock().unwrap(); while !*started { started = cvar.wait(started).unwrap(); } }
Note that a condvar should be used with one particular Mutex exactly, using more than one can lead to a panic.
Once
This is a more Rust-specific synchronization primitive which can be used to do a one-time global initialization. This is useful for FFI or related functionality.
#![allow(unused)] fn main() { use std::sync::Once; static START: Once = Once::new(); START.call_once(|| { // run initialization here }); }
The closure will run once exactly regardless of how many times you call .call_once().
Rust libraries
Since parallel/concurrent access is very important, there exists a number of crates in the Rust ecosystem focused on improving and extending the multi-threaded experience.
We have mentioned rayon already, let's focus on crates centered around shared state.
Crossbeam
Crossbeam is a loose collections of tools for concurrent programming, it contains a wide variety of smaller crates.
For example, it contains an implementation of AtomicCell,
which is very similar to the Cell type, except that it is thread-safe.
You can check via AtomicCell::<T>::is_lock_free() if the platform you are running for actually supports
the necessary atomics to make this type lockfree.
#![allow(unused)] fn main() { use crossbeam_utils::atomic::AtomicCell; let a = AtomicCell::new(7); assert_eq!(a.load(), 7); a.store(8); assert_eq!(a.load(), 8); }
Atomic loads use the Acquire ordering and atomic stores use the Release ordering.
Flume
While crossbeam does provide its own implementation for channels, which is mpmc,
the crate flume is the king when it comes to channels.
It is blazing fast, MPMC by default, and it supports both async and sync contexts, even
allowing you to mix and match to your hearts content.
use std::thread; fn main() { println!("Hello, world!"); let (tx, rx) = flume::unbounded(); thread::spawn(move || { (0..10).for_each(|i| { tx.send(i).unwrap(); }) }); let received: u32 = rx.iter().sum(); assert_eq!((0..10).sum::<u32>(), received); }
As far as I am concerned, it is magic.
Parking_lot
This crate does not really bring anything new to the table, it just takes existing, and remakes it better.
parking_lot contains smaller, faster and more flexible
implementations of Standard library synchronization primitives, and is therefore always preferred
if you are allowed to use it.
#![allow(unused)] fn main() { use parking_lot::{Mutex, Condvar}; use std::sync::Arc; use std::thread; let pair = Arc::new((Mutex::new(false), Condvar::new())); let pair2 = pair.clone(); // Inside of our lock, spawn a new thread, and then wait for it to start thread::spawn(move|| { let &(ref lock, ref cvar) = &*pair2; let mut started = lock.lock(); *started = true; cvar.notify_one(); }); // wait for the thread to start up let &(ref lock, ref cvar) = &*pair; let mut started = lock.lock(); if !*started { cvar.wait(&mut started); } // Note that we used an if instead of a while loop above. This is only // possible because parking_lot's Condvar will never spuriously wake up. // This means that wait() will only return after notify_one or notify_all is // called. }
Fits like a glove.
In fact, most of the time, introducing parking_lot to existing code requires no big rewrites,
just change where you importing the synchronization primitives from at the top of your Rust file :D
The Task: Concurrent ping pong
By this point, you should have read the async chapter, and should well be familiar with Tokio tasks.
Write a program with three tasks:
- a
Pingtask, which creates a ping every half a second - a
Pongtask, which responds with a pong - a display task, which displays these events to the standard output (eg. with
println!())
Your main task is choosing the most appropriate synchronisation primitives.
The output, as displayed by the display thread, should look something like this:
Ping
Pong
Ping
Pong
Ping
Pong
If your program prints either of those strings twice in a row, you have a race condition.
End product
In the end you should be left with a well prepared project, that has the following:
- documented code explaining your reasoning where it isn't self-evident
- optionally tests
- and an example or two where applicable
- clean git history that does not contain fix-ups, merge commits or malformed/misformatted commits
Your Rust code should be formatted by rustfmt / cargo fmt and should produce no
warnings when built. It should also work on stable Rust and follow the Braiins Standard
Metrics with Prometheus and Grafana
As your application grows, it becomes more and more important to have insight into what's going on. Metrics are one of the ways to provide information about the run of your application.
In recent years, one of the industry standards turned out to be a toolkit
built by SoundCloud called Prometheus. It facilitates
metrics and alerting with ease, great visualisation and powerful queries.
Prometheus is written in Go, and originally supported for Go applications, more and more implementations are popping up, and Rust is also supported for quite some time now.
The Rust client library was created
by the developers behind TiKV and TiDB highly scalable and performant NoSQL/NewSQL
software.
How do Prometheus metrics work
On the side of Rust, metrics are collected into a registry. By default, metrics are not sent anywhere, rather, they are scraped whenever necessary (requested). Generally, metrics are exposed on HTTP, and GETing the endpoint scrapes the metrics.
However, the Rust crate also allows scraping metrics into text for you to transfer however you wish:
#![allow(unused)] fn main() { use prometheus::{Opts, Registry, Counter, TextEncoder, Encoder}; // Create a Counter. let counter_opts = Opts::new("test_counter", "test counter help"); let counter = Counter::with_opts(counter_opts).unwrap(); // Create a Registry and register Counter. let r = Registry::new(); r.register(Box::new(counter.clone())).unwrap(); // Inc. counter.inc(); // Gather the metrics. let mut buffer = vec![]; let encoder = TextEncoder::new(); let metric_families = r.gather(); encoder.encode(&metric_families, &mut buffer).unwrap(); // Output to the standard output. println!("{}", String::from_utf8(buffer).unwrap()); }
On the server-side, a monitoring platform often looks like this:
- Multiple metric exporters are running and export local metrics on HTTP
- Prometheus is used to centralize and store the metrics
- Alertmanager triggers alerts based on those metrics
- Grafana produces dashboards
- PromQL is the query language used to describe dashboards and alerts.
Prometheus types
Prometheus supports four core metric types. These exist only on the side of the client libraries and the wire protocol, the Prometheus server flattens everything into untyped time series (but that may change).
These are
CounterGaugeHistogramSummary
Out of these, Summary is the only one not supported by the Rust library.
Histograms sample observations (for example, things like request durations or response sizes) and counts them into buckets, while also providing a sum of all observed values.
The difference between a Counter and a Gauge is that a Counter should be monotonically increasing,
whereas a Gauge can go up and down with no issue. A Counter may also be reset back to zero on restart.
Use Counter to keep count of things:
- errors
- numbers of requests
- tasks completed
- etc.
Use Gauge to report measured values:
- currently logged in users
- hash rate
- current draw
- etc.
Here is an example of using counters and gauges:
// Copyright 2019 TiKV Project Authors. Licensed under Apache-2.0. use prometheus::{IntCounter, IntCounterVec, IntGauge, IntGaugeVec}; use lazy_static::lazy_static; use prometheus::{ register_int_counter, register_int_counter_vec, register_int_gauge, register_int_gauge_vec, }; lazy_static! { static ref A_INT_COUNTER: IntCounter = register_int_counter!("A_int_counter", "foobar").unwrap(); static ref A_INT_COUNTER_VEC: IntCounterVec = register_int_counter_vec!("A_int_counter_vec", "foobar", &["a", "b"]).unwrap(); static ref A_INT_GAUGE: IntGauge = register_int_gauge!("A_int_gauge", "foobar").unwrap(); static ref A_INT_GAUGE_VEC: IntGaugeVec = register_int_gauge_vec!("A_int_gauge_vec", "foobar", &["a", "b"]).unwrap(); } fn main() { A_INT_COUNTER.inc(); A_INT_COUNTER.inc_by(10); assert_eq!(A_INT_COUNTER.get(), 11); A_INT_COUNTER_VEC.with_label_values(&["a", "b"]).inc_by(5); assert_eq!(A_INT_COUNTER_VEC.with_label_values(&["a", "b"]).get(), 5); A_INT_COUNTER_VEC.with_label_values(&["c", "d"]).inc(); assert_eq!(A_INT_COUNTER_VEC.with_label_values(&["c", "d"]).get(), 1); A_INT_GAUGE.set(5); assert_eq!(A_INT_GAUGE.get(), 5); A_INT_GAUGE.dec(); assert_eq!(A_INT_GAUGE.get(), 4); A_INT_GAUGE.add(2); assert_eq!(A_INT_GAUGE.get(), 6); A_INT_GAUGE_VEC.with_label_values(&["a", "b"]).set(10); A_INT_GAUGE_VEC.with_label_values(&["a", "b"]).dec(); A_INT_GAUGE_VEC.with_label_values(&["a", "b"]).sub(2); assert_eq!(A_INT_GAUGE_VEC.with_label_values(&["a", "b"]).get(), 7); }
CounterVec and GaugeVec bundles a set of metrics that share the same description, but have different values for their variable labels.
They are used if you want to count the same thing partitioned by various dimensions, such as:
- HTTP requests partitioned by response code and method
- Bitcoin mining shares partitioned by valid, invalid and duplicate shares
To learn more about generic usage of Prometheus and Grafana, check out the following links:
- https://prometheus.io/docs/introduction/overview/
- https://grafana.com/docs/grafana/latest/dashboards/ - for Grafana dashb oards in particular
Braiins tips and tricks for using Prometheus in production
In Braiins, we have developed a couple internal conventions on the side of Rust things, which we believe help us organize metrics in a reasonable way.
Always using partitioning with Counter/GaugeVec
This functionality mentioned a couple lines above is extremely useful, it helps you organize data better, and by default, you will see them in a single graph.
Wrapping metrics recording in methods
It is quite useful to have exact methods for recording a particular metric, that leaves very little to speculation and configuration. That makes it easy to orient yourself in the code as to where a particular metric with particular label set is being recorded.
For example, imagine you are writing a web app, and you want to count requests. A request may return 200, 403 and 404 depending on what request it is.
In the code, you would have a CounterVec with labels for ok, forbidden and notfound.
While it may be tempting to pass this as a parameter to a single function, it is a good practice to avoid stringly-typed APIs.
Here in Braiins, we would create the following three functions/methods (depending on if you use the default registry or your own one):
pub fn record_request_ok()pub fn record_request_forbidden()pub fn record_request_not_found()
This also makes it easily searchable in your code editor.
Nested metrics
Sometimes, you have crates which are both libraries and applications and you write another application, which adds a ton of its own functionality while also depending on the first one as a dependency. How do we deal with metrics?
Easily.
The nested crate gets its own containing structure which looks something like this:
#![allow(unused)] fn main() { #[derive(Debug)] pub struct Metrics { metric1: IntCounterVec, metric2: IntGauge, metric3: IntGaugeVec, metric4: IntCounterVec, } }
And is accompanied by its own initialization function, which creates an instance, registers all the counters with the registry, and stores it in a global variable (static) to be freely used by anything that wishes it so.
The topmost crate will have a similar structure, and the same init() function, except, it also calls the init() function
of the dependency one.
It would look something like this:
#![allow(unused)] fn main() { pub fn init( info1: Type1, info2: &Type2, ) -> MetricsRegistry { let metrics_registry = inner_metrics::init(info1, info2); let metrics = Metrics::new(&metrics_registry); INSTANCE .set(metrics) .expect("BUG: metrics instance already initialized!"); metrics_registry } }
In this case, we have the inner, base metrics construct the registry,and we then use to register our top-level stuff.
You could also do it the other way around, passing the registry downwards.
Furthermore, it is also handy to have something like a base_metrics() method on your top-level metrics, which returns
a reference to the InnerMetrics, so you don't have to fish for the global variable every time you need to record a base
metric from your crate.
You can use this model to create not just a chain of discrete metrics implementors, but also a tree, which might come in handy in some situations when you have multiple subcomponents that need to expose metrics
Metrics backreading
Prometheus are easily shared global state. This make it a prime place to store some information you plan to read in a different part of your application.
You may also want to have your application dynamically change its behavior based on some of its statistics.
Therefore, it can come in handy to read metrics you have already recorded.
Refer to the very first code example to see how to read your own metrics.
Including unit name in gauges
If you have many metrics which report stuff that has units, it can get messy figuring what has what unit,
so it is a good idea to add the unit to the name of the metric and perhaps also your recording function. For
example, you might want to _bytes or _watts.
The Task: Implementing a simple Hyper HTTP server to expose metrics
For this project, it is your task to create a simple barebones HTTP server with the Hyper framework,
which exposes the following metrics:
http_requests_total-> the total number of http requests madehttp_response_size_bytes-> the HTTP response sizes in bytes
These metrics should be available on 127.0.0.1:9898.
TIP: For hyper, use the features server, http1, tcp to get at least the minimal functionality out of Hyper to be able to write this application.
For tokio, you should be fine with
macros, rt-multi-thread
TIP 2: The
register_counter!/register_gauge!and theopts!macros are quite handy for registering metrics with the default registry. The default registry is absolutely enough for ths application.
If you want, you can also forgo hyper and use the HTTP server from the async chapter.
If you are feeling particularly brave, you can try running a local prometheus server and scraping the metrics with it:
https://prometheus.io/docs/prometheus/latest/getting_started/
When you run the application and either curl it, open the URL in your browser, or inspect the raw output via Prometheus or Grafana, it should look something like this:
# HELP http_requests_total Number of HTTP requests made.
# TYPE http_requests_total counter
http_requests_total 121
# HELP http_response_size_bytes The HTTP response sizes in bytes.
# TYPE http_response_size_bytes gauge
http_response_size_bytes 249
End product
In the end you should be left with a well prepared project, that has the following:
- documented code explaining your reasoning where it isn't self-evident
- optionally tests
- and an example or two where applicable
- clean git history that does not contain fix-ups, merge commits or malformed/misformatted commits
Your Rust code should be formatted by rustfmt / cargo fmt and should produce no
warnings when built. It should also work on stable Rust and follow the Braiins Standard
Idiomatic Rust
As with most programming languages, there is many ways to write Rust, however, unlike some other languages, Rust takes a more dogmatic approach to what is considered idiomatic, and what is not.
This is partly due to Rust's philosophy of providing one good way of doing things and making the other, unidiomatic ways, more awkward to do, leading programmers into common patterns.
However, these common patterns and habits might not be immediately obvious to newcomers. Rust's heritage is complicated, its low-level nature puts it alongside C and C++, but the language that it owes most of its inspiration to is OCaml, which is firmly planted in the more high-level, functional paradigm part of the programming language spectrum. While it has a C-like syntax, its semantics are generally unique or inspired by OCaml and Cycle.
The full list of inspirations can be found here: https://doc.rust-lang.org/reference/influences.html
It is quite an extensive list, in which procedural languages are a minority.
In this chapter, we shall name some of the most common patterns to help make your code more idiomatic.
Borrowed types over borrowing an owned type
For a number of Rust's standard library types, there exists two variants of one type:
- An owned one
- A borrowed one
The difference is that the owned one has a 'static' lifetime, meaning it
is not a reference to another type, and if you do not drop it (such as by
letting it go out of scope, dropping it manually with mem::drop(), or including
it in an instance of a type which is later dropped), it will live forever,
not limited by the lifetime of anything else.
Borrowed types tend to be thinner and often don't require allocations on their own, however, they are what it says on the tin: strongly typed references to some owned type. There is no hard requirement for a 1:1 parity, so one borrowed type can be produced from more owned types, we may consider calling borrowed types views into the owned types in some cases.
We have met at least two explicit examples of borrowed types.
With vectors, arrays and other collections the classic borrowed type is a slice,
for a collection of Collection<T>, such as Vec<T>, the slice is &[T] or &mut [T]
for mutable access.
Especially when you want to accept a parameter in a function or a method, and don't or can't take it by value, prefer using borrowed types of borrowing an owned type.
There is two reason for this:
- Greater flexibility
- Adding another level of indirection (The owned type may have an internal allocation it does access internally through a pointer already, which can be exposed as the borrowed type).
See the following example:
#![allow(unused)] fn main() { // unidiomatic fn takes_string(input: &String) { // This only accepts a reference to String } // idiomatic fn takes_string2(input: &str) { // This accepts: // - a reference to String // - a String slice // - anything that derefs to &str } }
Mutability
In Rust, variables (more often called bindings) are immutable by default. This is yet another of Rust's safety measures, as it makes you explicitly say if you want to mutate something at some point. If you mutate something you didn't say you are going to mutate, it may indicate a logic error or a typo in your program, which could have unforeseen consequences at runtime, if it were to go by unnoticed.
If you make variables uselessly mutable, you lose this benefit, however, if you don't disable the warning, Rust is pretty good at indicating when variables are mutable, but do not need to be.
Furthermore, immutable variables can be optimized better, which brings some performance benefits (although it may be marginal in your usecase).
It is a good idea and considered idiomatic to minimize segments of code contain mutable variables, especially if you only need the variable mutable for a very short period (such as some initialization).
The way to do this generally is to use a block with a temporary variable, which is mutable, and then to make it the return value from said block, which you store into an immutable variable.
Here is an example:
#![allow(unused)] fn main() { let data = { let mut data = get_data(); data.some_mutating_op(); // Lieutenant Commander data }; }
As you can see, we limited the mutable sector to its absolute minimum.
Returning
There are two ways of returning a value from a function:
- with the
returnkeyword, which works the same as in C-like languages - implicitly, by making the value the last statement of a particular code block and not terminating it with a semicolon
In idiomatic Rust, the return keyword is only used to indicate early returns,
whereas the second method is preferred otherwise.
There is a small semantic difference, which you might have already noticed from the example from the previous point, and that is that, the implicit return only returns from a particular block, not the entire function.
The latter approach is considered idiomatic for the following reasons, which you may debate depending on your programming history:
- Readability (it's just the value there, so it's clear)
- Flexibility (you can take the block and make it the value of a variable instead of function body without needing to modify this)
- It leans better into Rust's "everything is an expression" dogma, which we will look into in the next point
To compare, this code snippets illustrates this point:
#![allow(unused)] fn main() { // considered unidiomatic and Clippy will yell at you fn does_something() -> usize { return 42; } // perfection itself fn does_something2() -> usize { 42 } }
Expressions
In Rust, everything is an expression. Even things that return Rust's equivalent of the,
in mainstream languages well-known, void type, called unit and written as (),
are expressions, since unit is a proper value.
You should therefore thing in expressions, and consider control structures expressions also, and use them directly when you want a value:
#![allow(unused)] fn main() { let number = if condition { x * 2 } else { x / 2 }; let res = loop { break 42; }; let something_else = if let Some(x) = option { x * 145 } else { // do something and terminate the program with an error value exit code std::process::exit(14) }; println!("{}", something_else); let does_it_match = match value_of_enum { SomeEnum::Variant1 => "variant1", SomeEnum::Variant2 => "variant2", SomeEnum::Variant3 => "variant3", _ => unreachable!("we expected this eventuality to be unreachable, alas, we were wrong"), }; }
Of course, expressions which can have multiple arms have to have all arms return a value,
and the value has to be of the same type, otherwise, it will not type-check and rustc will
proverbially not let you pass.
However, you may have noticed, that we delegated some arms in the previous example to expressions
which are clearly not of the same type as the rest, namely std::process::exit(val) and unreachable!().
These are (or internally call) so-called divergent functions, meaning they execution never goes past them.
This is indicated by their return type being the ! (pronounced never type), which will type-check
with anything.
For all intents and purpose, you can consider the expression of return val; to have the never type as well,
since if its called, it terminates execution in a function early, and so it can type-check also.
Iterators
If you have spent any time playing around with functional programming languages, you might have noticed that many of them really don't like loops. This makes sense, since functional programming languages also tend to really not like mutable state, which commonly accompanies loops.
Rust is the same, however, it has fully featured loops, three types of them as a matter of fact, loop,
while and for. But in idiomatic Rust, these are seldom used, essentially only for event loops or
things which would be too awkward to represent with iterators.
Iterators are otherwise the preferred, and wherever you can and it makes sense to you, you should prefer using iterators over loops.
They generally have equivalent performance, in some cases, Rust can optimize iterators even better than loops.
When writing an operation on an iterator, it is traditional and idiomatic to break down what you are doing into very small operations, even if you were to repeat the same iterator transformation twice or more times in a row. There is no downside, and its more readable.
Also remember that iterators are lazy, and you need to consume them such as by using .collect() or .for_each().
See more in the iterators chapter.
Example:
#![allow(unused)] fn main() { let template_files = read_dir("theme")? .into_iter() .filter_map(|x| x.ok()) .map(|x| x.path()) .filter(|x| x.is_file()) .collect::<Vec<PathBuf>>(); }
This could be written as a single .filter_map and .collect.
TIP: If you are writing an iterator with a .for_each() consumer that is
more than, say, five lines long, it should probably be a for loop instead.
Recursion
On the other hand, here is where Rust's love story with FP falls a little short. Recursion is a common pattern in functional programming, such as to supplement the lack of loops, or to model other algorithms.
However, unlike most functional programming languages, Rust does not have Tail Call Optimization, and so, if you use recursion extensively, you will eventually blow your stack and your program will crash due to running out of stack memory.
TCO was deemed to not belong in Rust due to the following reasons:
- They "play badly" with deterministic destruction
- They "play badly" with assumptions in C tools, including platform ABIs and dynamic linking
- They require a calling convention which is a performance hit relative to the C convention
- We find most cases of tail recursion reasonably well convert to loops or iterators
- It can make debugging more difficult since it overwrites stack values.
Therefore, do not do recursion if you expect you might nest yourself thousands or more levels deep.
Constructors
Constructors are an established feature in programming languages that know the notion of Object. They typically have special syntax that slightly differs from normal methods and may be the only way of producing an instance of a non-primitive type.
Rust does not have any notion of a constructor, however, certain conventions have been established to imitate them for the time being, and they are named as such:
- A method called
new()taking zero parameters - A method called
new(params..)taking some parameters, if they are absolutely necessary for the creation of a type - A method called
from_X(X..)taking some parameters, if it is not possible to implementstd::convert::From<X>(maybe because there is more than one param), and anew()exists - Implementations of the
std::convert::Fromtrait where possible
Keep in mind that the From trait should never fail. If the conversion may fail, use TryFrom.
#![allow(unused)] fn main() { /// Time in seconds. pub struct Second { value: u64 } impl Second { // Constructs a new instance of [`Second`]. // Note this is an associated function - no self. pub fn new(value: u64) -> Self { Self { value } } /// Returns the value in seconds. pub fn value(&self) -> u64 { self.value } } }
Default and Debug
The Default trait is related to the previous topic. A recommended way to implement the new()
constructor is to implement or derive Default and then call it in the method implementation.
If you are fine with the default values for all members of your structure, you can derive the trait, otherwise, implement it manually.
#[derive(Default)] struct SomeOptions { foo: i32, bar: f32, } impl SomeOptions { fn new() -> Self { Default::default() } } fn main() { let options: SomeOptions = Default::default(); let other_options = SomeOptions::new(); }
Another trait that is a good idea to derive or implement for all of your types is Debug. This
traits is mentioned in the Standard Library traits chapter. It makes it
significantly easier for others to use your type in their own types, when they need this trait
implemented as well (if your type is not Debug, the trait cannot be derived).
Struct-update syntax
What if you want to create a struct from another struct of the types, which shares the values of some fields? There are two naive options: clone the the structure and change the fields that need to be different, or create a new instance of the structure and change the fields that need to be the same.
However, Rust has a better tool called the struct update syntax. It uses the double dot operator,
you may have seen it already. It is often used in tandem with the Default trait when you want to
use default values, but override some.
fn main() { let options = SomeOptions { foo: 42, ..Default::default() }; }
You can use it to implement better constructor functions.
Fallible code
If your code can fail, it is a good idea to propagate the error and use the ? (pronounced Try)
operator to either continue execution, or propagate error upwards.
To be able to use the try operator, your function either needs to return Result or Option, or another
type implementing the Try trait.
More on this in the Options and Results chapter.
Avoid using the legacy deprecated try!() macro. In all but the oldest edition of Rust, try is
a reserved keyword.
Concatenating strings
An operation that is done commonly is concatenating strings.
It is possible to build strings using the push and push_str methods on a mutable String,
or by using the plus operator. However, in cases where performance is not a concern and/or
you have a mix of literal and non-literal strings, using the format! macro is better.
It also saves you from having to explicitly convert convertible types to String.
#![allow(unused)] fn main() { let name = get_random_name_as_string_somewhere(); let new_string = format!("The year of Bitcoin is {}. - {}", 2022); }
Do not use this macro to convert a single value to string, format!("{}", val)
is less readable than val.to_string() and it may be much slower at no added benefit.
Builder pattern
Rust does not have any notion of an optional parameter, or in other words, a parameter with a default value. In order to prevent excessive typing, or spamming the Option type everywhere, the Builder pattern is used.
The Builder pattern provides either uses the target type (with default values preset), or another "builder" type that has methods typically named after the fields or configuration values that need to be set.
#![allow(unused)] fn main() { struct UserBuilder { email: Option<String>, first_name: Option<String>, last_name: Option<String> } impl UserBuilder { fn new() -> Self { Self { email: None, first_name: None, last_name: None, } } fn email(mut self, email: impl Into<String>) -> Self { self.email = Some(email.into()); self } fn first_name(mut self, first_name: impl Into<String>) -> Self { self.first_name = Some(first_name.into()); self } fn last_name(mut self, last_name: impl Into<String>) -> Self { self.last_name = Some(last_name.into()); self } // there is no consensus on what this method is called // it may also just be the method that consumes the type // // consider a scenario where you are building a type for Email, // the consumer may be the send(self) method() fn build(self) -> User { let Self { email, first_name, last_name } = self; User { email, first_name, last_name } } } }
example kindly adapted from Sergey Potapov
Panicking vs Result/Option
There are two main ways to indicate failure: using the Result and Option type (only use Option if there are no discernible error states you could report to the user of a type/function/library), and using panics.
It is a rookie mistake to conflate panics with exceptions, and using them where exceptions would be used in programming languages that have them. This is considered an anti-pattern.
Panics should be used scarcely, as they signify irrecoverable errors, and may abort() the entire process,
or shutdown the thread, if the panic does not propagate beyond the thread it occurred on. So only use them
when it is impossible to handle the error, or when you need to type-check in situations where you know
some code are is unreachable or some possibly fallible eventuality is actually impossible, but only you know it,
Rust doesn't.
#![allow(unused)] fn main() { panic!(); panic!("this is a terrible mistake!"); panic!("this is a {} {message}", "fancy", message = "message"); std::panic::panic_any(4); }
If the main thread panics, it will terminate all your threads and end your program with code 101.
If you have set panic = "abort" in your Cargo manifest, stack won't be unwound and you cannot expect
values to be dropped and your program to be gracefully terminated.
Strong types
As Pascal Hertleif spoke about in his old but gold Writing Idiomatic Libraries in Rust talk, in idiomatic Rust, you should avoid stringly-typed APIs. More broadly, prefer strong typing, and create types where applicable.
You want to do this so that you make your APIs more expressive (it is easier to discern what things mean by looking at their signatures), and it also helps you delegate some degree of sanity checking on the compiler, or forcing the end user to go through checks that you set in your wrapping type's implementation.
This boils down to three guidelines:
- use enums over numeric state constants
#![allow(unused)] fn main() { // good enum E { Invalid, Valid {...} } // bad const ERROR_INVALID: isize = -1; }
- use two-variant enums over bools where bool would indicate one of two possible states/values
#![allow(unused)] fn main() { // good enum Visibility { Visible, Hidden } struct MyType { // ... visible: Visibility } // bad struct MyType { visibility: bool, } }
- when representing units:
#![allow(unused)] fn main() { // good struct Voltage(f32); let voltage = Voltage(14.1); // bad let voltage = 14.1; }
Unsafe
Avoid unsafe where you can. Binding foreign libraries and syscalls is an unavoidable
exception. Especially avoid exposing an unsafe API to your library.
Remember that by the definition used by Rust, the following are considered unsafe:
- thread unsafe operations
- operations that may void memory safety
- operations where there exists a combination of parameters that may do one of the above or cause undefined behavior
Matching on Result and Option just to find which variant
A common anti-pattern found in Rust is using the if-let syntax just
to find what variant Option or Result is without doing anything with
the contained value (of course, this does not apply to Option::None, as it has no contained value).
Prefer using variant detection methods.
#![allow(unused)] fn main() { let x: Option<u32> = Some(2); assert_eq!(x.is_some(), true); let x: Option<u32> = None; assert_eq!(x.is_some(), false); // but .is_none() would be true! let x: Result<i32, &str> = Ok(-3); assert_eq!(x.is_err(), false); let x: Result<i32, &str> = Err("Some error message"); assert_eq!(x.is_err(), true); let x: Result<i32, &str> = Ok(-3); assert_eq!(x.is_ok(), true); let x: Result<i32, &str> = Err("Some error message"); assert_eq!(x.is_ok(), false); }
For all of these that have a contained value, there also exist .is_X_and(pred) variants, that
will only return a true if the value inside also matches a predicate defined by a closure.
For custom enums, you have to implement these.
You may also use the matches! macro (may be helpful when implementing said methods).
#![allow(unused)] fn main() { let foo = 'f'; assert!(matches!(foo, 'A'..='Z' | 'a'..='z')); let bar = Some(4); assert!(matches!(bar, Some(x) if x > 2)); }
Anti-pattern: Cloning to satisfy the borrow checker
When you are new to Rust, fighting with the borrow-checker is a common occurrence.
It may be tempting to resolve these issues, which may initially be confusing by just
cloning values willy-nilly. Using .clone() causes a copy of the data to be made,
requiring a new allocation on stack or on the heap. That is not optimal, and it
does not help you learn ownership.
#![allow(unused)] fn main() { // define any variable let mut x = 5; // Borrow `x` -- but clone it first let y = &mut (x.clone()); // without the x.clone() two lines prior, this line would fail on compile as // x has been borrowed // thanks to x.clone(), x was never borrowed, and this line will run. println!("{}", x); // perform some action on the borrow to prevent rust from optimizing this //out of existence *y += 1; }
However, keep on mind that .clone() is the preferred method of propagating Rc/Arc
pointers to a type, and it does not actually create a deep copy of the underlying
data.
There are also cases where unnecessary .cloning() is acceptable:
- You are still very new to ownership and boy, we sure as hell don't want to torture you to death all at once, do we
- The code does not have significant performance or memory constraints, but you need to get things done fast, such as prototyping, hackathon projects or competitions (you can always go back and iron things out).
- In situations where satisfying the borrow checker is really complex and you prefer to provide better readability over performance
You should run cargo clippy on your code, which is able to detect and eliminate some unnecessary
clones.
Anti-pattern: Denying or allowing all warnings
It may also be tempting by well-intentioned authors to ensure that the code builds without warnings. I too have fallen into this trap in the past.
You go and you annotate your crate root with the following.
#![allow(unused)] #![deny(warnings)] fn main() { // And there was peace in the land for forty years // // - Judges 5:31 GNT }
While this is short and it will stop the build if there is anything wrong, it will also stop the build if there is anything wrong. This opts out of Rust's stability, as new versions of the language may (and often do) introduce new warnings, and your crate is suddenly incompatible with these new versions.
New compile errors are introduced as well, yes, but they too have a certain grace
period before being turned to deny.
If you want to do this in your CI/CD pipeline, use the RUSTFLAGS="-D warnings" env variable.
Otherwise, consider denying exact warnings, for example:
#![allow(unused)] #![deny(bad_style, fn main() { const_err, dead_code, improper_ctypes, non_shorthand_field_patterns, no_mangle_generic_items, overflowing_literals, path_statements, patterns_in_fns_without_body, private_in_public, unconditional_recursion, unused, unused_allocation, unused_comparisons, unused_parens, while_true)] }
You can also use deny to enforce a degree of style:
#![allow(unused)] #![deny(missing_debug_implementations, fn main() { missing_docs, trivial_casts, trivial_numeric_casts, unused_extern_crates, unused_import_braces, unused_qualifications, unused_results)] }
Using outdated Rust
Sometimes you can't avoid it (such as if it is imposed on you by the environment you work in, or a particular tool, or missing platform support), so you are out of luck, but if you can, make sure to use the latest language edition and latest Rust version to be able to fully utilize the tools Rust provides you.
Newer versions of Rust may make your code more performant, less verbose and may contain security fixes.
Anti-pattern: Deref polymorphism
As elaborated in the chapter on advanced trait usage,
Rust does not have type inheritance, so it may be tempting to simulate it by using Deref to
imitate a sort of polymorphism.
class Foo {
void m() { ... }
}
class Bar extends Foo {}
public static void main(String[] args) {
Bar b = new Bar();
b.m();
}
You could emulate it using the anti-pattern as such:
use std::ops::Deref; struct Foo {} impl Foo { fn m(&self) { //.. } } struct Bar { f: Foo, } impl Deref for Bar { type Target = Foo; fn deref(&self) -> &Foo { &self.f } } fn main() { let b = Bar { f: Foo {} }; b.m(); }
This is an anti-pattern because it goes against the Rust philosophy of approaching
object oriented programming, but more exactly, it is abusing the Deref trait to
do something it was not intended for.
It is also not a trivial replacement, since traits implemented by Foo are not automatically
implemented for Bar, so this pattern interacts badly with bounds checking and thus generic programming.
There is no good alternative for this, you are out of luck, and have to learn how to use composition over inheritance instead.
The project: Making a static website generator idiomatic
For this project, you will take a minimalistic static site generator, I have written and made significantly less idiomatic, and make it idiomatic to your best ability.
Clone the project from here: https://gitlab.ii.zone/lho/hyper-rat-idiomatic-rust
To figure out if you have broken it, go into the test-site folder and run cargo-run.
This will build HTML in the test-site/build folder.
Either open the html files manually or host them with a simple HTTP server
such as simple-http-server -p 7777 --index.
It should look like this:
index.html

second.html

third.html

Using the Braiins crates registry
Recently, we set up our own crates registry. As we push more crates onto it, the necessity to familiarize yourself with it increases.
Currently, the registry running:
- production: https://registry.ii.zone
The registry is the kellnr implementation from BitFaltr. From the dependence fetching perspective, a registry works quite similarly to just getting your crates from crates.io.
You need to add a config for Cargo to your system (although it may
be already present in the repository, it will not be invoked with commands
that are unrelated to a particular crate such as cargo install).
# $HOME/.cargo/config.toml
[registries.braiins]
index = "sparse+http://registry.ii.zone/api/v1/crates/"
[source.braiins-cratesio]
registry = "sparse+http://registry.ii.zone/api/v1/cratesio/"
[source.crates-io]
replace-with = "braiins-cratesio"
Keep in mind that you can use the testing registry crates.io proxy if you want to help distribute the load.
This will make the registry available in your system. Now you can start adding dependencies from it, either by editing Cargo.toml, or using the appropriate command:
cargo add --registry braiins ii-clustering
Your system will now also use crates.io as proxied by kellnr. This can improve performance, and will reduce the bandwidth we create for crates.io (as it would be quite sad if we got cut off).
Preparing a crate for publishing
To be able to publish a crate, modify your Cargo.toml to include the
publish key, which will protect against publishing to crates.io, and
make sure all dependencies have either a crates.io version or registry
version (you can have both path and registry version at once).
[package]
name = "asset-server"
version = "0.1.0"
edition = "2021"
authors = ["Karel Vávra <karel.vavra@braiins.cz>"]
publish = ["braiins"]
# See more keys and their definitions at https://doc.rust-lang.org/cargo/reference/manifest.html
[dependencies]
anyhow = "1.0"
consul-async = { version = "0.3.0", registry = "braiins" }
consul-utils = { version = "0.2.0", registry = "braiins" }
ii-async-utils = { version = "0.3.0", registry = "braiins", default-features = false }
ii-metrics = { version = "0.2.2", registry = "braiins", features = ["scm_versioning"] }
ii-scm = { version = "0.2.0", registry = "braiins" }
protos = { version = "0.1.0", registry = "braiins" }
prost = "0.9"
maplit = "1.0.2"
parking_lot = { version = "0.12.1", features = ["deadlock_detection"] }
serde = { version = "1.0.114", features = [ "derive" ] }
structopt = "0.3"
tokio = { version = "1", features = ["full"] }
tracing = { version = "0.1" }
tracing-subscriber = { version = "0.3", features = ["env-filter"] }
tonic = "0.6"
tonic-reflection = "0.3"
tonic-tracing-reload = { version = "0.1.0", registry = "braiins" }
warp = "0.3"
tokio-stream = "0.1.8"
futures = ">= 0.3.5"
h2 = "0.3"
Actually publishing the crate
We have chosen to make all crates managed by the CI, and by a CI account.
The actual version bumping and git operations are executed by cargo-bump, which does the following:
- bumps [
major,minor,patch,prerelease] version- the array above represents the legitimate values for the $VERSION_SPEC variable, which you have to configure to create your publishing jobs
- creates a commit and git tag
- a
--tag-prefixis pre-pended to names of both - if there is multiple crates in a repository, --tag-prefix is probably necessary
- a
There is a few peculiarities and specifics about the versioning behavior built on the job template below:
- The commit and tag are created by the user who triggered the pipeline
- If the jobs are not running on master, the last segment of the branch is added to the pre-release segment of the version.
- The pre-release version segment is pre-pended by the string
ci-. This is because this segment cannot start with a number, so for example jtr/feat/10407 would otherwise produce an invalid version
crate: ii-clustering: 1.2.14 ──────────┐ (supposing we don't want to bump X.Y.Z)
├───┬───── 1.2.14-ci-k-means-clustering.1
branch: lho/feat/k-means-clustering ───┘ │
│
│ (if missing, it is only added)
bump prerelease ───────┼───── 1.2.14-ci-k-means-clustering.1
│
│
│ (if present, last number is appended)
bump prerelease ───────┼───── 1.2.14-ci-k-means-clustering.2
│
│ (contrary to the more freeform semver)
│ (standard, prerelease version has to)
│ (satisfy the regex [a-zA-Z]\w+.\d+)
bump minor ───────┼───── 1.3.0-ci-k-means-clustering.1
│
│
│
bump major ───────┼───── 2.0.0-ci-k-means-clustering.1
│
│
│
bump patch ───────┼───── 2.0.1-ci-k-means-clustering.1
│
│
│
bump major ───────┼───── 3.0.0-ci-k-means-clustering.1
│
│
(bumping prerelease on master strips it) │
(without increasing any other segment) │
merge to branch master ┐ │
│ │
bump prerelease ┤ │
└──────┼───── 3.0.0
│
│
bump minor ───────┼───── 3.1.0
│
│
fork: lho/fix/precision-fix ┐ │
│ │
bump prerelease ┤ │
└──────┼───── 3.1.0-ci-precision-fix.1
│
│
│
bump prerelease ───────┼───── 3.1.0-ci-precision-fix.2
│
│
│
bump prerelease ───────┼───── 3.1.0-ci-precision-fix.3
│
▀
Here is a template you can use in your .gitlab-ci.yml:
publish-<which-version>:
when: manual
stage: publish
variables
VERSION_SPEC: <which-version>
before_script:
- !reference [.cargo-publish, before_script]
script:
- # if the crate being published is not in root
#- cd <crate-folder/>
- !reference [.cargo-publish, script]
The following variables have to be defined:
$VERSION_SPEC : one_of[major, minor. patch, pre-release]
$CRATES_REGISTRY_SSH_KEY : priv key of crates registry deploy key
(name might differ in monorepo)
$CARGO_REGISTRIES_BRAIINS_TOKEN: an auth token for the ci account
These must be readable. Your repo must also be able to accept commits
in the format of <name>?-<semver-version>.
You can use the following regex to combine it with rejecting improperly formatted commits:
^(^(fixup![ ])*(build|ci|docs|feat|fix|perf|refactor|style|test|chore)(\([a-z]+\)){0,1}:\s.+\s#\S+|(([A-Za-z_][A-Za-z0-9_-]*-)?(0|[1-9]\d*)\.(0|[1-9]\d*)\.(0|[1-9]\d*)(?:-((?:0|[1-9]\d*|\d*[a-zA-Z-][0-9a-zA-Z-]*)(?:\.(?:0|[1-9]\d*|\d*[a-zA-Z-][0-9a-zA-Z-]*))*))?(?:\+([0-9a-zA-Z-]+(?:\.[0-9a-zA-Z-]+)*))?))$
Yes, the regex is long and ugly, but so is the SemVer specification.
On the side of Rust configuration, the following entries in the cargo config are necessary:
# .cargo/config.toml
[registries.braiins]
index = "sparse+http://registry.ii.zone/api/v1/crates/"
[source.braiins-cratesio]
registry = "sparse+http://registry.ii.zone/api/v1/cratesio/"
[source.crates-io]
replace-with = "braiins-cratesio"
You can add these entries to your $HOME/.cargo/config.toml config as well.
Also make sure to limit which registries a package can be published to:
[package]
# ... other fields
publish = ["braiins"]
You can install cargo-bump easily from the Braiins registry:
$ cargo install --registry braiins cargo-bump
Note: this version is different form the one in the crates.io registry, and that one will not work.
Publishing to monorepo
Publishing to the monorepo is quite similar, except to get access to the publishing
jobs, you need to push to the branch publish+<branchname>. This will spawn
a special pipeline which only contains the publishing jobs. This will check out
<branchname>, so it is not important what's on the publish branch.
The same jobs as specified above will be available for every package specified in
the file .ci-bump.toml:
Add entries like this:
[[packages]]
name = "name-of-crate"
path = "path/to/contain/folder"
This file is processed by ci-bumper, which dynamically generates a template
based on its contents. The template used by this crate can be found in the root
of the monorepo at /.ci-bump-template.yml. The generated yaml can be inspected
as the artifact .ci-bump.yml of the generate-publish-jobs CI job in the publish
pipeline.
The complete process is as follow:
- Make sure the crate you want to publish is mentioned in
.ci-bump.toml - Merge the changes you want published into master (unless you want to publish a special prerelease version)
- Open a MR from
publish+mastertomaster, updating the branch - This should create a publish pipeline, run the correct publish job, such as
p-example-major - Merge the MR
If the prerelease job is ran on the publish+master branch, it will strip any prerelease
suffix and try to publish that version. On any other branch, jobs will add a numbered prerelease suffix
based on the name of the branch.
Necessary care
Make sure that you follow semver to the best of your ability when versioning. The Semantic Versioning specification can be found here:
You should also make sure that you do not publish code you do not want to be published, as it is quite difficult to delete versions from Rust crate registries. As a matter of fact, it is an unsupported operation and has to be done by hand.
If for any reason you want to find out if your crate is publishable ahead of time,
use the cargo package command.
If for any reason you have to publish a crate by hand, always append the
--registry braiins flag, even if with a correct package.publish in the manifest,
Cargo would deduce the braiins registry. This is because if this key is accidentally
missing (perhaps because it simply isn't there or because you made a typo, in which case
Cargo would just throw a warning about an unknown key), you could publish the package
to crates.io and we would be screwed, as it would be very, very difficult getting
it off of there.
Troubleshooting
Here is a couple reasons you might be unable to publish a crate version to the registry:
- Version with the same number is already there
- Your dependencies are incorrect (missing registry versions)
- You have a caret dependency
- Your crate depends on files which are not specified in the
package.includekey - You are trying to publish a package that's too big because you forgot to remove unrelated
artifacts by .gitignore or by the
package.excludekey - Your crate depends on files which are outside its folder, that's trouble because the crate can't be packaged properly. You have to rewrite the crate.
Rust Developer: Introduction
Welcome to the Rust Developer online course developed in collaboration between Braiins Systems s.r.o. and Robot_Dreams.
Over the next ten weeks, we will go through all the important of the concepts of the Rust programming language, both hands on and in practice via hands-on examples and homeworks.
Organization
The Rust programming course is split into twenty lesson. For each lesson, there will be a chapter on the sidebar of this website, a presentation, and a short handout summary of the key takeaways from the lesson.
Some lessons have an accompanying homework, which is found at the bottom of given lessons chapter. They will be linked to Google Classroom.
Homework will never be assigned to two consecutive chapters, to make sure that you are never under too much pressure.
TIP: To run code examples in chapters on this webite, click the ▶️ button to see output appear underneath the code snippet. Clicking the copy icon let's you easily transfer the code to a Rust Playground which allows you to modify it and experiment. Just using Ctrl-C is sometimes not enough, as many examples contain hidden code to reduce clutter and ensure only the important part of the snippet is emphasized. Some code examples might also be editable, you are encouraged to play around with them :-)
Requirements
It is recommended that you use Linux, but we can probably work with Windows also. Mac should be fine too, but I have the least experience with that platform.
Having an environment for Rust development in your device is a strong requirement, as the Rust Playground can only get you so far, and some projects may require you to import crates that are not available on the playground. Please check out the following list of links to help you get a working setup:
- rustup (installation tool): https://rustup.rs/
- Are We (I)DE Yet? (overview of editor support and what plugins/extensions are required if any): https://areweideyet.com/
- Rust toolchain component overview (to get you familiarized with the programs you might be using): https://rust-lang.github.io/rustup/concepts/components.html
1: Why choose Rust?
This lesson has some overlap with the Rust - Language of the Future webinar: https://www.youtube.com/watch?v=4djxKiFrO0A that was held before the start of this course.
Hi, and welcome to the first lesson of the Rust Developer course. Since this is the beginning of the course, we should start at the beginning as well.
Introduction
Rust is a systems programming language that focuses on performance, reliability, and productivity. It has been designed to address the issues of memory safety and concurrent programming by not compromising on performance.
Despite only gaining traction in recent years, Rust is not that new, both in implementation and conceptually. It was originally invented by Graydon Hoare, a Mozilla developer at the time, in 2006, with the mission of creating a language for writing robust code. It is named after a species of fungi (the rust fungus) and because rust is a substring of robust.
Mozilla’s Involvement
In 2009, Rust caught the attention of Mozilla, which began sponsoring the project. Mozilla saw potential in Rust as a safer alternative to C++ for developing high-performance, oncurrent systems, especially in the context of web browsers. Rust was used to develop components for the Servo layout engine, an experimental browser engine aimed at improving the parallel processing of web content.
This was a difficult endeavor and required a high-level of trust from the side of Mozilla because the language was evolving rapidly at the time and breaking changes would be introduced on essentially weekly basis.
Stable Release
Rust 1.0, the first stable release, was announced in May 2015. This release marked a significant milestone, providing developers with a stable platform for building applications. Since then, Rust has followed a regular release schedule, with new stable versions being released every six weeks.
All changes pass from nightly, through beta into the stable channel. In this course, we will be using the stable channel, but even the nightly one tends to be reliable enough that some companies (usually startups) are not afraid to put it into production.
Philosophy of Rust
Over time, the philosophy of Rust crystalized into a focus on the following areas, with these solutions to them:
- Performance: Rust offers performance similar to C and C++ but with additional safety features.
- Memory Safety Guarantees: Rust’s borrow checker ensures memory safety and prevents common bugs like null pointer dereferencing and data races.
- Concurrency: Rust makes it easier to reason about concurrency, enabling developers to write multi-threaded applications with confidence.
Building up on the last point, Rust tries to make it easy to reason about everything by being very explicit and not doing any "behind the scenes magic". This makes Rust code explicit and helps you think about what you are doing, but also slower to write than many other languages.
Key features of Rust
Rust is a language that has a rather unusual pedigree. The oldest and most historically prominent for Rust was OCaml and SML, a functional programming language (although not a pure one like Haskell). Nowadays, OCaml's influences are mostly seen on Rust's syntax and keywords.
There is a number of other influences, which can be found here:
https://doc.rust-lang.org/reference/influences.html
The result is a language that claims to not be overly original, but rather one that brings features from more obscure languages and discoveries from academic circles into a form that is suitable for mainstream development.
We can briefly summarize the key features of Rust like this:
1. Syntax:
- OCaml- and C-Like Syntax: Rust's syntax is influenced not just by OCaml, but also by C, making it familiar to developers with a background in languages with similar heritage.
- Pattern Matching: Rust supports powerful pattern matching, which is a versatile tool for handling structured data and control flow.
- Macros: Rust supports hygienic macros for metaprogramming, allowing code generation and reducing boilerplate.
2. Semantics:
- Ownership System: Rust introduces a unique ownership system with borrowing and lifetime concepts, enforcing memory safety and preventing data races at compile-time.
- Expression-Based: Rust is predominantly expression-based, meaning most constructs return a value, contributing to concise and expressive code.
- Immutable by Default: Variables are immutable by default, which encourages functional programming principles and helps prevent unintended side effects.
3. Typing:
- Static Typing: Rust is statically typed, which means types are checked at compile-time, reducing runtime errors.
- Type Inference: While being statically typed, Rust also offers type inference, allowing for more concise code without explicit type annotations.
- Generics and Traits: Rust supports generics and traits, providing powerful tools for polymorphism and code reuse.
- Algebraic Data Types: Rust supports algebraic data types (enums and structs), facilitating expressive modeling of data structures.
- Lifetime Annotations: Lifetimes are part of Rust’s type system, enabling fine-grained control over object lifetimes and ensuring memory safety.
4. Concurrency:
- Fearless Concurrency: Rust features ownership, borrowing, and lifetimes, which together enable "fearless concurrency", preventing data races and enabling safe parallel execution.
- Async/Await: Rust supports asynchronous programming with async/await syntax, making it easier to write non-blocking code.
5. Memory Management:
- No Garbage Collector: Rust does not use a garbage collector, relying instead on its ownership system to manage memory, ensuring predictable performance.
- Zero-Cost Abstractions: Rust’s abstractions have minimal or no runtime overhead, ensuring high performance.
6. Error Handling:
- Result and Option Types: Rust uses the Result and Option types for error handling, making errors explicit and encouraging developers to handle them appropriately.
- Panic: Rust includes a panic mechanism for dealing with unrecoverable errors, with options for customization.
In the following lessons, we will examine all of these points, but first, let's start by running a hello world.
Hello World
To get started, here is the quintessential "Hello, World!" program written in Rust:
fn main() { println!("Hello, World!"); }
You can use the Rust Playground website to try out it and modify it, or you can use the play button in the top right corner of the code example.
Let's break down this simple program:
-
fn main()- This line defines the main function, which is the entry point of every Rust program.
The
fnkeyword is used to declare a new function, followed by the name of the function,main, and a pair of parentheses()indicating that this function takes no arguments. Keywords in Rust are typically short. In Rust, the main function does not have to return anything. The program will exit with code0unless otherwise specified.
- This line defines the main function, which is the entry point of every Rust program.
The
-
{and}- These curly braces
{ }denote the start and end of the function body. All Rust functions are enclosed in curly braces. This will be familiar to you, if you used any of the languages influenced by C.
- These curly braces
-
println!("Hello, World!");- This line is the body of the main function. The
println!macro is called to print the string"Hello, World!"to the console followed by a new line. The!afterprintlnindicates that this is a macro call rather than a regular function call. Macros in Rust are a form of metaprogramming and are used for a variety of tasks, including printing to the console. The string"Hello, World!"is passed as an argument to theprintln!macro. We will discuss why it is a macro in a future lesson. - The line ends with a semicolon
;, which is used to terminate expressions in Rust.
- This line is the body of the main function. The
When you run this program, the Rust compiler will compile the source code into an executable binary.
Upon execution, the program will print Hello, World! to the console. This program demonstrates
the basic structure of a Rust program, including function definition, macro invocation, and expression termination.
Advanced Hello World
Here is a slightly more advanced example, that greets someone in particular:
use std::io; fn main() { // Print a message to ask for the user's name println!("Enter your name:"); // Create a new String to store the user input let mut name = String::new(); // Read the user input and store it in the 'name' variable io::stdin().read_line(&mut name).expect("Failed to read line"); // Trim the trailing newline character from the input let name = name.trim(); // Print a greeting message with the user's name println!("Hello, {}!", name); }
This program first prints "Enter your name:" to the console and waits for user input.
It then reads the input into the name variable. Before printing out the greeting
message, it trims the trailing newline character from the input. Finally,
it prints "Hello,
Notice the .expect(), which constitutes error handling (gracefully shutdown program
with this message if .read_line() returns an error), the .trim() (the read line contains
the trailing newline character) and the re-declaration of the name variable as immutable - Rust
allows variable shadowing.
Development environment
Running examples through the Rust playground will not be enough for us, we need to set up a development environment.
The guide for installing Rust focuses mostly on Linux and Visual Studio Code as our editor of choice. The reason why we picked VS Code is because some Rust tools are developed in tandem with their respective VS Code extensions, ensuring the greatest level of compatibility and maturity.
You are welcome to choose any other editor, or IDE. Here is a handy website to help you on your way:
Without further ado, let's get into it.
Step 1: Install Rust
-
Open a Terminal or Command Prompt
- On Windows, you can open the Command Prompt by searching for
cmdin the Start menu. Rustup also provides a graphical installer that you can use if you do not want to use the Command Prompt. - On macOS, you can open the Terminal from the Applications folder under Utilities.
- On Linux, you can open a terminal window (how depends on your distribution, but you probably know already)
- On Windows, you can open the Command Prompt by searching for
-
Download and Install Rustup
- Run the following command in the Terminal or Command Prompt:
curl --proto '=https' --tlsv1.2 -sSf https://sh.rustup.rs | sh - Follow the on-screen instructions to complete the installation.
- Run the following command in the Terminal or Command Prompt:
-
Configure the Path
- Once installed, close the current Terminal or Command Prompt and open a new one.
- Run the following command to add Rust to your system’s PATH variable:
source $HOME/.cargo/env - On Windows, Rustup should automatically configure the PATH variable for you.
-
Verify Installation
- Run the following command to verify that Rust is installed correctly:
At the time of this writing, version 1.72 is the latest.rustc --version
- Run the following command to verify that Rust is installed correctly:
Step 2: Install Visual Studio Code (VSCode)
-
Download VSCode
- Visit the Visual Studio Code download page and download the version appropriate for your operating system.
-
Install VSCode
- Follow the installation instructions for your operating system:
- Windows: Run the installer and follow the prompts.
- macOS: Open the downloaded
.zipfile and drag Visual Studio Code to your Applications folder. - Linux: Follow the platform-specific instructions provided on the download page.
- Follow the installation instructions for your operating system:
-
Launch VSCode
- Once installed, launch Visual Studio Code from your applications menu or by searching for it. On
Linux, you can also launch VS Code from the terminal by writing
code.
- Once installed, launch Visual Studio Code from your applications menu or by searching for it. On
Linux, you can also launch VS Code from the terminal by writing
Step 3: Install the rust-analyzer Extension
-
Open VSCode
- If not already open, launch Visual Studio Code.
-
Access Extensions View
- Click on the Extensions view icon on the Sidebar (or press
Ctrl+Shift+X/Cmd+Shift+X).
- Click on the Extensions view icon on the Sidebar (or press
-
Search and Install
rust-analyzer- In the Extensions view search box, type
rust-analyzer. - Locate
rust-analyzerin the search results and click on the Install button. - NOTE: Do not install any other Rust extension,
rust-analyzeris the current and best one, and the olderrustextension has conflicts with it.
- In the Extensions view search box, type
-
Reload Window
- After the installation is complete, you may be prompted to reload the window to activate the extension. If so, click on the Reload button.
The VS Code extension will also automatically fetch
rust-analyzertoolchain component, if your Rust installation did not include it already.
- After the installation is complete, you may be prompted to reload the window to activate the extension. If so, click on the Reload button.
The VS Code extension will also automatically fetch
-
Configure
rust-analyzer(Optional)- You can configure
rust-analyzersettings by accessing the settings menu (Ctrl+,/Cmd+,) and searching forrust-analyzer. For the purposes of our course, no configuration should be necessary on most systems.
- You can configure
Now, you have Rust, Visual Studio Code, and the rust-analyzer extension installed and configured on your system, ready for Rust development.
Running Hello World in VS Code
To verify everything is working correctly, we will run the previous "Hello world!" example with our new setup.
Step 1: Create a New Cargo Project
-
Open a Terminal or Command Prompt
- Navigate to the directory where you want to create your new Rust project.
-
Create a New Cargo Project
- Run the following command, replacing
hello_worldwith the name you'd like to give to your project:cargo new hello_world - This command uses the Cargo build system/package manager to create a new directory named
hello_worldwith the initial project files.
- Run the following command, replacing
-
Navigate to the Project Directory
- Change into the newly created project directory:
cd hello_world
- Change into the newly created project directory:
Step 2: Open the Project in VSCode
-
Launch VSCode
- If you do not have your VSCode opened yet, launch.
-
Open the Project Folder
- Click on the “File” menu in the top left corner and select “Open Folder…”.
- Navigate to the
hello_worlddirectory you've just created and select “Open”.
-
Explore the Project Structure
- In the Explorer sidebar, you should see the
hello_worldproject structure. The main file of interest issrc/main.rs, which contains the main function of your application.
- In the Explorer sidebar, you should see the
Step 3: Review and Run the Code
-
Review the Generated Code
- Open the
src/main.rsfile and review the generated code. It should contain the following "Hello, World!" program:fn main() { println!("Hello, World!"); }
- Open the
-
Open the Terminal in VSCode
- Click on the “Terminal” menu at the top, and select “New Terminal”. A terminal should open at the bottom of the VSCode window, with the working directory set to your project folder. Using a terminal built into VSCode is typically more ergonomic than working with a separate window.
-
Run the Project
- In the terminal, type the following command and press
Enterto run the project:cargo run - Cargo will compile and run the project, and you should see the output
Hello, World!in the terminal. If you see an error, you may be missing a dependency on your system - usually a C compiler.
- In the terminal, type the following command and press
Step 4: (Optional) Edit the Code
- Feel free to edit the
println!macro insrc/main.rsto print a different message, save the file (Ctrl+S/Cmd+S), and rerun the project withcargo runto see your changes.
Congratulations, you’ve successfully created a new Rust Cargo project, opened it in Visual Studio Code, and ran the "Hello, World!" program! This concludes our setup for Rust.
Common Cargo commands
Cargo is Rust’s build system and package manager, and it comes with a variety of commands to help you develop Rust applications efficiently. In fact, it is one of the reasons why developers like Rust in the first place - gone is the dependency management hell common in C and other languages.
Here are some common Cargo commands that you will use frequently when working with Rust projects:
1. cargo new <project_name>
- Description: Creates a new Rust project with the specified name. It generates a directory with the project name, initializes a Git repository, and creates initial files.
- Example Usage:
cargo new my_project
2. cargo build
- Description: Compiles the current project. By default, it creates a debug build, which can be several
orders of magnitudes slower and significantly larger. Use the
--releaseflag for an optimized build. - Example Usage:
cargo buildorcargo build --release
3. cargo run
- Description: Compiles and runs the current project.
- Example Usage:
cargo runorcargo run --release
4. cargo check
- Description: Quickly checks the current project for errors without producing executable binaries.
It is significantly faster than
cargo build, and often will be enough when developing Rust. - Example Usage:
cargo check
5. cargo test
- Description: Compiles and runs tests for the current project. This will verify doctests too, we will discuss testing later.
- Example Usage:
cargo test
6. cargo doc
- Description: Builds documentation for the current project.
- Example Usage:
cargo docorcargo doc --opento also open it in your browser.
7. cargo update
- Description: Updates dependencies as listed in
Cargo.lock. - Example Usage:
cargo update
8. cargo clean
- Description: Removes the
target/directory where Cargo puts built artifacts. It is a good idea to run this command every once in a while, since thetarget/folder can grow pretty large for applications that are being developed for a long time. - Example Usage:
cargo clean
9. cargo fmt
- Description: Formats the code in the current project according to the Rust style guidelines. Keep in mind that most editors will be able to already format code properly on their own, so you may not use this command very often.
- Example Usage:
cargo fmt
NOTE: Most of these commands (if it makes sense) will also automatically fetch and setup all of your
application's dependencies, there is no explicit step like npm install. There exists a cargo install
command, however, which is used to install Rust applications to your system - in other words, it is similar
to npm install --global or yarn global add.
Familiarity with these commands will help you effectively navigate and manage your Rust projects. Feel free to come back to this section to refer to the commands written here.
Homework
For the first lesson, we will start simple.
Your assignment is to set up your development environment for Rust and try it out.
Description:
These instructions are essentially slightly condensed versions of the ones above, so refer to them in case you run into any issues. Keep in mind that you can also always message me on Discord, if you run into problems.
-
Install Rust:
- Follow the guide provided earlier to install Rust on your system. Ensure that it's properly installed by
using the
rustc --versioncommand in your terminal or command prompt.
- Follow the guide provided earlier to install Rust on your system. Ensure that it's properly installed by
using the
-
Install Visual Studio Code (VSCode) - OPTIONAL:
- Download and install Visual Studio Code from the official website. This will be your Integrated Development Environment (IDE) for writing and managing Rust code.
-
Set up the
rust-analyzerextension - OPTIONAL:- Once you have VSCode installed, add the
rust-analyzerextension from the Extensions view in VSCode. This will provide you with enhanced functionality and support for Rust development within the IDE.
- Once you have VSCode installed, add the
(The previous two steps are optional because you are welcome to use any editor you want - VS Code is only my recommendation)
-
Create and Run a "Hello, World!" Cargo Project:
- Utilize the knowledge gained from today's lesson to create a new Rust project using Cargo. Write the "Hello, World!" program and run it successfully within VSCode.
-
Set Up a GitHub Repository:
- If you don't have a GitHub account yet, please create one.
- Once your account is set up, create a new repository to store your Rust project.
- Follow GitHub's instructions to push your local Rust "Hello, World!" project to this new repository.
-
Modify and Update:
- Feel free to make any modifications to the "Hello, World!" example. This could be as simple as changing the message printed to the console or experimenting with additional Rust syntax and features.
- You don't know much Rust yet, so the degree to which you want to play around with the program is up to you.
- After making your modifications, commit the changes, and push them to your GitHub repository.
Submission:
- Upon completion, please share the link to your GitHub repository containing the modified "Hello, World!" project on the class submission platform.
- Ensure that your repository is public so that it can be accessed and reviewed.
Deadline:
- Please complete and submit this assignment until Tuesday, October 9 at the latest. It will, however, make your life much easier if you manage to do it by the next lesson - Thursday, October 5
This exercise is our first foray into the world of Rust programming. By installing the necessary tools, writing a basic program, and pushing the project to github GitHub, you are laying down the foundational skills needed for completing the rest of the course. Don’t hesitate to reach out if you have any questions or encounter any issues; I am here to help!
Happy oxidation!
2: Rust Basics: Syntax and Variables, Compiling programs with Cargo
Now that we have a working Rust installation, it is finally time to dig in and get familiar with Rust as a language. In this lesson, we will gain an overview of Rust's syntax, the usage of variables, and how to work with Cargo to compile our programs.
You may be wondering, why we dedicate an entire lesson to this - the reason is simple, variables are not as trivial in Rust, and they touch upon topics such as pattern-matching, shadowing, and ownership, so there is a plenty of topics we need to introduce at least in in the briefest of terms.
Without a further ado, let's get into Rust syntax. There is no way to really sugar coat it, so let's just go concept by concept.
Comments
Comments in Rust start with //. Multi-line comments can be written between /* and */.
Multi-line comments can be nested freely, so you don't have to worry about existing comments
if you want to disable a part of code that may already have comments.
#![allow(unused)] fn main() { // This is a single-line comment /* This is a multi-line comment */ }
Doc Comments
Rust supports documentation comments that are used to generate external documentation.
Doc comments use three slashes /// or //!. Doc comments are formatted in Markdown
and may contain images, links and code examples.
#![allow(unused)] fn main() { /// This is a doc comment for the following struct. struct MyStruct { // ... we will look at structs in Lesson 4 } //! This is a module-level doc comment. }
The general rule is that the /// doc-comment documents the item right underneath it,
whereas the //! documents the item it is contained in. When documenting modules
declared by file structure, the //! doc comment is the only practical option.
Literals
Literals represent fixed, immutable values, just like in any langauge. In Rust, you have numeric literals, string literals, character literals, and so on.
fn main() { let integer = 10; let floating_point = 3.14; let character = 'a'; let string = "Hello, Rust!"; let boolean = true; }
For numeric types, you can specify the type right at the literal:
fn main() { let integer = 10u32; }
Numbers always have a specific type, which is either the default (u32)
Variable Bindings
Variables in Rust are immutable by default, and you declare them with the let keyword.
fn main() { let x = 5; // immutable variable let mut y = 10; // mutable variable y = 15; // re-assigning mutable variable }
The type can be specified by including a : Type right after the binding identifier:
fn main() { let x: i32 = 5; println!("x is: {}", x); }
We explicitly set the type of the x variable to i32, which is the default, if
no other type can be inferred.
NOTE: Rust is statically typed, meaning that types are always concrete and never change during the runtime of the program. If you do not specify a type in one place or another, it will be deduced from the context, the variable binding will not be untyped.
Etymology
Note that in Rust, what are commonly known as variables in many other languages are referred to as "variable bindings". They are called bindings because they bind a name to a value, essentially tying the name to the value, so we can use the name to refer to the value later in the program.
Shadowing
Variable shadowing is another interesting feature of Rust’s variable bindings. Shadowing occurs when we declare a new variable with the same name as a previous variable. The new variable "shadows" the name of the previous variable, meaning the original is no longer accessible and any future use of the variable will refer to the new one.
Here’s an example of shadowing:
fn main() { let x = 5; println!("x is: {}", x); // prints "x is: 5" let x = "Rust"; println!("x is: {}", x); // prints "x is: Rust" }
In this example, the first let x binds x to the value 5. The second let x shadows
the first, binding x to the value "Rust".
Shadowing is particularly useful when you want to change the type of a variable or declare a new value to the same name immutably. Here's an example where shadowing is used to 'change' the type of a variable:
fn main() { let x = "5"; println!("x is: {}", x); // prints "x is: 5" let x: i32 = x.parse().expect("Not a number"); println!("x is: {}", x); // prints "x is: 5" }
In this case, the binding x is initially a string. Then, it is shadowed by a new x
that is a result of parsing the original string x into an i32. It is a common idiom
to repeat the shadowing of the same variable name as you build from inputs to final
values (parsing is one such case).
Shadowing allows you to reuse variable names, which can lead to more concise and readable code, but it can also introduce bugs if used carelessly, as the original variable becomes inaccessible. On the other hand, you can use shadowing to impose further restrictions that can help keep your code bug free - shadowing a mutable variable as immutable when you know you will no longer need to mutate it.
For starters, we can take the primitive types, here is a handy table of the ones avaible in Rust and their C equivalents:
| Rust Type | Numeric Type | Size (bytes) | Corresponding C Type |
|---|---|---|---|
i8 | Integer | 1 | int8_t |
u8 | Unsigned | 1 | uint8_t |
i16 | Integer | 2 | int16_t |
u16 | Unsigned | 2 | uint16_t |
i32 | Integer | 4 | int32_t |
u32 | Unsigned | 4 | uint32_t |
i64 | Integer | 8 | int64_t |
u64 | Unsigned | 8 | uint64_t |
i128 | Integer | 16 | __int128_t (GCC) |
u128 | Unsigned | 16 | __uint128_t (GCC) |
isize | Integer | Dependent on the architecture | intptr_t |
usize | Unsigned | Dependent on the architecture | uintptr_t |
f32 | Floating Point | 4 | float |
f64 | Floating Point | 8 | double |
The size column indicates the size of each type in bytes. isize and usize are architecture-dependent,
and the i128 and u128 types may have equivalent C types depending on the compiler used,
but you can't find them in the C standard. The f32 and f64 represent floating-point numbers in Rust,
corresponding to float and double in C, respectively.
There are other primitive types in Rust, these are the simple ones:
| Rust Type | Description |
|---|---|
bool | A boolean type representing the values true or false. |
char | A character type representing a single Unicode character, like 'a'. |
str | A string slice type, typically used as &str, representing a reference to a UTF-8 encoded string slice. |
unit | The unit type () representing an empty tuple, often used to signify that a function doesn’t return any meaningful value. |
And then we have three types related to collections:
| Rust Type | Description |
|---|---|
tuple | A collection of values with different types. The size is fixed at compile-time. For example, (i32, f64, &str). |
array | A collection of values with the same type. The size is fixed at compile-time. For example, [i32; 5]. |
slice | A dynamically-sized view into a contiguous sequence, [T]. It is more commonly used as a reference, &[T], representing a view into an array or another slice. |
Blocks
A block in Rust is a group of statements enclosed within curly braces {}. It can be used to group statements together.
fn main() { { let x = 10; println!("x inside block: {}", x); } }
Much like many things in Rust, a block is an expression and you can use it to produce a value to assign to a variable binding:
fn main() { let x = 5; let y = { let temp = x * 2; temp + 1 }; println!("y is: {}", y); // prints "y is: 11" }
In this example, y is assigned the value of the block, which is temp + 1, resulting in 11.
Additionally, Rust allows you to name a block and use the break keyword to exit the block early
and specify the value it should result in. Here’s an example:
fn main() { let x = 5; let y = 'block: { if x < 10 { break 'block x * 2; } x + 1 }; println!("y is: {}", y); // prints "y is: 10" }
These features make Rust's block expressions a powerful tool for structuring your code. You can also use these to prevent polluting your namespace with variables that lean into being named similarly. This feature is also great for macros, which often generate block expressions.
Statements
A statement performs an action. In Rust, each statement ends with a semicolon ;.
fn main() { let x = 5; // statement println!("x is: {}", x); // statement }
If you ommit the semicolon of the final statement in a block, control flow expression
or a function body, it will be considered that block's return value. You can put
any statement there, but keep in mind that most will just return Rust's equivalent
of void, the empty tuple (), often referred to as unit.
For example, in both Rust and C, assignment is an expression, meaning it evaluates to a value. However, there is a key difference between the two languages in how assignment expressions are handled.
In C, an assignment expression evaluates to the value that was assigned, making it useful in certain scenarios, like conditional statements or within other expressions:
#include <stdio.h>
int main() {
int x;
if ((x = 10)) {
printf("x is: %d\n", x); // prints "x is: 10"
}
return 0;
}
In contrast, Rust’s assignment expression always evaluates to the aforementioned unit type ().
This means that you can’t use the value of the assignment in the same way you might in C:
fn main() { let x; if (x = 10) { // This will result in a compile-time error! println!("x is: {}", x); } }
This Rust code will not compile because the expression x = 10 evaluates to (),
and if expects a boolean expression. The unit type () doesn’t carry any meaningful information,
and as such, using assignment as an expression in Rust is not very useful.
In Rust, if you need to assign a value and use it within a condition, you need to separate the assignment and the condition:
fn main() { let x; x = 10; if x == 10 { println!("x is: {}", x); // prints "x is: 10" } }
This design choice in Rust encourages more explicit and clear code, reducing the chance of subtle bugs introduced by assignments inside expressions. There is a further reason in that having the same behavior as C could clash with Rust's memory management model, but we will get back to that later.
Tuple Declarations
A tuple is an ordered list of fixed-size elements, possibly of different types.
fn main() { let tuple = (1, 2.0, "Rust"); let (integer, floating_point, string) = tuple; // destructuring a tuple }
Destructuring a tuple (which in this case creates three separate independent bindings -
integer, floating_point and string) is often the most useful way to deal with a
tuple.
If you want to preserve the tuple and access its elements as elements of a tuple, you would use the dot syntax with an index:
fn main() { let tuple = (1, "hello", 4.5); let (x, y, z) = tuple; println!("x: {}, y: {}, z: {}", x, y, z); // Accessing elements of a tuple let first_element = tuple.0; let second_element = tuple.1; let third_element = tuple.2; println!("First element: {}", first_element); // prints "First element: 1" println!("Second element: {}", second_element); // prints "Second element: hello" println!("Third element: {}", third_element); // prints "Third element: 4.5" }
In Rust, you can access the elements of a tuple using a dot followed by the index of the value you
want to access, starting from 0. So, tuple.0 refers to the first element, tuple.1 to the second, and so on.
This way, you can either destructure the tuple to access its elements, as seen with (x, y, z),
or you can use indexing with a dot notation to access individual elements directly.
Array Declarations
An array is a collection of objects of the same type, stored in contiguous memory locations. The length of the array is fixed, and must be known at compile time.
fn main() { let array = [1, 2, 3, 4, 5]; // type is [i32; 5] let first = array[0]; // accessing array elements }
These syntax elements, presented from simplest to more complex, provide a good foundational understanding for starting with Rust.
Rust's Standard Library
The Rust Standard Library is the foundation of portable Rust software, a set of minimal and battle-tested shared abstractions. It offers core types, like Vec<T> and Option<T>, library-defined operations on language primitives, standard macros, I/O and multithreading, among many other features.
Finding Documentation
-
Locally: If you have Rust installed via
rustup, you can access the local documentation with the following command:rustup doc --stdThis will open up the documentation in your default web browser.
-
Remotely: The official Rust documentation, including the Standard Library, can be found online at:
Essential Modules in Rust's Standard Library
1. std::io
Handles input and output functionality. Commonly used for reading from and writing to files, stdin, and stdout.
#![allow(unused)] fn main() { use std::io; }
2. std::fmt
Formatting and printing. Contains traits that dictate display and debug print behaviors.
#![allow(unused)] fn main() { use std::fmt; }
3. std::fs
Filesystem operations. Used for reading and writing files, directory manipulation, and more.
#![allow(unused)] fn main() { use std::fs; }
4. std::collections
A module that provides various data structures like HashMap, HashSet, VecDeque, etc.
#![allow(unused)] fn main() { use std::collections::HashMap; }
5. std::error
Error handling utilities. Provides the Error trait, which can be used to define custom error types.
#![allow(unused)] fn main() { use std::error::Error; }
6. std::thread
Multithreading and concurrency. Enables the creation and management of threads.
#![allow(unused)] fn main() { use std::thread; }
7. std::time
Time operations, like measuring durations or obtaining the current time.
#![allow(unused)] fn main() { use std::time::{Duration, Instant}; }
8. std::net
Networking operations, including TCP and UDP primitives.
#![allow(unused)] fn main() { use std::net::TcpListener; }
9. std::option and std::result
Enums representing optional values (Option<T>) and potential errors (Result<T, E>). They are fundamental to Rust's error handling and control flow.
#![allow(unused)] fn main() { use std::option::Option; use std::result::Result; }
10. std::str and std::string
String and string slice types and associated functions.
#![allow(unused)] fn main() { use std::str; use std::string::String; }
Rust's String Type
While we are already touching upon the topic of strings, we should actually introduce them.
Rust has many String types, but for us, only two are important - the str primitive type and
the String standard library type.
Unlike the str (aka string slice), a String is growable and allows modification. It's UTF-8 encoded,
ensuring any valid String will be properly encoded Unicode data.
Creating a String
-
From a Literal: Use
to_string()to create aStringfrom a string literal.#![allow(unused)] fn main() { let my_string = "Hello, world!".to_string(); } -
From a String Slice: You can also create it directly from a string slice (
str) using thefromfunction.#![allow(unused)] fn main() { let my_string = String::from("Hello, world!"); }
Manipulating a String
-
Appending: You can append to a
Stringusingpush_strorpush.#![allow(unused)] fn main() { let mut hello = String::from("Hello, "); hello.push_str("world!"); // Append a str hello.push('!'); // Append a char } -
Concatenation:
Stringcan be concatenated using the+operator or theformat!macro.#![allow(unused)] fn main() { let hello = String::from("Hello, "); let world = "world!"; let hello_world = hello + world; }Note: When using
+, the left operand gets moved and cannot be used again. -
Indexing:
Stringdoes not support indexing directly because it’s encoded in UTF-8, which does not have constant-time indexing.
Converting Between String and str
-
You can create a string slice by referencing a
String.#![allow(unused)] fn main() { let string_slice: &str = &my_string; }
Unicode and UTF-8 Encoding
Stringholds UTF-8 bytes and ensures the data is valid UTF-8, enabling the representation of a wide range of characters from various languages and symbols.
Accessing Bytes and Characters
-
To iterate over Unicode scalar values (char), use
chars():#![allow(unused)] fn main() { for c in my_string.chars() { println!("{}", c); } } -
To iterate over bytes, use
bytes():#![allow(unused)] fn main() { for b in my_string.bytes() { println!("{}", b); } }
Memory and Allocation
Stringis allocated on the heap, and it can dynamically grow or shrink as needed.- Memory is automatically reclaimed when
Stringgoes out of scope, thanks to Rust’s ownership system and the drop trait.
Useful Methods
len(): Get the length in bytes.is_empty(): Check if theStringis empty.split_whitespace(): Iterator over words.replace(from, to): Replace a substring.
Where to Find More Information
You can find more details in the Rust documentation:
Homework
For the lesson "Rust Basics: Syntax and Variables", we're building upon the foundational concepts you've learned and applying them to a practical task.
Your assignment is to write a program that reads from standard input, transmutes text according to the provided specification, and prints the result back to the user. The behavior of the program should be modified based on parsed CLI arguments.
Description:
In this (still very simple) exercise, you'll be using Rust's string manipulation capabilities. Here's what you need to do:
-
Setting up the Crate:
- Add the
slugcrate to your Cargo project to help with theslugifyfeature. To do this, open yourCargo.tomlfile and under the[dependencies]section, add:slug = "latest_version". (Replace "latest_version" with the most recent version number from crates.io, which is 0.1.4) - Once added, you can use it in your project by adding
use slug::slugify;at the top of your main Rust file. View the crate's documentation to see how to use it: https://docs.rs/slug/0.1.4/slug/
- Add the
-
Read Input:
- Read a string from the standard input.
-
Parse CLI Arguments:
- Based on the provided CLI argument, the program should modify the text's behavior. Use the
std::env::args()method to collect CLI arguments:
- Based on the provided CLI argument, the program should modify the text's behavior. Use the
use std::env; fn main() { let args: Vec<String> = env::args().collect(); println!("{}", args[0]); }
Note that the .len() and .is_empty() methods are available on Vector<String> to help you figure out,
if you received the necessary parameters.
- Transmute Text:
- If the argument is
lowercase, convert the entire text to lowercase. - If the argument is
uppercase, convert the entire text to uppercase. - If the argument is
no-spaces, remove all spaces from the text. - If the argument is
slugify, convert the text into a slug (a version of the text suitable for URLs) using theslugcrate.
- If the argument is
For one bonus point, try making two additional transformations of your own.
- Print Result:
- Print the transmuted text back to the user.
Hint: For string manipulations, the Rust standard library provides handy methods like:
to_lowercase()to_uppercase()replace(" ", "")
Submission:
- After implementing and testing your program, commit your changes and push the updated code to the GitHub repository you created for the previous homework.
- Submit the link to your updated GitHub repository on our class submission platform, ensuring your repository remains public for access and review.
Deadline:
- Please complete and submit this assignment by Tuesday, October 16. Attach the link to the Github repository again to the Google Classroom assignment.
By the end of this exercise, you'll tried out string manipulations, using external crates, and managing your Rust projects with Cargo. Should you face any hurdles or have questions, don't hesitate to ask or consult the Rust documentation. All of these will be super important in the future.
Forge ahead, and happy coding!
Lesson 3: Control Flow and Functions, Modules
Introduction
Control Flow in Programming
Control flow determines the order in which statements, instructions, or function calls are executed within a program. At its core, control flow is about making decisions. A program can take different paths of execution depending on various conditions, and this flexibility allows us to create dynamic and responsive software.
In everyday life, we make decisions based on conditions. For instance, "If it's raining, I'll take an umbrella. Otherwise, I won't." This decision-making ability is essential in programming, too. Depending on whether a condition is true or false, a program may execute different blocks of code, repeat a task multiple times, or skip over sections altogether.
Rust's Approach to Functions, Ownership, and Modules
Rust provides a fresh perspective on these fundamental concepts, especially with its unique ownership system.
-
Functions: In Rust, functions are used to organize and reuse code. They are defined with the
fnkeyword and can have parameters and return values. Rust also allows functions to be nested and supports first-class functions, which can be assigned to variables or passed as arguments. -
Ownership: One of the standout features of Rust is its ownership system. It ensures memory safety without the need for a garbage collector. In Rust, every value has a single owner, and when the owner goes out of scope, the value will be dropped, freeing its memory. This concept plays a crucial role when functions take ownership of values or borrow them.
-
Modules: Rust uses modules to organize and control the privacy of code. They serve as a namespace for grouping related functionalities. With modules, we can define which parts of our code are public and which remain private, ensuring a clear boundary and promoting encapsulation.
In this lesson, we will delve deep into how Rust handles these concepts, enhancing your understanding and equipping you with the skills to write effective Rust programs.
1. Conditional Statements
What are Conditional Statements?
Conditional statements allow a program to execute certain blocks of code based on whether a particular condition is true or false. They enable decision-making capabilities within a program, mirroring real-life scenarios where we make choices based on circumstances.
Importance of Condition-Based Execution:
Decision-making is the backbone of any dynamic application. Imagine a calculator app that couldn't decide what operation to perform based on the user's input, or a game that couldn't respond to player actions. Conditional statements enable such behavior, allowing software to react to various inputs and situations.
if Statement
The if statement is the most straightforward way to introduce conditional execution.
Syntax and Basic Examples:
#![allow(unused)] fn main() { let x = 5; if x > 3 { println!("x is greater than 3"); } }
In the example above, the block of code inside the {} will be executed because the condition x > 3 is true.
else if and else
For handling multiple conditions, Rust provides the else if and else constructs to chain or nest conditions.
Chaining Conditions:
#![allow(unused)] fn main() { let y = 15; if y < 10 { println!("y is less than 10"); } else if y > 20 { println!("y is greater than 20"); } else { println!("y is between 10 and 20, inclusive"); } }
Nested Conditions:
You can also nest if statements inside others for more complex decision-making.
#![allow(unused)] fn main() { let a = 4; let b = 7; if a > 5 { if b > 8 { println!("Both conditions are true"); } } }
match
Rust's match statement provides pattern matching, a powerful feature that allows for more concise and readable code compared to chained if-else statements.
Introduction to Pattern Matching in Rust:
Pattern matching enables you to compare a value against different patterns and execute the corresponding block of code for the matching pattern.
Basic and Advanced Examples:
#![allow(unused)] fn main() { let number = 4; match number { 1 => println!("One"), 2 => println!("Two"), 3 => println!("Three"), _ => println!("Any other number"), } }
In this basic example, the program prints "Any other number" because the variable number doesn't match 1, 2, or 3. The _ pattern acts as a catch-all.
For more advanced usage, consider an enumeration:
#![allow(unused)] fn main() { enum Color { Red, Blue, Green, RGB(u8, u8, u8), } let color = Color::RGB(65, 105, 225); match color { Color::Red => println!("Red"), Color::Blue => println!("Blue"), Color::Green => println!("Green"), Color::RGB(r, g, b) => println!("Red: {}, Green: {}, Blue: {}", r, g, b), } }
Here, we've used pattern matching to destructure the RGB variant and print its values.
2. Loops
Why Do We Need Loops?
At the heart of many tasks in programming is the need for repetition. Whether it's processing every element in a list, repeatedly asking for user input until it's valid, or running a game's main loop until the player decides to exit, these tasks all require repetitive action.
Iterating and Repetitive Tasks in Coding:
Loops offer a way to perform an action repeatedly, based on a condition or a set number of times. Without loops, we'd find ourselves writing the same code over and over, leading to inefficiencies and harder-to-maintain code.
loop
The loop construct in Rust provides a way to create an infinite loop, which will keep executing its block of code until explicitly told to stop.
Syntax and Usage:
#![allow(unused)] fn main() { loop { println!("This will print endlessly"); } }
Breaking Out of Infinite Loops Using break:
While a loop by definition is infinite, you can control its execution using the break keyword.
#![allow(unused)] fn main() { let mut count = 0; loop { if count >= 5 { break; } println!("Count is: {}", count); count += 1; } }
while Loop
The while loop is similar to the loop, but with a condition attached. The block of code will keep executing as long as the condition remains true.
Syntax, Examples, and Use Cases:
#![allow(unused)] fn main() { let mut number = 3; while number != 0 { println!("Number is: {}", number); number -= 1; } }
Comparison with loop:
The key difference between loop and while is the condition. With loop, the absence of a condition means it runs indefinitely, while while depends on its condition to continue running.
for Loop
The for loop in Rust is designed for iterating over elements, such as those in a collection or range.
Introduction to Range-Based Loops:
#![allow(unused)] fn main() { for i in 1..4 { println!("Number: {}", i); } }
Iterating Over Collections:
#![allow(unused)] fn main() { let fruits = vec!["apple", "banana", "cherry"]; for fruit in fruits { println!("Fruit: {}", fruit); } }
Iterators
In Rust, many collection types offer iterators, which are objects that allow you to process each element in a collection in sequence.
What are Iterators?
An iterator abstracts the process of sequencing elements, letting you focus on what you want to do with each element rather than how to get them.
Methods like map, filter, etc.:
#![allow(unused)] fn main() { let numbers = vec![1, 2, 3, 4, 5]; let squared: Vec<_> = numbers.iter().map(|x| x * x).collect(); println!("{:?}", squared); // [1, 4, 9, 16, 25] let evens: Vec<_> = numbers.iter().filter(|&&x| x % 2 == 0).collect(); println!("{:?}", evens); // [2, 4] }
Chainable Operations:
You can chain iterator methods to combine operations:
#![allow(unused)] fn main() { let sum_of_squares: i32 = numbers.iter().map(|&x| x * x).sum(); println!("{}", sum_of_squares); // 55 }
3. Functions and Parameter Passing
Introduction to Functions in Rust
Functions are at the core of structured and maintainable programming. They enable you to group a set of related statements together to perform a specific task. By using functions, we can avoid redundancy, make code more readable, and facilitate modular programming.
Defining and Calling Functions
Defining a Function:
In Rust, a function is defined using the fn keyword, followed by the function name, parameters in parentheses, an optional return type, and a block of code.
#![allow(unused)] fn main() { fn greet() { println!("Hello, Rustacean!"); } }
Calling a Function:
Once a function is defined, you can call it by its name followed by parentheses.
#![allow(unused)] fn main() { greet(); // This will print: Hello, Rustacean! }
Types of Parameters and Return Values
Rust is a statically typed language, which means that types of all variables must be explicitly defined or inferred at compile time.
When defining a function, you must specify the types of its parameters:
#![allow(unused)] fn main() { fn add(a: i32, b: i32) -> i32 { a + b } }
In the example above, the function add takes two parameters of type i32 and returns an i32.
Parameter Passing
When passing parameters to functions in Rust, understanding how data is transferred is crucial. It's tightly integrated with Rust's ownership system.
By Value vs By Reference:
- By Value:
When you pass data by value, you're transferring ownership of that data (for types without theCopytrait) or making a copy of the data (for types with theCopytrait).
#![allow(unused)] fn main() { fn consume(data: String) { println!("Data received: {}", data); } let my_data = String::from("Hello"); consume(my_data); // my_data is no longer usable here as its ownership was transferred. }
- By Reference:
Passing data by reference means you're passing a pointer to the data's location in memory, not the actual data itself. This way, you can access data without taking ownership.
#![allow(unused)] fn main() { fn read(data: &String) { println!("Data read: {}", data); } let my_data = String::from("Hello"); read(&my_data); // my_data remains usable as we only passed a reference. }
Mutable vs Immutable References:
By default, references are immutable. If you want to modify the data a reference points to, you need a mutable reference:
#![allow(unused)] fn main() { fn modify(data: &mut String) { data.push_str(", World"); } let mut greeting = String::from("Hello"); modify(&mut greeting); println!("{}", greeting); // This will print: Hello, World }
However, Rust has strict rules on references to ensure memory safety:
- At any given time, you can have either one mutable reference or any number of immutable references to a particular piece of data, but not both.
- Mutable references must always be unique.
4. Ownership and Functions
Quick Recap of Rust's Ownership System
Rust's ownership system is a set of rules that the compiler checks at compile time to ensure memory safety without a garbage collector. The key principles of this system are:
- Ownership: Every piece of data in Rust has a single owner, which determines the data's lifespan. Once the owner goes out of scope, the data is dropped (i.e., memory is freed).
- Borrowing: Instead of transferring ownership, data can be borrowed either as mutable (can be changed) or immutable (cannot be changed).
- Rules: You can't have mutable and immutable references to the same data in the same scope. Also, there can only be one mutable reference to a piece of data in a particular scope.
Ownership and Borrowing in the Context of Functions
Functions play a significant role in Rust's ownership model, as they are the primary means by which data is passed around in a program.
Transfer of Ownership:
When a variable is passed to a function, Rust defaults to moving or copying the data, depending on the data's type.
#![allow(unused)] fn main() { fn take_string(s: String) { // s comes into scope and takes ownership. println!("{}", s); } // s goes out of scope and is dropped. let my_string = String::from("hello"); take_string(my_string); // my_string is no longer valid here because its ownership was transferred. }
Borrowing: Mutable and Immutable References:
You can borrow data to a function using references, which allows access without taking ownership.
- Immutable Borrow:
#![allow(unused)] fn main() { fn read_string(s: &String) { println!("{}", s); } let my_string = String::from("hello"); read_string(&my_string); // my_string is still valid here because we passed an immutable reference. }
- Mutable Borrow:
#![allow(unused)] fn main() { fn change_string(s: &mut String) { s.push_str(", world"); } let mut my_string = String::from("hello"); change_string(&mut my_string); println!("{}", my_string); // Prints "hello, world". }
Lifetime Considerations:
Lifetimes are annotations in Rust that specify how long references to data should remain valid. They prevent "dangling references" by ensuring data outlives any references to it. In function signatures, lifetimes help to clarify the relationship between the lifetimes of parameters and return values.
#![allow(unused)] fn main() { fn longest<'a>(s1: &'a str, s2: &'a str) -> &'a str { if s1.len() > s2.len() { s1 } else { s2 } } }
In the function above, the lifetime annotation 'a specifies that the lifetimes of s1, s2, and the return value must all be the same.
5. Modules and Code Organization
The Need for Modular Code
As programs grow in size and complexity, organizing and managing the code becomes a challenge. To tackle this, programming languages provide modular systems to help developers compartmentalize, reuse, and maintain their codebase. By splitting code into distinct modules, you can group related functionality, improve code readability, and promote reusability.
Defining and Using Modules in Rust
In Rust, the mod keyword is used to declare a module. Modules allow you to group function definitions, data structures, and even other modules.
#![allow(unused)] fn main() { mod greetings { pub fn hello() { println!("Hello, world!"); } } }
To use functions or types from a module:
fn main() { greetings::hello(); }
Nested Modules:
Modules can also be nested within other modules.
mod outer { pub mod inner { pub fn inner_function() { println!("Inside the inner module!"); } } } fn main() { outer::inner::inner_function(); }
Access Modifiers
In Rust, by default, everything is private—be it functions, variables, or modules—unless specified otherwise.
pub Keyword and Its Significance:
The pub keyword is used to make an item public, thereby making it accessible from outside its current module.
#![allow(unused)] fn main() { mod my_module { pub fn public_function() { println!("This is a public function."); } fn private_function() { println!("This is a private function."); } } }
In the above code, public_function can be accessed outside of my_module, but private_function cannot.
Private vs Public Items:
Private items can only be used within their current module, while public items can be used anywhere the module itself is accessible.
Organizing Code Within a Project
When working on bigger projects, keeping all the code in one file becomes impractical. Rust offers a system to split code across multiple files while still maintaining a logical and coherent structure.
Splitting Code Across Files:
Each module can be moved to its own file. For instance, a module named foo can be moved to a file named foo.rs.
mod and use Statements:
The mod statement can be used to declare a module and link to its file:
#![allow(unused)] fn main() { mod foo; }
With this, Rust will look for a file named foo.rs in the same directory.
The use statement simplifies paths, making it easier to refer to items in modules:
use foo::some_function; fn main() { some_function(); }
Conclusion
In this lesson, we delved deep into various foundational concepts of the Rust programming language, underscoring the importance of each in writing efficient, safe, and organized code.
Key Takeaways:
-
Control Flow: We explored how conditional statements, like
if,else if,else, andmatch, enable decision-making in our programs. Each provides a mechanism to conditionally execute blocks of code, allowing for dynamic behavior based on inputs or states. -
Loops and Iterators: Iteration, through constructs like
loop,while, andfor, is a cornerstone of programming, enabling repetitive tasks and operations over collections. Alongside these, iterators and their methods, such asmapandfilter, provide powerful tools to transform and process data. -
Functions: Functions serve as the primary building blocks of Rust programs, allowing for modular, reusable, and organized code. We learned how to define, call, and work with functions, emphasizing the importance of parameter types, return values, and the intricacies of parameter passing.
-
Ownership in Functions: Rust's unique ownership system ensures memory safety without a garbage collector. Through function parameter passing, we understood the nuances of ownership transfer, borrowing, and lifetimes—crucial components for writing safe Rust code.
-
Modules and Code Organization: As our programs grow, so does the need for structured organization. Rust's module system and access controls help in compartmentalizing functionality, promoting reusability, and maintaining larger codebases effectively.
By mastering these foundational concepts, you are better equipped to navigate the Rust programming landscape, building applications that are not only efficient and fast but also memory-safe. As you continue your Rust journey, remember that these principles, though at times challenging, are at the heart of what makes Rust such a powerful and reliable language.
Lesson 4: Structs, Enums, and Pattern Matching
Rust, as a systems programming language, places a strong emphasis on memory safety without sacrificing performance. A fundamental way it achieves this is through its rich set of data structures. In Rust, data structures help organize and manage data efficiently, enabling the creation of complex software that's both performative and safe.
One of the standout features of Rust is its combination of enums and pattern matching. This powerful duo allows developers to expressively represent a variety of data shapes and handle them in a concise and type-safe manner. Together, they form a cornerstone of Rust's expressive type system and ensure that developers can model real-world problems effectively while maintaining the guarantees of the Rust compiler.
In this lesson, we'll dive into structs, enums, and pattern matching, exploring how they can be used to elegantly solve problems and streamline our code. Whether you're coming from a background in Python or another language, you're sure to find these constructs both fascinating and highly practical.
1. Structs and Tuples
Structs in Rust are a way to create custom types that allow you to bundle several values into a single type. They serve as the foundational building block for creating more complex data types and play a pivotal role in encapsulating data and behaviors.
Introduction to structs in Rust:
- Why and when to use them: Structs are useful when you want to group related data together. For instance, consider the scenario where you're modeling a point in a 3D space. You could manage three separate variables for the x, y, and z coordinates. But using a struct, you can encapsulate these coordinates into a single entity. This not only makes the code cleaner but also ensures that the data is treated as a cohesive unit.
Defining structs:
-
Named fields vs tuple structs: There are two main ways to define structs in Rust: with named fields and as tuple structs.
#![allow(unused)] fn main() { // Named fields struct Point3D { x: f32, y: f32, z: f32, } // Tuple structs struct Color(u8, u8, u8); }Named fields are self-descriptive, making the code more readable. Tuple structs, on the other hand, don't have field names; you access their elements by their position, similar to tuples. Tuple structs are useful when you want to give a name to a tuple-like data structure.
-
Mutable vs immutable structs: By default, instances of structs are immutable in Rust. To make them mutable, you need to use the
mutkeyword.#![allow(unused)] fn main() { let mut point = Point3D { x: 1.0, y: 2.0, z: 3.0 }; point.x = 4.0; // This is possible only because point is mutable }
Initializing and accessing struct fields: Once you've defined a struct, you can create instances of that struct and access its fields.
#![allow(unused)] fn main() { let origin = Point3D { x: 0.0, y: 0.0, z: 0.0 }; println!("The origin is at ({}, {}, {})", origin.x, origin.y, origin.z); let red = Color(255, 0, 0); println!("Red has values ({}, {}, {})", red.0, red.1, red.2); }
Tuples:
-
What are tuples?: Tuples are ordered lists of fixed size. They can contain multiple values of different types. Think of them as a lightweight, quick way of grouping related values without creating a formal data structure.
-
Defining, accessing, and destructuring tuples: Defining a tuple is straightforward.
#![allow(unused)] fn main() { let tuple_example = (1, "hello", 4.5); }Accessing tuple values is done by their index, starting at 0.
#![allow(unused)] fn main() { println!("First value: {}", tuple_example.0); println!("Second value: {}", tuple_example.1); }You can also destructure a tuple, which means breaking it down into its individual components.
#![allow(unused)] fn main() { let (x, y, z) = tuple_example; println!("x: {}, y: {}, z: {}", x, y, z); }
Tuples and structs often serve as the basis for modeling and representing data in Rust, and mastering them is essential to writing effective Rust code. As we delve deeper into enums and pattern matching, you'll see how these foundational structures pave the way for even more powerful constructs.
2. Enumerations and Pattern Matching
Enums, short for "enumerations", are a distinct feature of Rust. They allow you to define a type that represents one of several possible variants. Unlike other languages where enums are essentially named integers, Rust's enums are much more powerful.
Introduction to enumerations:
- Motivation for enums in type safety: Often in programming, we encounter scenarios where a value can be one of several possibilities. While one approach is to use separate boolean flags or integers to represent these states, such solutions aren't type-safe and can lead to errors. Enter enums: they provide a means to enumerate all possible states a value can have, making it impossible to represent invalid states if used correctly.
Defining and using enums:
- Variants with data: One of the standout features of Rust's enums is that each variant can hold different kinds
and amounts of data.
Here, each variant represents a different kind of message. The#![allow(unused)] fn main() { enum Message { Quit, Move { x: i32, y: i32 }, Write(String), ChangeColor(u8, u8, u8), } }Movevariant holds twoi32values,Writeholds aString, andChangeColorholds threeu8values.
To use an enum, you can create a variant like so:
#![allow(unused)] fn main() { let msg = Message::Write(String::from("hello")); }
Pattern matching with enums:
-
The power of the
matchkeyword: Rust provides thematchkeyword, which allows you to run different code for different variants of an enum. This pattern matching is exhaustive, meaning you have to handle all possible variants (or use a default_wildcard).#![allow(unused)] fn main() { match msg { Message::Quit => { println!("The Quit variant has no data to destructure."); }, Message::Move { x, y } => { println!("Move in the x direction {} and in the y direction {}", x, y); }, Message::Write(text) => { println!("Text message: {}", text); }, Message::ChangeColor(r, g, b) => { println!("Change the color to red {}, green {}, and blue {}", r, g, b); }, } } -
Matching with different variants: As seen in the example above, the
matchexpression lets you destructure and handle different variants separately. Each arm of thematchblock provides a pattern and the code to run if the pattern matches the enum variant. This enables precise, clear, and type-safe handling of different cases.
In conclusion, enums and pattern matching are integral to Rust's philosophy of safety and expressiveness. They allow for concise representation of multiple states and ensure that these states are handled appropriately, preventing many common programming errors. Combining enums with structs and tuples, you get a robust set of tools to model and work with complex data shapes effectively.
3. Associated Functions and Methods
In Rust, both structs and enums can have associated functions and methods. These are powerful constructs that allow for object-oriented patterns, even though Rust is primarily a functional language.
Understanding methods vs functions in Rust:
- While a function is a standalone block of code that can be called with some parameters and return a value, a method is a function associated with a particular instance of a type (like an instance of a struct or an enum). Methods have access to the data within that instance and to other methods on the same instance.
Defining methods on structs and enums:
-
The
selfkeyword: Just likethisin many object-oriented languages, Rust uses theselfkeyword to refer to the instance of the struct or enum the method is called on. Depending on how you want to accessself, you can take it by value (self), by reference (&self), or as a mutable reference (&mut self).#![allow(unused)] fn main() { struct Rectangle { width: u32, height: u32, } impl Rectangle { // Method that borrows `self` immutably fn area(&self) -> u32 { self.width * self.height } // Method that borrows `self` mutably fn square(&mut self) { self.width = self.height; } } } -
Chainable methods: By returning a mutable reference to
self, you can create chainable methods, allowing for fluent interfaces.#![allow(unused)] fn main() { impl Rectangle { fn set_width(&mut self, width: u32) -> &mut Self { self.width = width; self } fn set_height(&mut self, height: u32) -> &mut Self { self.height = height; self } } let mut rect = Rectangle { width: 30, height: 50 }; rect.set_width(40).set_height(60); }
Associated functions:
-
What are they and how they differ from methods: Unlike methods, associated functions don't take
selfas a parameter. They're still defined within theimplblock and are associated with the type, but not with any particular instance of that type. -
Use cases like constructors: One common use for associated functions is to create constructor-like functions for your structs. In Rust, there's no dedicated constructor syntax as in some languages; instead, you can use associated functions to create and initialize a struct.
#![allow(unused)] fn main() { impl Rectangle { fn square(size: u32) -> Rectangle { Rectangle { width: size, height: size } } } let sq = Rectangle::square(20); }
In this section, you've learned how Rust blends functional and object-oriented paradigms. By understanding associated functions, methods, and their nuances, you can design Rust types that are both ergonomic and efficient, allowing for clean, modular, and maintainable code.
4. Advanced Control Flow
While Rust provides traditional control flow constructs like if, else, and while, it also introduces some unique
forms that significantly enhance code readability and safety. These constructs play especially well with Rust's type
system and its emphasis on pattern matching.
Enhancing code readability and safety:
- Rust's philosophy revolves around making it hard to write incorrect code. By leveraging its unique control flow constructs,
- developers can write clearer, less error-prone code that also reveals intent more transparently.
if-let syntax:
-
What is it and when to use it?: The
if-letconstruct allows you to combineifand pattern matching. It's particularly useful when you're interested in only one variant of an enum or want a more concise way to handleOptiontypes. -
Concise way of handling enums and Option types:
#![allow(unused)] fn main() { let some_option: Option<i32> = Some(5); if let Some(x) = some_option { println!("Value inside Some: {}", x); } else { println!("It was None!"); } }Without
if-let, you'd typically use amatchstatement to achieve the same, butif-letprovides a more succinct way when only one pattern needs special treatment.
while-let:
-
Looping through Option values: The
while-letloop continually matches a pattern until it fails. It's helpful when you're working with sequences ofOptionvalues and you want to take actions until you find aNone.#![allow(unused)] fn main() { let mut stack = vec![1, 2, 3]; while let Some(top) = stack.pop() { println!("{}", top); } } -
Usage with iterators: Another common use of
while-letis with iterators. It provides a concise way to loop through items until the iterator is exhausted.
let else:
-
Syntax and motivation behind it: The
let elsesyntax would be a proposed addition to the language to cover a common case where you want to handle a failed pattern match immediately after thelet. It would make the code clearer by allowing you to focus on the happy path in the main block and handle the alternative scenario in theelsepart. -
Use cases and examples: Assuming this feature has been added to Rust, it could be used in scenarios like this:
#![allow(unused)] fn main() { let Some(value) = some_option else { return Err("The option was None!"); }; do_something_with(value); }Without
let else, this would typically require anif letcombined with anelse, making the code more nested and less readable.
By embracing these advanced control flow constructs, Rust ensures that developers can handle various scenarios in a way that's both expressive and safeguards against common pitfalls. This results in more resilient and transparent code, aligning with Rust's objectives of performance, safety, and clarity.
Conclusion
Rust provides a plethora of tools to ensure both safety and efficiency in its programs. At the heart of many Rust applications are its fundamental building blocks: structs and enums.
Structs in Rust are versatile and can be molded to fit various use-cases. Whether you're dealing with simple data groups using named fields, or utilizing tuple structs for concise data packaging, structs are essential for representing structured data in a clear and type-safe manner.
On the other hand, enums elevate the power of Rust's type system to a new level. Unlike many languages that offer a limited version of enumerations, Rust's enums can represent a multitude of complex states with associated data. They capture the essence of a type being in one of many possible states, enforcing rigorous handling of these states through Rust's type system.
Furthermore, the pattern matching capabilities provided by Rust, be it through the traditional match
expression or the more concise if-let and while-let constructs, ensure that handling the various states
or conditions in your code is both exhaustive and clear. The advent of constructs like let else, should
it be stabilized, shows Rust's commitment to refining and enhancing its syntax for better clarity and safety.
In essence, as you've seen throughout this lesson, structs and enums aren't just mere data containers in Rust. They're foundational to how Rust ensures safety, clarity, and efficiency in its programs. By mastering these concepts, you not only unlock the potential to design intricate data models but also harness the power of Rust's type system to write robust, error-resistant code.
Lesson 5: Error Handling and Result
Rust adopts a unique and pragmatic approach to error handling, which is reflective of the language's emphasis on safety and performance. Error handling in Rust can be categorized primarily into two types based on the nature of the errors:
-
Recoverable Errors: These are errors that we expect might happen and for which we can define an alternative course of action. An example might be attempting to read a file that doesn't exist. In this case, we can provide feedback to the user or perhaps try reading from a backup file.
-
Unrecoverable Errors: These are serious errors that we don't expect to happen under normal operation and are usually indicative of critical problems. For these errors, the most sensible action is typically to stop execution immediately. An example would be attempting to access an index of an array that doesn't exist.
The distinction between these two categories is crucial in understanding Rust's error handling mechanisms.
In Rust, recoverable errors are typically represented with the Result enum, while unrecoverable errors
are dealt with using the panic! macro. This structure ensures that we handle errors explicitly and robustly,
making our code safer and more resilient.
In this lesson, we'll dive deep into the Result type, explore how it helps in handling recoverable errors,
and understand the philosophy behind Rust's approach to error management.
1. Rust's Approach to Error Handling
Importance of Robust Error Handling in Applications
Every software application, big or small, can face unforeseen situations or erroneous states. Such states
might arise from user mistakes, system errors, or even unexpected external conditions. For a language
that puts a premium on reliability, like Rust, having a strong error-handling mechanism is paramount.
Proper error handling can prevent unwanted behaviors, protect data integrity, and even ensure the safety
and smooth user experience of an application.
Rust's Focus on Type Safety and Explicit Handling
Rust's philosophy revolves around type safety and explicitness. This means Rust prefers situations where
the programmer has to make deliberate decisions rather than allowing implicit behavior. This principle
is evident in its error handling as well.
When it comes to errors, Rust doesn't believe in exceptions, which are common in many other languages.
Instead, it uses algebraic data types, particularly enums like Result<T, E>, to make errors explicit.
This pattern forces developers to confront and handle the possibility of errors directly in the type system.
It's a way of saying, "Here's a function. It might succeed and return this type T, or it might fail
and give you an error of type E." The onus is then on the developer to deal with both these possibilities,
which the Rust compiler enforces.
Overview of Rust's Main Error Handling Constructs
Rust provides two primary constructs for error handling:
-
The
ResultEnum: As mentioned,Resultis an enum that has two variants:OkandErr. If a function succeeds, it returnsOk(value), wherevalueis the result of the function. If it fails, it returnsErr(error), whereerrordescribes what went wrong. This is the primary mechanism for handling recoverable errors in Rust.#![allow(unused)] fn main() { fn division(dividend: f64, divisor: f64) -> Result<f64, &'static str> { if divisor == 0.0 { Err("Cannot divide by zero!") } else { Ok(dividend / divisor) } } } -
The
panic!Macro: When the program encounters an unrecoverable error, or when it's in a state it cannot (or shouldn't) continue from, Rust provides thepanic!macro. When invoked, this macro will halt the program's execution, unwind the stack (by default), and provide a failure message.fn main() { panic!("This is an unrecoverable error!"); }
Together, these constructs provide a comprehensive mechanism for dealing with both expected and unexpected errors, ensuring that Rust programs are both robust and safe.
2. Handling Errors with the Result Type
Introduction to the Result Enum
At the heart of Rust's error handling mechanism for recoverable errors is the Result enum. It's a generic
type, represented as Result<T, E>, where T is the type of the value that will be returned in case
of success, and E is the type of the error in case of failure.
There are two variants of the Result enum:
Ok(T): Represents a successful outcome and contains the result value of typeT.Err(E): Represents a failure outcome and contains the error value of typeE.
For instance, if a function returns a Result<String, &'static str>, it means that upon success, the
function will return an Ok variant with a String inside, and upon failure, it will return an Err
variant with a static string indicating the error.
#![allow(unused)] fn main() { fn read_file(file_path: &str) -> Result<String, &'static str> { // ... logic to read file ... // On success: Ok(data) // On failure: Err("Failed to read the file.") } }
Pattern Matching with Result
One of the most powerful ways to handle the Result type is through pattern matching. It allows developers
to cater to both the Ok and Err scenarios explicitly.
#![allow(unused)] fn main() { match read_file("/path/to/file.txt") { Ok(content) => { println!("File contents: {}", content); }, Err(error) => { println!("An error occurred: {}", error); } } }
With this structure, if the function succeeds and returns an Ok variant, the content of the file will
be printed. If it fails and returns an Err variant, the error message will be printed instead.
Common Methods Associated with Result
The Result type comes with a series of helper methods to make working with it more streamlined:
-
unwrap(): This method directly retrieves the value inside anOkvariant or panics if theResultis anErr.- Pros: Quick way to get the value without explicit error handling.
- Cons: Can cause the program to panic if not used cautiously.
#![allow(unused)] fn main() { let value = some_result.unwrap(); // Panics if some_result is Err } -
expect(message: &str): Similar tounwrap(), but allows you to specify a panic message.- Pros: Provides more context when the program panics.
- Cons: Still can cause the program to panic.
#![allow(unused)] fn main() { let value = some_result.expect("Failed to retrieve the value"); } -
is_ok(): Returnstrueif theResultis anOkvariant, andfalseotherwise.- Pros: Allows for quick checks.
#![allow(unused)] fn main() { if some_result.is_ok() { // Do something if it's Ok } } -
is_err(): Returnstrueif theResultis anErrvariant, andfalseotherwise.- Pros: Another way for quick checks.
#![allow(unused)] fn main() { if some_result.is_err() { // Handle the error } }
In practice, while methods like unwrap() and expect() can be useful during development or in scenarios
where you're certain about the outcome, it's recommended to handle errors explicitly in production code
to ensure safety and reliability.
3. The ? Operator and the Option Type
Introduction to the Option Type
While the Result type is an essential construct in Rust's error handling, the Option enum is another
vital tool for handling the absence of values. It's a way to express the possibility that a value might
be missing without resorting to null references, which can lead to null pointer exceptions in other languages.
The Option type is generic and has two variants:
Some(T): Represents the presence of a value and contains that value of typeT.None: Represents the absence of a value.
Here's a simple example to illustrate the Option type:
#![allow(unused)] fn main() { fn find_name(id: u32) -> Option<String> { // Imagine this function checks an internal map for a name associated with an ID // On finding a name: Some(name) // If the name is not found: None } }
The Synergy Between Option and Result
It's not uncommon to see functions that might return an error or a missing value. In such scenarios, combining
Option and Result can be extremely handy. For instance, a function might return a Result<Option<String>, SomeErrorType>. This means the function could successfully return a String (Ok(Some(String))), indicate
that the value is missing without an error (Ok(None)), or return an error (Err(SomeErrorType)).
The ? Operator
When working with many functions that return Result or Option, handling each potential error or absence
of value can lead to deeply nested code. This is where the ? operator comes into play.
-
What it does and its advantages:
The?operator allows for a concise way to propagate errors up the call stack. If the value is anOkorSome, it will extract the value inside. If it's anErrorNone, it will return early from the function and propagate the error or absence of value. -
Syntactic Sugar for Propagating Errors:
Imagine having a series of functions that returnResult:
#![allow(unused)] fn main() { fn task1() -> Result<(), &'static str> { /*...*/ } fn task2() -> Result<(), &'static str> { /*...*/ } fn task3() -> Result<(), &'static str> { /*...*/ } fn perform_tasks() -> Result<(), &'static str> { task1()?; task2()?; task3()?; Ok(()) } }
In the above code, if any of the tasks (functions) result in an Err, the perform_tasks function will
exit early and return that error. This is much cleaner than writing nested matches or unwraps.
- Using with both
ResultandOption:
The beauty of the?operator is that it's not limited to justResult. It works withOptiontoo. When used with anOption, if the value isNone, the function will return early, propagating the absence of value.
#![allow(unused)] fn main() { fn get_value() -> Option<i32> { /*...*/ } fn process_value() -> Option<i32> { let value = get_value()?; Some(value + 10) } }
If get_value returns None, then process_value will also return early with None.
To conclude, the ? operator combined with Rust's Result and Option types provides a robust and concise
error-handling mechanism, ensuring both safety and readability in the code.
4. Propagating Errors Up the Call Stack
Why Error Propagation is Essential
Error propagation is the process of passing errors from a function back to its caller, allowing higher-level
functions to decide how to handle these errors. This strategy is vital for a few reasons:
- Separation of Concerns: Not all functions should handle all errors. By propagating errors, we can let specific parts of the codebase handle the errors, ensuring cleaner and more maintainable code.
- Informed Decisions: Higher-level functions often have more context about what's happening in the application. By propagating errors to them, they can make more informed decisions about how to handle these errors.
- Graceful Degradation: Instead of the program crashing abruptly on encountering an error, propagating allows for graceful handling – maybe logging the error, alerting the user, or even trying an alternative solution.
Manual Propagation Using Pattern Matching and the match Keyword
Before the advent of tools like the ? operator, manual error propagation was done using pattern matching.
Here's how it works:
#![allow(unused)] fn main() { fn inner_function() -> Result<i32, &'static str> { // Some logic... Err("Some error occurred") } fn outer_function() -> Result<i32, &'static str> { match inner_function() { Ok(value) => Ok(value * 2), // Process value if successful Err(e) => Err(e), // Propagate the error if it occurred } } }
In the above example, the outer_function calls inner_function. If inner_function encounters an error,
it is manually propagated to the caller using the match keyword.
Automated Propagation with the ? Operator
The ? operator simplifies the manual propagation process. Using our previous example:
#![allow(unused)] fn main() { fn outer_function() -> Result<i32, &'static str> { let value = inner_function()?; // Automatically propagates if an error occurs Ok(value * 2) } }
This way, if inner_function returns an Err, outer_function will immediately return that error as
well. If it's an Ok, the code proceeds, and value will contain the integer from the Ok variant.
Returning Result from Functions
To effectively propagate errors, functions need to return a Result type. By having a Result as a return
type, functions signal to their callers that they might fail and return an error. It's the caller's responsibility
to then decide how to handle this potential error – either by handling it directly or by propagating it further up.
Here's an example to illustrate:
fn main() -> Result<(), &'static str> { let result = outer_function()?; println!("Result is: {}", result); Ok(()) }
In the above code, the main function itself returns a Result. If outer_function encounters an error,
main will propagate that error. The Rust runtime will handle errors from main and display them.
In conclusion, error propagation is a robust mechanism that ensures errors don't go unnoticed or mishandled.
By leveraging tools like pattern matching and the ? operator, Rust provides a flexible and efficient
system for dealing with errors at different levels of an application's call stack.
5. Errors vs Panics
Understanding the Difference
In Rust, error handling can broadly be categorized into two types: standard errors and panics. While both
pertain to unexpected or undesirable situations in code, they differ in nature and how the Rust runtime deals with them.
- Errors: These are recoverable and are typically handled using the
Resulttype. The programmer expects them and writes code to deal with them gracefully. - Panics: These represent unrecoverable errors in the application. When Rust code panics, it usually means something went very wrong, and normal execution can't continue.
What is a Panic? Unrecoverable Errors
A panic is Rust's way of saying, "Something has gone terribly wrong, and I don't know how to (or shouldn't)
continue." It's a state where the program can't proceed further due to reasons like array out-of-bounds
access, attempting to unwrap a None value, etc.
- When and Why Rust Panics:
- Array Out-of-Bounds: Accessing an element that doesn't exist.
#![allow(unused)] fn main() { let arr = [1, 2, 3]; arr[5]; // This will panic } - Calling
unwrap()on aNoneOption or anErrResult:#![allow(unused)] fn main() { let none: Option<i32> = None; none.unwrap(); // This will panic } - Arithmetic Overflow (in debug mode):
#![allow(unused)] fn main() { let max_value = i8::MAX; let overflowed_value = max_value + 1; // Panics in debug mode }
- Array Out-of-Bounds: Accessing an element that doesn't exist.
The Difference in Handling: Unwinding vs Aborting
When a panic occurs, Rust has to decide how to deal with it:
-
Unwinding: This is the default behavior in Rust. It cleans up the data of the current thread's stack, unwinding each stack frame and executing any associated clean-up code. It's a somewhat graceful way of dealing with panics, but it can add some runtime overhead.
-
Aborting: Instead of unwinding, Rust can be configured to abort the entire process upon a panic. This is faster but offers less granularity in handling. It's chosen either by setting specific flags during compilation or using the
abortpanic strategy in the project's Cargo.toml file.
Strategies to Handle Panics
While panics are designed to be unrecoverable, there are scenarios where you might want to catch them,
especially when interfacing with non-Rust code or preventing a whole multi-threaded application from crashing
due to a panic in a single thread.
-
catch_unwind: This function from thestd::panicmodule can be used to catch panics and transform them into a result.#![allow(unused)] fn main() { use std::panic::{catch_unwind, AssertUnwindSafe}; let result = catch_unwind(AssertUnwindSafe(|| { // Some code that might panic })); match result { Ok(_) => println!("Code executed successfully"), Err(_) => println!("Code panicked"), } } -
Setting Panic Hooks:
std::panic::set_hookallows you to set a custom function to be called when a panic occurs. This can be useful for custom logging or alerting mechanisms.#![allow(unused)] fn main() { use std::panic; panic::set_hook(Box::new(|panic_info| { if let Some(s) = panic_info.payload().downcast_ref::<&str>() { println!("Panic occurred: {}", s); } else { println!("Panic occurred"); } })); // This will trigger the panic hook panic!("This is a test panic"); }
To sum up, while both errors and panics in Rust signify something going amiss, their nature, handling mechanisms, and implications for the application differ significantly. Understanding when and how to use each, especially in the context of ensuring reliable and robust software, is essential for Rust developers.
Conclusion
The Importance of Conscientious Error Handling in Rust
In the journey of software development, encountering errors is inevitable. However, how we handle these
errors can make a vast difference in the reliability, robustness, and user-friendliness of our applications.
Rust, with its emphasis on type safety and zero-cost abstractions, offers a compelling paradigm for error
handling. Through its constructs like Result, Option, and panics, Rust allows developers to address
both recoverable and unrecoverable errors with clarity and precision.
By treating error handling as a first-class concept, Rust promotes the creation of resilient software that gracefully deals with unexpected situations. This not only results in a more pleasant experience for the end-user but also reduces the chances of critical system failures or vulnerabilities.
Encouraging Best Practices and Avoiding Common Pitfalls
As with any tool or feature, effective error handling in Rust requires understanding and adhering to best practices:
-
Explicit over Implicit: Instead of hoping for the best, be explicit about potential errors using the
Resulttype. Clearly indicate which functions can fail and why. -
Prefer
Resultover Unchecked Panics: While panics are essential for handling unexpected scenarios, they should not be the go-to for expected errors. UsingResultandOptionensures that calling functions can decide how to handle errors, providing more flexibility and control. -
Avoid Overusing
unwrap(): While convenient, usingunwrap()orexpect()recklessly can lead to unexpected panics. Instead, aim for proper error handling using pattern matching or the?operator. -
Provide Meaningful Error Messages: When returning errors, be descriptive. A well-crafted error message can drastically reduce debugging time and provide clarity for other developers or users.
-
Stay Informed: Rust's ecosystem is vibrant and ever-evolving. New libraries and patterns for error handling might emerge, so stay updated and be open to refining your strategies.
In conclusion, error handling isn't just a technical necessity; it's an art that balances user experience, developer experience, and system reliability. By internalizing the philosophies and tools that Rust provides, developers can ensure that their software not only functions correctly but also gracefully handles the unexpected twists and turns of the real world. Embracing conscientious error handling elevates the quality of your software, making it trustworthy and reliable in the eyes of its users.
Homework
Continuing from our last assignment on "Rust Basics: Syntax and Variables, Compiling programs with Cargo", we are going to complicate things. (insert some meme about enterprise-grade Java programming)
Your goal is to enhance the previously developed application, focusing on graceful error handling, and possibly leveraging third-party crates to make your task easier.
Description:
This exercise emphasizes proper error propagation, eliminating the use of unwraps and expects, and
utilizing Option and Result types for comprehensive error representation.
-
Refactor main() Function:
- Restructure the
main()function to solely examine the first argument to identify the required operation, and execute its function. - Display either the operation's output or an error if the output is invalid.
- Restructure the
-
Function creation for Operations:
- For each operation from the previous assignment, create a dedicated function.
- These functions should validate arguments, parse, and subsequently return the output as a
String. - Return
Result<String, Box<dyn Error>>from each function. This facilitates the conversion of a variety of error types using the?operator. You will need to importstd::errror::Errorto be able to use this. - Use the
format!()macro to construct strings, mirroring the use ofprintln!().
-
Error Handling in main():
- Present the selected operation and any errors encountered. Print both to stderr via the
eprintln!()macro. - Successful operation outputs should be relayed to stdout (
println!()).
- Present the selected operation and any errors encountered. Print both to stderr via the
-
Implement the CSV Operation:
- Incorporate an additional operation labeled
csv. - This operation should interpret the input string as CSV (reading the entire input, not merely one line), treating the inaugural row as headers.
- Exhibit the parsed content in an orderly table layout.
- For ease, you can assume that neither header names nor values will span over 16 characters. There is a bonus point in it for you, if you can handle any length of values and headers.
- If you want, you can create a
Csvstruct, which will store the headers and values, and implement theDisplaytrait on per standard library documentation (https://doc.rust-lang.org/std/fmt/trait.Display.html#examples). This will make your finalcsv()function much cleaner. Remember that everything that implementsDisplaygets a.to_string()method for free. - You can opt to manually parse the CSV or employ the
csvcrate. Feel free to explore and test other crates that might be beneficial. - Your application should ideally remain stable and not panic, even when fed with nonsensical input.
- Incorporate an additional operation labeled
Submission:
- After refining your program and ensuring its robustness, commit your alterations and push the updated code to the GitHub repository.
- Share the link to your updated GitHub repository on our class submission platform, making sure your repository remains accessible to the public or me at least.
Deadline:
- Please finalize and submit this assignment by Monday, October 23.
This exercise will immerse you deeper into Rust's error-handling paradigm, aiming for an application that is resilient and adept at handling unexpected conditions. As always, refer to the Rust documentation when in doubt and never hesitate to seek guidance.
Forge ahead, and happy coding!
Lesson 6: Collections - Vectors, Strings and HashMaps
In any programming journey, one of the pivotal topics is understanding and effectively utilizing collection types. Collections, as the name suggests, allow developers to aggregate multiple data elements into a single type. This ability is crucial because, in real-world applications, operations rarely happen on just one or two pieces of data. Think of your favorite social media application: it doesn't just show one post but a collection of posts, and likewise, each post might consist of a collection of comments.
Rust, valuing performance and safety, offers a rich set of collection types tailored to various use cases. While there are several collections available in the Rust standard library, three stand out as the most commonly used:
- Vectors (
Vec<T>): An ordered, growable list of elements of a specific type. - Strings (
Stringand&str): Collections of characters that represent text. - Hash Maps (
HashMap<K, V>): Key-value pairs where each key maps to a value, useful for storing associations.
In this lesson, we'll delve into these primary collection types, understanding their intricacies, and how to use them effectively in Rust.
1. Arrays and Slices
Understanding Arrays in Rust
In Rust, arrays are a fundamental data structure, providing a way to store multiple values of the same type consecutively in memory. Each element in an array can be accessed using an index.
- Defining, Initializing, and Accessing Arrays:
#![allow(unused)] fn main() { // Define and initialize an array of 5 integers let numbers = [1, 2, 3, 4, 5]; // Access elements using index notation let first = numbers[0]; // 1 let second = numbers[1]; // 2 }
It's essential to note that trying to access an element using an index that's out of bounds will result in a compile-time error, thanks to Rust's commitment to safety.
- Fixed-size and Performance Benefits:
Arrays in Rust have a fixed size. Once you've defined the size of an array, it can't grow or shrink. This characteristic provides performance benefits as the size is known at compile time, enabling certain optimizations.
#![allow(unused)] fn main() { let fixed_array: [i32; 3] = [1, 2, 3]; }
Slices
Slices, on the other hand, are references or "views" into a contiguous sequence of elements in a collection, like arrays.
- What are Slices and Why Use Them?
A slice doesn't have ownership. Instead, it borrows from the data it points to, providing a way to work with a section of a collection without consuming it entirely.
For instance, imagine you want to operate on the first three elements of an array without affecting the rest. A slice can help you achieve this!
- Borrowing a Portion of an Array or Another Collection:
#![allow(unused)] fn main() { let numbers = [1, 2, 3, 4, 5]; let slice = &numbers[1..4]; // This will create a slice of [2, 3, 4] }
- Slice Type and the
&[]Syntax:
The type of a slice depends on the type of element it points to. For instance, for an array of i32,
the slice type would be &[i32].
- Mutable Slices:
Just as with references, slices can be mutable, allowing the underlying data to be modified:
#![allow(unused)] fn main() { let mut numbers = [1, 2, 3, 4, 5]; let slice_mut = &mut numbers[1..4]; slice_mut[0] = 7; // numbers array now becomes [1, 7, 3, 4, 5] }
Slices play a crucial role in ensuring safety and flexibility in Rust's system. By borrowing data and not owning it, slices allow for temporary, focused operations on collections, opening up a world of possibilities in data manipulation.
2. Working with Vectors
Introduction to Vectors
Vectors (Vec<T>) in Rust are similar to arrays but with a significant twist: they're dynamic. This means
that, unlike arrays, vectors can grow or shrink in size during runtime.
- Differences Between Vectors and Arrays:
- Size Flexibility: As mentioned, vectors can change size, but arrays cannot.
- Memory Allocation: Vectors are allocated on the heap, which means they can adjust their size as needed. Arrays are stack-allocated with a fixed size.
- Usage: Arrays are better suited for situations with a known, constant list of elements, while vectors are more apt for collections that require dynamic modifications.
Creating and Initializing Vectors:
#![allow(unused)] fn main() { // Create an empty vector of integers let mut vec1 = Vec::new(); // Initialize a vector using the vec! macro let vec2 = vec![1, 2, 3, 4, 5]; }
Accessing and Modifying Vector Elements:
Vectors come packed with methods that make them versatile and easy to use:
- push(): Add an element to the end of the vector.
- pop(): Remove and return the last element, if any.
- len(): Get the number of elements in the vector.
#![allow(unused)] fn main() { let mut numbers = vec![1, 2, 3]; numbers.push(4); // [1, 2, 3, 4] let last_element = numbers.pop(); // Some(4), numbers: [1, 2, 3] let length = numbers.len(); // 3 }
Access elements using index notation, but remember, attempting to access an out-of-bounds index will cause a runtime panic:
#![allow(unused)] fn main() { let second = numbers[1]; // 2 }
Iterating Over Vectors:
Vectors, being collections, are naturally iterable:
- Borrowing, mutability, and looping:
#![allow(unused)] fn main() { // Immutable borrow for num in &numbers { println!("{}", num); } // Mutable borrow for num in &mut numbers { *num *= 2; // double each element } }
Resizing and Capacity Considerations:
Vectors dynamically manage their capacity, but being aware of this can sometimes lead to optimizations. When a vector's capacity is exhausted, it reallocates, typically doubling its current capacity.
- You can pre-allocate space with
with_capacity()if you have a rough idea of the size upfront. capacity()tells you the current capacity.shrink_to_fit()will reduce the capacity to fit the current length.
#![allow(unused)] fn main() { let mut numbers = Vec::with_capacity(10); numbers.push(1); numbers.push(2); println!("Capacity: {}", numbers.capacity()); // Capacity: 10 }
In summary, vectors provide the dynamic capability to arrays, allowing developers to efficiently manage collections that might need adjustments during runtime. They're fundamental in various tasks and are a versatile tool in the Rust ecosystem.
3. Strings and Their Manipulation
Overview of Rust's Many String Types
Strings are a central piece in any programming language. In Rust, the concept of strings is multifaceted, designed to provide flexibility while ensuring memory safety and efficient performance.
Stringvsstr:
String: This is a growable, mutable, heap-allocated string type. It's the one you'd commonly use for constructing and modifying string data.str: Often seen in its borrowed form&str, this is an immutable fixed-length string slice. It represents a view into an already existing string, be it aString, a string literal, or a subset of another string.
Creating and Initializing String:
#![allow(unused)] fn main() { // Using the new method to create an empty String let mut s = String::new(); // From a string literal let s = String::from("hello"); }
String Manipulation:
- Appending, Inserting, and Removing Characters:
#![allow(unused)] fn main() { let mut s = String::from("hello"); // Appending a string slice s.push_str(" world"); // s: "hello world" // Appending a character s.push('!'); // s: "hello world!" // Removing the last character s.pop(); // s: "hello world" }
- String Slicing:
Just as you can slice arrays and vectors, you can slice strings to get &str values:
#![allow(unused)] fn main() { let hello = &s[0..5]; // "hello" let world = &s[6..11]; // "world" }
Ownership and Borrowing with Strings:
Strings in Rust follow the same ownership and borrowing principles as the rest of the language. However, a unique challenge arises with UTF-8 encoding.
Rust's strings are UTF-8 encoded, which means that not every byte corresponds to a valid character. Because of this, blindly indexing can result in breaking a character and causing a panic.
#![allow(unused)] fn main() { let s = "こんにちは"; let s_slice = &s[0..2]; // Panic! Splitting a character }
String Methods and Functions:
Strings in Rust come with a plethora of methods and functions designed to make string manipulation as seamless as possible:
- Conversions: Convert between different string types and other types.
#![allow(unused)] fn main() { let s = "42".to_string(); let n: i32 = s.parse().expect("Not a number!"); }
- Case Changes: Transform string cases.
#![allow(unused)] fn main() { let upper = "hello".to_uppercase(); let lower = "HELLO".to_lowercase(); }
- Trimming: Remove leading and trailing whitespaces.
#![allow(unused)] fn main() { let s = " Rust is great! "; let trimmed = s.trim(); // "Rust is great!" }
In essence, Rust's strings are more than mere collections of characters. They are tools designed to be safe, efficient, and powerful, enabling developers to deal with text in a type-safe and memory-efficient way.
4. Using Hash Maps for Key-Value Storage
Introduction to Hash Maps
At its core, a hash map is a data structure that associates keys with values. This association, commonly referred to as key-value pairs, provides an efficient way to store and retrieve data based on unique identifiers.
- The Significance of Key-Value Pairs in Programming:
Imagine you want to create a phone directory. A hash map would allow you to associate a name (the key) with a phone number (the value). Due to its unique storage mechanism, retrieving the phone number for a particular name is rapid, making hash maps crucial for many applications.
Creating and Initializing a Hash Map:
In Rust, the HashMap<K, V> type is used, where K is the type of the keys and V is the type of the values.
#![allow(unused)] fn main() { use std::collections::HashMap; let mut scores = HashMap::new(); scores.insert("Blue", 10); scores.insert("Yellow", 50); }
Inserting, Updating, and Removing Key-Value Pairs:
#![allow(unused)] fn main() { // Inserting scores.insert("Green", 30); // Updating a value scores.insert("Blue", 15); // Overwrites the previous value of 10 // Only insert if the key has no value scores.entry("Blue").or_insert(20); // Does nothing as "Blue" already exists scores.entry("Orange").or_insert(40); // Inserts "Orange" with a value of 40 // Removing a key-value pair scores.remove("Yellow"); }
Accessing Values:
- Using the
getMethod and Pattern Matching:
The get method returns an Option<&V>, which can be Some(&value) if the key exists and None if it doesn't.
#![allow(unused)] fn main() { let team_name = "Blue"; match scores.get(team_name) { Some(score) => println!("Score for {}: {}", team_name, score), None => println!("{} team not found!", team_name), } }
Iterating Over Key-Value Pairs:
You can easily loop over each key-value pair in a hash map:
#![allow(unused)] fn main() { for (team, score) in &scores { println!("Team: {}, Score: {}", team, score); } }
Performance Considerations and Hashing Functions:
A hash map's performance hinges on its hashing function, which determines how it places keys and values into memory. By default, Rust uses a cryptographically strong hashing function that can resist Denial of Service (DoS) attacks. However, this might not always be the fastest possible hashing function available.
If performance is a more pressing concern than security against DoS attacks, you can swap out the default
hasher with a faster one (like FnvHashMap from the fnv crate). Still, always be cautious about the
trade-offs you're making.
In summary, hash maps in Rust offer a powerful way to associate keys with values, backed by the language's
strong safety and performance guarantees. Whether you're building caches, dictionaries, or any application
where efficient key-based access is crucial, HashMap is an indispensable tool in your Rust arsenal.
Conclusion
In the realm of programming, data storage and manipulation stand as pivotal tasks. Different scenarios necessitate different types of collections, each with its nuances, benefits, and limitations. This is analogous to using the right tool for the job in handiwork; picking the wrong tool can make the task inefficient or even unfeasible.
-
Vectors are versatile and dynamic, suited for situations where you need to maintain an ordered list of items with the flexibility of changing its size. Their continuous memory layout also makes them cache-friendly.
-
Strings in Rust, whether it's
Stringorstr, have been meticulously crafted to ensure efficient text manipulation while safeguarding against common pitfalls, especially around UTF-8 encoding. -
Hash Maps emerge as champions when the task is to associate keys with values. They provide lightning-fast lookups, making them ideal for dictionaries, caches, and various applications requiring key-based access.
But it's not only about understanding each collection's characteristics. It's about discerning which collection to employ based on the task's requirements. A nuanced understanding of collections can be the difference between an efficient, responsive application and a sluggish one.
As you progress in Rust, remember that the language offers these tools, not to perplex you, but to equip you. By understanding the nuances of each and the problems they're tailored to solve, you're empowered to make informed, effective decisions in your software designs. Embrace them, and let them elevate your Rust journey.
Lesson 7: Concurrency and Multithreading
Introduction
Overview of concurrency and its importance in modern computing.
Concurrency in computing refers to the ability of a system to perform multiple tasks in overlapping periods of time. With the advent of multi-core processors and the demands of modern applications, the ability to execute tasks concurrently has become paramount. Imagine if your web browser could only load one tab at a time or if a server could only handle one request in a given moment – the limitations would be immediately apparent.
Concurrency allows applications to maximize resource utilization, achieve better responsiveness, and in many cases, enhance throughput. In real-world scenarios, this might translate to faster loading web pages, responsive software interfaces, and servers capable of handling thousands of simultaneous requests.
The unique safety guarantees Rust offers for concurrent programming.
Rust stands out in the landscape of programming languages due to its emphasis on safety, especially in concurrent scenarios. The ownership system, which forms the backbone of Rust's memory safety guarantees, also has deep implications for concurrent programming:
-
Ownership and Borrowing: Rust ensures that at any given time, either one mutable reference to data exists, or multiple immutable references, but never both. This eliminates data races by design, as concurrent threads cannot simultaneously mutate and access shared data.
-
Locks and Synchronization: Rust's standard library offers robust primitives like
MutexandRwLockfor thread-safe data access. When using these, the compiler will ensure that data access is correctly synchronized, providing another layer of safety. -
Thread Safety: Types that can be safely transferred across threads implement the
Sendtrait, while those that can be safely accessed from multiple threads simultaneously implement theSynctrait. Rust's type system checks for these traits at compile time, making it easier to catch concurrency issues before they turn into runtime errors.
By leveraging these features, Rust developers can confidently write concurrent programs without the usual fears of data races, deadlocks, and other common pitfalls.
1. Introduction to Concurrency in Rust
What is concurrency and why is it crucial?
Concurrency is the execution of several instruction sequences at the same time. It's achieved by dividing a program into independent tasks that can run in overlapping periods. Concurrency is crucial in today's computing world for several reasons:
-
Resource Utilization: As modern processors come with multiple cores, using concurrency allows applications to harness the full potential of the hardware by executing multiple tasks on different cores simultaneously.
-
Responsiveness: For user-facing applications, concurrency ensures that a long-running task doesn't block the main thread, thus providing a smoother user experience. For example, background data fetching can happen while the user continues to interact with the interface.
-
Scalability: Servers and applications that need to handle multiple requests or operations simultaneously benefit from concurrency, as it allows them to scale with demand.
Multithreading vs. Multiprocessing
-
Multithreading: It involves multiple threads of a single process. Threads share the same memory space and can communicate more quickly than processes. However, they must be carefully managed to avoid conflicts in shared memory.
-
Multiprocessing: It involves using multiple processes, each running in its memory space. This provides memory isolation between processes, making them less prone to interference. However, inter-process communication can be slower and more complex than thread-based communication.
-
Rust's philosophy for concurrent programming.
Rust's approach to concurrency is rooted in its overall philosophy of providing guarantees at compile time without incurring runtime overhead.
-
Zero-cost abstractions: In Rust, the abstractions provided to make concurrent programming safer and more straightforward do not come at a runtime cost. This means that while you get a higher level of safety and ease-of-use, your programs remain as efficient as if you had written low-level code.
-
Memory Safety: Rust's ownership model ensures that references to memory are unique or read-only. This guarantees that threads won't unexpectedly modify shared memory, preventing a whole class of potential bugs.
Challenges in concurrent programming.
Concurrency brings its challenges, and while Rust provides tools to address many of them, it's crucial to understand these challenges:
-
Race Conditions: When the behavior of a program depends on the relative timing of events, such as threads, it may produce unpredictable results.
-
Deadlocks: This occurs when two or more threads are unable to proceed with their execution because each is waiting for the other to release a resource.
-
Data Races: A data race happens when two threads access the same memory location simultaneously, and at least one of them is writing to it. In Rust, the ownership model helps prevent data races at compile time.
2. Creating and Managing Threads
Basics of threads in Rust
Threads are the smallest units of execution in an operating system, and in Rust, they can be easily created and managed using the standard library.
Creating a new thread using the spawn function.
In Rust, you can use the spawn function from the std::thread module to create a new thread:
use std::thread; fn main() { thread::spawn(|| { // Code that runs in a new thread println!("Hello from a new thread!"); }); println!("Hello from the main thread!"); }
The spawn function takes a closure as its argument, which contains the code that the new thread will
run. This code runs concurrently with the rest of the program.
Handling thread lifetimes.
A key aspect of working with threads is understanding their lifetimes. When the main thread of a Rust program finishes execution, it doesn't wait for other spawned threads to finish. If you need to make sure a thread completes its work before the main thread exits, you'll need to handle its lifetime explicitly.
Join handles
The spawn function returns a join handle. This handle can be used to wait for the thread to finish.
Waiting for threads to complete.
You can call the join method on a join handle to make sure the main thread waits for the spawned thread to finish:
use std::thread; fn main() { let handle = thread::spawn(|| { println!("Hello from a new thread!"); }); // Wait for the spawned thread to finish handle.join().unwrap(); println!("Hello from the main thread!"); }
Handling thread return values.
Threads can also return values when they finish execution. You can obtain this value through the join handle:
use std::thread; fn main() { let handle = thread::spawn(|| { // Do some computation 42 }); let result = handle.join().unwrap(); println!("The answer is: {}", result); }
Thread attributes and configuration.
For more advanced thread configurations, Rust provides the Builder type in the std::thread module.
With it, you can set attributes like the thread's name or stack size.
Setting names, stack sizes, etc.
use std::thread; fn main() { let builder = thread::Builder::new().name("mythread".into()).stack_size(32 * 1024); let handle = builder.spawn(|| { println!("Hello from a custom thread!"); }).unwrap(); handle.join().unwrap(); }
In the above code, we create a new thread with a custom name "mythread" and a stack size of 32 KB. The
Builder::new() method returns a new thread builder, and you can chain methods to set various configurations.
After setting the desired attributes, you can use the spawn method on the builder to create the thread.
3. Synchronization and Communication Between Threads
Problems arising from concurrent data access.
When multiple threads access data concurrently, problems can arise if at least one of them is modifying the data. This can lead to:
- Inconsistent or unpredictable states.
- Crashes or bugs due to interleaved operations.
- Corrupted data structures.
Data races and the need for synchronization.
A data race occurs when two or more threads access the same data concurrently, and at least one of them writes to it. Data races can cause undefined behavior and are notoriously hard to debug. To avoid these issues, you need synchronization mechanisms that ensure only one thread can access the data at a time, or that access by multiple threads is coordinated safely.
Mutex (Mutual Exclusion)
A Mutex (short for "mutual exclusion") is a synchronization primitive that prevents multiple threads from accessing shared data at the same time.
The role of Mutex<T> in Rust.
In Rust, the Mutex<T> type in the std::sync module provides a way to protect shared data:
use std::sync::{Mutex, Arc}; use std::thread; fn main() { let counter = Arc::new(Mutex::new(0)); let mut handles = vec![]; for _ in 0..10 { let counter = Arc::clone(&counter); let handle = thread::spawn(move || { let mut num = counter.lock().unwrap(); *num += 1; }); handles.push(handle); } for handle in handles { handle.join().unwrap(); } println!("Result: {}", *counter.lock().unwrap()); }
Here, we use a Mutex<i32> to safely increment a counter across multiple threads.
Locking, unlocking, and potential deadlocks.
When you want to access the data in a mutex, you must lock it. The call to lock can block if another
thread has already locked the mutex. Once you're done, the lock is automatically released.
However, it's essential to use mutexes carefully. Improper use can lead to deadlocks, where two or more threads are stuck, each waiting for the other to release a lock.
Channels
Channels are a powerful way for threads to communicate with each other. They allow one thread to send data to another, ensuring safe and synchronized data access.
Introduction to the std::sync::mpsc module (multi-producer, single-consumer).
Rust offers channels through the std::sync::mpsc module, with "mpsc" standing for "multi-producer, single-consumer."
This means that while multiple threads can send messages into the channel, only one thread can receive those messages.
Creating channels and transferring data between threads.
Using channels is straightforward:
use std::thread; use std::sync::mpsc; fn main() { let (tx, rx) = mpsc::channel(); thread::spawn(move || { tx.send("Hello from the spawned thread!").unwrap(); }); let received = rx.recv().unwrap(); println!("Main thread received: {}", received); }
Here, tx is the sending end of the channel, and rx is the receiving end. The spawned thread sends
a message through the channel, and the main thread receives it.
Synchronous vs. asynchronous channels.
Rust's standard library provides synchronous channels, where the send operation can block if the receiving
end doesn't pick up the message quickly enough. For asynchronous communication, you might consider third-party
libraries like tokio that offer non-blocking channels and other asynchronous programming primitives.
4. Send & Sync Traits
Understanding the significance of these traits.
In Rust, the Send and Sync traits are pivotal for enforcing the language's stringent memory safety
and synchronization guarantees, especially in concurrent contexts.
- Ensuring memory safety in concurrent scenarios: As Rust aims to avoid undefined behavior,
SendandSyncare marker traits that indicate whether objects of a type can be safely shared across threads. The absence or presence of these traits provides the compiler with enough information to enforce memory safety in concurrent code.
The Send trait
The Send trait signifies that ownership of an object of this type can be safely transferred between threads.
- Indicating a type is safe to transfer between threads: If a type implements
Send, it indicates that it does not encapsulate any form of thread-unsafe reference or state.
Example:
use std::thread; fn main() { let val = "Hello, Send trait!".to_string(); thread::spawn(move || { println!("{}", val); }); }
Here, the String type implements Send, so we can transfer ownership of val into the spawned thread safely.
The Sync trait
The Sync trait, on the other hand, allows an object of that type to be safely shared (by reference) between threads.
- Indicating a type is safe to be referenced from multiple threads: If a type is
Sync, it tells Rust that it is safe to be accessed by multiple threads simultaneously.
Example:
use std::thread; use std::sync::{Arc, Mutex}; fn main() { let val = Arc::new(Mutex::new("Hello, Sync trait!".to_string())); for _ in 0..3 { let val = Arc::clone(&val); thread::spawn(move || { let val = val.lock().unwrap(); println!("{}", *val); }); } thread::sleep(std::time::Duration::from_secs(1)); }
The Arc<Mutex<T>> pattern is often used to share mutable data safely among threads, where Mutex<T> is Sync.
Common types that implement Send and/or Sync.
- Primitive types like
i32,f64, etc., areSendandSync. Arc<T>isSendandSyncifTisSendandSync.Mutex<T>isSendandSyncifTisSend.- Channels (
mpsc::Sender,mpsc::Receiver) areSend. - Other common collection types like
Vec<T>andHashMap<K, V>areSendifT,K, andVareSend.
Handling non-Send and non-Sync types in threaded contexts.
When dealing with types that are not Send or Sync, you must ensure that their usage is confined to
the thread where they are created, or leverage thread-safe wrapper types to contain them.
-
Using
Rc<T>orRefCell<T>: These types are notSendorSync. If you need reference-counting or interior mutability across threads, use their thread-safe counterparts:Arc<T>andMutex<T>/RwLock<T>. -
Handling GUI elements: GUI elements are often non-
Sendand non-Sync. In such cases, you need to employ mechanisms (like channels) to communicate with the GUI thread, instead of trying to share GUI objects between threads.
Understanding and leveraging Send and Sync traits appropriately is crucial to crafting reliable, concurrent
Rust programs without sacrificing performance. These traits, backed by Rust’s borrow checker, offer a
solid foundation for fearless concurrency, where you can spawn threads liberally without the constant
fear of introducing data races or other concurrency bugs.
Conclusion
Rust has positioned itself as a vanguard in the realm of concurrent programming. Its strict type system, coupled with the ownership model and borrow checker, presents a robust framework for creating concurrent applications with the utmost confidence.
The advantages Rust offers for concurrent programming include:
-
Memory Safety Without Garbage Collection: Unlike some languages that rely on a runtime or garbage collection to handle memory safety, Rust does so at compile-time. This means Rust can ensure thread safety without the overhead of a runtime system, leading to efficient and performant concurrent applications.
-
Expressive Type System: Rust's
SendandSynctraits are indicative of its powerful type system, which makes concurrency primitives both expressive and safe. These traits allow developers to be explicit about the concurrency guarantees of their types, ensuring that only safe concurrent operations are permitted. -
Zero-Cost Abstractions: Rust's philosophy is not just about safety but also about ensuring that safety doesn't come at a high performance cost. Its concurrency constructs, like channels and mutexes, are designed to be zero-cost abstractions. That means you're not paying a runtime penalty for the guarantees they offer.
-
Fearless Concurrency: Rust's slogan, "fearless concurrency," is not mere hyperbole. With tools like the borrow checker and concepts like ownership and lifetimes, Rust provides a framework wherein developers can harness the full power of concurrency without the typical fears of data races, deadlocks, or other concurrency bugs.
In conclusion, as the software landscape continues its inexorable march towards more concurrent and parallel systems, Rust offers a beacon of safety and performance. Whether you're developing a high-performance server, a system utility, or any application that demands concurrent operations, Rust provides the tools and guarantees to ensure your software is fast, efficient, and above all, safe.
Homework
Expanding on the previous homework, we are going to complicate things once again by making the application interactive.
This assignment will transform your previous application into a multithreaded one.
Description:
You'll be tasked with implementing multi-threading in your Rust application. This will enhance the efficiency of your program by dividing tasks among separate threads.
-
Set up Concurrency:
- Spin up two threads: one dedicated to receiving input and another for processing it.
- Make use of channels to transfer data between the two threads. You can employ Rust's native
std::mpsc::channelor explore theflumelibrary for this.
-
Input-Receiving Thread:
- This thread should continuously read from stdin and parse the received input in the format
<command> <input>. Remember to avoid "stringly-typed APIs" - the command can be an enum. For an enum, you can implement theFromStrtrait for idiomatic parsing.
- This thread should continuously read from stdin and parse the received input in the format
-
Processing Thread:
- Analyze the command received from the input thread and execute the appropriate operation.
- If successful, print the output to stdout. If there's an error, print it to stderr.
-
CSV File Reading:
- Instead of reading CSV from stdin, now adapt your application to read from a file using
the
read_to_string()function. Make sure you handle any potential errors gracefully.
- Instead of reading CSV from stdin, now adapt your application to read from a file using
the
-
Bonus Challenge - Oneshot Functionality:
- If you're looking for an additional challenge, implement a mechanism where the program enters the interactive mode only when there are no CLI arguments provided. If arguments are given, the program should operate in the previous way, processing the command directly.
Submission:
- Once you've revamped your application to support concurrency and updated the CSV reading functionality, commit and push your code to the GitHub repository used for prior assignments.
- Share your repository link on our class submission platform, ensuring the repository is set to public.
Deadline:
- This assignment should be completed and submitted by Monday, October 30.
Tackling concurrency is a big leap, but with Rust's robust concurrency model and your growing experience, you're more than equipped to handle it. Refer to the official Rust documentation when in doubt, and as always, reach out for any assistance.
Forge ahead, and happy concurrent coding!
Lesson 8: Standard I/course/O, File I/O and Error Handling
Lesson 9: Network I/course/O
Lesson 10: Generics and Traits
Introduction
The Need for Generics and Traits in Type-Safe Programming
Generics and traits are foundational concepts in Rust that facilitate code reusability and maintainability while upholding strict type safety. Generics allow the creation of functions, structs, enums, and methods that can operate over different data types without compromising Rust’s guarantees about memory safety. This is achieved by allowing the programmer to abstract over types.
For instance, consider a function that sums the elements of a list. Without generics, you would
need separate implementations for each data type: one for a list of i32s, another for f64s,
etc. With generics, you can write a single function that works for any numeric type.
Traits, on the other hand, are a way to define shared behavior. They are similar to what other languages call interfaces. A trait can be composed of multiple methods, and it specifies a set of methods that a type must implement. This allows different types to be treated abstractly based on the behaviors they share. Traits can be used to define shared behavior in a way that abstracts over different concrete types.
A Glimpse into How Rust Provides Flexibility Without Sacrificing Performance
Rust achieves flexibility through traits and generics without sacrificing performance thanks to its two different approaches to polymorphism: static dispatch and dynamic dispatch. Static dispatch uses monomorphization at compile time to generate code for each concrete type used with a generic, which allows the compiler to optimize away the abstraction layer. This is the default in Rust when using generics and provides performance comparable to writing type-specific code.
Dynamic dispatch, used with trait objects, allows for more traditional runtime polymorphism, where different types can be handled at runtime through a single interface. While this adds a slight runtime cost due to indirection, it provides flexibility in contexts where the exact types cannot be known at compile time.
Rust’s borrow checker and ownership model apply to both generics and trait objects, ensuring that, despite the abstraction, the code remains memory safe and free of data races without requiring a garbage collector.
With this foundation, let's delve deeper into generics and traits, and how Rust optimizes for performance and safety.
1. Understanding Generics in Rust
Generics in Rust serve the purpose of writing flexible and reusable code that can work with many different data types without sacrificing type safety and performance. They are integral in creating collections, like vectors and hash maps, that can handle any data type, as well as in implementing algorithms that can be applied to a wide variety of situations.
Why Use Generics? The Balance Between Flexibility and Type Safety
The use of generics is a middle ground between complete abstraction and strict type specificity. Generics allow you to write a function or struct that can work with any type without losing Rust’s guarantees around memory safety. The compiler ensures that your generic types will behave correctly with the operations you perform on them, all the while minimizing code duplication.
The Syntax and Placeholders for Generic Data Types
The syntax for using generics involves the use of angle brackets <> to define generic type
parameters. Here’s a simple example of a generic function:
#![allow(unused)] fn main() { fn get_first<T>(list: &[T]) -> Option<&T> { list.first() } }
In this function, T is a placeholder for any type, and Rust ensures that whatever type T
turns out to be, the operations you try to perform on T (in this case, first) are valid.
Benefits: Code Reusability, Type Safety, and Performance Optimizations at Compile-Time
Generics contribute significantly to code reusability, as you can write a library or function that can work with any type, and users of your code can specify exactly what types they want to use.
Type safety is not compromised because the Rust compiler will ensure that your code can only be used with types that support the operations you need. For example, you can constrain your generics to only work with types that implement a particular trait, thereby ensuring that the types have certain behaviors.
Performance is not sacrificed because Rust implements generics through monomorphization, where the compiler generates specific code for each concrete type that your generic code is instantiated with. This is as opposed to runtime type checks, which would introduce overhead. Monomorphization means that using generics can be as fast as using specific types, as the compiler can optimize the resulting code just as effectively.
2. Defining Generic Functions and Structs
Writing Generic Functions
Generic functions allow the same function to be applied to arguments of different types. The
syntax for defining a generic function involves specifying type parameters in angle brackets
<> after the function name.
#![allow(unused)] fn main() { fn wrap_in_result<T>(value: T) -> Result<T, &'static str> { if some_condition(value) { Ok(value) } else { Err("An error message") } } }
Constraints, or type bounds, can be added to specify that a type must implement certain traits for the function to work with it. This ensures type safety and allows the function to use the methods defined by the traits.
#![allow(unused)] fn main() { fn print_debug<T: std::fmt::Debug>(value: T) { println!("{:?}", value); } }
Use-cases for generic functions include algorithms like sorting or searching that can operate on any collection of sortable or searchable items.
Creating Generic Structs and Enums
Generic structs and enums are powerful tools for reusability and modularity.
#![allow(unused)] fn main() { struct Point<T> { x: T, y: T, } enum Option<T> { Some(T), None, } }
These constructs enhance reusability by allowing the programmer to use the same struct or enum with different contained types without code duplication. They also enhance modularity by allowing you to write code that can work with any type that conforms to specified constraints, without needing to know what those types will be ahead of time.
The where Clause in Generics
The where clause comes into play when specifying more complex constraints for generics. It
provides a clear, organized way to list these constraints, especially when there are many or
they are complex.
#![allow(unused)] fn main() { fn some_function<T, U>(t: &T, u: &U) -> i32 where T: Display + Clone, U: Clone + Debug, { // function body } }
Using where can also improve readability, especially when the list of trait bounds becomes
long, by moving them out of the function signature itself. It provides a clear separation between
the function’s parameter list and the trait bounds on those parameters. Furthermore, the where
clause can enhance flexibility because it can express constraints that cannot be otherwise specified
directly in the parameter list, such as lifetimes or associated types constraints.
3. Implementing Traits for Reusable Code
Introduction to Traits
Traits in Rust are a core feature that enables polymorphism—allowing different data types to
be treated through a common interface. A trait can be thought of as a collection of methods
that define a set of behaviors. Traits are essential for sharing behavior across multiple structs
and enums; for instance, any type that can be displayed as a string can implement the Display
trait.
Comparing traits to other language constructs, they are similar to interfaces in languages like Java or typeclasses in Haskell. However, traits can also contain default method implementations, not just method signatures.
Defining and Implementing Traits
To define a trait, you use the trait keyword followed by a set of method signatures that delineate
the behavior types implementing the trait should possess.
#![allow(unused)] fn main() { trait Shape { fn area(&self) -> f64; } }
Implementing a trait for a given type involves providing concrete behavior for the trait's methods for that type.
#![allow(unused)] fn main() { struct Circle { radius: f64, } impl Shape for Circle { fn area(&self) -> f64 { std::f64::consts::PI * self.radius * self.radius } } }
Traits can also provide default method implementations that can be overridden by types that implement the trait.
#![allow(unused)] fn main() { trait Shape { fn area(&self) -> f64; fn perimeter(&self) -> f64 { 0.0 // Default implementation, likely to be overridden } } }
Using Traits as Interfaces
Traits can be used to create object-oriented patterns in Rust, where a trait defines a common interface for different types. This enables polymorphism where a function can accept any type that implements a particular trait.
Static dispatch refers to the use of generics with traits to perform function calls determined at compile time. It leverages Rust's monomorphization to ensure that there is no runtime overhead.
#![allow(unused)] fn main() { fn print_area<T: Shape>(shape: &T) { println!("The area is {}", shape.area()); } }
Trait objects, on the other hand, allow for dynamic dispatch. A trait object points to both an instance of a type implementing our trait and a table used to look up trait methods on that type at runtime. This introduces a runtime cost but allows for greater flexibility.
#![allow(unused)] fn main() { fn print_area(shape: &dyn Shape) { println!("The area is {}", shape.area()); } }
In conclusion, traits in Rust offer a way to define and implement shared behavior across different types, contributing to code reuse and maintainability. The ability to choose between static and dynamic dispatch allows the programmer to make trade-offs between type flexibility and runtime performance.
4. Supertraits and Higher-Ranked Trait Bounds (Generic Closures)
Supertraits
Supertraits are a way to establish a hierarchy or dependency between traits, where one trait requires the functionality of another. In essence, they allow a trait to inherit the requirements of another trait.
For example, you might have a Display trait that you want to be usable only for types that
also implement the ToString trait. This can be specified using supertraits:
#![allow(unused)] fn main() { trait ToString { fn to_string(&self) -> String; } trait Display: ToString { fn display(&self) -> String; } impl ToString for i32 { fn to_string(&self) -> String { self.to_string() // uses standard to_string implementation } } impl Display for i32 { fn display(&self) -> String { format!("Integer: {}", self.to_string()) } } }
The Display trait is a supertrait of ToString—it can rely on any functionality that ToString
provides. This ensures that any type implementing Display must also implement ToString,
thus having access to the to_string method.
Higher-Ranked Trait Bounds
Higher-ranked trait bounds (HRTBs) involve lifetimes and allow for more advanced and flexible borrowing scenarios with generics, especially in the context of closures and function pointers.
Lifetimes are Rust's way of ensuring that references are valid for a certain scope of the program's execution. They are a part of type definitions and function signatures, ensuring that Rust's strict borrowing rules are upheld.
#![allow(unused)] fn main() { fn apply<F>(f: F) where for<'a> F: Fn(&'a i32), { let x = 27; f(&x); } }
In this example, F is a closure that takes a reference to an i32. The for<'a> syntax indicates
that F can be called with a reference of any lifetime. This means the closure f can accept
a reference to an i32 that has any lifetime, making the apply function very flexible.
Generic Closures and Their Constraints
Closures in Rust can capture variables from their environment, and they can be generic over the types of these captured variables. This generic nature of closures can lead to situations where the lifetime of the closure's environment needs to be considered, and higher-ranked trait bounds are particularly useful in these cases.
#![allow(unused)] fn main() { fn with_closure<F>(closure: F) where F: for<'a> Fn(&'a str), { let string = "temporary string".to_string(); closure(&string); } }
Here, the with_closure function accepts any closure that can take a &str with any lifetime.
This ensures that no matter how or where the closure was defined, it can safely operate on the
string slice provided within the function.
How Higher-Ranked Trait Bounds Enhance Expressiveness
HRTBs allow Rust developers to express very granular and precise control over the lifetimes of parameters in generic functions, especially when dealing with closures and function pointers. They provide a way to declare that the generic parameters can work with any lifetime, not just a single concrete lifetime. This is essential for writing flexible libraries that can handle many different use cases without running afoul of Rust's borrow checker.
5. Common Rust Traits
Overview of the Rust Standard Library's Ubiquitous Traits
The Rust standard library provides a variety of traits that are fundamental to idiomatic Rust programming. These traits serve as the backbone for a multitude of common patterns and operations, ranging from conversion and comparison to iteration and resource management.
Marker Traits in the Standard Library
Marker traits are traits that don't have any methods but signify certain properties about a type. Examples include:
Copy: Indicates that a type's instances can be duplicated by copying bits.Send: Types that can be transferred safely across thread boundaries.Sync: Types that can be accessed from multiple threads safely.
Drop: Managing Resource Deallocation
The Drop trait is used to run some code when a value goes out of scope. This is particularly
important for types that manage resources like file descriptors or network sockets, which need
explicit cleanup.
#![allow(unused)] fn main() { struct MyResource { // Some fields } impl Drop for MyResource { fn drop(&mut self) { // Clean up code } } }
From and Into: Generic Conversions Between Types
The From and Into traits are closely related and facilitate conversions between types. Implementing
the From trait for a type automatically provides a corresponding Into implementation.
The From trait allows for a type to define how to create itself from another type, and it's
reflexive, meaning a type can always convert into itself.
#![allow(unused)] fn main() { struct Number { value: i32, } impl From<i32> for Number { fn from(item: i32) -> Self { Number { value: item } } } let num = Number::from(30); let num: Number = 30.into(); // Thanks to the Into trait }
TryFrom and TryInto: Fallible Conversions Between Types
Similarly to From and Into, TryFrom and TryInto handle conversion between types. However,
these conversions can fail, so they return a Result type.
#![allow(unused)] fn main() { impl TryFrom<i32> for Number { type Error = &'static str; fn try_from(item: i32) -> Result<Self, Self::Error> { if item > 0 { Ok(Number { value: item }) } else { Err("Negative value") } } } }
Default: Providing Default Values for Types
The Default trait allows types to define a default value. This is commonly used for types
that have a logical default state, or for initializing a type before it’s configured further.
#![allow(unused)] fn main() { impl Default for Number { fn default() -> Self { Number { value: 0 } } } }
Iterator: Building and Working with Iterators
The Iterator trait is central to iteration in Rust. It provides a way to produce a sequence
of values, usually in a lazy fashion. Implementing this trait allows for the use of for-loops
and many other iteration patterns.
#![allow(unused)] fn main() { impl Iterator for MyCollection { type Item = i32; fn next(&mut self) -> Option<Self::Item> { // Return the next item in the sequence } } }
Traits for Operators
Traits such as Add, Sub, Mul, and Div define operators in Rust. By implementing these
traits, you can overload the corresponding operators (+, -, *, /) for custom types.
#![allow(unused)] fn main() { use std::ops::Add; impl Add for Number { type Output = Number; fn add(self, other: Number) -> Number { Number { value: self.value + other.value, } } } }
A Glimpse into Other Essential Traits and Their Roles
Clone: To create non-Copy clones of a type. (We have already seen this one!)PartialEqandEq: For equality comparison;Eqis a marker trait that indicates that every comparison will be reflexive, symmetric, and transitive.PartialOrdandOrd: For ordering comparisons, withOrdindicating a total ordering.Debug: To format a value using the{:?}formatter. (This one too!)
These traits encompass a large portion of the routine capabilities needed for various types in Rust. Their implementations can often be automatically derived by the compiler for custom types, which underscores their foundational nature within the Rust ecosystem.
6. Implementing an Iterator for the Fibonacci Sequence
The Fibonacci sequence is a series of numbers where each number is the sum of the two preceding ones. In Rust, we can create an iterator that generates the Fibonacci sequence indefinitely (or until it overflows the bounds of the numeric type we're using). Here’s how you can implement such an iterator:
struct Fibonacci { curr: u64, next: u64, } impl Fibonacci { fn new() -> Self { Fibonacci { curr: 0, next: 1 } } } impl Iterator for Fibonacci { type Item = u64; fn next(&mut self) -> Option<Self::Item> { let new_next = self.curr.checked_add(self.next); match new_next { Some(next_val) => { let new_curr = self.next; // Update the current and next values self.curr = new_curr; self.next = next_val; Some(new_curr) }, // If overflow occurs, stop iteration None => None, } } } fn main() { let fibo_sequence = Fibonacci::new(); for number in fibo_sequence.take(10) { println!("{}", number); } }
In this example:
- We define a
Fibonaccistruct to hold the state of the iterator. - We implement the
newassociated function as a constructor to start the sequence. - We implement the
Iteratortrait forFibonacci.- The
Itemtype is defined asu64, which is the type of elements being iterated over. - The
nextmethod returns anOption<Self::Item>. If the next value in the sequence can be computed without overflow, it is wrapped inSomeand returned. If an overflow would occur,Noneis returned, signaling the end of the iterator.
- The
The checked_add function is used to add u64 values while checking for overflow. If an overflow
is detected, None is returned, which we use to signal the iterator should terminate.
In the main function, we create a new Fibonacci instance and use take(10) to get the first
10 values from the sequence, which are then printed out to the console.
This iterator will yield values of the Fibonacci sequence until the u64 type can no longer
represent them due to overflow, at which point the iterator will gracefully end.
7. Making the Iterator Generic Over the Numeric Type with the num Crate
To create a generic Fibonacci iterator that works with any numeric type, you can utilize the
num crate, which provides traits that abstract over numeric types. This will allow us to use
operations like add in a generic context.
First, you'll want to include the num crate in your Cargo.toml:
[dependencies]
num-traits = "0.2"
Now, you can define a generic Fibonacci iterator using traits from the num crate:
use num_traits::{Zero, One, CheckedAdd}; struct Fibonacci<T> { curr: T, next: T, } impl<T> Fibonacci<T> where T: Zero + One, { fn new() -> Self { Fibonacci { curr: Zero::zero(), next: One::one(), } } } impl<T> Iterator for Fibonacci<T> where T: CheckedAdd + Clone, { type Item = T; fn next(&mut self) -> Option<Self::Item> { let new_next = self.curr.checked_add(&self.next)?; let new_curr = self.next.clone(); self.curr = new_curr; self.next = new_next; Some(self.curr.clone()) } } fn main() { let fibo_sequence = Fibonacci::<u64>::new(); for number in fibo_sequence.take(10) { println!("{}", number); } }
Here’s what changed to make the Fibonacci struct generic:
- The
Fibonaccistruct now has a type parameterT, which represents the numeric type. - The
currandnextfields use typeT. - We’ve added a
whereclause in theFibonacci::newfunction and theIteratorimplementation to specify trait bounds forT. These bounds requireTto implement theZero,One, andCheckedAddtraits which are provided by thenum-traitscrate.ZeroandOneare traits that allow us to get zero and one values for generic numeric types.CheckedAddprovides thechecked_addmethod, which we use to add numbers while checking for overflow.
- In the
nextmethod, the?operator is used to returnNonefrom the function ifchecked_addreturnsNone.
This generic implementation now allows the Fibonacci iterator to be used with any numeric
type that the num-traits crate supports, making it far more flexible and powerful.
8. Making a Heterogeneous Collection with Trait Objects
In Rust, trait objects allow for dynamic dispatch and the storage of different types that implement the same trait within a single collection. This is particularly useful for creating heterogeneous collections. Here’s how you can create such a collection using trait objects:
Trait Objects and Storing Them in a Vec
Trait objects are created by specifying a trait name behind a reference (&) or a smart pointer
like Box, Rc, or Arc. For example, Box<dyn SomeTrait> is a trait object that allows
for different types that implement SomeTrait to be stored in a Box, which can then be collected
in a Vec.
trait Drawable { fn draw(&self); } struct Circle { radius: f64, } impl Drawable for Circle { fn draw(&self) { println!("Circle with radius {}", self.radius); } } struct Square { side: f64, } impl Drawable for Square { fn draw(&self) { println!("Square with side {}", self.side); } } fn main() { let shapes: Vec<Box<dyn Drawable>> = vec![ Box::new(Circle { radius: 1.0 }), Box::new(Square { side: 2.0 }), ]; for shape in shapes { shape.draw(); } }
The Any Trait and Downcasting
The Any trait enables runtime type checking, which allows you to check the type of a trait
object and downcast it to a concrete type safely at runtime. Here's an example:
use std::any::Any; fn main() { let shapes: Vec<Box<dyn Any>> = vec![ Box::new(Circle { radius: 1.0 }), Box::new(Square { side: 2.0 }), ]; for shape in shapes { if let Some(circle) = shape.downcast_ref::<Circle>() { println!("Circle with radius {}", circle.radius); } else if let Some(square) = shape.downcast_ref::<Square>() { println!("Square with side {}", square.side); } } }
impl Blocks for Trait Objects (impl dyn Trait)
Rust allows you to define default implementations for trait objects using impl dyn Trait.
This is useful when you want to provide additional methods for the trait object that aren't
part of the original trait definition.
trait Drawable { fn draw(&self); } // Additional methods for the trait object impl dyn Drawable { fn describe(&self) { println!("This is a drawable object."); } } impl Drawable for Circle { fn draw(&self) { println!("Circle with radius {}", self.radius); } } // ... implementations for Circle and Square ... fn main() { let shapes: Vec<Box<dyn Drawable>> = vec![ Box::new(Circle { radius: 1.0 }), // ... other shapes ... ]; for shape in shapes { shape.describe(); shape.draw(); } }
In this case, describe is an additional method that is not part of the Drawable trait but
is implemented specifically for the dyn Drawable trait object. This allows all your drawable
trait objects to share common behavior that isn’t defined in the original trait.
Conclusion
Generics and traits in Rust are foundational for writing robust and reusable code. Generics allow developers to write functions, structs, and enums that can operate on different data types, while traits define behavior in a way that different data types can share.
Through the examples and concepts discussed in this lesson, we’ve seen the power of generics to reduce code duplication and enhance type safety without runtime cost. Traits have been shown to provide a flexible framework for sharing behavior across types, allowing for polymorphism in a strongly-typed context.
When using these features, it is crucial to adhere to best practices:
- Use generics to handle concepts that are truly generic across data types, avoiding over-engineering solutions when a simpler type-specific implementation would suffice.
- Leverage trait bounds to specify the minimum functionality needed for a generic type parameter. This makes your code more flexible and easier to use with a wider range of types.
- Prefer composition over inheritance when using traits to share behavior, which aligns with Rust’s philosophy and leads to more maintainable code.
- Use trait objects judiciously. They are invaluable for creating heterogeneous collections and enabling dynamic dispatch, but they come with a runtime cost. Always measure and understand the trade-offs for your specific use case.
- Implement widely-used Rust traits from the standard library when appropriate, like
Drop,Debug,Clone,Iterator, and others, to integrate well with Rust's ecosystem.
In summary, generics and traits should be used to write code that is expressive, efficient, and ergonomic. With the power of these features at your fingertips, you can tackle a wide range of programming challenges in Rust effectively, making your code both flexible and performant.
Lesson 11: Rust Ecosystem, Community Resources, and Tooling
Introduction
Rust’s ecosystem is a rich tapestry woven with numerous community contributions that range from powerful command-line tools to robust libraries for web development, scientific computing, and more. Understanding this ecosystem is pivotal for leveraging Rust’s full potential and for contributing back to it.
The symbiotic relationship between the community, tools, and libraries is what makes Rust more than just a language; it's an ecosystem where each part supports and enhances the others. Tools and libraries often make heavy use of generics and traits, offering interfaces that are both highly flexible and type-safe. Understanding how to use these features effectively is key to not only utilizing the Rust ecosystem but also contributing to it, ensuring that your code can be easily used and integrated by others.
1. Exploring the Rust Ecosystem and Available Libraries
The Rust ecosystem is a thriving and ever-growing landscape that has expanded rapidly since Rust's inception. As an open-source project, it has amassed a wide range of libraries, tools, and frameworks, which are collectively known as "crates." These crates cover almost every conceivable area of software development, from web frameworks to game development, and command-line interfaces to asynchronous programming.
crates.io serves as the central crate registry for the Rust community. It’s where developers can publish and share their crates, and where users can search and include dependencies into their projects. When searching for libraries, developers can evaluate the quality of a crate by considering several factors:
- Recent updates: A crate that is regularly updated is more likely to be well-maintained.
- Number of downloads: High download numbers can be a good indicator of a crate's popularity and community trust.
- Documentation: Good documentation is essential for understanding and effectively using a crate.
- License: Ensuring the crate’s license is compatible with your project's needs is crucial.
For hosting your own crate registry, there are options available beyond crates.io. Cargo supports
alternative registries, and setting one up involves configuring cargo config and Cargo.toml
with the registry index's URL. Hosted solutions like Kellnr offer a private and secure way
to manage your crates, suitable for companies or private projects that require control over
their dependencies.
The ecosystem boasts several popular and essential crates for a variety of tasks:
- Web Development: Crates like
actix-webandrocketprovide robust frameworks for building web applications. - Async Programming:
tokioandasync-stdare at the forefront of asynchronous runtime environments. - Game Development: Libraries such as
amethystandggezoffer the necessary tools to create engaging games. - CLI Parsing: Crates like
clapandstructoptmake it simple to parse command-line arguments and subcommands.
Resources like awesome-rust and lib.rs are curated lists that categorize and showcase high-quality crates across various domains, making it easier for developers to find the tools they need for their projects. These lists often include community ratings, which can provide additional insights into a crate's reliability and suitability for a task.
2. Managing Dependencies with Cargo
Cargo Project File Structure: A Cargo project typically contains:
src/directory where the source files reside.Cargo.tomlfor specifying project metadata and dependencies.Cargo.lockfor locking down the versions of dependencies.- Optional
.cargo/directory for custom configuration.
Dependency Management:
Dependencies in Rust are declared in the Cargo.toml file. Here is an example with advanced features:
[package]
name = "my_project"
version = "0.1.0"
edition = "2021"
[dependencies]
serde = { version = "1.0", features = ["derive"] }
log = "0.4.14"
[dependencies.awesome-crate]
version = "0.2"
optional = true
default-features = false
features = ["sqlite", "magic"]
[target.'cfg(windows)'.dependencies]
winapi = "0.3"
[dependencies]
# Renaming a crate
local_time = { package = "chrono", version = "0.4", features = ["serde"] }
# Specifying a Git dependency
git_crate = { git = "https://github.com/user/repo.git", branch = "main" }
# Path dependencies for local development
local_crate = { path = "../local_crate" }
# Patching a crate version
[patch.crates-io]
tokio = { git = "https://github.com/tokio-rs/tokio.git", branch = "master" }
Locking Dependencies with Cargo.lock:
The Cargo.lock file is automatically generated and updated by Cargo. It should not be manually edited.
This file ensures that the project uses specific versions of each dependency to allow reproducible builds.
.cargo/config.toml:
You can configure Cargo's behavior per project by using a .cargo/config.toml file. An example of setting
a default target might look like this:
[build]
target = "x86_64-unknown-linux-gnu"
Building for Different Targets: To build for a different target, you specify the target in the command line:
cargo build --target=x86_64-pc-windows-gnu
Publishing to crates.io:
To publish a crate to crates.io, you must include all necessary metadata in Cargo.toml, and then use
the cargo publish command. Here’s an example:
[package]
name = "my_crate"
version = "0.1.0"
authors = ["Your Name <you@example.com>"]
edition = "2021"
description = "A description of my crate"
license = "MIT OR Apache-2.0"
repository = "https://github.com/username/my_crate"
keywords = ["cli", "tool"]
categories = ["command-line-utilities"]
[dependencies]
serde = "1.0"
[lib]
path = "src/lib.rs"
Before publishing, you should ensure that the code is well-documented, has a README file, and
that you have logged in to crates.io using cargo login. Once everything is set, run cargo publish to upload your crate.
3. Community Resources
Rust Documentation: Where and How to Find It:
Rust’s documentation is a model for open-source projects, providing comprehensive guides and references.
The primary source is the official Rust website, which hosts the documentation for the Rust standard
library. Additionally, each crate hosted on crates.io usually has its own documentation, often
generated using rustdoc and hosted on docs.rs.
For example, to view the documentation for a specific crate you are using, you can run:
cargo doc --open
This command compiles the documentation for your current project and all of its dependencies and then opens it in your web browser.
The Rust Book: The Rust Book is an indispensable resource for both new and seasoned developers. It offers a step-by-step guide to Rust’s concepts and is freely available online. It can be accessed via the official Rust website or directly in your terminal with:
rustup doc --book
Other Books: Beyond The Rust Book, there are other valuable texts such as:
- "Rust Programming by Example": focuses on creating applications with Rust.
- "Programming Rust": provides a comprehensive overview of advanced Rust concepts.
- "The Rustonomicon": delves into the dark arts of unsafe Rust.
Rust Forums, User Groups, and Meetups: The community around Rust is friendly and welcoming, with various platforms for discussion and support:
- The official users.rust-lang.org forum is a place to ask questions and share experiences.
- Meetups and user groups can be found all over the world. Platforms like Meetup.com often list local Rust events.
- The Rust community also maintains a Community Discord and Rust subreddit for more informal chats and discussions.
Conferences and Events: Rust’s calendar is dotted with events, both in-person and virtual, which serve as opportunities for learning and networking:
- RustConf: This is the official Rust conference in the United States and includes talks from core team members and community leaders.
- RustFest: A European Rust conference that brings together the community for a few days of talks, workshops, and collaboration.
- Rust Belt Rust: A conference focused on Rust in the Midwest and Rust Latam in Latin America.
These events often feature sessions ranging from beginner introductions to deep technical dives, making them invaluable for Rustaceans at any level of expertise.
4. Tooling for Linting and Managing Rust Code
Rustup: Managing Rust Versions and Toolchains:
rustup is Rust's toolchain manager. It allows you to install and manage multiple versions of Rust,
including stable, beta, and nightly, along with their respective toolchains. To list all installed toolchains, you can run:
rustup toolchain list
To install a specific version of Rust, such as version 1.56.0, you can use:
rustup install 1.56.0
You can also manage targets for cross-compilation. To add a target, for instance, the ARM architecture, you can use:
rustup target add armv7-unknown-linux-gnueabihf
To update your toolchain to the latest version, simply run:
rustup update
Clippy: Rust's Linter:
Clippy is a helpful tool for catching common mistakes and improving the quality of your Rust code.
To configure Clippy lints, you can use attributes in your code. For example, to allow a specific lint, you could add:
#![allow(unused)] #![allow(clippy::lint_name)] fn main() { }
To run Clippy across your project, you would use the command:
cargo clippy
After running, Clippy will provide recommendations which can be automatically applied to the codebase in some cases with:
cargo clippy --fix
Rustfmt: Code Formatter for Rust:
rustfmt automatically formats Rust code to ensure a consistent style. To prevent rustfmt from formatting a
particular piece of code, you can use the #[rustfmt::skip] attribute. For example:
#[rustfmt::skip] fn main() { // This code will not be reformatted by rustfmt. let x = { 1 }; }
To configure rustfmt globally or per project, you can use a rustfmt.toml file. Here's an example configuration:
max_width = 100
hard_tabs = false
This will set the maximum line width to 100 characters and use spaces instead of tabs.
Other Tools and Utilities:
cargo-audit: InspectsCargo.lockfor crates with known vulnerabilities.cargo-bench: Helps in writing benchmark tests to assess performance.cargo-tarpaulin: Provides test coverage reporting for Rust projects.
Incorporating these tools into a CI/CD pipeline helps maintain high code quality and adherence to best
practices. rustup in particular is a versatile manager that not only handles different Rust versions
but also manages associated components and cross-compilation targets, making it a cornerstone of Rust development.
Conclusion
The Rust community is dynamic and continuously evolving, fostering an environment where tools and resources are regularly updated and expanded upon. This ecosystem not only supports the growth and development of the language itself but also of those who use it. As Rustaceans, staying engaged with the community and up-to-date with the latest advancements is crucial.
Encouraging a habit of continuous exploration will equip you with a deeper understanding of the language's capabilities and the rich suite of tools at your disposal. Participating in forums, contributing to open source projects, or even simply experimenting with new crates and features can significantly enhance your proficiency in Rust.
As you progress, remember that Rust is designed to empower its users. Its tools and resources are there to facilitate your journey, making coding in Rust a robust and efficient experience. The Rust ecosystem is a testament to the collaborative spirit of its community, and your active involvement will contribute to its richness and vitality. Embrace the journey of learning and discovery, and let the myriad of available tools and resources guide you towards mastering the Rust language.
Homework
Your next challenge is to professionalize your client-server chat application by organizing it into Cargo crates and incorporating production-ready libraries. This assignment will also give you the opportunity to clean up your project structure and prepare it for real-world applications.
Description:
-
Cargo Crates Conversion:
- If you have not already, transform both the client and server parts of your chat application into separate Cargo crates.
- Structure your project directory to clearly separate the two parts of the application.
-
Shared Functionality:
- Identify any shared functionality between the client and server.
- Consider abstracting this shared code into a third "library" crate that both the client and server can utilize.
-
Production-Ready Libraries:
- Introduce production-ready libraries for key functionalities, such as:
log(with some backend) ortracing(withtracing-subscriber) for logging.rayonfor data parallelism, if applicable.itertoolsfor advanced iterator operations, if applicable.
- Introduce production-ready libraries for key functionalities, such as:
-
Crates Exploration:
- Dive into resources such as crates.io, lib.rs, or rust-unofficial/awesome-rust on GitHub to discover crates that could simplify or enhance your chat application.
- Look for crates that offer robust, tested solutions to common problems or that can add new functionality to your application, if you want. Keep in mind that we will be rewriting the application to be ansynchronous soon
-
Documentation and Comments:
- Update your
README.mdto document how to use the new crates and any significant changes you've made to the application structure. - Add comments throughout your code to explain your reasoning and provide guidance on how the code works.
- Update your
-
Refactoring:
- Refactor your existing codebase to make use of the new crates and shared library, ensuring that everything is cleanly integrated and operates smoothly.
Submission:
- Once you've completed the refactoring of your application into Cargo crates, commit and push your updated project to your GitHub repository.
- Provide comprehensive documentation in your
README.mdto guide users and developers in understanding your application setup and operation. - Submit the link to your updated repository on the class submission platform, and make sure the repository is set to public.
Deadline:
- This homework is due by Monday, November 20, 2023.
Transitioning to a more modular and professional structure is a crucial step in software development. By incorporating external crates and best practices, you are not only making your code more robust and maintainable but also learning to navigate the rich ecosystem of Rust. If you find yourself needing assistance, remember that the Rust community is incredibly supportive and that I am here to help and post cat memes.
Lesson 12: Lifetimes and References
Introduction to Lifetimes and References in Rust
Rust ensures memory safety through its unique system of ownership, borrowing, and lifetimes, without the need for a garbage collector. Lifetimes are a compile-time feature of Rust that allow it to prevent data races and ensure that references are always valid. Here, we delve into why lifetimes are a cornerstone of Rust's memory safety guarantees.
In many languages, memory safety is an afterthought, leading to common errors such as dangling pointers and buffer overflows. Rust, however, incorporates these concerns into its very type system through lifetimes, which describe the scope for which a reference to a resource is valid. This way, the Rust compiler can ensure references do not outlive the data they point to.
Rust's approach to reference borrowing is distinct. When a variable is borrowed, Rust enforces rules that govern how references to that variable can be used. These rules are built around the concepts of mutable and immutable references and are enforced at compile time. A single mutable reference or any number of immutable references to a resource can exist, but not both at the same time. This guarantees safe concurrency and prevents data races.
Understanding how to work with lifetimes and references is crucial for writing efficient and safe Rust programs. Throughout this lesson, we will explore advanced concepts of lifetimes and references, how they are inferred by the compiler, and situations where explicit lifetime annotations are necessary. We'll also look at lifetime elision rules that make writing Rust more ergonomic without sacrificing safety.
The following sections will offer a deep dive into these topics, providing you with the knowledge to leverage Rust's ownership model to its full extent. This will include detailed code examples to illustrate complex scenarios you may encounter in everyday Rust programming.
1. Understanding Lifetimes and Their Role in Rust
Memory Management in Rust:
Rust manages memory through a system of ownership with a set of rules that the compiler checks at compile time. Memory can be allocated on the stack or the heap. Stack allocations are determined at compile time and are used for data with a fixed size that can be known at compile time. Heap allocations, on the other hand, are for data that can grow or whose size is not known until runtime. They require dynamic memory allocation, which is more flexible but also demands explicit management.
The Concept of Lifetimes:
Lifetimes are Rust's construct to track the scope of references, which prevents dangling references and ensures memory safety. Every reference in Rust has a lifetime, which is the scope for which that reference is valid. Lifetimes are implicit and inferred by the Rust compiler most of the time, but there are cases where the programmer must annotate lifetimes explicitly to ensure safety.
Why Lifetimes are Crucial for Safety:
Lifetimes ensure that references cannot outlive the data they point to. They help to prevent two major classes of bugs: using a reference after its data has gone out of scope, and memory unsafety through concurrent modification. This is paramount in avoiding runtime errors and ensuring that Rust programs are memory-safe without needing a garbage collector.
The Borrow Checker:
The borrow checker is the component of the Rust compiler that enforces borrowing rules. It reviews all borrows to ensure that they adhere to Rust’s strict ownership principles. Here's how it ensures safety:
- No Data Races: By enforcing a rule that states you can have either one mutable reference or any number of immutable references, the borrow checker prevents data races at compile time.
- No Dangling References: The borrow checker ensures that references do not outlive the data they point to, which means you cannot have a reference to data that has been deallocated.
- No Invalid Memory Access: By tracking lifetimes, Rust prevents accessing uninitialized memory or memory that has been freed.
fn main() { let r; // ---------+-- 'a // | { // | let x = 5; // -+-- 'b | r = &x; // | | } // -+ | // | println!("r: {}", r); // | } // ---------+
In the above snippet, 'a is the lifetime of the reference r, and 'b is the lifetime of
the variable x. The Rust compiler, via its borrow checker, will not allow this program to
compile because the reference r lives longer than the variable x it refers to. The borrow
checker's intervention here prevents a class of bugs that are common in other programming languages,
where a reference or pointer to a stack-allocated variable escapes the scope of that variable.
This is a simple yet powerful illustration of lifetimes and the borrow checker at work.
2. Lifetime Annotations and Scoping
Syntax for Lifetime Annotations:
In Rust, lifetime annotations are denoted with an apostrophe (') followed by a name. The names
themselves are not significant; they are merely tags to refer to lifetimes. These annotations
indicate that the lifetime of a reference affects the code in some way. For example, 'a and
'b are common names for lifetime parameters.
Function Signatures with Lifetimes:
When defining functions that take references, you may need to annotate lifetimes to express how the lifetimes of the arguments relate to each other and to the lifetime of the return value. This is done to ensure that the data referenced by a returned reference is valid for as long as the reference itself. Here's an example of a function signature with lifetime annotations:
#![allow(unused)] fn main() { fn longest<'a>(x: &'a str, y: &'a str) -> &'a str { if x.len() > y.len() { x } else { y } } }
In this function, 'a is the lifetime that relates the lifetimes of both input references and
the output reference. The lifetime 'a will live at least as long as the function arguments.
Structs and Lifetimes:
For structs that hold references, lifetimes must be annotated to ensure the data referenced is valid for the life of the struct. This is crucial for structs because they can be used to create complex data types that reference each other.
#![allow(unused)] fn main() { struct Book<'a> { title: &'a str, author: &'a str, } impl<'a> Book<'a> { fn new(title: &'a str, author: &'a str) -> Self { Book { title, author } } } }
The lifetime 'a in the Book struct definition means that Book cannot outlive the references
it holds in title and author.
Lifetimes in the Context of Scopes:
Scopes play a critical role in lifetimes and references. A scope determines the lifetime of a variable, and a reference cannot outlive its referent's scope. When a variable goes out of scope, Rust automatically deallocates the memory, and all references to it become invalid. This behavior prevents dangling references and ensures memory safety.
Understanding scopes and how they impact references is vital in Rust. The compiler uses lifetimes to ensure that references do not live longer than the data they point to, which is determined by the scopes in which the data is valid. This way, Rust provides strong guarantees about reference validity, preventing a large class of bugs.
3. Borrowing and References in Rust
Mutable vs. Immutable References:
In Rust, you can have either a mutable reference or immutable references to a piece of data,
but not both at the same time. Immutable references (&T) allow read-only access to the data,
and you can have as many of these as you need. Mutable references (&mut T), however, allow
modifying the data they point to, and Rust enforces a strict rule that only one mutable reference
to a particular piece of data may exist at any one time in a particular scope. This ensures
that only one entity can change the data at a time, preventing data races.
Rules and Patterns of Borrowing:
The borrowing rules are enforced at compile time and dictate how references to data can be used and combined:
- One Mutable Reference: You can have one and only one mutable reference to a particular piece of data in a particular scope, which prevents simultaneous mutations that could lead to data races.
- Multiple Immutable References: You can have any number of immutable references because no one who is just reading the data can affect its integrity.
- Temporary Borrows: Rust allows temporary borrows, which are scoped borrows that let you create a reference within a smaller scope within a function, ensuring the reference cannot be used after the temporary scope ends.
fn main() { let mut data = 10; let r1 = &data; // immutable borrow starts here let r2 = &data; // another immutable borrow starts here // mutable borrow in the same scope would cause a compilation error println!("{} and {}", r1, r2); // immutable borrows are used here // immutable borrows end here }
Dangling References:
A dangling reference occurs when a reference points to memory that has been deallocated. Rust prevents this by ensuring that references never outlive the data they refer to. The borrow checker enforces this by analyzing the lifetimes of variables and ensuring that any references to those variables do not outlive them.
The Relationship Between Lifetimes and Borrowing:
Lifetimes are an integral part of the borrowing system. They allow the Rust compiler to track how long a reference should be valid and ensure it does not outlive the data it points to. This system of lifetimes and borrowing means that Rust can prevent memory safety errors like dangling pointers and data races without a garbage collector. Lifetimes provide the compiler with the information it needs to enforce borrowing rules, which are fundamental to ensuring that references are used safely.
4. Smart Pointers
Introduction to Pointers in Programming:
Pointers are a fundamental feature that enables programming languages to work with memory locations. In traditional languages like C, pointers are simply addresses that point to locations in memory. Rust, however, abstracts pointers into more sophisticated types known as 'smart pointers.' These smart pointers encapsulate additional metadata and capabilities, such as reference counting or mutability rules, and are guaranteed safe through Rust's ownership and borrowing rules.
Box<T>: Heap-allocated Values:
Box<T> is a smart pointer for heap allocation in Rust. It allows programmers to store data
on the heap rather than the stack, which is useful when you want to allocate a value that you
don't know the size of at compile time, or when you need to ensure that a value has a consistent
address in memory (like in the case of recursive data structures).
enum List<T> { Cons(T, Box<List<T>>), Nil, } use List::{Cons, Nil}; fn main() { let list = Cons(1, Box::new(Cons(2, Box::new(Cons(3, Box::new(Nil)))))); }
Rc<T>: Reference-counted Data Types:
Rc<T>, or 'reference counted', is a smart pointer that enables multiple owners of the same
data. It keeps track of the number of references to a value which determines whether or not
the value is still in use. When there are no references, the value can be automatically dropped.
Rc<T> is used when you want to allocate data on the heap for multiple parts of your program
to read, without introducing a borrowing system at compile time.
RefCell<T>: Internal Mutability:
RefCell<T> provides 'interior mutability' - a design pattern in Rust that allows you to mutate
data even when there are immutable references to that data, by borrowing at runtime instead
of compile time. It enforces the borrowing rules at runtime and can lead to a panic if the rules
are violated (e.g., if a borrow and a mutable borrow happen at the same time).
Combining Smart Pointers:
Smart pointers can be combined to provide more complex functionality. For instance, Rc<RefCell<T>>
allows for multiple owners of mutable data. It combines the ability of Rc<T> to have multiple
references with the mutability of RefCell<T>. This combination is commonly used in scenarios
where you want to have multiple parts of your program mutate shared data safely at runtime.
use std::rc::Rc; use std::cell::RefCell; fn main() { let value = Rc::new(RefCell::new(5)); let a = value.clone(); let b = value.clone(); *a.borrow_mut() += 1; *b.borrow_mut() += 1; println!("value: {:?}", value.borrow()); }
In the above example, value is wrapped in both Rc and RefCell, allowing it to be cloned
(creating multiple references) and mutated through the RefCell interface, despite the fact
that a and b are both immutable references to value. This demonstrates the utility of
combining smart pointers to suit specific needs in your Rust programs.
Lesson 13: Error Handling - Custom Error Types
Introduction
In the realm of real-world software development, especially in systems programming, the ability to accurately and effectively handle errors is not just an afterthought but a crucial aspect of building robust and reliable applications. Rust, known for its focus on safety and performance, also places a significant emphasis on explicit and thoughtful error handling. This approach contrasts with many other programming languages where error handling might be more implicit or even optional.
The necessity for custom error types in Rust arises from its rich type system and the need for expressive and comprehensive error reporting. Custom error types allow developers to create specific, meaningful error messages and categorizations, which are essential for diagnosing and resolving issues effectively. This approach is especially beneficial in large and complex applications where errors must be tracked and handled precisely.
Rust's commitment to explicit error handling is evident in its standard library, which includes robust features for handling recoverable and unrecoverable errors. The language encourages developers to think about the different failure scenarios upfront, leading to more resilient code. However, the standard library's error handling mechanisms sometimes fall short in terms of expressiveness and flexibility, particularly when dealing with complex application-specific errors. This gap is where custom error types come into play.
In the following sections, we will delve into the intricacies of creating custom error types in Rust,
utilizing powerful libraries like thiserror and anyhow. These libraries simplify the process of defining
and using custom error types, making your code more manageable and expressive. We will also cover best
practices in error handling that align with Rust's philosophy of explicitness and robustness.
1. Creating Custom Error Types in Rust
The Various Forms of Error Representations in Rust
In Rust, error types can be represented in multiple ways, each serving different use cases and complexities of error handling. Two primary forms are enum-based and struct-based error types.
-
Enum-based Error Types: Enumerations in Rust are particularly powerful for error handling due to their ability to encapsulate different types of errors into a single type. Each variant of the enum can represent a different kind of error, often with its associated data. This approach is highly suitable for scenarios where you have multiple distinct error conditions that your code needs to handle.
#![allow(unused)] fn main() { enum DatabaseError { ConnectionFailed(String), QueryError(String), NotFound, } } -
Struct-based Error Types: While enums are versatile for handling multiple error types, sometimes a more straightforward approach is needed. Struct-based error types are useful when you need to model a single kind of error, especially when it involves carrying detailed context or state. Structs can be more readable and easier to work with when dealing with a specific error scenario.
#![allow(unused)] fn main() { struct NetworkError { code: u32, message: String, retryable: bool, } }
Deciding on the Granularity of Custom Errors
When designing custom error types, an important consideration is the level of granularity.
-
Specific vs. Generic Errors: Balancing between specificity and generality in error types is crucial. Highly specific errors (e.g.,
FileNotFoundError) are excellent for precise error handling but can lead to an explosion of error types in a large application. Conversely, too generic errors (e.g.,IOError) might not provide enough information for effective debugging. The key is to strike a balance based on the context of the application. -
Thinking in Terms of Domain-Specific Errors: It's often beneficial to think in terms of domain-specific errors. This approach involves creating error types that are closely aligned with the application's domain, thereby making them more intuitive and relevant. For instance, in a web application, having error types like
AuthenticationErrororDatabaseConnectionErrorcan be more meaningful than using generic error types.
In the next sections, we'll explore the utilization of the thiserror and anyhow crates in Rust, which
facilitate the creation and management of custom error types, making the error handling process more streamlined
and effective.
2. Implementing the Error Trait
Understanding the std::error::Error Trait
In Rust, the std::error::Error trait is a crucial part of the error handling ecosystem. It provides
a standard interface for error types, enabling interoperability and a consistent way of handling errors
across different libraries and applications. Implementing this trait for your custom error types is vital
for leveraging Rust's full error handling capabilities.
Essential Methods in the Error Trait
The Error trait has several methods, but only two are necessary to mention:
-
fn source(&self) -> Option<&(dyn Error + 'static)>: This method returns an optional reference to the underlying cause of the error, if any. It's particularly useful for "chaining" errors, allowing users to understand the sequence of failures that led to the current error. -
fn description(&self) -> &str(Deprecated): Previously used for providing a short description of the error, but now it's recommended to use theDisplaytrait for this purpose instead. Sometimes, this method is used to prove a more complex string description.
Rust's standard library also provides default implementations for other methods of the Error trait,
which you can override if needed.
Implementing the Trait for Custom Error Types
Implementing the Error trait for custom error types involves a few steps:
-
Providing Context and Details: Utilize the
Displaytrait to provide human-readable error messages. This trait is often used in conjunction with theErrortrait to describe the error.#![allow(unused)] fn main() { use std::fmt; impl fmt::Display for DatabaseError { fn fmt(&self, f: &mut fmt::Formatter) -> fmt::Result { match self { DatabaseError::ConnectionFailed(msg) => write!(f, "Connection failed: {}", msg), DatabaseError::QueryError(msg) => write!(f, "Query error: {}", msg), DatabaseError::NotFound => write!(f, "Record not found"), } } } } -
Implementing
ErrorTrait: After implementingDisplay, you can implementError. Often, this implementation is straightforward, especially if your error type doesn't need to chain to another error.#![allow(unused)] fn main() { impl std::error::Error for DatabaseError {} }
Benefits of Implementing the Error Trait
Implementing the std::error::Error trait offers several advantages:
-
Compatibility with Other Error Handling Tools and Patterns: Your custom error types become compatible with Rust's broader error handling ecosystem. This compatibility allows your errors to be used seamlessly with standard library functions and third-party crates that expect or operate on
std::error::Error. -
Improved Debugging and Diagnostics: Implementing the
Errortrait, especially when combined with theDisplaytrait, provides clearer and more informative error messages. This clarity is invaluable for debugging and resolving issues more efficiently.
In the next sections, we will explore the use of thiserror and anyhow crates for even more streamlined
error type definitions and handling.
3. Error Handling Best Practices
Structuring Errors with Layers
Effective error handling in Rust often involves structuring errors into various layers that reflect different levels of abstraction:
-
Library-Level Errors: These errors are specific to the internal workings of a library. They should be detailed and precise, providing enough information for library maintainers to diagnose issues.
-
Application-Level Errors: These errors are more generic and are designed for consumption by the application using the library. They often abstract away the lower-level details and provide a context that is relevant at the application level.
-
User-Facing Errors (Optional): In applications with a user interface, it's sometimes necessary to convert technical error messages into something more user-friendly. These errors should be concise and understandable to end users.
This layered approach ensures that each component or layer of your application deals with errors relevant to its level of abstraction, thereby making error handling more organized and maintainable.
Providing Meaningful Error Messages
Meaningful error messages are key to effective debugging and user comprehension:
-
For Developers: Include detailed information like context, state, or values that led to the error. This approach aids in diagnosing and fixing issues quickly.
-
For Users: If the error is user-facing, the message should be clear, concise, and devoid of technical jargon. It should ideally guide the user towards possible solutions or next steps.
Using Result<T, E> Effectively
The Result<T, E> enum is a cornerstone of error handling in Rust. It's essential to use its capabilities effectively:
-
Combinators: Rust provides various combinators for handling
Resulttypes, such asmap_err,unwrap_or, and others. These combinators allow for more concise and expressive error handling.#![allow(unused)] fn main() { let result = some_operation().map_err(|e| CustomError::new(e.to_string())); } -
Error Conversion: Converting between different error types is common. Using the
?operator can automatically convert errors if their types implement theFromtrait for the target error type.
Avoiding Over-Generalization of Errors
While Rust allows for using broad error types like Box<dyn Error>, it's essential to avoid over-generalizing
errors:
-
Use Specific Errors When Possible: Specific errors provide more context and make debugging easier. Reserve broad error types for cases where the error can genuinely originate from multiple unpredictable sources.
-
When to Use
Box<dyn Error>: This approach is suitable in top-level functions or when interfacing with multiple libraries that might produce a wide range of errors. It's a trade-off between flexibility and specificity.
By following these best practices, you can leverage Rust's robust error handling features to build more
reliable and maintainable applications. Next, we will delve into the use of the thiserror and anyhow
libraries to further enhance the error handling experience in Rust.
4. Error Libraries: Anyhow & Thiserror
Anyhow
-
Introduction and Use-Case Scenarios:
Anyhowis a flexible error handling library designed for applications. It's particularly useful when you need to handle a variety of error types without defining and managing numerous specific error types.- Ideal for application-level code where the focus is on quick and easy error handling, and the detailed categorization of each error is not as critical.
-
Simplified Error Handling for Applications:
- With
Anyhow, you can easily wrap and propagate errors without having to define custom error types. It allows for using the?operator on different error types without explicit conversions. - This simplicity aids in writing cleaner code with less boilerplate, especially in scenarios where the exact type of error is less important than the fact an error occurred.
- With
-
Features Like Wrapping Errors, Context Addition, and More:
-
Anyhowprovides capabilities to wrap errors, maintaining the original error while allowing you to add additional context or a new error message. -
The library supports backtrace generation, making it easier to pinpoint where errors originate in the code.
-
Example usage:
#![allow(unused)] fn main() { use anyhow::{Result, Context}; fn some_operation() -> Result<()> { another_function().context("Failed to complete the operation")?; Ok(()) } }
-
Thiserror
-
Introduction and When to Use:
Thiserroris designed for library authors and focuses on defining and managing custom error types with ease.- It's most suitable when you need to create well-defined, descriptive error types, often in libraries or more complex application logic.
-
Deriving Error Implementations Automatically:
- One of the key features of
Thiserroris its ability to derive implementations of theErrortrait automatically. This feature significantly reduces the boilerplate code typically associated with defining custom error types. - The
#[derive(Error, Debug)]attribute simplifies the creation of error types, automatically implementing the necessary traits.
- One of the key features of
-
Combining with Custom Error Types for Richer Error Handling:
-
Thiserrorexcels when combined with custom error types, as it allows for detailed, context-rich error descriptions. -
It supports error chaining and source propagation, enabling comprehensive error reporting and analysis.
-
Example usage:
#![allow(unused)] fn main() { use thiserror::Error; #[derive(Error, Debug)] enum MyError { #[error("failed to read file `{0}`")] ReadError(String), #[error(transparent)] IOError(#[from] std::io::Error), // ... } }
-
By leveraging Anyhow and Thiserror, Rust developers can choose the right tool for the task at hand,
balancing between simplicity and precision in error handling. The next sections will continue to build
upon these concepts, integrating them into practical coding scenarios.
Conclusion
Emphasizing the Importance of Structured Error Handling in Software Reliability
As we conclude Lesson 13 on "Error Handling: Custom Error Types" in Rust, it's imperative to reiterate the critical role that structured and thoughtful error handling plays in the development of reliable and robust software. Rust, with its strong emphasis on safety and correctness, encourages a disciplined approach to error handling, which is not merely about preventing crashes or failures but about creating systems that are predictable, debuggable, and resilient.
Custom error types and structured error handling are not just best practices; they are essential tools in the Rust programmer's toolkit. They enable you to clearly communicate the intent of your code, handle unexpected conditions gracefully, and provide meaningful feedback to other developers and end-users. This clarity and precision in error reporting and handling significantly contribute to the overall quality and maintainability of your software.
Encouraging the Use of Available Libraries to Simplify Error Handling Without Losing Expressiveness
This lesson highlighted the power and flexibility of libraries like anyhow and thiserror. These libraries
are not just conveniences; they are powerful abstractions that allow Rust developers to handle errors
more effectively and with less boilerplate. Anyhow simplifies error handling in application code, making
it easier to write and maintain. In contrast, thiserror shines in library development, providing a declarative
way to define custom error types that are both expressive and easy to manage.
The use of these libraries, along with adherence to best practices like structuring errors with layers,
providing meaningful error messages, using Result<T, E> effectively, and avoiding over-generalization,
empowers you to handle errors in a way that upholds the high standards of reliability and robustness that
Rust is known for.
As you continue to explore and master Rust, remember that effective error handling is a hallmark of high-quality Rust code. It's not just about handling the "happy path" but also about anticipating and gracefully managing the myriad ways in which things can go awry. This mindset, combined with the powerful tools and features Rust provides, will enable you to build applications and libraries that stand the test of time and usage.
Homework
In this assignment, you will be enhancing the robustness of your client-server chat application by
introducing comprehensive error handling. By leveraging the anyhow and thiserror crates, you'll
simplify the process and ensure more accurate, user-friendly error reporting.
Description:
- Integrate Anyhow and Thiserror:
- Introduce the
anyhowcrate to manage errors in a straightforward, flexible way. This crate is especially useful for handling errors that don't need much context or are unexpected. - Utilize the
thiserrorcrate to create custom, meaningful error types for your application. This is particularly beneficial for errors where you need more context and structured data.
- Introduce the
Use these two crates at your discretion.
-
Error Handling in the Server:
- Ensure that your server accurately reports errors to the client in a strongly-typed manner. Any operation that can fail should communicate its failure reason clearly and specifically.
-
Client-Side Error Management:
- Modify the client to handle and display error messages received from the server appropriately. Ensure that these messages are user-friendly and informative.
-
Refactoring for Error Handling:
- Review your existing codebase for both the client and server. Identify areas where error handling
can be improved and implement changes using
anyhowandthiserror. - Pay special attention to operations that involve network communication, file handling, and data parsing, as these are common sources of errors.
- Review your existing codebase for both the client and server. Identify areas where error handling
can be improved and implement changes using
-
Documentation and Testing:
- Test various failure scenarios to ensure that errors are handled gracefully and the error messages are clear and helpful.
Submission:
- After integrating advanced error handling in your application, commit and push your changes to your GitHub repository.
- Submit the link to your updated repository on the classroom.
Deadline:
- This assignment should be completed and submitted by Tuesday, November 28, 2023.
Enhancing your application with proper error handling not only makes it more robust and user-friendly
but also prepares you for handling complex scenarios in real-world software development. Should you
encounter any challenges, remember to refer to the documentation of the anyhow and thiserror crates
and feel free to reach out.
Good luck :D
Lesson 14: Async Programming with Futures and Async/course/Await
Lesson 15: Async Programming - The Tokio Framework
Introduction
Overview of Asynchronous Programming in Rust
Asynchronous programming is a paradigm that allows for non-blocking operations, enabling programs to perform
multiple tasks concurrently. In Rust, this is achieved through the async and .await syntax, introduced
in Rust 1.39. This feature allows functions to be defined as asynchronous (async fn), returning a Future.
A Future is a core trait representing a value that may not be immediately available. To efficiently
manage these asynchronous operations, Rust employs executors, which are responsible for polling futures to completion.
The Significance of Tokio in Rust's Async Ecosystem
Tokio stands out as a prominent runtime in Rust's async ecosystem, providing a multi-threaded, work-stealing scheduler. It is designed to efficiently run asynchronous tasks, I/O operations, and timers. Tokio is not just an executor; it's a comprehensive framework offering utilities to create both simple and complex network applications. It includes:
- An I/O driver built on top of
miofor event-driven, non-blocking I/O. - Utilities for asynchronous networking and inter-task communication.
- Time-based functionalities, such as delays and intervals.
Tokio's significance lies in its ability to leverage Rust's safety and performance traits, offering a robust platform for developing high-performance asynchronous applications. It's widely used in web servers, database clients, and various network services, illustrating its versatility and reliability in handling asynchronous operations.
In the following sections, we will delve deeper into Tokio's components, its usage patterns, and practical code examples to demonstrate its capabilities in real-world scenarios.
1. Tokio's Core Components
Tasks
-
Definition, Importance, and Tokio's Approach to Task Management
Tasks in Tokio are analogous to lightweight threads, executingasyncblocks of code. They enable concurrent, non-blocking operations, essential in I/O-bound applications. In Tokio, tasks are built on Rust'sFuturetrait and are scheduled to run when the resources they await are ready.Example: Creating and Spawning a Task in Tokio
#[tokio::main] async fn main() { tokio::spawn(async { // Perform some asynchronous work println!("Task is running"); }); // Other code can run concurrently here } -
Task Scheduling and Execution in Tokio's Architecture
Tokio employs a work-stealing scheduler to distribute tasks across threads efficiently.Example: Work-Stealing in Action
#![allow(unused)] fn main() { // This code example is conceptual and for illustrative purposes // It demonstrates the idea of work-stealing, not actual Tokio API usage. tokio::spawn(async { /* Task 1 */ }); tokio::spawn(async { /* Task 2 */ }); // If one thread becomes idle, it can steal and execute tasks from others. }
Reactors
-
The Concept of a Reactor in Async Programming
Reactors monitor I/O resources for readiness and notify relevant tasks. This is key for efficient I/O handling. -
How Tokio Implements an Event-Driven Model with Reactors
Tokio's reactors use OS-level events to manage I/O readiness notifications.Example: Using a reactor in Tokio (File)r
// Tokio's reactor runs implicitly in the background when using the tokio runtime. #[tokio::main] async fn main() { // When performing async I/O operations here, Tokio's reactor is engaged. let data = tokio::fs::read("some_file.txt").await.unwrap(); println!("Read data: {:?}", data); }
Executors
-
Executors in Tokio Explained
Executors drive tasks to completion by polling them. -
Comparison of Threaded vs Current Thread Executors in Tokio
- Multi-Threaded Executors: Ideal for parallel task execution.
- Current Thread Executors: Better for lighter workloads and more control.
Example: Multi-Threaded Executor
#[tokio::main] // Defaults to a multi-threaded executor async fn main() { // Tasks spawned here can run on different threads }Example: Current Thread Executor
#[tokio::main(flavor = "current_thread")] async fn main() { // Tasks spawned here will run on the current thread }If you want to configure how much threads you want your executor to have, you can change it with the attribute:
#![allow(unused)] fn main() { #[tokio::main(flavor = "multi_thread", worker_threads = 10)] }
You can also create an executor manually:
fn main() { tokio::runtime::Builder::new_multi_thread() .enable_all() .build() .unwrap() .block_on(async { println!("Hello world"); }) }
In the following sections, we will explore more intricate functionalities and advanced usage scenarios within the Tokio framework.
2. Tokio's IO Library
Async Read and Write
-
Synchronous vs Asynchronous IO: Differences and Implications
In synchronous IO, operations like reading from or writing to a file block the executing thread until the operation completes. This can be inefficient, especially in IO-bound applications where such operations are frequent. In contrast, asynchronous IO operations allow the thread to perform other tasks while waiting for IO operations to complete, significantly improving resource utilization and throughput.Example: Synchronous Read (Standard Rust)
#![allow(unused)] fn main() { use std::fs::File; use std::io::Read; let mut file = File::open("some_file.txt").unwrap(); let mut contents = String::new(); file.read_to_string(&mut contents).unwrap(); // The thread is blocked until the file is fully read. }Example: Asynchronous Read (Tokio)
use tokio::io::AsyncReadExt; #[tokio::main] async fn main() { let mut file = tokio::fs::File::open("some_file.txt").await.unwrap(); let mut contents = Vec::new(); file.read_to_end(&mut contents).await.unwrap(); // Other async operations can run while waiting for the file to be read. } -
Building Async Read and Write Operations Using Tokio
Tokio provides async versions of standard read and write operations, allowing for non-blocking IO in async applications.Example: Asynchronous Write (Tokio)
use tokio::io::AsyncWriteExt; #[tokio::main] async fn main() { let mut file = tokio::fs::File::create("output.txt").await.unwrap(); file.write_all(b"Hello, world!").await.unwrap(); // The file write operation is non-blocking. }
Async Networking
-
Creating Async TCP/UDP Servers and Clients
Tokio excels in building high-performance network applications with support for both TCP and UDP protocols. Asynchronous networking allows handling many connections simultaneously without the overhead of thread-per-connection.Example: Asynchronous TCP Server (Tokio)
use tokio::net::TcpListener; use tokio::io::{AsyncReadExt, AsyncWriteExt}; #[tokio::main] async fn main() { let listener = TcpListener::bind("127.0.0.1:8080").await.unwrap(); loop { let (mut socket, _) = listener.accept().await.unwrap(); tokio::spawn(async move { let mut buf = [0; 1024]; loop { let n = match socket.read(&mut buf).await { Ok(n) if n == 0 => return, Ok(n) => n, Err(_) => return, }; if socket.write_all(&buf[0..n]).await.is_err() { return; } } }); } } -
Managing Concurrent Connections Effectively
Tokio's asynchronous model is particularly beneficial for managing numerous concurrent network connections. By spawning tasks for each connection, the server can handle multiple connections concurrently without blocking.Example: Handling Multiple TCP Connections Concurrently (Tokio)
use tokio::net::TcpListener; use tokio::io::{AsyncReadExt, AsyncWriteExt}; #[tokio::main] async fn main() { // Bind the server to a local address let listener = TcpListener::bind("127.0.0.1:8080").await.unwrap(); println!("Server running on 127.0.0.1:8080"); loop { // Accept incoming connections let (mut socket, addr) = match listener.accept().await { Ok((socket, addr)) => (socket, addr), Err(e) => { eprintln!("Failed to accept connection: {}", e); continue; } }; println!("New connection from {}", addr); // Spawn a new task for each connection tokio::spawn(async move { let mut buffer = [0; 1024]; // Read data from the socket loop { match socket.read(&mut buffer).await { Ok(0) => { // Connection was closed println!("Connection closed by {}", addr); return; } Ok(n) => { // Echo the data back to the client if let Err(e) = socket.write_all(&buffer[..n]).await { eprintln!("Failed to write to socket: {}", e); return; } } Err(e) => { eprintln!("Failed to read from socket: {}", e); return; } } } }); } }
Tokio's IO capabilities are integral to building efficient, scalable asynchronous applications in Rust. In the following sections, we will further explore advanced features and patterns in Tokio's async programming.
3. Tokio select! Macro
Understanding select!
-
The Functionality and Significance of the
select!Macro
Theselect!macro in Tokio is a powerful tool for handling multiple asynchronous operations concurrently. It allows a program to "select" over a set of different futures, effectively waiting for the first one to complete. This is particularly useful in scenarios where you need to respond to whichever operation completes first, without blocking on each individually.Example: Basic Usage of
select!use tokio::select; use tokio::time::{sleep, Duration}; #[tokio::main] async fn main() { let future1 = sleep(Duration::from_secs(5)); let future2 = sleep(Duration::from_secs(10)); select! { _ = future1 => println!("Future 1 completed first"), _ = future2 => println!("Future 2 completed first"), } }
Practical Applications
-
Managing Multiple Futures and Timeouts in Async Workflows
select!is ideal for managing different futures, especially when dealing with I/O operations, timers, or any combination of asynchronous events. It's also useful for implementing timeouts for certain operations.Example: Using
select!with a Timeoutuse tokio::time::{sleep, timeout, Duration}; #[tokio::main] async fn main() { let long_running_future = sleep(Duration::from_secs(30)); match timeout(Duration::from_secs(10), long_running_future).await { Ok(_) => println!("Operation completed within the timeout"), Err(_) => println!("Operation timed out"), } } -
Addressing Conditional Async Operations
select!can be used to handle conditional asynchronous logic, where the completion of certain tasks may depend on external or concurrent factors.Example: Conditional Operation with
select!// Example demonstrating conditional operation based on external factors // using `select!`. use tokio::select; use tokio::sync::mpsc; use tokio::time::{sleep, Duration}; #[tokio::main] async fn main() { let (tx, mut rx) = mpsc::channel(32); let timeout_duration = Duration::from_secs(5); // Simulate an external event sending a message tokio::spawn(async move { sleep(Duration::from_secs(2)).await; tx.send("Message from external event").await.unwrap(); }); select! { Some(message) = rx.recv() => { // Handle the message received from the channel println!("Received message: {}", message); } _ = sleep(timeout_duration) => { // Handle timeout println!("No message received within {} seconds; operation timed out.", timeout_duration.as_secs()); } } }
Best Practices and Patterns
-
Efficient and Clean Code Using
select!
When usingselect!, it's important to structure code for clarity and efficiency. Avoid overly complex select blocks and consider breaking down complicated logic into simpler, more manageable parts. -
Avoiding Common Pitfalls in Using
select!
A common pitfall withselect!is the accidental creation of biased selections, where one future is unintentionally given priority over others. Ensure that futures are structured in a way that avoids such biases unless explicitly intended.Example: Another Use of
select!// Demonstrates a balanced approach in using `select!` to avoid biased selections. use tokio::select; use tokio::time::{sleep, Duration, Instant}; #[tokio::main] async fn main() { let future1 = sleep(Duration::from_secs(3)); let future2 = sleep(Duration::from_secs(1)); let future3 = sleep(Duration::from_secs(2)); let start_time = Instant::now(); loop { select! { _ = future1 => { println!("Future 1 completed after {:?}", start_time.elapsed()); break; } _ = future2 => { println!("Future 2 completed after {:?}", start_time.elapsed()); break; } _ = future3 => { println!("Future 3 completed after {:?}", start_time.elapsed()); break; } } } }
The select! macro is a versatile tool in the Tokio toolkit, enabling complex and responsive asynchronous
logic in Rust applications. The next sections will further explore advanced Tokio features and real-world
application scenarios.
4. Async Database Libraries
Overview
- Challenges of Traditional Blocking Database Operations
In traditional database interactions, operations like queries and transactions are blocking, meaning they hold up the execution thread until completion. This can lead to inefficiencies in resource usage, especially in applications requiring high concurrency. Blocking operations are detrimental in an asynchronous environment, as they counteract the benefits of non-blocking, concurrent execution.
Integrating sqlx with Tokio
-
Configuring an Asynchronous Database Connection
sqlxis a popular asynchronous, pure-Rust database library that integrates seamlessly with Tokio. It supports various databases like PostgreSQL, MySQL, SQLite, and more. Configuring an async database connection withsqlxinvolves setting up the database client with appropriate connection parameters.Example: Async Database Connection with
sqlxuse sqlx::postgres::PgPoolOptions; #[tokio::main] async fn main() { let pool = PgPoolOptions::new() .max_connections(5) .connect("postgres://user:password@localhost/database") .await .unwrap(); // Use the connection pool for async database operations } -
Performing Async Queries and Managing Results
Withsqlx, executing asynchronous queries and handling their results is straightforward. It leverages Rust's type system for compile-time query validation, enhancing safety and reliability.Example: Async Query with
sqlx#![allow(unused)] fn main() { use sqlx::postgres::PgPool; async fn fetch_data(pool: PgPool) { let rows = sqlx::query!("SELECT id, name FROM users") .fetch_all(&pool) .await .unwrap(); for row in rows { println!("User ID: {}, Name: {}", row.id, row.name); } } }
Alternative Libraries
-
Exploration of Other Async Database Libraries Compatible with Tokio
Besidessqlx, there are other asynchronous database libraries likediesel(with async support),tokio-postgres, andmobc. Each offers different features and trade-offs, suitable for various use cases. -
Criteria for Selecting an Appropriate Library
When choosing an async database library, consider factors like database compatibility, feature set (e.g., query builders, connection pooling), performance characteristics, community support, and ease of integration with your existing async framework (like Tokio).Example: Comparison Table or Criteria List
sqlx: Compile-time query validation, broad database support.diesel: Robust query builder, extensive feature set.tokio-postgres: Direct, low-level access to PostgreSQL.mobc: Generic connection pooling with async support.
In the next sections, we will delve into advanced usage patterns and tips for optimizing asynchronous database interactions using Tokio and these libraries.
5. Advanced Tokio Features
Futures and Streams
-
In-depth Look at Implementing Futures and Streams in Tokio
Futures and streams are fundamental concepts in asynchronous programming with Tokio. A future represents a single asynchronous computation that will eventually complete with a value. Streams, on the other hand, are similar to futures but can yield multiple values over time.Implementing Custom Futures and Streams Implementing custom futures and streams involves defining how they are polled. This typically requires implementing the
FutureorStreamtrait and defining thepollmethod.Example: Implementing a Custom Future
#![allow(unused)] fn main() { use std::pin::Pin; use std::task::{Context, Poll}; use std::future::Future; struct MyFuture; impl Future for MyFuture { type Output = String; fn poll(self: Pin<&mut Self>, cx: &mut Context<'_>) -> Poll<Self::Output> { // Implementation details... Poll::Ready("Completed".to_string()) } } }Example: Implementing a Custom Stream
#![allow(unused)] fn main() { use std::pin::Pin; use std::task::{Context, Poll}; use tokio_stream::Stream; struct MyStream; impl Stream for MyStream { type Item = i32; fn poll_next(self: Pin<&mut Self>, cx: &mut Context<'_>) -> Poll<Option<Self::Item>> { // Implementation details... Poll::Ready(Some(42)) } } } -
Practical Examples and Use Cases
Futures and streams are extensively used for handling asynchronous I/O operations, timers, and other events that occur over time. Streams are particularly useful in scenarios like processing incoming network data, where the data arrives in chunks over time.
Error Handling in Async Contexts
-
Strategies for Effective Error Handling in Async Tokio Applications
Error handling in asynchronous applications can be more complex due to the nature of concurrent operations. There is nothing all that special - except that we now have an extra case to consider - should your future return a Result, or should you return a Result with a future in the Ok() variant?Example: Error Handling with Futures (Same as with sync code)
#[tokio::main] async fn main() { let result = async_operation().await; match result { Ok(value) => println!("Success: {}", value), Err(e) => eprintln!("Error: {}", e), } } async fn async_operation() -> Result<i32, &'static str> { // Some async logic... Err("An error occurred") } -
Examples of Common Error Scenarios and Solutions
Dealing with timeouts, connection errors, and data parsing issues are common in async programming. Employing timeouts usingtokio::time::timeout, handling connection issues gracefully, and safely parsing incoming data are crucial skills.Example: Handling Timeouts
use tokio::time::{timeout, Duration}; #[tokio::main] async fn main() { match timeout(Duration::from_secs(5), async_operation()).await { Ok(Ok(value)) => println!("Completed: {}", value), Ok(Err(e)) => eprintln!("Operation error: {}", e), Err(_) => eprintln!("Operation timed out"), } } async fn async_operation() -> Result<String, &'static str> { // Simulate long-running operation Err("Failed operation") }
In the next sections, we will continue exploring advanced topics, including interaction with other async libraries, optimizing Tokio applications for performance, and integrating Tokio with synchronous code.
6. Building Real-World Applications with Tokio
Case Studies
-
Analysis of Real-World Applications Built with Tokio
Tokio has been the foundation for numerous high-performance applications, ranging from web servers to database clients. Analyzing these applications can provide valuable insights into effective async programming patterns.Example: Web Server Using Hyper and Tokio Hyper, a fast HTTP implementation, often uses Tokio for its async runtime. Web servers built with Hyper and Tokio benefit from non-blocking I/O and efficient connection handling, ideal for high-load environments.
Example: Real-time Data Processing Application Applications requiring real-time data processing, such as financial tickers or chat servers, leverage Tokio's ability to handle high volumes of concurrent data streams efficiently.
-
Lessons Learned and Best Practices from Existing Projects
Common lessons include the importance of proper task sizing (neither too big nor too small), the effective use of Tokio's synchronization primitives (like Mutex and channels), and the balance between concurrency and parallelism.
Performance Optimization
-
Techniques for Optimizing Tokio-based Applications
Efficient async programming in Tokio often involves minimizing task switching and ensuring that I/O operations are truly non-blocking. It's also crucial to correctly configure the Tokio runtime, such as choosing the right executor and tuning thread pool sizes.Example: Optimizing Task Sizes and Concurrency Ensuring that async tasks are appropriately sized and not overly granular can lead to more efficient execution and less overhead.
-
Profiling and Benchmarking Tools for Tokio
Tools likeperf,flamegraph, and Tokio's own tracing facilities can be used to profile and benchmark Tokio applications. These tools help identify performance bottlenecks, such as excessive polling, and provide insights into the runtime behavior of async tasks.Example: Using
flamegraphto Profile a Tokio Application Generating a flamegraph of a Tokio application can visually represent where the application spends most of its time, helping to pinpoint inefficiencies.
In the final section, we will summarize the key takeaways from this lesson and provide guidance for further learning and exploration in the realm of asynchronous programming with Tokio in Rust.
7. Integrating Tokio with Other Async Frameworks
Interoperability Challenges and Solutions
-
Understanding and Managing Compatibility Between Tokio and Other Async Runtimes
Integrating Tokio with other async frameworks (like async-std or smol) can present challenges, primarily due to differences in their underlying executors and I/O models. These differences can cause compatibility issues, especially when trying to run tasks or futures that depend on specific runtime characteristics.To manage these challenges, it's essential to understand the core differences between these runtimes. For instance, Tokio uses a work-stealing scheduler and its own reactor for I/O, which might not be compatible with the executors or I/O mechanisms of other frameworks.
Strategies for Interoperability:
- Runtime Bridging: Using compatibility layers or bridges that allow futures from one runtime to be executed on another. For example,
tokio-compatcan help run Tokio futures on other executors. - Selective Task Spawning: Carefully choosing where to spawn tasks based on their runtime dependencies, ensuring that each task runs on an executor that supports its requirements.
- Avoiding Runtime-Specific Features: When designing libraries or components intended for cross-runtime use, avoid using features specific to a single runtime, such as Tokio's I/O or time utilities.
- Runtime Bridging: Using compatibility layers or bridges that allow futures from one runtime to be executed on another. For example,
-
Practical Examples of Cross-Runtime Integrations
Here’s an example of how to use a Tokio-based library in an async-std application, highlighting the use of a compatibility layer.Example: Using Tokio-based Library in async-std Environment
use async_std::task; use tokio_compat_02::FutureExt; // Compatibility layer async fn tokio_based_operation() { // Operation that requires Tokio runtime } fn main() { task::block_on(async { tokio_based_operation().compat().await; }); }In this example,
tokio_compat_02::FutureExtis used to adapt a Tokio-based operation so that it can run within an async-std task. This demonstrates a practical approach to integrating different async runtimes, ensuring broader compatibility and flexibility in application design.
This lesson on integrating Tokio with other async frameworks concludes our exploration into advanced aspects of asynchronous programming with Tokio in Rust. The skills and knowledge gained here provide a strong foundation for building robust, efficient, and interoperable async applications.
Conclusion
Summarizing the Comprehensive Capabilities of Tokio in Rust's Async Landscape
Tokio has established itself as a cornerstone in Rust's asynchronous programming landscape, offering a broad range of capabilities essential for modern, high-performance applications. Throughout this course, we've explored various facets of Tokio, including:
- Core Components: Tokio's architecture with tasks, reactors, and executors provides a robust foundation for building async applications.
- IO Library: Asynchronous read/write operations and networking capabilities highlight Tokio's strengths in handling IO-bound tasks efficiently.
select!Macro: This powerful feature enables handling multiple asynchronous events concurrently, enhancing the responsiveness and flexibility of applications.- Async Database Libraries: Integrating Tokio with async database libraries like
sqlxshowcases its versatility in managing asynchronous database operations. - Advanced Features: We delved into implementing custom futures and streams and addressed error handling in async contexts, underscoring Tokio's depth in facilitating complex async workflows.
- Real-World Applications: Case studies and performance optimization techniques provided insights into practical applications and best practices in leveraging Tokio's capabilities.
- Interoperability with Other Async Frameworks: We examined the challenges and solutions in integrating Tokio with different async runtimes, emphasizing its adaptability.
Other Libraries in the Tokio Ecosystem
Tokio's ecosystem encompasses a range of libraries that complement and extend its core functionalities:
- Hyper: A fast and safe HTTP implementation for Rust, often used with Tokio for building web servers and clients.
- Tonic: A gRPC over HTTP/2 implementation designed for use with Tokio, facilitating high-performance remote procedure calls.
- Mio: A low-level I/O library that forms the basis of Tokio's reactor, handling non-blocking I/O operations.
- Tokio-Compat: Provides compatibility layers for integrating with other async runtimes and for bridging different versions of Tokio.
- Tracing: A framework for instrumenting Rust programs to collect structured, event-based diagnostics, particularly useful in asynchronous contexts.
In conclusion, Tokio offers a comprehensive, efficient, and robust framework for asynchronous programming in Rust. Its wide array of features, coupled with an extensive ecosystem, makes it a top choice for developers looking to harness the power of async programming in Rust.
Homework
This assignment takes your client-server chat application to the next level by rewriting it to use the asynchronous paradigm with Tokio. Additionally, you'll start integrating a database to store chat and user data, marking a significant advancement in your application's complexity and functionality.
Description:
-
Asynchronous Rewriting Using Tokio:
- Refactor both the client and server components of your application to work asynchronously, using Tokio as the foundation.
- Ensure all I/O operations, network communications, and other latency-sensitive tasks are handled using Tokio's asynchronous capabilities.
-
Database Integration:
- Choose a database framework like
sqlx,diesel, or any other of your preference to integrate into the server for data persistence. - Design the database to store chat messages and user data effectively.
- Choose a database framework like
-
User Identification:
- Implement a mechanism for clients to identify themselves to the server. This can range from a simple identifier to a more secure authentication process, depending on your preference and the complexity you wish to introduce.
- Ensure that the identification process is seamlessly integrated into the asynchronous workflow of the client-server communication.
-
Security Considerations:
- While focusing on the asynchronous model and database integration, keep in mind basic security practices for user identification and data storage.
- Decide on the level of security you want to implement at this stage and ensure it is appropriately documented.
-
Refactoring for Asynchronous and Database Functionality:
- Thoroughly test all functionalities to ensure they work as expected in the new asynchronous setup.
- Ensure the server's interactions with the database are efficient and error-handled correctly.
-
Documentation and Comments:
- Update your
README.mdto reflect the shift to asynchronous programming and the introduction of database functionality. - Document how to set up and run the modified application, especially any new requirements for the database setup.
- Update your
Submission:
- After completing the asynchronous rewrite and integrating the database, commit and push your updated application to your GitHub repository.
- Make sure your repository's
README.mdis updated with all the necessary instructions and information, and keep the repository public. - Share the link to your repository on our class submission platform.
Deadline:
- The deadline for this assignment is Monday, December 4, 2023.
Transitioning to an asynchronous model and introducing database integration are significant steps in developing scalable and efficient applications. These changes will enhance your application's performance and lay the groundwork for more advanced features and functionalities. As always, if you encounter any difficulties or have questions, please don't hesitate to ask for help.
Introduction
In software development, the roles of testing and documentation are paramount. They ensure that code is not only functional but also maintainable, understandable, and reusable. This lesson delves into the significance of these two aspects and explores Rust's built-in tools designed to facilitate efficient testing and comprehensive documentation.
-
Testing: Ensures that your code performs as expected, helps to prevent regressions, and boosts confidence in the stability of your software. In Rust, testing is treated as a first-class feature, integrated seamlessly into the language and its toolchain.
-
Documentation: Vital for understanding the purpose and usage of your code. Good documentation is particularly crucial in open-source projects and large codebases. Rust emphasizes documentation quality, offering robust tools like
cargo docto automatically generate HTML documentation from your code comments.
In the following sections, we will explore these concepts in greater detail, providing insights into the best practices and advanced features offered by Rust for effective testing and documentation.
1. Writing Tests in Rust
The Philosophy of Testing in Rust
In Rust, testing is not just a practice but a philosophy. The language and its ecosystem encourage you to test your code thoroughly. Rust's design choices, such as its type system and ownership model, naturally reduce certain types of bugs, but testing remains crucial for ensuring logic correctness, especially in complex applications.
Unit Tests vs. Integration Tests
-
Unit Tests: Focus on small parts of the codebase in isolation, typically individual functions or modules. In Rust, unit tests are conventionally located in the same file as the code they test, often at the bottom, inside a
testsmodule annotated withcfg(test)to ensure they're not included in the compiled result unless testing.#![allow(unused)] fn main() { #[cfg(test)] mod tests { #[test] fn test_function() { //... } } } -
Integration Tests: Test the behavior of your code as a whole, or test interactions between different pieces of your codebase. These are typically placed in a dedicated
testsdirectory at the top level of your project. Each file in this directory is compiled as a separate crate.src/ lib.rs tests/ integration_test.rs
Setting Up and Structuring Test Functions
-
The
#[test]Attribute: This attribute marks a function as a test case, indicating to the Rust compiler that it should be run when you execute your test suite.#![allow(unused)] fn main() { #[test] fn test_addition() { assert_eq!(2 + 2, 4); } } -
Assertion Macros: Rust provides several macros to assert conditions in tests:
-
assert!: Ensures a condition is true. If it's false, the test fails.#![allow(unused)] fn main() { assert!(1 + 1 == 2); } -
assert_eq!: Tests for equality between two expressions.#![allow(unused)] fn main() { assert_eq!(vec![1, 2], vec![1, 2]); } -
assert_ne!: Tests for inequality.#![allow(unused)] fn main() { assert_ne!("Hello", "world"); }
-
By understanding and utilizing these concepts and tools, you can ensure your Rust code is not only functionally robust but also well-tested and reliable.
2. Using the Built-in Testing Framework
Rust's built-in testing framework is a powerful tool that simplifies the process of writing and running tests. It is designed to be intuitive and integrated seamlessly with the Rust toolchain, particularly with Cargo.
Running Tests with cargo test
-
Basic Usage: To run tests, use the
cargo testcommand in your project's directory. This command automatically finds and executes all test functions annotated with#[test]across your project.cargo test -
Filtering Which Tests to Run: You can specify a filter to run only the tests whose names contain the provided string.
cargo test test_function_name
Controlling Test Execution
-
Running Tests Concurrently: By default, Rust runs tests concurrently using threads. This behavior speeds up the testing process but can be problematic for tests that cannot be run in parallel. You can change the number of threads used with the
--test-threadsflag:cargo test -- --test-threads=1 -
Handling Test Failures and Panics: When a test fails or panics,
cargo testwill provide a detailed report. Rust tests use panic to signal failure, so any panic within a test function indicates a failed test.
Test Configuration and Conditional Compilation
-
cfg(test): This attribute configures the compiler to only include the annotated code (such as test modules) when running tests. This is useful for ensuring that test code does not end up in the final build.#![allow(unused)] fn main() { #[cfg(test)] mod tests { #[test] fn test_example() { //... } } } -
Other Relevant Attributes: Besides
cfg(test), you can use other attributes to further control the testing process. For instance,#[ignore]can be used to skip certain tests unless specifically requested:#![allow(unused)] fn main() { #[test] #[ignore] fn expensive_test() { //... } }
By mastering these aspects of Rust's testing framework, you can leverage cargo test to effectively manage
and execute a wide range of tests, ensuring the reliability and correctness of your Rust applications.
3. Documenting Code with Rustdoc
The Value of Well-Documented Code
Well-documented code is essential for maintainability, collaboration, and usability, especially in large or open-source projects. Good documentation helps developers understand the purpose, usage, and behavior of code, facilitating easier integration, modification, and debugging.
Introduction to rustdoc, Rust's Documentation Tool
rustdoc is Rust's built-in tool for generating HTML documentation from source code comments. Integrated
with Cargo, it extracts documentation from the code and creates user-friendly web pages. This tool is
instrumental in making Rust's documentation culture strong and effective.
Writing Documentation Comments
-
Triple Slash
///for Public-Facing Documentation: Use the triple slash for documenting public items like functions, structs, enums, and modules. These comments appear in the generated HTML documentation.#![allow(unused)] fn main() { /// Calculates the sum of two numbers. /// /// # Examples /// ``` /// let result = sum(5, 3); /// assert_eq!(result, 8); /// ``` pub fn sum(a: i32, b: i32) -> i32 { a + b } } -
Using Markdown Within Comments: Rustdoc supports Markdown, allowing you to use formatting, links, lists, and code blocks within your documentation. This feature enhances the readability and clarity of the documentation.
#![allow(unused)] fn main() { /// This function performs a *complex* calculation. /// /// # Arguments /// /// * `input` - An integer parameter /// /// # Example /// /// See the [`complex_calculation`] function for more details. /// /// [`complex_calculation`]: ./fn.complex_calculation.html pub fn complex_function(input: i32) -> i32 { //... } }
Viewing Generated Documentation with cargo doc
-
Generating and Viewing Documentation: To generate and view your project's documentation, use the
cargo doccommand followed bycargo doc --opento open it in your web browser.cargo doc cargo doc --open
This documentation is stored locally and includes both your project's documentation and the documentation
of all its dependencies. Understanding and utilizing rustdoc effectively allows you to provide clear,
helpful documentation for your code, a vital component of quality software development.
4. Doc-Tests
What are Doc-Tests?
Doc-tests are a unique and powerful feature in Rust that allows you to write tests directly in your documentation. These tests serve two primary purposes: they verify that the code examples in your documentation are accurate and they provide executable examples to your users. By ensuring that your examples work as expected, doc-tests help maintain the integrity and reliability of your documentation.
Writing and Structuring Doc-Tests
-
Embedding Code in Documentation: To write a doc-test, embed Rust code in your documentation comments using Markdown code blocks. Rustdoc will automatically identify these code blocks as tests to run.
#![allow(unused)] fn main() { /// Adds two numbers. /// /// # Examples /// /// ``` /// let result = add(2, 3); /// assert_eq!(result, 5); /// ``` /// /// ``` /// // This example demonstrates how to handle negative numbers. /// let result = add(-2, 3); /// assert_eq!(result, 1); /// ``` pub fn add(a: i32, b: i32) -> i32 { a + b } } -
Ensuring Correctness: Each code block in your documentation should be a self-contained test case. Rustdoc runs these tests by wrapping them in a function and compiling them. To pass, the code must compile and run without panicking.
Running and Verifying Doc-Tests with cargo test
-
Executing Doc-Tests: When you run
cargo test, Rustdoc compiles and runs all doc-tests along with your unit and integration tests. This ensures that your documentation stays up-to-date and accurate with the codebase.cargo test -
Observing Test Results: If a doc-test fails,
cargo testwill provide a detailed report, just like it does for unit and integration tests. This report helps in pinpointing exactly where and why the test failed.
Doc-tests represent a significant advantage in Rust, offering a practical way to maintain correctness in documentation. They bridge the gap between documentation and testing, ensuring that your examples not only illustrate your code but also function as intended.
5. Code-Coverage Solutions
The Significance of Measuring Code Coverage
Code coverage is a metric used to measure the extent to which your source code is executed when your test suite runs. It helps in identifying untested parts of your codebase, ensuring that critical functionality is covered by tests. High coverage is often correlated with lower chances of bugs, but it's important to balance striving for high coverage with the understanding that 100% coverage does not guarantee a bug-free code.
Introduction to Code-Coverage Tools in the Rust Ecosystem
Several tools are available in the Rust ecosystem to measure code coverage:
-
Tarpaulin: A popular Rust tool that offers features like line coverage, branch coverage, and XML and HTML report generation. It's Linux-only and can be installed via
cargo install cargo-tarpaulin.cargo tarpaulin -
Grcov: Part of the Mozilla's set of tools,
grcovworks with the Rust compiler's built-in instrumentation to generate coverage data. It is compatible with multiple platforms and can output results in various formats like lcov, coveralls, and more.cargo test -- -Zinstrument-coverage grcov . --binary-path ./target/debug/ -s . -t html --branch --ignore-not-existing -o ./target/debug/coverage/ -
Other Tools: The Rust ecosystem is continuously evolving, and new tools or updates to existing tools are introduced regularly. It's recommended to keep an eye on the Rust community for the latest developments in code coverage solutions.
Generating and Interpreting Code Coverage Reports
-
Generating Reports: After running tests with a coverage tool, you'll receive a report detailing the coverage percentage and potentially identifying uncovered lines or branches in your code.
-
Aiming for Higher Coverage: Aim for high coverage but recognize its limits. Coverage tools can't assess the quality of tests, only their quantity. It's possible to have high coverage with ineffective tests.
-
Understanding its Limits: Coverage should not be the only metric to gauge the effectiveness of your tests. It's a tool to help improve testing but not an end goal in itself. Focus on writing meaningful tests that effectively exercise your code rather than merely increasing the coverage percentage.
By leveraging code coverage tools, you can gain a deeper understanding of your test suite's effectiveness, guiding you to write more comprehensive tests and ultimately create more robust and reliable Rust applications.
Conclusion
Reflecting on the journey through Rust's testing and documentation capabilities, we recognize the dual significance of these practices in the realm of software development. Testing and documentation are not mere formalities; they are integral to the creation of robust, maintainable, and user-friendly software.
The Dual Significance of Testing and Documentation
-
Testing: It's a fundamental aspect of ensuring code reliability and functionality. Rust's emphasis on testing, from unit and integration tests to doc-tests, demonstrates its commitment to software robustness. Testing is not just about preventing errors; it's about creating a safety net that allows developers to add features, refactor, and optimize with confidence.
-
Documentation: Often considered the first line of communication with future users and contributors, including your future self. Rust's
rustdoctool and its integration with the language make it straightforward to create rich, useful documentation. Well-written documentation serves as a guide, a reference, and a learning resource, enhancing the overall value of your code.
The Continuous Cycle of Writing, Testing, and Documenting Code
The process of writing, testing, and documenting code is a continuous and iterative cycle in the software development process:
-
Writing Code: Starts with the implementation of functionality, guided by Rust's principles of safety and concurrency.
-
Testing Code: Each new feature or bug fix is accompanied by corresponding tests, ensuring the code works as intended and remains robust against future changes.
-
Documenting Code: As features are added and modified, the documentation is updated to reflect these changes, keeping it relevant and useful.
This cycle is not a linear process but an ongoing, iterative practice. Each step informs and improves the others. Tests can reveal the need for clearer documentation; documentation can highlight areas needing more thorough testing; writing code can bring insights into both.
In conclusion, the power of Rust lies not just in its syntax or its performance but in its holistic approach to software development. Embracing testing and documentation as core aspects of this approach leads to software that is not only powerful and efficient but also understandable and maintainable. This lesson serves as a foundation for incorporating these practices into your Rust development process, fostering the creation of high-quality, reliable software.
Homework
For this week's task, we'll focus on enhancing your chat application with some essential practices in software development: adding documentation and tests. This assignment is more open-ended, allowing you to decide the extent and depth of documentation and testing based on your discretion and the application's needs.
Description:
-
Doc-Comments:
- Add doc-comments to key functions and modules in your client and server code.
- Focus on providing clear, concise descriptions that explain what each function or module does.
- You don't need to document every function, but aim to cover the main ones, especially those that are complex or not immediately obvious.
-
Basic Testing:
- Write a few tests for parts of your application. You can choose which aspects to test based on what you think is most crucial or interesting.
- Consider including a couple of unit tests for individual functions or components and maybe an integration test if applicable.
- Use Rust's built-in testing framework to add these tests to your project.
-
Flexibility in Testing:
- There's no requirement for comprehensive test coverage for this assignment. Just a few tests to demonstrate your understanding of testing principles in Rust will suffice.
- Feel free to explore and test parts of the application you're most curious about or consider most critical.
Submission:
- After adding doc-comments and some tests, commit and push these changes to your GitHub repository.
- Submit the link to your updated repository on the class submission platform, ensuring the repository is public.
Deadline:
- This assignment should be completed and submitted by Monday, December 11, 2023.
This week's task is an excellent opportunity to get hands-on experience with two vital aspects of software development: documentation and testing. While the scope is flexible, try to use this as a chance to think critically about what parts of your code could benefit most from comments or tests. As always, if you have any questions, feel free to ask.
Happy documenting and testing!
Lesson 17: Rust and Web Development
Introduction
In the realm of web development, a new player has steadily been gaining ground and acclaim for its unique capabilities and performance: Rust. This language, known primarily for its memory safety and performance, is increasingly being adopted for web development purposes.
Rust's journey into the web development domain marks a significant shift, as it brings along strengths that are particularly pertinent to this field. The key advantages of using Rust for web development are its safety, concurrency, and performance.
-
Safety: Rust is designed with a strong emphasis on memory safety. Its ownership model, which includes features like borrowing and lifetimes, ensures that many common bugs, such as null pointer dereferencing and buffer overflows, are caught at compile time. This aspect of Rust is especially critical in web applications where security and reliability are paramount.
-
Concurrency: Rust's approach to concurrency is based on the principle of fearless concurrency. It allows for safe and efficient execution of multiple tasks at the same time, a necessity in handling numerous web requests. Rust achieves this through its ownership and type system, preventing data races that are common in concurrent programming.
-
Performance: Rust’s performance is comparable to that of C and C++, but it provides higher-level abstractions and a more robust standard library. This means Rust can handle high-performance tasks typically required in web development, like processing large amounts of data or high-traffic web services, without the overhead of a garbage collector.
As web applications continue to grow in complexity and scale, Rust's strengths in these areas make it an increasingly attractive option for web developers. The following sections will delve deeper into Rust's capabilities in web development, showcasing practical examples and advanced techniques that leverage Rust's unique features.
1. Overview of Rust's Web Development Ecosystem
Rust's journey into web development is a testament to its adaptability and robustness. Initially designed for systems programming, Rust has expanded its reach, carving a niche in the web development ecosystem. This section will provide a brief history of Rust's foray into web development, highlight its key strengths in this field, and introduce the major players in its web development ecosystem.
-
Brief History of Web Development in Rust:
- Early Days: Rust's initial focus was on system-level programming, but its potential for web development was quickly recognized.
- Community Interest: The Rust community began experimenting with web applications, recognizing Rust's potential for building reliable and efficient web services.
- Maturation: Over time, Rust's web development ecosystem has matured, with the creation of numerous libraries and frameworks catering to different aspects of web development.
-
Strengths Rust Brings to Web Development:
- Type Safety: Rust's strict type system eliminates a whole class of runtime errors, ensuring that code behaves as expected. This is crucial for building reliable web applications that can handle various inputs and scenarios.
- Memory Efficiency: With its zero-cost abstractions and lack of a garbage collector, Rust allows for fine-grained control over memory usage. This translates into high-performance web applications that are resource-efficient.
- Concurrency: Rust's approach to concurrency, with guarantees against data races, enables the development of highly scalable web services that can handle numerous simultaneous requests without compromising on safety or performance.
-
Key Players in the Rust Web Development Ecosystem:
- Libraries: Rust boasts a growing collection of libraries that cater to various needs in web development,
such as request handling, data serialization, and authentication.
- Example:
serdefor serialization,reqwestfor HTTP client operations.
- Example:
- Frameworks: Several web frameworks have emerged, each offering different levels of abstraction and features.
- Notable examples include
Actix-Webfor its speed and flexibility, andRocketfor its ease of use and declarative programming style.
- Notable examples include
- Community Support: The Rust community plays a pivotal role in the ecosystem, contributing to open-source projects, providing extensive documentation, and offering support through forums and chat platforms.
- Libraries: Rust boasts a growing collection of libraries that cater to various needs in web development,
such as request handling, data serialization, and authentication.
In the following sections, we will delve deeper into the specifics of Rust's web development capabilities, including hands-on examples and discussions of various libraries and frameworks. This exploration will demonstrate how Rust's unique features are leveraged to create robust, efficient, and scalable web applications.
2. Working with Web Frameworks
Rocket:
Rocket is a web framework for Rust that is known for its simplicity, safety, and expressiveness. It is designed to make web development easy and enjoyable, without sacrificing power and flexibility. Here, we'll dive into Rocket's overview and philosophy, how to set up a Rocket project, and the essentials of defining routes, handlers, and managing state.
-
Overview and Philosophy:
- Ease of Use: Rocket aims to make web development as simple as possible. It achieves this through an intuitive API and extensive documentation.
- Type Safety and Robustness: Rocket leverages Rust's type system to prevent common bugs and ensure that web applications are robust and reliable.
- Extensibility: While providing a lot of functionality out of the box, Rocket is also highly extensible, allowing developers to easily add custom functionality.
-
Setting up a Rocket Project:
- Installation: Ensure that you have the latest version of Rust and Cargo installed.
- Creating a New Project: Use Cargo to create a new project:
cargo new my_rocket_app. - Adding Dependencies: In your
Cargo.toml, add Rocket as a dependency:[dependencies] rocket = "0.5.0-rc.1" - Including Nightly Rust: Rocket often requires the latest features of Rust, so you might need to set your project to use the nightly version of the Rust compiler. This can be done using
rustup default nightly.
-
Defining Routes, Handlers, and Managing State:
- Defining Routes: In Rocket, routes are defined with annotations. For example:
#![allow(unused)] fn main() { #[get("/")] fn index() -> &'static str { "Hello, world!" } } - Handlers: The function
indexis a request handler. Handlers in Rocket take zero or more parameters and return a type that implements theRespondertrait. - Mounting Routes: Routes are registered with the Rocket instance:
#![allow(unused)] fn main() { #[launch] fn rocket() -> _ { rocket::build().mount("/", routes![index]) } } - Managing State: To share state across handlers, use the
.manage()method on the Rocket instance. The state can be accessed in handlers using a guard pattern:#![allow(unused)] fn main() { struct MyState { data: String, } #[get("/state")] fn state(state: &State<MyState>) -> &str { &state.data } }
- Defining Routes: In Rocket, routes are defined with annotations. For example:
These are the basics to get started with Rocket. The framework offers much more, including support for templating, complex routing, request guards, and more. The following sections will explore more advanced features and use cases, showcasing Rocket's capabilities in building sophisticated web applications.
Actix-Web:
Actix-Web is a powerful, pragmatic, and extremely fast web framework for Rust. It is built on the Actix actor framework, which provides a different approach to handling concurrent web requests. Below, we'll explore the introduction to Actix-Web, its use of the Actor model, and how to handle routes, middleware, and databases in Actix-Web.
-
Introduction to the Actix-Web Framework:
- High Performance: Actix-Web is known for its outstanding performance. It's often cited as one of the fastest web frameworks available in any programming language, thanks to its use of the Actix system.
- Flexibility and Extensibility: Actix-Web offers a lot of flexibility and is highly extensible, allowing developers to tailor it to their specific needs.
- Feature-Rich: It comes packed with features such as WebSocket support, integrated user authentication, and a powerful routing system.
-
Building with the Actor Model and Its Benefits:
- Actor Model Basics: Actix-Web is built on top of Actix, an actor system for Rust. In this model, actors are objects which encapsulate state and behavior and communicate exclusively by exchanging messages.
- Concurrency: The actor model naturally supports concurrency. Actors run independently and handle messages asynchronously, leading to highly concurrent web applications.
- Isolation: Each actor in Actix operates independently, which provides fault tolerance. If an actor panics, it can be restarted without affecting other parts of the system.
-
Handling Routes, Middleware, and Databases:
- Defining Routes: In Actix-Web, routes are defined using macros or function calls, and they map to request handlers.
async fn index() -> impl Responder { HttpResponse::Ok().body("Hello world!") } #[actix_web::main] async fn main() -> std::io::Result<()> { HttpServer::new(|| { App::new().route("/", web::get().to(index)) }) .bind("127.0.0.1:8080")? .run() .await } - Middleware: Actix-Web supports middleware for request processing. Middleware can be used for logging, authentication, CORS, etc.
#![allow(unused)] fn main() { App::new() .wrap(middleware::Logger::default()) .route("/", web::get().to(index)) } - Databases: Integration with databases in Actix-Web can be achieved using asynchronous ORM libraries like
Dieselorsqlx. These can be incorporated into the Actix actor system for efficient database interaction.
- Defining Routes: In Actix-Web, routes are defined using macros or function calls, and they map to request handlers.
In summary, Actix-Web offers a unique approach to web development in Rust with its use of the Actor model, providing excellent performance and concurrency capabilities. The framework is suitable for a wide range of web applications, from simple APIs to complex, high-load systems. The next sections will delve into more specific use cases and advanced features of Actix-Web.
Axum:
Axum is a relatively newer web framework in the Rust ecosystem, known for its focus on modularity and ergonomics. It is built on top of Tokio and Tower, making it highly asynchronous and efficient. Axum aims to make it simple to build robust and scalable web applications. This section will cover the basics of Axum, creating HTTP services using it, and its approach to layering and service filtering.
-
Brief about Axum and its Modularity:
- Modularity: Axum is designed to be modular, allowing developers to pick and choose only the components they need. This design philosophy keeps the core lightweight and flexible.
- Ergonomics and Asynchronicity: Built on the async ecosystem around Tokio, Axum provides an ergonomic and efficient way to handle asynchronous operations in web applications.
- Integration: Despite its modularity, Axum integrates seamlessly with other components in the async ecosystem, such as Hyper for HTTP and Tower for service abstraction.
-
Creating HTTP Services Using Axum:
- Simple and Intuitive API: Axum provides a straightforward API to set up HTTP services. Here’s a basic example to create a simple web server:
use axum::{ routing::get, Router, }; #[tokio::main] async fn main() { let app = Router::new().route("/", get(|| async { "Hello, World!" })); axum::Server::bind(&"127.0.0.1:3000".parse().unwrap()) .serve(app.into_make_service()) .await .unwrap(); } - Routing and Handlers: Routes in Axum are defined using a router, and handlers can be simple async functions.
- Simple and Intuitive API: Axum provides a straightforward API to set up HTTP services. Here’s a basic example to create a simple web server:
-
Layering and Service Filtering:
- Layering: Axum utilizes the concept of middleware layers for composing behavior. Layers can be used to add cross-cutting concerns like logging, authentication, or error handling to applications.
#![allow(unused)] fn main() { let app = Router::new() .route("/", get(|| async { "Hello, World!" })) .layer(TraceLayer::new_for_http()); } - Service Filtering: This feature allows more fine-grained control over request handling. Filters can be used to extract data from requests, handle different types of requests, and even share data between handlers.
#![allow(unused)] fn main() { let app = Router::new().route("/users/:user_id", get(user_handler)); async fn user_handler(Extension(db): Extension<Database>, Path(user_id): Path<String>) -> String { // Handler logic here } }
- Layering: Axum utilizes the concept of middleware layers for composing behavior. Layers can be used to add cross-cutting concerns like logging, authentication, or error handling to applications.
Axum, with its modular approach, brings a fresh perspective to web development in Rust. It simplifies the creation of high-performance and scalable web applications while providing the flexibility to integrate with the broader asynchronous Rust ecosystem. The upcoming sections will explore advanced topics and best practices for developing web applications using Axum.
Warp:
Warp is a Rust web server framework that emphasizes composability and ease of use, built on top of Hyper, a fast HTTP implementation. It uses a unique approach to web development by offering a system of composable filters. This section will cover Warp's approach to web development, its system of composable filters and routing, and how to combine these filters and share state.
-
Warp's Approach to Web Development with Rust:
- Focus on Composability: Warp's main feature is its highly composable nature. It allows building web applications by combining small, reusable components called filters.
- Ergonomic and Expressive: Despite its high performance, Warp doesn't sacrifice ergonomics or expressiveness, offering an API that is both powerful and easy to use.
- Built on Hyper: Leveraging Hyper for its HTTP implementation, Warp benefits from Hyper's speed and reliability.
-
Composable Filters and Routing:
- Filters: In Warp, everything is a filter - from handling requests and responses to querying databases. Filters can be combined to build more complex behavior.
#![allow(unused)] fn main() { let hello = warp::path("hello") .and(warp::get()) .map(|| "Hello, World!"); } - Routing: Warp allows defining routes by combining filters. These routes determine how requests are handled and can be tailored to specific paths, HTTP methods, headers, and more.
#![allow(unused)] fn main() { let routes = hello.or(other_route).or(another_route); }
- Filters: In Warp, everything is a filter - from handling requests and responses to querying databases. Filters can be combined to build more complex behavior.
-
Combining Filters and Sharing State:
- Combining Filters: Filters in Warp can be combined using
and,or, and other combinators. This allows building sophisticated request handling logic.#![allow(unused)] fn main() { let route = warp::path("test") .and(warp::get()) .and(warp::query::<HashMap<String, String>>()) .map(|params: HashMap<String, String>| { // Handle the request and params here }); } - Sharing State: State can be shared across filters using Warp's
clonefeature. This is useful for sharing resources like database connections.#![allow(unused)] fn main() { let state = Arc::new(MyAppState::new()); let state_filter = warp::any().map(move || state.clone()); let route = warp::path("stateful") .and(state_filter) .map(|state: Arc<MyAppState>| { // Use state here }); }
- Combining Filters: Filters in Warp can be combined using
Warp's philosophy centers around building web applications as compositions of small, reusable pieces. This approach, combined with the power and speed of Rust, makes Warp an excellent choice for developers looking for a flexible and efficient web development framework. In the following sections, we'll explore more advanced techniques and best practices for building applications with Warp.
3. Rust for Backend Development
Building RESTful APIs with Rust
Rust's efficiency and safety make it an excellent choice for building RESTful APIs. The process involves handling HTTP requests and responses, parsing JSON data, and ensuring efficient data management.
-
Managing Request and Response Data:
- Parsing and Generating JSON: Libraries like
serdeoffer powerful serialization and deserialization capabilities for JSON, making it easy to handle request and response data in a type-safe manner. - Endpoint Definitions: Rust frameworks allow defining endpoints with specific HTTP methods and paths, ensuring clear and maintainable API structures.
- Error Handling: Rust's robust error handling can be used to manage various failure scenarios gracefully, providing meaningful responses to clients.
- Parsing and Generating JSON: Libraries like
-
Integrating with Databases:
- ORMs and Database Access Libraries: Libraries like
Dieselandsqlxprovide ORM (Object-Relational Mapping) capabilities, simplifying database interactions with Rust. These libraries offer a way to work with databases in a safe and idiomatic manner. - Handling Database Migrations: Tools like Diesel's CLI can manage database schema migrations, allowing easy and reliable schema evolution.
- Secure Operations: Emphasizing Rust's safety, these libraries ensure that database operations are secure and less prone to errors like SQL injection.
- ORMs and Database Access Libraries: Libraries like
Authentication and Authorization
Implementing authentication and authorization is critical in backend development to secure user data and ensure proper access control.
-
JWT, OAuth, and Other Authentication Mechanisms:
- JWT (JSON Web Tokens): Rust has libraries to generate and validate JWTs, useful for stateless authentication.
- OAuth: Implementing OAuth protocols for third-party integrations is feasible with Rust's secure and efficient networking capabilities.
-
Managing User Sessions and Data Securely:
- Session Management: Techniques like encrypted cookies or token-based systems can be implemented to manage user sessions.
- Data Security: Ensuring the security of user data involves practices like using HTTPS, hashing passwords (with libraries like
bcrypt), and following best practices in data handling.
Asynchronous Web Servers and Performance
Rust's asynchronous programming model is well-suited for building high-performance, non-blocking web servers.
-
Leveraging Rust's Async Capabilities:
- Non-blocking I/O: Rust's async/await syntax, combined with its efficient runtime, allows for building servers that handle large numbers of concurrent connections without blocking.
- Tokio and async-std: Libraries like Tokio and async-std provide asynchronous runtimes and utilities to build scalable and efficient web servers.
-
Performance Comparison with Other Languages/Frameworks:
- Benchmarking: Rust often outperforms other backend languages in benchmarks, particularly in terms of memory usage and CPU efficiency.
- Use Cases: While Rust is excellent for high-performance scenarios, its complexity may not always justify its use in simpler applications. A thoughtful consideration of the specific use case and requirements is essential when choosing Rust over other technologies.
In this section, we have covered how Rust can be used to create robust and efficient backend systems, leveraging its strengths in safety, concurrency, and performance. The next sections will delve deeper into these aspects with practical examples and advanced concepts.
4. Deploying Rust Web Applications
Deploying Rust web applications involves several considerations to ensure security, performance, and scalability. Furthermore, the use of containers and orchestration tools like Docker and Kubernetes plays a significant role in the deployment process. Monitoring and logging are also critical components for maintaining the health and performance of the application.
-
Considerations for Deployment:
- Security: Ensure that the application is secure by default. This includes using HTTPS, keeping dependencies updated, and following secure coding practices.
- Performance: Optimize for the best performance by tuning configurations, leveraging Rust's efficient CPU and memory usage, and profiling the application to identify bottlenecks.
- Scalability: Design the application architecture to handle growth in user traffic and data. This can be achieved through load balancing, efficient database design, and horizontal scaling.
-
Containers and Orchestration:
- Docker: Containerizing a Rust application with Docker simplifies deployment, ensuring consistency across different environments. Rust's small runtime footprint makes it well-suited for containerization.
- Kubernetes: For larger applications, Kubernetes offers an orchestration system that manages containerized applications. It provides features like automated rollouts, scaling, and self-healing.
- Synergy with Rust: Rust's performance characteristics make it a great candidate for microservices architectures commonly deployed using Docker and Kubernetes. The small binary sizes and efficient resource usage are advantageous in containerized environments.
-
Monitoring and Logging:
- Tools: Utilize tools like Prometheus for monitoring and Grafana for visualization to keep track
- of the application's performance and health. Logging libraries in Rust, such as
logandenv_logger, can be integrated to capture and manage logs. - Best Practices: Implement structured logging to capture relevant data in a consistent format. Monitoring should include key metrics such as response times, error rates, and system resource usage.
- Alerts and Analysis: Set up alerts based on thresholds in key metrics to quickly identify and respond to issues. Regular analysis of logs and metrics can provide insights into performance trends and potential improvements.
4. Deploying Rust Web Applications
Deploying Rust web applications involves several considerations to ensure security, performance, and scalability. Furthermore, the use of containers and orchestration tools like Docker and Kubernetes plays a significant role in the deployment process. Monitoring and logging are also critical components for maintaining the health and performance of the application.
-
Considerations for Deployment:
- Security: Ensure that the application is secure by default. This includes using HTTPS, keeping dependencies updated, and following secure coding practices.
- Performance: Optimize for the best performance by tuning configurations, leveraging Rust's efficient CPU and memory usage, and profiling the application to identify bottlenecks.
- Scalability: Design the application architecture to handle growth in user traffic and data. This can be achieved through load balancing, efficient database design, and horizontal scaling.
-
Containers and Orchestration:
- Docker: Containerizing a Rust application with Docker simplifies deployment, ensuring consistency across different environments. Rust's small runtime footprint makes it well-suited for containerization.
- Kubernetes: For larger applications, Kubernetes offers an orchestration system that manages containerized applications. It provides features like automated rollouts, scaling, and self-healing.
- Synergy with Rust: Rust's performance characteristics make it a great candidate for microservices architectures commonly deployed using Docker and Kubernetes. The small binary sizes and efficient resource usage are advantageous in containerized environments.
-
Monitoring and Logging:
- Tools: Utilize tools like Prometheus for monitoring and Grafana for visualization to keep track
of the application's performance and health. Logging libraries in Rust, such as
logandenv_logger, can be integrated to capture and manage logs. - Best Practices: Implement structured logging to capture relevant data in a consistent format. Monitoring should include key metrics such as response times, error rates, and system resource usage.
- Alerts and Analysis: Set up alerts based on thresholds in key metrics to quickly identify and respond to issues. Regular analysis of logs and metrics can provide insights into performance trends and potential improvements.
- Tools: Utilize tools like Prometheus for monitoring and Grafana for visualization to keep track
of the application's performance and health. Logging libraries in Rust, such as
Deploying Rust web applications involves careful planning and the use of modern tools and practices to ensure a smooth, scalable, and secure operation. With Rust's growing ecosystem, deploying these applications is becoming increasingly accessible, allowing developers to leverage Rust's strengths in a production environment. The next sections will provide more detailed guidance and examples on deploying Rust applications effectively.
Homework
The next step in advancing your chat application is to develop a web frontend for the server. This web interface will provide functionalities like viewing all stored messages and managing user data. This task will deepen your understanding of web frameworks in Rust and their integration with asynchronous back-end systems.
Description:
-
Web Frontend Development:
- Create a web frontend for your server application. This interface should allow users to view all messages stored on the server. Consider implementing a feature to filter messages by user.
-
User and Message Management:
- The web frontend should provide functionality to delete users and all associated messages. This adds an important aspect of user and data management to your application.
-
Choosing a Web Framework:
- Select a web framework for your frontend. You can choose from options like Axum, Rocket, actix-web, or warp.
- Given that your chat application is asynchronous, using an async-compatible web framework (like Axum or actix-web) might simplify integration.
-
Integration with the Backend:
- Ensure that the frontend seamlessly interacts with your existing asynchronous server backend. The frontend should effectively display data from and send requests to the server.
-
Interface Design:
- Design the user interface to be intuitive and user-friendly. While sophisticated UI design isn't the focus, aim for a clean and navigable layout. Considering this course is not about nice web design, it can be as plain visually as you want, you don't need to be a CSS expert :)
Submission:
- After developing the web frontend, commit and push your code to your GitHub repository.
- Ensure that the repository is public and submit the link on our class submission platform.
Deadline:
- The deadline for this assignment is Wednesday, December 13, 2023.
This assignment will bridge the gap between backend and frontend development, giving you a holistic view of full-stack development in Rust. While the focus is on functionality, also consider the user experience when interacting with the web interface. If you encounter any challenges or have questions about integrating the frontend with your asynchronous backend, don't hesitate to ask for help.
Best of luck, and I look forward to seeing your web-enabled chat application!
Lesson 18: Metrics in Rust
Introduction
In modern software development, metrics play a pivotal role in understanding, monitoring, and improving applications. Metrics provide valuable insights into the performance, health, and usage patterns of software, enabling developers and operations teams to make data-driven decisions.
The Importance of Metrics in Modern Software Development
Metrics serve as a quantitative basis for:
- Performance Tuning: Identifying performance bottlenecks and optimizing code.
- Monitoring and Alerting: Tracking the health and availability of applications in real time and alerting on anomalies.
- Capacity Planning: Understanding resource usage patterns to make informed decisions about scaling and infrastructure investments.
- User Behavior Analysis: Gaining insights into how users interact with the application, which can guide feature development and improvements.
- Debugging and Diagnosis: Aiding in quickly pinpointing issues in production environments.
Overview of the Metrics Ecosystem in Rust
Rust, known for its performance and reliability, offers a growing ecosystem for metrics collection and monitoring:
- Prometheus: A powerful time-series database and monitoring system. It's widely used in the Rust community for its efficient storage, powerful query language (PromQL), and easy integration.
- Metrics-rs: A lightweight and flexible metrics library for Rust. It allows for collecting various types of metrics like counters, gauges, and histograms.
- Tracing: A framework for instrumenting Rust programs to collect structured, event-based diagnostic information. It can be used in conjunction with metrics for in-depth analysis.
- Telementry and Observability Platforms: Integration with cloud-based platforms like Datadog, New Relic, and others, which offer advanced analytics, visualization, and alerting capabilities.
In this lesson, we will delve deeper into how to effectively utilize metrics in Rust applications, focusing on practical implementation and best practices.
1. Prometheus Metrics
Introduction to Prometheus
Prometheus is a prominent open-source monitoring and alerting toolkit, widely recognized in the monitoring landscape for its robustness and flexibility. It's particularly renowned for its efficient handling of time-series data and its powerful query language, PromQL.
Role of Prometheus in the Monitoring Landscape
Prometheus plays a crucial role in modern monitoring ecosystems, offering:
- High Scalability: Efficiently handles large volumes of metrics.
- Powerful Data Model: Utilizes a multi-dimensional data model with time series data.
- Strong Query Language: PromQL allows for complex data queries and aggregations.
- Service Discovery Integration: Automatically discovers targets to monitor.
- Flexible Alerting: Integrates with Alertmanager for complex alerting rules.
Why Rust Developers Should Consider Integrating Prometheus Metrics
For Rust developers, Prometheus integration offers:
- Performance Insights: Understand the performance characteristics of Rust applications.
- Reliability Monitoring: Track application reliability and uptime.
- Resource Optimization: Identify and optimize resource usage.
- Easy Integration: Rust’s ecosystem provides convenient libraries for integration.
Rust Libraries for Prometheus
prometheus: The primary crate for integrating Prometheus with Rust applications. It offers functionality to define, update, and collect metrics.prometheus-static-metric: A helper crate to create static metrics, which are faster than dynamic metrics but require a predefined set of labels.
Setting Up a Basic Prometheus Client in a Rust Application
To set up Prometheus in a Rust project, include the prometheus crate in your Cargo.toml and create a basic metric:
use prometheus::{Opts, Counter, Registry}; fn main() { let counter_opts = Opts::new("example_counter", "An example counter metric"); let counter = Counter::with_opts(counter_opts).expect("metric can be created"); let registry = Registry::new(); registry.register(Box::new(counter.clone())).expect("metric can be registered"); // Use the counter counter.inc(); // Additional logic... }
Metrics Types in Prometheus
Prometheus supports several types of metrics, each suited for different use cases:
- Counters: A metric that only increases. Used for counting events (e.g., requests processed).
- Gauges: A metric that can go up or down. Suitable for measuring values like memory usage.
- Histograms: Used to observe distributions of values (e.g., request latencies). They bucket values and count occurrences in each bucket.
- Summaries: Similar to histograms, but also provide a total count and sum of observed values.
Each metric type is designed to suit particular monitoring needs, enabling Rust developers to gather a comprehensive understanding of their application's performance and health.
Sure, let's create examples showcasing how to use Prometheus gauges and counters in Rust.
Example 1: Using Prometheus Counters in Rust
Counters are a metric type that only increase (e.g., number of requests processed, tasks completed, errors occurred).
First, ensure you have the prometheus crate included in your Cargo.toml:
[dependencies]
prometheus = "0.12"
Now, let's create a simple example where we increment a counter every time a certain function is called:
use prometheus::{Counter, Opts, Registry}; fn main() { // Create a counter let counter_opts = Opts::new("my_counter", "A counter for tracking events"); let counter = Counter::with_opts(counter_opts).expect("metric can be created"); // Create a registry and register the counter let registry = Registry::new(); registry.register(Box::new(counter.clone())).expect("metric can be registered"); // Simulate some events for _ in 0..5 { simulate_event(&counter); } // Export the current state of the counter (for example purposes) println!("Counter value: {}", counter.get()); } fn simulate_event(counter: &Counter) { // Increment the counter counter.inc(); println!("Event occurred"); }
In this example, the simulate_event function increments the counter each time it's called.
Example 2: Using Prometheus Gauges in Rust
Gauges are a metric type that can go up or down (e.g., current memory usage, number of active threads).
use prometheus::{Gauge, Opts, Registry}; fn main() { // Create a gauge let gauge_opts = Opts::new("my_gauge", "A gauge for tracking a value"); let gauge = Gauge::with_opts(gauge_opts).expect("metric can be created"); // Create a registry and register the gauge let registry = Registry::new(); registry.register(Box::new(gauge.clone())).expect("metric can be registered"); // Simulate value changes gauge.set(10.0); println!("Gauge set to 10"); gauge.inc(); println!("Gauge incremented"); gauge.dec(); println!("Gauge decremented"); // Export the current state of the gauge (for example purposes) println!("Gauge value: {}", gauge.get()); }
In this example, the gauge is initially set to 10, then incremented and subsequently decremented, showcasing how gauges can be adjusted both up and down.
These examples illustrate the basic use of counters and gauges in a Rust application using Prometheus.
2. Instrumentation
What is Instrumentation?
Instrumentation refers to the integration of monitoring code within an application. This process involves embedding code to collect and send metrics about the application's operation, performance, and behavior. Instrumentation is a key aspect of observability and is essential for diagnosing issues, understanding system performance, and making informed decisions based on data.
Inserting Monitoring Code into an Application
The act of instrumentation involves:
- Adding Metrics: Embedding code that records metrics like response times, error rates, and system utilization.
- Logging and Tracing: Incorporating logging statements and tracing information to track the flow and state of the application.
How to Instrument a Rust Application for Prometheus Metrics
Instrumenting a Rust application with Prometheus involves several key steps:
-
Selecting Metrics: Identify what aspects of the application are crucial to monitor, such as request latency, error rates, or resource usage.
-
Integration: Use the
prometheuscrate to integrate Prometheus metrics into your Rust application. -
Deciding Parts to Instrument: Focus on critical paths, such as API endpoints, performance-sensitive code, and error-prone areas.
Effective Practices for Instrumentation
- Avoid Over-Instrumentation: Excessive metrics can lead to clutter and performance overhead. Focus on metrics that provide meaningful insights.
- Performance Considerations: Be mindful of the impact of instrumentation on the application's performance. Efficiently designed metrics minimize overhead.
- Balanced Approach: Strive for a balance between detail and simplicity. Choose metrics that offer actionable insights without overwhelming the system.
3. Recording and Measuring Data
Push vs. Pull Models in Metrics Collection
In the context of metrics collection, there are two primary models: push and pull. Each model represents a different approach to how metrics data is transmitted from the application to the monitoring system.
-
Push Model: In this model, the application actively sends (or "pushes") metrics to the monitoring server at regular intervals. This approach is often used in environments where the monitoring server cannot easily reach the application, such as in highly distributed systems.
-
Pull Model: Conversely, in the pull model, the monitoring server periodically requests (or "pulls") metrics from the application. This model is widely used due to its simplicity and effectiveness in various environments.
How Prometheus Adopts the Pull Model and Its Advantages
Prometheus primarily uses the pull model for metrics collection. In this setup, Prometheus server regularly scrapes metrics from the instrumented applications.
Advantages of the Pull Model in Prometheus:
- Simplicity: Easier to set up and manage, as the Prometheus server centrally controls the scraping intervals.
- Reliability: The pull model is less prone to data loss, as Prometheus continuously scrapes data at regular intervals.
- Scalability: Prometheus efficiently handles scraping from numerous targets, making it suitable for large-scale deployments.
- Security: The pull model can be more secure, as it requires applications only to expose an endpoint for scraping, reducing the attack surface.
Recording Metrics
Recording metrics effectively in Prometheus involves:
-
Proper Labeling and Categorizing: Labels in Prometheus are key-value pairs associated with a metric. Proper labeling is crucial for categorizing and filtering metrics. Labels should be descriptive yet concise to facilitate meaningful queries and analysis.
-
Storing and Managing Metric Data Efficiently: Prometheus stores time series data in a highly efficient, compressed format. It's important to manage the retention policies and disk usage to ensure efficient storage, especially in high-volume environments.
Measuring Application Performance
Key aspects of application performance that should be measured include:
-
Response Times: Tracking the time taken to process requests, typically measured using histograms in Prometheus to observe the distribution of response times.
-
Error Rates: Monitoring the rate of errors or failures, often using counters to track occurrences over time.
-
Resource Utilization: Metrics like CPU and memory usage, which are critical for understanding the application's impact on the underlying infrastructure.
-
Custom Metrics: Depending on the application's domain, custom metrics can be highly valuable. For instance, an e-commerce application might track metrics related to transactions or user cart sizes.
Creating custom metrics should be guided by the specific needs and critical aspects of the application. It's essential to identify metrics that provide actionable insights and align with the business or operational goals of the application.
Conclusion
In this lesson, we explored the vital role of metrics in Rust applications, focusing on Prometheus as a powerful tool for monitoring and alerting.
Reflecting on the Value of Metrics in Understanding Application Behavior
Metrics serve as a crucial lens through which we can observe and understand our applications. They provide objective data that helps us to:
- Diagnose Issues: Quickly identify and address performance bottlenecks or failures.
- Optimize Performance: Continuously monitor and improve the efficiency of our code.
- Understand User Interactions: Gain insights into how users engage with our applications, informing future development decisions.
The integration of Prometheus in Rust applications, as we have seen, offers a robust and scalable approach to capturing and analyzing these metrics. Its pull-based model, combined with a powerful query language and flexible data model, makes it an ideal choice for Rust developers seeking to gain deeper insights into their applications.
Emphasizing the Need for Continuous Monitoring and Refinement
The landscape of software development is ever-evolving, and so are the applications we build. Continuous monitoring is not just a one-time setup but an ongoing process that requires regular refinement. As applications grow and change, so too should our approach to metrics and monitoring:
- Iterative Improvement: Regularly review and update the metrics being collected to ensure they remain relevant and useful.
- Performance Tuning: Use metrics data to fine-tune the performance of the application, adapting to new challenges and requirements.
- Proactive Maintenance: Leverage metrics for preventive maintenance, identifying potential issues before they escalate into problems.
In conclusion, the thoughtful application of metrics and monitoring, particularly through tools like Prometheus, is an indispensable part of modern Rust application development. It empowers developers to not only build applications that perform well but also to maintain a deep understanding of their behavior and impact.
Homework
In this assignment, you will add monitoring capabilities to the server part of your chat application using Prometheus. Monitoring is a crucial aspect of maintaining and understanding the health and performance of applications, especially in production environments.
Description:
-
Integrate Prometheus:
- Add Prometheus to your chat application's server.
- Ensure that Prometheus is set up correctly to gather metrics from your server.
-
Metrics Implementation:
- Implement at least one metric using Prometheus. At a minimum, add a counter to track the number of messages sent through your server.
- Optionally, consider adding a gauge to monitor the number of active connections to your server. This can provide insights into user engagement and server load.
-
Metrics Endpoint:
- Set up an endpoint within your server application to expose these metrics to Prometheus. This typically involves creating a
/metricsendpoint. - Ensure that the endpoint correctly exposes the metrics in a format that Prometheus can scrape.
- Set up an endpoint within your server application to expose these metrics to Prometheus. This typically involves creating a
Typically, this means using the TextEncoder: https://docs.rs/prometheus/0.13.3/prometheus/struct.TextEncoder.html
You can refer to the Hyper example: https://github.com/tikv/rust-prometheus/blob/master/examples/example_hyper.rs
- Documentation and Testing:
- Document the new metrics feature in your
README.md, including how to access the metrics endpoint and interpret the exposed data. - Test to make sure that the metrics are accurately recorded and exposed. Verify that Prometheus can successfully scrape these metrics from your server.
- Document the new metrics feature in your
Submission:
- After integrating Prometheus and setting up the metrics, commit and push your updated server application to your GitHub repository.
- Update the
README.mdwith instructions on how Prometheus integration works and how to view the metrics. - Ensure that your repository is public and submit the link on our class submission platform.
Deadline:
- The deadline for this assignment is Monday, December 19, 2023.
Lesson 20: Miscellaneous
Introduction
In this lesson, we dive into some of the more specialized but essential areas of Rust programming. These topics may not be part of your everyday coding toolkit, but understanding them can significantly enhance your capabilities as a Rust developer. Each topic holds unique utility in various facets of Rust development, enabling more powerful, flexible, and efficient coding practices.
1. Macros and Meta-programming
Introduction to Macros
Macros in Rust are quite different from what you might be familiar with in other languages. They are powerful tools that allow you to write more expressive and flexible code.
- What are Macros?: Macros are a way of writing code that writes other code, which is known as metaprogramming. In Rust, they are used to define custom syntax or to reduce code repetition.
- Macros vs. Functions: The key difference between macros and functions lies in when they are processed. Macros are expanded during compilation, allowing them to operate on the code itself (e.g., syntax trees), while functions operate on runtime data.
Writing Macros
Writing macros in Rust can initially seem daunting due to their syntax and conceptual overhead. However, they become invaluable tools once mastered.
- The
macro_rules!Construct: This is the most common way of defining macros in Rust. It uses a syntax akin to pattern matching to define how input tokens are transformed into Rust code. - Capture and Repetition Syntax: Macros can capture variables from their calling environment and support repetition, which allows you to repeat certain parts of a macro for each element in a list of inputs.
Example:
#![allow(unused)] fn main() { macro_rules! vec_of_strings { ( $( $x:expr ),* ) => { { let mut temp_vec = Vec::new(); $( temp_vec.push(String::from($x)); )* temp_vec } }; } }
Meta-programming and Procedural Macros
While macro_rules! macros are powerful, procedural macros take Rust's metaprogramming capabilities to
the next level.
- Custom Derive Functionality: Procedural macros can be used to automatically generate code for custom
deriveattributes. This is particularly useful for boilerplate code like implementing common traits for structs. - Using Libraries like
synandquote: Libraries likesynandquoteare used for parsing Rust code into a syntax tree (syn) and then turning these syntax trees back into Rust code (quote). This process is fundamental in writing complex procedural macros.
Example:
#![allow(unused)] fn main() { use proc_macro::TokenStream; use quote::quote; use syn::{parse_macro_input, DeriveInput}; #[proc_macro_derive(MyCustomDerive)] pub fn my_custom_derive(input: TokenStream) -> TokenStream { let input = parse_macro_input!(input as DeriveInput); let name = input.ident; let expanded = quote! { impl MyTrait for #name { fn my_function(&self) -> String { String::from("Hello from MyCustomDerive") } } }; TokenStream::from(expanded) } }
In this lesson, we have explored the power and utility of macros and metaprogramming in Rust. These concepts enable developers to write more abstract, concise, and reusable code, enhancing the overall efficiency and capability of their Rust applications.
2. Interfacing with C and Other Languages
The FFI (Foreign Function Interface)
The Foreign Function Interface (FFI) in Rust is a powerful feature that allows Rust programs to interface with other programming languages, notably C. This is crucial in scenarios where you need to use libraries written in other languages or when Rust needs to interact with system-level APIs.
- Purpose and Importance: FFI is essential for leveraging existing libraries and functionalities written in other languages, avoiding the need to rewrite complex logic in Rust. It's also vital for scenarios requiring direct system calls or when interfacing with hardware where C libraries are predominant.
Interacting with C
Interacting with C is a common use case for Rust's FFI capabilities, enabling Rust to call C functions and vice versa.
- Calling C Functions from Rust: This is done using
extern "C"blocks, which declare the external C functions in Rust code. For example:
To call this function, you generally need to use#![allow(unused)] fn main() { extern "C" { fn c_function(arg: i32) -> i32; } }unsafeblocks because Rust cannot guarantee the safety of external code. - Exposing Rust Functions to C: Rust functions can be made available to C by marking them with
#[no_mangle]and declaring them asextern "C". This prevents Rust's name mangling and ensures the C compiler can link to them. - Handling C Data Structures: When working with C data structures, Rust provides several tools and
types (like
c_void,c_int) in thestd::os::rawmodule to mirror C types. Proper handling of these types is crucial to maintain memory safety.
Bindings and Wrapper Libraries
For complex libraries, manually writing bindings can be tedious and error-prone. Tools like bindgen
for Rust and cbindgen for C can automatically generate these bindings.
bindgenandcbindgen:bindgenautomatically generates Rust FFI bindings to C (and some C++) libraries. Conversely,cbindgengenerates C headers for Rust libraries, useful when Rust code needs to be called from C.- Real-world Example: OpenSSL in Rust: OpenSSL, a widely used C library for SSL and TLS protocols,
can be used in Rust through FFI. Rust's
opensslcrate is an example of a wrapper library providing safe Rust bindings for OpenSSL. It usesbindgento generate bindings, allowing Rust applications to leverage OpenSSL for cryptographic functions.
Example:
// Using the openssl crate in Rust extern crate openssl; use openssl::ssl::{SslMethod, SslConnector}; fn main() { let connector = SslConnector::builder(SslMethod::tls()).unwrap().build(); // Now you can use connector to initiate secure connections... }
Through FFI and tools like bindgen, Rust can effectively interface with C and other languages, expanding
its applicability to areas where native libraries are predominant or where system-level interaction is
required. This interoperability is one of the strengths of Rust, making it a versatile choice for various
programming scenarios.
bindgen
bindgen is a powerful tool in the Rust ecosystem, specifically designed to facilitate the creation of
bindings between Rust and C/C++ libraries. It plays a crucial role in Rust's interoperability with existing
C/C++ codebases, making it an indispensable tool for projects that rely on native libraries.
How bindgen Works
- Automatic Bindings Generation:
bindgenautomates the process of generating Rust FFI bindings to C and C++ code. It works by parsing C/C++ header files and generating corresponding Rust code. This includes functions, structs, enums, and constants. - Usage with Build Scripts: Typically,
bindgenis used in Rust's build scripts (build.rs). This script instructscargoto automatically generate bindings at compile time. This approach ensures that the bindings are always up-to-date with the C/C++ source.
Advanced Features of bindgen
- Customization:
bindgenprovides numerous options to customize the generated bindings. For example, you can specify which functions, types, or variables to include or exclude. This is particularly useful for large libraries where you only need a subset of the functionality. - Handling Complex Types:
bindgeneffectively handles complex C/C++ types, including nested structs, unions, and C++ classes (limited support). It translates these types into equivalent Rust types, respecting memory layout and alignment. - Callbacks and Function Pointers:
bindgencan handle function pointers and callbacks, translating them into Rust function types or closures. This is crucial for libraries that use callbacks for event handling or async operations.
Integration with Other Rust Tools
- Compatibility with
cargo:bindgenintegrates seamlessly with Rust's package manager,cargo. This integration simplifies the process of including native libraries in Rust projects. - Working with
ccCrate: For projects where you need to compile C/C++ source code as part of the build process,bindgencan be used alongside thecccrate. This combination allows for compiling C/C++ code into static libraries and then generating Rust bindings for them.
Real-World Usage
- Wide Adoption: Many Rust crates that provide bindings to popular C/C++ libraries use
bindgen. For instance, thebzip2-rsandopenssl-syscrates usebindgento generate bindings to the respective C libraries. - Cross-Language Interoperability:
bindgenis not only useful for calling C/C++ code from Rust but also beneficial for projects where Rust is part of a larger polyglot system. It allows Rust components to seamlessly interact with parts of the system written in C/C++.
Challenges and Best Practices
- Safety Considerations: While
bindgengenerates the necessary code to interface with C/C++, the safety guarantees of Rust are not automatically applied to this generated code. It is the developer's responsibility to use the unsafe code appropriately and to provide safe abstractions where possible. - Keeping Bindings Updated: In projects with rapidly evolving C/C++ codebases, keeping the Rust bindings in sync can be challenging. Automating the bindings generation as part of the build process helps mitigate this issue.
In summary, bindgen is a key tool for Rust developers working with C/C++ libraries. It streamlines the
process of interfacing Rust with other languages, fostering the creation of robust and interoperable systems.
3. Rust for Frontend Development
WebAssembly (Wasm) and Rust
The advent of WebAssembly (Wasm) has opened new horizons for frontend development, and Rust is uniquely positioned to leverage these opportunities due to its performance and safety features.
- Advantages of using Rust with Wasm: Rust compiles to WebAssembly, bringing its performance and efficiency to web applications. This combination is particularly powerful for compute-intensive tasks, like graphics rendering or complex calculations, traditionally challenging for JavaScript.
- Performance and Security Benefits: Rust's emphasis on safety and zero-cost abstractions translates well into Wasm. It minimizes runtime errors and ensures memory safety, which is crucial for web applications. Additionally, Rust's compiled nature and efficient memory management lead to performance improvements over traditional JavaScript applications.
Frameworks and Libraries
Several frameworks and libraries in the Rust ecosystem facilitate frontend development, bridging the gap between Rust and web technologies.
-
Introduction to Yew, Seed, and Other Frontend Frameworks:
- Yew: A modern Rust framework for creating multi-threaded frontend web apps using Wasm. It features a component-based architecture similar to React and supports hooks and functional components.
- Seed: Another Rust frontend framework, Seed offers a simple-to-use, Elm-inspired approach to building web applications. It aims to be developer-friendly and straightforward without sacrificing power or flexibility.
-
Building and Deploying a Sample Frontend Application Using Rust: Here’s a basic outline for creating a simple web application with Yew:
- Setting Up: Start by setting up a new Rust project and add Yew as a dependency in your
Cargo.toml. - Creating Components: Define your components, just like you would in React. Yew uses a similar JSX-like syntax, making it familiar to those coming from a JavaScript background.
- State Management: Manage the application's state within components or use context for shared state across the app.
- Routing: Yew provides tools for client-side routing, allowing you to define navigable pages and links.
- Building for Wasm: Compile your Rust project to WebAssembly using
wasm-pack. - Deployment: Deploy the compiled Wasm application using standard web servers or static site hosts like Netlify or GitHub Pages.
- Setting Up: Start by setting up a new Rust project and add Yew as a dependency in your
Example Cargo.toml snippet for a Yew project:
[dependencies]
yew = "0.18"
In conclusion, the integration of Rust with WebAssembly is revolutionizing frontend web development, offering performance and security that were previously difficult to achieve. Frameworks like Yew and Seed make this integration accessible, enabling Rust developers to build fast, secure, and interactive web applications. The potential of Rust in the realm of frontend development is immense, and it's an exciting area for Rustaceans to explore and innovate.
4. Nightly Rust
Stable vs. Nightly Rust
Rust, as a language, maintains different release channels to cater to various user needs and development stages. These channels are primarily Stable, Beta, and Nightly.
- Release Channels of Rust:
- Stable Rust: This is the official release channel that most Rust users should be using. It offers the latest officially released features and changes every six weeks. It's considered the most reliable and well-tested version.
- Nightly Rust: The Nightly channel is where all the new, experimental features live. It's updated daily and includes the latest developments in the Rust compiler and standard library. While it provides access to cutting-edge features, it's less stable and can introduce breaking changes.
Features Exclusive to Nightly
Nightly Rust is enticing for developers wanting to explore the forefront of Rust's capabilities.
- Using Feature Flags: In Nightly Rust, many new features are gated behind feature flags. These flags
are annotations that enable experimental features in your code. For example, using
#![feature(async_closure)]in your code would allow you to experiment with asynchronous closures. - Previewing Future Rust Features: Nightly gives a sneak peek into what might become part of Stable Rust in the future. It's a playground for testing new language features, optimizations, and APIs before they are finalized for the Stable release.
Considerations for Nightly Use
While Nightly Rust is exciting, it's essential to consider its implications, especially in production environments.
- Stability Concerns: Nightly releases are inherently less stable than Stable Rust. They haven't undergone the same level of testing and can include incomplete features. This instability can lead to unexpected behavior and bugs.
- Bugs and Breakages: Features in Nightly Rust can change rapidly, and there's always a risk of encountering bugs or having your code break with a new nightly release. These aspects make Nightly less suitable for production use, where stability and predictability are key.
- Production Scenarios: For most production scenarios, the recommendation is to stick with Stable Rust. This ensures that your codebase remains stable and free from the volatilities of ongoing development. Nightly Rust is best used for experimentation, contributing to Rust itself, or in situations where you specifically need a feature that's only available in Nightly.
In summary, Nightly Rust offers a glimpse into the future of the Rust language, providing access to the latest features and improvements. However, its dynamic and experimental nature means that it's not the best fit for all scenarios, particularly where stability and long-term maintenance are crucial. It's an excellent tool for experimentation and exploration, but for most production needs, Stable Rust remains the go-to choice.
Showcasing Notable Nightly Rust Features
Nightly Rust includes a range of experimental features that are not yet available in the Stable version. These features often include new syntax, optimizations, or additions to the standard library. Below are a couple of notable examples:
1. Generators and Async/Await Syntax
One of the most significant additions to Rust, initially available only on Nightly, was the async/await syntax, which has since been stabilized. However, Nightly continues to experiment with advanced forms of asynchronous programming.
- Generators: Generators, still a Nightly-exclusive feature, allow the creation of coroutines in Rust. They enable functions to yield multiple times, returning a sequence of values over time.
- Async Blocks in Constants: The ability to use async blocks within constants is an ongoing experiment in Nightly Rust. This feature would allow more flexible and powerful compile-time computations.
Example using generators (requires Nightly and feature flag):
#![feature(generators, generator_trait)] use std::ops::{Generator, GeneratorState}; use std::pin::Pin; fn generator_example() -> impl Generator<Yield = i32, Return = ()> { || { yield 1; yield 2; yield 3; } } fn main() { let mut gen = generator_example(); loop { match Pin::new(&mut gen).resume(()) { GeneratorState::Yielded(x) => println!("{}", x), GeneratorState::Complete(_) => break, } } }
2. Const Generics
Const generics is another feature that's been in the works in Nightly Rust. It extends Rust's powerful generics system to allow types to be parameterized by constants.
- Const Generics: This feature enables types to be parameterized with compile-time values, such as integers. This has broad applications in areas like numeric programming, where it allows for more precise type control.
Example using const generics (requires Nightly and feature flag):
#![feature(const_generics)] struct Array<T, const N: usize>([T; N]); impl<T, const N: usize> Array<T, N> { fn new(values: [T; N]) -> Self { Array(values) } } fn main() { let array: Array<i32, 3> = Array::new([1, 2, 3]); // Use array... }
Note on Nightly Features
It's important to remember that while these features are exciting, they are also subject to change and might not make it into the Stable channel in their current form. Therefore, when using these features, one should be prepared for potential changes or removal in future Nightly builds. Using Nightly features is a great way to explore the cutting-edge capabilities of Rust and provide feedback on their development.
5. Debugging
Introduction to Debugging in Rust
Debugging is a crucial aspect of software development, and Rust is no exception. Effective debugging helps to quickly identify and resolve issues in your code, leading to more reliable and robust applications.
- Importance of Effective Debugging: In Rust, the compiler's strictness catches many potential errors at compile-time. However, logic errors, runtime errors, and performance issues still need to be diagnosed and resolved through debugging.
Using Print and Logging
Print debugging is a simple yet often effective way to understand what's happening in your code. Rust provides a handy macro for this purpose.
- The
dbg!Macro: This macro is a quick and easy way to print the value of a variable along with its file and line number information. It's especially useful during development and prototyping. Thedbg!macro returns the value of what it prints, making it easy to insert into existing code without altering behavior.
Example:
#![allow(unused)] fn main() { let x = 42; let y = dbg!(x * 2) + 1; // This will print something like "[src/main.rs:2] x * 2 = 84" }
Debuggers and Tools
For more advanced debugging, Rust integrates well with standard debugging tools and also offers Rust-specific enhancements.
- Using
gdbandlldbwith Rust: Both GDB (GNU Debugger) and LLDB (LLVM's Debugger) can be used to debug Rust programs. They provide features like setting breakpoints, stepping through code, inspecting memory, and more. - Rust-specific tools like
rust-gdb:rust-gdbis a wrapper script around GDB that provides better integration with Rust. It improves the formatting of Rust values and structures in GDB's output, making it easier to interpret.
Example of using rust-gdb:
rust-gdb target/debug/my_program
- Profiling and Performance Analysis: Beyond finding bugs, debugging also involves performance analysis. Tools like Valgrind, Instruments (on macOS), and perf (on Linux) are commonly used for profiling Rust applications. They help in identifying performance bottlenecks, memory leaks, and other inefficiencies.
Profiling Example:
Using perf on Linux:
perf record target/release/my_program
perf report
This command records the performance of the program and then generates a report detailing CPU usage and other performance metrics.
Note on Debugging
While dbg! and print debugging are useful, they are just the starting point. Leveraging more powerful
tools like GDB, LLDB, and Rust-specific scripts like rust-gdb can significantly enhance your debugging
capabilities. Profiling tools further aid in refining your application's performance, ensuring efficient
and optimal operation.
In summary, debugging in Rust encompasses a variety of strategies, from simple print statements to sophisticated use of debuggers and profilers. Each method plays a role in building a complete understanding of your Rust applications' behavior and performance.
Conclusion: Farewell and Looking Ahead
As we conclude not only Lesson 19: "Miscellaneous" but also our journey through the Rust programming course, it's time to reflect on the path we've traversed and look forward to the adventures that await in your programming future.
-
A Journey Through Rust: We've explored the many facets of Rust, from its fundamental concepts to more advanced features. Each lesson has built upon the last, crafting a comprehensive understanding of this powerful language. From ownership and borrowing to concurrency, FFI, and beyond, you've gained knowledge that positions you well for real-world Rust development.
-
The Breadth of Rust's Ecosystem: This final lesson, encompassing topics like macros, FFI, Nightly Rust, and debugging, underscores the depth and versatility of Rust. These diverse elements of the Rust ecosystem demonstrate its capability to handle a wide array of programming challenges, making it an invaluable tool in your software development arsenal.
-
Looking Ahead: As you move forward, remember that learning is a continuous journey. The Rust community is vibrant and ever-evolving, with new libraries, tools, and features regularly emerging. Stay engaged with the community, explore open-source projects, and continue building your skills.
-
Farewell, But Not Goodbye: While this course may be ending, your journey with Rust is just beginning. The skills you've acquired here are a foundation upon which you can build incredible software. Embrace the challenges and opportunities that come with being a Rustacean.
Thank you for taking part of the course. As you venture forth, armed with the knowledge and skills gained, remember that the world of Rust programming is pretty fun and has good memes. Cya, guys.
Additional resources
Links
Nix in Braiins
Nix is a powerful package manager for Linux and other Unix systems that makes package management reliable and reproducible. It provides a declarative approach to package and configuration management and is designed to ensure that package installations are isolated from each other. This isolation prevents the common "dependency hell" and makes it easy to roll back changes. Nix stores all packages in unique directories in the Nix store, identified by hashes of their dependencies, ensuring that different configurations can coexist without interference. Its approach to package management is highly innovative and offers a high degree of flexibility, particularly for complex software environments.
Nix and Rust together work pretty well to create a powerful combination for reliable and efficient software development.
In Braiins, we use Nix in several places:
Keep in mind that you maybe do not have access to all of these repositories.
Why Nix for Rust?
Rust is known for its safety and performance, while Nix offers unmatched reproducibility and dependency management. The integration of Nix in Rust development can make some things a breeze
- Reproducibility: Nix ensures that your Rust projects are built in a consistent environment, avoiding the "it works on my machine" problem.
- Dependency Management: Nix handles complex dependency trees gracefully, ensuring that all dependencies are correctly versioned and isolated.
- Isolation: Using Nix, each project can have its own isolated environment with specific versions of the Rust compiler and dependencies.
Our main motivation were the following:
- Effective caching in CI - Nix hashes everything and keeps built derivations in a so called "nix store" typically located in the /nix/store folder of your local installation
- Dependencies for cross-compilation - In Tooling, we cross-compile to several different architectures for Linux and also produce builds of Toolbox for Windows and Mac
Example: Setting up Nix
To start using Rust with Nix, you first need to set up an environment.
Start by installing Nix, here's how to do it:
-
Install Nix: If you haven't already installed Nix, you can do so by running:
sh <(curl -L https://nixos.org/nix/install) --daemon -
Enable Flake Support: As of Nix 2.4, flakes are an experimental feature, so you need to enable them manually. Edit
/etc/nix/nix.conf(or~/.config/nix/nix.confif you're not using NixOS) and add:experimental-features = nix-command flakes
Here's an example of how to create a simple Nix shell environment for Rust development:
-
Create a file named
shell.nixwith the following content:{ pkgs ? import <nixpkgs> {} }: pkgs.mkShell { buildInputs = [ pkgs.rustc pkgs.cargo ]; }This
shell.nixfile specifies that you want an environment withrustc(the Rust compiler) andcargo(Rust's package manager and build tool). -
Enter the Nix shell by running:
nix-shellThis command will download and install the specified versions of
rustcandcargointo a temporary environment. Note that while I show you how to do this with rustc and Cargo, there is a plenty of packages you can find here https://search.nixos.org/packages -
Once inside the Nix shell, you can start using Rust as usual. Any Rust project you build inside this shell will use the exact versions of Rust and Cargo specified in
shell.nix.
In our repositories, however, we use a more finetuned approach - managing Rust versions
with fenix and building Rust crates with
crane.
We will introduce these properly after we get into flakes.
Example: Adding Rustfmt and Clippy
Extend your shell.nix to include rustfmt and clippy:
{ pkgs ? import <nixpkgs> {} }:
pkgs.mkShell {
buildInputs = [ pkgs.rustc pkgs.cargo pkgs.rustfmt pkgs.clippy ];
}
Now, when you enter the Nix shell, you'll also have access to rustfmt and clippy
alongside rustc and cargo.
Introduction to Flakes
Flakes are a feature in Nix that provides a more reproducible and manageable way of handling packages and configurations. A flake is essentially a function that has inputs and outputs, and locks dependencies to a specific version.
What are Flakes?
Flakes are a new way to manage Nix projects that bring several advantages over the
traditional nix-shell approach. They allow for:
- Reproducible Environments: Flakes lock the versions of all dependencies, ensuring that every user gets the exact same development environment.
- Declarative Configuration: Flakes make Nix configurations more readable and manageable by using a declarative syntax.
- Improved Dependency Management: Flakes handle dependencies in a more consistent and reliable manner.
Key Features of Flakes
The key features of flakes include:
- Lock File: Flakes generate a
flake.lockfile which pins the versions of all dependencies, making builds reproducible across different machines. - Inputs: Flakes can specify inputs (like Nix packages or other flakes) which are tracked and versioned.
- Outputs: Flakes produce outputs, such as Nix packages, NixOS modules, or anything else that can be built with Nix.
Flakes in the Context of Rust Development
In Rust development, flakes can be particularly useful for:
- Managing Rust Toolchain: Specifying the exact versions of
rustcandcargoensures that all developers and CI systems use the same compiler and tool versions. - Handling Dependencies: Rust projects often have numerous dependencies; flakes can manage these dependencies in a reproducible manner.
Example: Creating a Basic Flake
-
Start by creating a
flake.nixfile in your Rust project's root directory:{ description = "A simple Nix flake example"; inputs = { nixpkgs.url = "github:NixOS/nixpkgs/nixpkgs-unstable"; }; outputs = { self, nixpkgs }: { defaultPackage.x86_64-linux = nixpkgs.legacyPackages.x86_64-linux.hello; }; }This file defines a basic flake which re-exports the hello package from the nixpkgs repository. If you try
nix run .#, it should print "Hello world!". -
Build your project with:
nix buildThis command only builds the flake.
Here is an example with a custom derivation for the default package:
{
description = "A simple Nix flake with a custom derivation";
inputs = {
nixpkgs.url = "github:NixOS/nixpkgs/nixpkgs-unstable";
};
outputs = { self, nixpkgs }: {
defaultPackage.x86_64-linux = nixpkgs.stdenv.mkDerivation {
name = "my-custom-package";
buildCommand = ''
mkdir -p $out/bin
echo -e "#!/bin/sh\necho Hello from custom derivation!" > $out/bin/my-script.sh
chmod +x $out/bin/my-script.sh
'';
};
};
}
Using flakes in this way ensures that your Rust project is built in a consistent, reproducible environment, minimizing "works on my machine" issues.
Configuring the Rust Development Environment
We can see how to work with Rust by taking inspiration from the docker-spider project:
#![allow(unused)] fn main() { { inputs = { crane = { url = "github:ipetkov/crane"; inputs = { flake-utils.follows = "flake-utils"; nixpkgs.follows = "nixpkgs"; }; }; fenix = { url = "github:nix-community/fenix"; inputs.nixpkgs.follows = "nixpkgs"; }; flake-utils.url = "github:numtide/flake-utils"; nixpkgs.url = "nixpkgs/nixos-unstable"; }; outputs = { self, crane, fenix, flake-utils, nixpkgs }: flake-utils.lib.eachDefaultSystem (system: { packages.default = let craneLib = crane.lib.${system}.overrideToolchain fenix.packages.${system}.minimal.toolchain; in craneLib.buildPackage { src = ./.; pname = "docker-spider"; }; }); } }
First, we provide toolchain via Fenix (this example is simple and just takes
the default minimal toolchain, but we can use it to get toolchain info from sources
such as the rust-toolchain.toml file as well).
Next, we create a simple crane package:
craneLib.buildPackage {
src = ./.;
pname = "docker-spider";
};
Entering the Development Shell: Use the nix develop command to enter a shell
with all the dependencies specified in your flake.nix:
nix develop
Inside this shell, you will have access to the Rust compiler (rustc), Cargo, and
any other dependencies you've added to your flake.nix.
Building and Running the Rust Project with Nix Flakes
To build and run your Rust project using Nix flakes, follow these steps:
-
Building with Nix: Use the
nix buildcommand to build your project according to the specifications in yourflake.nix:nix build -
Running the Built Executable: The output of your build will be in the
resultdirectory. You can run your executable directly from there:./result/bin/my-rust-project
That's about it for the introduction.
Flakes
Nix Flakes are an essential part of the Nix ecosystem, offering a more reproducible, composable, and declarative approach to package management. Here's a comprehensive overview with examples:
Overview
- Purpose: Flakes provide a hermetic, reproducible, and declarative way to manage Nix packages, projects, and configurations.
- Components:
- Flake.nix: Central to any flake, this file declares inputs (dependencies), outputs (packages, applications), and how to build them.
- Lock File: Ensures reproducibility by pinning the exact version of each input.
This file is called
flake.lock
Basic Structure
A simple flake.nix might look like this:
{
description = "A simple Nix flake example";
inputs = {
nixpkgs.url = "github:NixOS/nixpkgs/nixpkgs-unstable";
};
outputs = { self, nixpkgs }: {
defaultPackage.x86_64-linux = nixpkgs.legacyPackages.x86_64-linux.hello;
};
}
This is the same example from the previous chapter
Using Flakes
- Creating a New Flake: Initialize a new flake in a directory with
nix flake init. - Building a Flake: Use
nix buildto build the flake's default package. - Updating Flake Inputs: Run
nix flake updateto update the inputs according to the lock file.
Example: Packaging an Application
Here's an example of packaging a simple application with a flake:
{
description = "My Application";
inputs = {
nixpkgs.url = "nixpkgs/nixos-unstable";
};
outputs = { self, nixpkgs }: {
packages.x86_64-linux.myapp = nixpkgs.stdenv.mkDerivation {
name = "myapp";
src = ./.;
buildInputs = [ nixpkgs.gcc nixpkgs.make ];
buildPhase = ''
make
'';
installPhase = ''
mkdir -p $out/bin
cp myapp $out/bin/
'';
};
};
}
Advanced Usage
- Overlays: Customize packages from
nixpkgsusing overlays. - Custom Inputs: Include other flakes as inputs.
- Cross-Compilation: Support for cross-compiling to different platforms.
Best Practices
- Version Control: Keep your
flake.nixandflake.lockunder version control. - Modularity: Create modular and reusable components.
- Documentation: Document the purpose and usage of your flakes.
Limitations
- Compatibility: Not all Nix packages, libraries, or configurations have been converted to flakes.
- Not all features related to flakes are stable yet
Examples of derivations
Derivations are Nix's counterpart to packages (and also sometimes intermediary build steps leading to packages!).
Many language-specific libraries, such as crane provide wrappers which construct derivations for you.
The simplest way to create a derivation is to use the mkDerivation function:
Example 1: Basic C Application
{
description = "A simple C application";
inputs = {
nixpkgs.url = "github:NixOS/nixpkgs/nixos-21.05";
};
outputs = { self, nixpkgs }: {
packages.x86_64-linux.myCApp = nixpkgs.stdenv.mkDerivation {
pname = "myCApp";
version = "1.0";
src = ./.;
buildInputs = [ nixpkgs.gcc ];
};
};
}
Example 2: Python Application with Custom Phases
{
description = "A Python application";
inputs = {
nixpkgs.url = "github:NixOS/nixpkgs/nixos-21.05";
};
outputs = { self, nixpkgs }: {
packages.x86_64-linux.myPythonApp = nixpkgs.stdenv.mkDerivation {
pname = "myPythonApp";
version = "1.0";
src = ./.;
buildInputs = [ nixpkgs.python3 ];
buildPhase = ''
python3 setup.py build
'';
installPhase = ''
python3 setup.py install --prefix=$out
'';
};
};
}
Example 3: Application with Custom Patches and Post-Install
{
description = "An application with custom patches";
inputs = {
nixpkgs.url = "github:NixOS/nixpkgs/nixos-21.05";
};
outputs = { self, nixpkgs }: {
packages.x86_64-linux.myPatchedApp = nixpkgs.stdenv.mkDerivation {
pname = "myPatchedApp";
version = "1.0";
src = ./.;
patches = [ ./fix-bug.patch ./add-feature.patch ];
postInstall = ''
echo "Post-install actions here"
'';
};
};
}
Example 4: Application with Pre-Configured and Post-Build Steps
{
description = "Application with pre- and post-build steps";
inputs = {
nixpkgs.url = "github:NixOS/nixpkgs/nixos-21.05";
};
outputs = { self, nixpkgs }: {
packages.x86_64-linux.myComplexApp = nixpkgs.stdenv.mkDerivation {
pname = "myComplexApp";
version = "1.0";
src = ./.;
preConfigure = ''
echo "Pre-configuration actions here"
'';
postBuild = ''
echo "Post-build actions here"
'';
};
};
}
Some important fields in mkDerivation:
pname: Package name.version: Package version.src: Source of the package, often the current directory (./.).buildInputs: List of dependencies required to build the package.buildPhase,installPhase,preConfigure,postInstall,postBuild: Custom phases to control different stages of the build process.patches: List of patches to be applied to the source.
CI/CD - Single projects
{
inputs = {
crane = {
url = "github:ipetkov/crane";
inputs = {
flake-utils.follows = "flake-utils";
nixpkgs.follows = "nixpkgs";
};
};
fenix = {
url = "github:nix-community/fenix";
inputs.nixpkgs.follows = "nixpkgs";
};
flake-utils.url = "github:numtide/flake-utils";
nixpkgs.url = "nixpkgs/nixos-unstable";
};
outputs = { self, crane, fenix, flake-utils, nixpkgs }:
flake-utils.lib.eachDefaultSystem (system: {
packages.default =
let
craneLib = crane.lib.${system}.overrideToolchain
fenix.packages.${system}.minimal.toolchain;
in
craneLib.buildPackage {
src = ./.;
pname = "docker-spider";
};
});
}
The flake.nix File
-
Inputs: The file specifies several inputs, including
crane,fenix,flake-utils, andnixpkgs. These inputs are likely dependencies or tools required for your project. Each of these inputs has a URL, indicating where Nix can fetch them, and some have additional input dependencies themselves. -
Outputs: The outputs section is where the actual build and deployment configurations are defined. This file uses
flake-utils.lib.eachDefaultSystem, suggesting it's set up to handle multiple systems (or architectures). This is a common practice for building packages that are compatible with different operating systems or hardware architectures. -
Build and Deployment Logic: Inside the outputs, you would typically define how your application or package is built and possibly how it should be deployed. This can include custom build scripts, packaging instructions, and more.
Creating a .gitlab-ci.yml for GitLab CI
To use this flake.nix in a GitLab CI pipeline, you need to create a .gitlab-ci.yml file that tells
GitLab CI how to build and test your project using Nix. Here's a basic example:
stages:
- build
- test
build-job:
stage: build
image: nixos/nix
script:
- nix build
artifacts:
paths:
- result
Explanation:
- Stages: Defined two stages,
buildandtest. You can add more stages likedeployif needed. - Build Job:
- Uses the
nixos/nixDocker image, which comes with Nix pre-installed. - Runs
nix buildto build your project using theflake.nixfile. - Artifacts (
result) are saved and can be used in later stages.
- Uses the
- Test Job:
- Also uses the
nixos/niximage.
- Also uses the
This setup does no caching. If you can and have access to it, you can use caching in our CI by using the correct image and correct runner tags:
.image: &image
image: docker.ii.zone/pool/main/nix-ci:latest
tags:
- nix
This setup will build and test your Nix project on GitLab CI every time you push changes to your repository. Make sure to adjust the test command and add any additional stages or jobs as needed for your specific project.
Multiple packages in a single project: Frontend Flake
{
# this is the description of the flake. It is just a bit of metadata, not very important for Braiins usecase
description = "Frontend Flake";
# when using `nix develop`, this is what will be prepended
nixConfig.bash-prompt-prefix = "(frontend) ";
# dependencies of the frontend falek
inputs = {
# flakes
nixpkgs.url = "github:NixOS/nixpkgs/nixpkgs-unstable"; # We are using the unstable Nix channel here because Pepa needs a new NodeJS version
flake-utils.url = "github:numtide/flake-utils"; # A library that provides a wrapper that projects your flake to different architectures
# among other things
# a library used for filtering out source code
# we use this to ensure that only what is needed is built
# If we had projects completely separated into folders, we wouldn't need this
# however, there is a common core between the JS packages
nix-filter = {
url = "github:numtide/nix-filter";
};
# this consumes a Python Poetry metadata to create a Nix environment to run and build our Python
poetry2nix = {
url = "github:nix-community/poetry2nix";
inputs.nixpkgs.follows = "nixpkgs";
inputs.flake-utils.follows = "flake-utils";
};
# our repo that provides docker base images for Nix
# we use this for the debian basis
base-images = {
url = "git+ssh://git@gitlab.ii.zone/pool/base-images.nix";
inputs.nixpkgs.follows = "nixpkgs";
inputs.flake-utils.follows = "flake-utils";
inputs.nix-filter.follows = "nix-filter";
};
# adds treefmt support, so we can format everything via nix
treefmt-nix = {
url = "github:numtide/treefmt-nix";
inputs.nixpkgs.follows = "nixpkgs";
};
# git repos that are not flakes yet
#
# locale dependencies
braiins-os-locale = {
url = "git+https://github.com/braiins/bos-i18n.git";
flake = false;
};
web-pool-locale = {
url = "git+https://github.com/slushpool/web-pool-i18n.git";
flake = false;
};
toolbox-locale = {
url = "git+https://github.com/braiins/toolbox-i18n.git";
flake = false;
};
insights-locale = {
url = "git+https://github.com/braiins/insights-i18n.git";
flake = false;
};
};
outputs =
# flakes
{ self # | outputs are a function that takes an attribute set
, nixpkgs # | containing all of the inputs as parameter
, flake-utils # |
, nix-filter # | and returns an attrset with the actual outputs
, poetry2nix # |
, base-images # | in this case, the final attrset is created by
, treefmt-nix # | flake-utils
# git repos from github # |
, braiins-os-locale # |
, web-pool-locale # | any Git repository can be an input to a flake,
, toolbox-locale # | doesn't have to be a flake. You can refer to files
, insights-locale # | from these repositories same as you would to files
, ... # | of a derivation in a flake
}:
flake-utils.lib.eachDefaultSystem
(localSystem:
let
# starting node version # |
NODE_VERSION = "19.6.0"; # |
# Nixpkgs imports
#
# - Set up pkgs for current system
# - Import lib and stdenv
pkgs = (import nixpkgs) { inherit localSystem; }; #
inherit (pkgs) lib; #
inherit (pkgs) stdenv; #
# Outside dependencies
#
# - node dependencies
# - python dependencies
# - git repositories
git-deps = (import ./nix/git-deps.nix) {
inherit braiins-os-locale web-pool-locale toolbox-locale insights-locale stdenv;
};
inherit (git-deps) makeGitDeps;
yarn-deps = (import ./nix/yarn-files.nix) {
inherit stdenv pkgs nix-filter;
};
inherit (yarn-deps) yarnFiles;
python-env = (import ./nix/python-env.nix) {
inherit stdenv pkgs nix-filter localSystem poetry2nix;
};
inherit (python-env) pythonEnv;
# Internal definitions' imports
config = (import ./nix/config.nix) {
inherit stdenv pkgs nix-filter;
};
unpatchedYarnPackages = (import ./nix/packages.nix) {
inherit stdenv pkgs nix-filter config makeGitDeps yarnFiles pythonEnv;
};
yarnPackages = with builtins; let
patchGitInfo = package: stdenv.mkDerivation {
name = "patched-${package.name}";
buildInputs = [ pkgs.gnused ];
phases = [ "buildPhase" ];
buildPhase =
let
placeholder_hash = "REPLACE_THIS_WITH_GIT_HASH";
placeholder_date = "REPLACE_THIS_WITH_GIT_DATE";
head = substring 0 16 (self.rev or "0000000000000000");
date =
let
_ = self.lastModifiedDate or "YYYYMMDDhhmmss";
d = {
YYYY = builtins.substring 0 4 _;
MM = builtins.substring 4 2 _;
DD = builtins.substring 6 2 _;
hh = builtins.substring 8 2 _;
mm = builtins.substring 10 2 _;
ss = builtins.substring 12 2 _;
};
in
"${d.YYYY}-${d.MM}-${d.DD}_${d.hh}:${d.mm}:${d.ss}";
in
''
mkdir -p $out
cp -r ${package}/* $out/
cd $out
# By default, the files are read-only, so we need to change that
chmod a+w -R .
echo "build info"
echo " head = ${head}"
echo " date = ${date}"
# ↓ files ↓ non-binary ↓ containing predefined placeholder strings ↓
paths=($(find . -type f -exec grep -I1q "${placeholder_hash}\|${placeholder_date}" {} \; -print))
# the array expansion is not a valid NIX syntax, so we need to escape
# the variable interpolation pattern to let it be evaluated by bash
for path in ''${paths[@]}; do
echo "Patching the file ''${path}"
sed -i 's|${placeholder_hash}|${head}|g' ''${path}
sed -i 's|${placeholder_date}|${date}|g' ''${path}
done
# Make the files read-only again
chmod a-w -R .
'';
};
in
(mapAttrs (name: value: (patchGitInfo value)) unpatchedYarnPackages.normal);
dockerImages =
(import ./nix/docker-images.nix) {
inherit stdenv pkgs nix-filter base-images yarnPackages;
};
# create a list combining all paths, so we can symlinkJoin them
paths = with builtins; (map (key: getAttr key yarnPackages) (attrNames yarnPackages));
apps =
let
wrapped_command = cmd: {
type = "app";
program =
let
# Merge Linux-only deps with general deps (because of Mac, naturally)
buildInputs = config.buildInputs ++ (lib.optionals pkgs.stdenv.hostPlatform.isLinux config.linuxBuildInputs);
env_script = pkgs.writeShellScript "script.sh" ''
# GitLab CI section start
CIS_NAME="wraper_setup"
CIS_LABEL="Nix command env setup"
CIS_OPTS="[collapsed=true]"
echo -e "\033[0Ksection_start:$(date +%s):$CIS_NAME$CIS_OPTS\r\033[0K$CIS_LABEL"
# ENV
export TERM=${config.env.TERM}
# PATH
export PATH="${lib.concatStringsSep ":" (builtins.map (x: "${x}/bin") (buildInputs))}:$PATH"
export PATH="${pythonEnv}/bin:$PATH"
export PATH="${pkgs.ruff}/bin:$PATH"
echo "PATH:"
sed 's/:/\n - /g' <<< ":$PATH"
# Install local poetry env so that "poetry run" can pick it up
poetry install --no-root --quiet --no-interaction
echo -e "\nPython prefix when running through bare 'python'":
echo -e " $(python -c 'import sys; print(sys.prefix)')\n"
echo -e "\nPython prefix when running through 'poetry run':"
echo -e " $(poetry run python -c 'import sys; print(sys.prefix)')\n"
# GitLab CI section end
echo -e "\033[0Ksection_end:$(date +'%s'):$CIS_NAME\r\033[0K "
${cmd} $@
'';
in
"${env_script}";
};
in
{
# Linters
lint-proto = (wrapped_command "make proto-lint proto-format-diff");
lint-js = (wrapped_command "make lint-js");
lint-yarn = (wrapped_command "make lint-yarn");
lint-styles = (wrapped_command "make lint-styles");
lint-configs = (wrapped_command "make lint-configs");
# Tests
ci-test-static = (wrapped_command "make ci-test-static");
ci-test-unit = (wrapped_command "make ci-test-unit");
# util
wrapped-make = (wrapped_command "make");
};
in
{
inherit apps;
# Set formatter and enable packages by including them here.
#
# To add a docker image, go to
# ./nix/docker-images.nix
#
# To add a package, go to
# ./nix/packages.nix
#
# Keep in mind that you will have to define a new dependency to the docker images,
# which you will have to pass in as a parameter (see insights-docker for an example).
formatter = treefmt-nix.lib.mkWrapper pkgs {
projectRootFile = "flake.nix";
programs.nixpkgs-fmt.enable = true;
programs.black.enable = true;
settings.formatter.ruff = {
command = pkgs.ruff;
options = [ "check" ];
includes = [ "*.py" ];
};
};
packages = yarnPackages // (lib.optionalAttrs pkgs.stdenv.hostPlatform.isLinux dockerImages) // unpatchedYarnPackages.cypress // {
default = pkgs.symlinkJoin {
name = "all";
inherit paths;
};
nodeDeps = yarn-deps.yarnFiles;
pythonEnv = python-env.pythonEnv;
};
# Default X86 shell
# You can create shells for other platforms and configurations
devShells.default = pkgs.mkShell {
# Default x86_64-linux shell
# This shell will be invoked if you just type:
#
# ```
# nix develop
# ```
#
# You can create more shells following this example,
# but you will need to call them something else
buildInputs = config.buildInputs ++ [
pkgs.nodejs_20
pkgs.netcat-gnu
];
shellHook = ''
export PATH="${pythonEnv}/bin:$PATH"
export PATH="${pkgs.ruff}/bin:$PATH"
poetry env use "$(python -c 'import sys; print(sys.prefix)')/bin/python"
'';
inherit (config) env;
};
});
}
Multiple packages in a single project: Tooling Flake
Nix basic concepts and patterns
Here are some common patterns and concepts you'll often encounter in Nix:
-
Attribute Sets: These are similar to dictionaries or maps in other languages. They are a key-value store, where the keys are strings and the values can be of any type.
{ packageName = "example"; version = "1.2.3"; dependencies = [ "dep1" "dep2" ]; } -
Functions: Functions are first-class citizens in Nix. They are often used to parameterize package descriptions.
{ stdenv, fetchurl }: stdenv.mkDerivation { name = "example-1.2.3"; src = fetchurl { url = "http://example.com/example-1.2.3.tar.gz"; sha256 = "0l6m5..."; }; } -
Derivations: The most important concept in Nix is the derivation. A derivation describes everything needed to build a package (source, dependencies, build script, etc.).
derivation { name = "example-1.2.3"; builder = "${bash}/bin/bash"; args = [ ./builder.sh ]; env = { source = fetchurl { url = "http://example.com/example-1.2.3.tar.gz"; sha256 = "0l6m5..."; }; }; } -
String Interpolation: Nix supports string interpolation, making it easy to compose strings.
let name = "example"; version = "1.2.3"; in "${name}-${version}" -
Let-In Blocks: Used for defining local variables. The
letblock allows you to define a set of local variables that can be used in the expression following thein.let x = 10; y = 20; in x + y # 30 -
Importing Other Nix Files: Nix allows modularization by letting you import other Nix files.
let myPackage = import ./my-package.nix; in myPackage -
Conditional Expressions: Nix supports
if...then...elseexpressions for conditional logic.if lib.versionAtLeast lib.version "2.0" then { enableFeatureX = true; } else { enableFeatureX = false; } -
Lists: Just like in other languages, Nix supports lists. They are often used for dependencies.
[ "pkg1" "pkg2" "pkg3" ] -
Overrides and Customization: One powerful feature of Nix is the ability to override or customize packages. This is often done using the
overrideAttrsfunction.pkgs.hello.overrideAttrs (oldAttrs: { buildInputs = oldAttrs.buildInputs ++ [ pkgs.gnutls ]; })This example takes the existing
hellopackage and addsgnutlsto itsbuildInputs. -
Builtins and Language Constructs: Nix has several built-in functions and language constructs that are frequently used.
builtins.fetchGit: Fetches sources from a Git repository.builtins.readFile: Reads the contents of a file into a string.
let version = builtins.readFile ./version.txt; in "Package version: ${version}" -
Lazy Evaluation: Nix employs lazy evaluation, meaning expressions are only evaluated when they are needed. Keep that in mind, since your code may not execute when you expect it to. (Particularly when debugging)
-
Path Expressions: Nix has a unique way of handling file paths, using the
/operator to construct paths in a manner that is aware of the Nix store.let src = ././source; in "${src}/subdir/file" -
Platform Specifics: Nix allows you to specify platform-specific dependencies or configurations using conditional expressions.
{ stdenv }: stdenv.mkDerivation { name = "example"; buildInputs = stdenv.lib.optionals stdenv.isLinux [ pkgs.glibc ] ++ stdenv.lib.optionals stdenv.isDarwin [ pkgs.darwin.apple_sdk.frameworks.CoreFoundation ]; } -
Using
withStatement: Thewithstatement allows for importing all attributes from a given set into the local scope, reducing the need for prefixing them.
with pkgs;
let
myPackage = stdenv.mkDerivation {
name = "my-package";
buildInputs = [ git cmake gcc ];
};
in
myPackage
- Conditional Dependencies with
lib.optionals: You can conditionally include dependencies based on certain conditions usinglib.optionals.
{ lib, stdenv, fetchurl, openssl, libevent }:
stdenv.mkDerivation {
name = "example";
src = fetchurl {
url = "http://example.com/example.tar.gz";
sha256 = "0l6m5...";
};
buildInputs = [ openssl libevent ]
++ lib.optionals stdenv.isLinux [ pkgs.glibc ];
}
- Dynamic Attribute Set with
mapAttrs: ThemapAttrsfunction is used to transform each attribute in a set, which is useful for dynamically creating attribute sets.
let
inputSet = { a = 1; b = 2; c = 3; };
outputSet = lib.mapAttrs (name: value: value * 2) inputSet;
in
outputSet # { a = 2; b = 4; c = 6; }
- Environment Variables in Derivations: You can set environment variables in package derivations, which are used during the build process.
stdenv.mkDerivation {
name = "example";
buildInputs = [ openssl ];
preBuild = ''
export OPENSSL_DIR=${openssl.dev}
'';
}
Resources
- Awesome Nix - A curated list of the best resources in the Nix community, covering a wide range of topics related to Nix.
- Learn Nix | Nix & NixOS - A comprehensive guide.
- Zero to Nix - A beginner-friendly learning resource for Nix, designed to help newcomers get started.
- Nix from First Principles: Flake Edition - A recent tutorial focused on learning Nix via flakes.
- Nix Notes - A collection of short notes about Nix, each contributing to the same virtual machine image.
- Nix Pills - The best way to learn, with examples.
- Nix Shorts - A collection of short notes about how to use Nix, updated for Nix Flakes.
Tour of Rust tooling
You unlock this door with the key of imagination. Beyond it is another dimension - a dimension of sound, a dimension of sight, a dimension of mind. You're moving into a land of both shadow and substance, of things and ideas. You've just crossed over into the Twilight Zone!
Imagine, if you will, a foreign Rust codebase with a lot of issues, and you gotta fix the issues as quickly and as effectively as possible. Doing everything by hand is a waste of time.
For that, we need to become a little familiar with Rust tooling.
Luckily, we don't have to imagine and speak theoreticals. For this workshop, we have prepared one such small codebase:
https://github.com/luciusmagn/workshop-tools-testauskameli
This is a fork of a hobby open-source project I developed with a friend a while ago. Thanks to the additions of the fork, it now has all the good stuff:
- Incomprehensible user documentation (it's in Finnish)
- It does not compile out of the box
- Both missing and redundant dependencies
- When it does, it causes a segfault despite being completely safe Rust
Our goal for today is to get it to compile, fix the segfault and the style issues, all by using tools available to us in the Rust toolchain, with the addition of a couple community tools.
We are not allowed to disable large sections of code as the "make it compile" part of the task, or to forgo any functionality.
The following command should work on both debug and release build profiles when we are done without panic!s or segfaults:
# in root of repository,
# for every file in ./echo-tests
cat file | cargo run --bin cli
This command spins up the cli testing frontend of the Testauskameli bot. The "echo"
handler of the bot takes any message starting with echo , stripping it, capitalizing
the first letter and returning the result.
If you believe you got the hang of Rust's tooling, consider this a time challenge, and see how fast you can fix the repository. When you complete the challenge, send an email to the following address with your time and I will make a leader-board here:
For the rest of us, let's get started.
The repository contains no sub-modules and we are working on the master branch, so
you can just clone it normally:
git clone https://github.com/luciusmagn/workshop-tools-testauskameli
rustup
Before we get to using tools from the toolchain, we must first get acquainted with rustup,
the tool that manages toolchains.
It is generally advisable to install Rust via rustup, as it allows you to have more than
one toolchain at once without issue and mix and match toolchain components, which is often
a requirement for serious Rust development.
If you prefer having Rust as a system package, see if your system has a package for rustup.
Having a Rust system package directly is only good enough for non-developers who want to install
software running on stable.
You can look up how to install rustup here:
During installation, Rustup will ask you what flavor of Rust you want to install, feel free to keep the defaults. This should install the standard profile of stable for your current host triplet.
The Rust toolchain has many components, here is an overview:
rustc— The Rust compiler and Rustdoc.cargo— Cargo is a package manager and build tool.rustfmt— Rustfmt is a tool for automatically formatting code.rust-std— This is the Rust standard library. There is a separaterust-stdcomponent for each target thatrustcsupports, such asrust-std-x86_64-pc-windows-msvc.rust-docs— This is a local copy of the Rust documentation. Use therustup doccommand to open the documentation in a web browser. Runrustup doc --helpfor more options.rls— RLS is a language server that provides support for editors and IDEs.clippy— Clippy is a lint tool that provides extra checks for common mistakes and stylistic choices.miri— Miri is an experimental Rust interpreter, which can be used for checking for undefined-behavior.rust-src— This is a local copy of the source code of the Rust standard library. This can be used by some tools, such as RLS, to provide auto-completion for functions within the standard library; Miri which is a Rust interpreter; and Cargo's experimental build-std feature, which allows you to rebuild the standard library locally.rust-analysis— Metadata about the standard library, used by tools like RLS.rust-mingw— This contains a linker and platform libraries for building on thex86_64-pc-windows-gnuplatform.llvm-tools-preview— This is an experimental component which contains a collection of LLVM tools.rustc-dev— This component contains the compiler as a library. Most users will not need this; it is only needed for development of tools that link to the compiler, such as making modifications to Clippy.
Rustup by default installs the default profile, which contains the rustc,
cargo, rust-std for your target, rustfmt and clippy.
Many editors and Rust-support plugins for IDEs require a language server to give you auto-suggestions and realtime linting.
On the nightly toolchain, you can install rust-analyzer, which is the new,
shiny and performant language server protocol implementation. You also need
to opt for the rust-src component:
rustup component add rust-src
rustup +nightly component add rust-analyzer-preview
(keep in mind that at the time you read this, rust analyzer might already be available on stable, make sure to check its installation page)
Before doing this, we need to add the nightly toolchain:
rustup toolchain add nightly
Although it is seldom used outside of language testers, you can also add the beta toolchain
channel, and sometimes you might need a specific toolchain version, wherein for stable, you can
use the numeric version such as 1.55, and with nightly, you need the date it was released (as nightlies
are released almost daily), such as nightly-2020-07-27.
For this project, we need the default profile and the nightly toolchain should be installed as well.
Cross-compilation
Although we won't be using this for this project, it helps to know that
rustup helps facilitate cross-compilation. You simply need to add a target,
which will download the standard library for the given host, the Rust compiler is
cross-compiling by default:
rustup target add riscv64gc-unknown-none-elf
Cross-compilation is essentially zero-effort if you have Docker on your system
and install cross.
It is a wrapper for Cargo and it will do all the necessary work for cross-compilation.
Compiling the project
Once you have cloned the repository, switch directory to it and try compiling it:
cargo build --workspace
The --workspace flag (new name for the obsolete --all flag) makes sure you are trying
to compile all crates in the workspace, regardless of which folder you are in.
On stable 1.60, I get many errors:
#![allow(unused)] fn main() { warning: `testauskameli` (lib) generated 1 warning error: could not compile `testauskameli` due to 34 previous errors; 1 warning emitted warning: build failed, waiting for other jobs to finish... error: build failed }
Let's quickly inspect them:
- We see some warnings about unused imports
- Most of the errors are related to async traits and how they are currently not supported
- There is one error about the feature gate
Let's start by looking at the last one in particular:
#![allow(unused)] fn main() { error[E0554]: `#![feature]` may not be used on the stable release channel --> testauskameli/src/lib.rs:4:1 | 4 | #![feature(async_closure)] | ^^^^^^^^^^^^^^^^^^^^^^^^^^ }
This is a clear indicator, that we must use the nightly channel for this project. To use nightly, we need to do one of the following:
rustup default nightly- instead of just
cargotypecargo +nightlyin every command. This is better if you are mainly developing on stable though
Therefore, I suggest the first option.
Let's see how it changes when we compile with nightly:
#![allow(unused)] fn main() { Some errors have detailed explanations: E0276, E0277, E0432, E0706. For more information about an error, try `rustc --explain E0276`. warning: `testauskameli` (lib) generated 1 warning error: could not compile `testauskameli` due to 33 previous errors; 1 warning emitted warning: build failed, waiting for other jobs to finish... }
Now that's an error resolved roight there.
Fixing the dependencies
Let's take a look at one of the async trait errors:
#![allow(unused)] fn main() { error[E0706]: functions in traits cannot be declared `async` --> testauskameli/src/lib.rs:176:5 | 176 | async fn send(&self, content: RunnerOutput, context: &Self::Context) -> Result<()>; | -----^^^^^^^^^^^^^^^^^^^^^^^^^^^^^^^^^^^^^^^^^^^^^^^^^^^^^^^^^^^^^^^^^^^^^^^^^^^^^^ | | | `async` because of this | = note: `async` trait functions are not currently supported = note: consider using the `async-trait` crate: https://crates.io/crates/async-trait }
The notes of the compiler errors and warnings tend to be quite helpful.
If we look into the Cargo.toml of testauskameli/, we can see that the library is
indeed missing this dependency:
[package]
name = "testauskameli"
version = "0.1.0"
edition = "2021"
authors = ["Luukas Pörtfors <lajp@iki.fi>", "Lukáš Hozda <me@mag.wiki>"]
# See more keys and their definitions at https://doc.rust-lang.org/cargo/reference/manifest.html
[dependencies]
tracing = "0.1"
tracing-subscriber = "0.2"
async-process = "1.3.0"
anyhow = "1.0.53"
either = "1.6.1"
flume = "0.10.10"
tempfile = "3.3.0"
rand = "0.8.4"
itertools = "0.10.3"
vial = "0.1.9"
diesel = "1.4.8"
toml = "0.5.8"
imageproc = { version = "0.22.0", optional = true }
rusttype = { version = "0.9.2", optional = true }
image = { version = "0.23.14", optional = true }
regex = { version = "1.5.4", optional = true }
which = "4.2.4"
[features]
default = ["snippets"]
snippets = ["nomeme", "echo", "haskell"]
nomeme = ["imageproc", "rusttype", "image", "regex"]
echo = []
haskell = []
Now, we could go on crates.io, look up async-trait, find the current
version and then edit the TOML.
But we also could not do that.
There exists an extremely handy utility called cargo-edit,
which adds Cargo sub-commands for manipulating dependencies in an efficient and non-intrusive way.
The simplest way to install it is via Cargo:
cargo install cargo-edit
For figuring out if software installed with Cargo needs an update, you can use cargo-update
(not to be confused with cargo update command which updates dependencies in Cargo.lock to the latest semver-compatible version),
which adds the cargo install-update sub-command to Cargo. Check out its help text to figure out its usage.
Now that we have installed cargo-edit, we have the following new sub-commands at our disposal:
cargo add # add or modify a dependency
cargo rm # remove a dependency
cargo upgrade # upgrade dependencies in Cargo.toml (as opposed to cargo update)
cargo set-version # set crate version
Of course, the correct command here is cargo add.
cd testauskameli # if you are not in the folder already
cargo add async-trait
Let's try compiling again:
#![allow(unused)] fn main() { ╭[RAM 57%] bos ~/ws-tooling-testauskameli [master][!] rs v1.62.0-nightlytax: ╰ 07:02 lh-thinkpad magnusi » cargo build --workspace Updating crates.io index Compiling futures v0.3.21 Compiling tokio-rustls v0.23.2 Compiling tokio-rustls v0.22.0 Compiling h2 v0.3.12 Compiling testauskameli v0.1.0 (/home/magnusi/ws-tooling-testauskameli/testauskameli) Compiling async-tungstenite v0.11.0 Compiling cli v0.1.0 (/home/magnusi/ws-tooling-testauskameli/cli) Compiling hyper v0.14.17 Compiling hyper-rustls v0.23.0 Compiling reqwest v0.11.9 Compiling serenity v0.10.10 Compiling bot v0.1.0 (/home/magnusi/ws-tooling-testauskameli/bot) Finished dev [unoptimized + debuginfo] target(s) in 54.01s }
No errors this time, very good.
Redundant dependencies
However, there might dependencies that are unused and only serve to prolong the compilation times (as Cargo doesn't know if a library is actually used, it builds it anyway).
Finding these is usually a painful process of reading the code and/or commenting out deps at random or with some sort of an algorithm in the respective Cargo.toml.
Luckily, although it is not definitive, there exists a solution.
The cargo-udeps utility does exactly what we need.
You install pretty much the same way:
cargo install cargo-udeps --locked
(cargo install by default does not respect Cargo.lock and chooses latest semver-compatible dependency
versions by default. The author of this crate suggests using --locked which makes Cargo respect the lockfile,
however, it works fine for me without it too. Your mileage may vary).
As of April 2021, udeps still requires to be ran with the nightly toolchain, although you can use it for
stable projects as well. Therefore, it is recommended to invoke it with the +nightly Cargo modifier:
#![allow(unused)] fn main() { cargo +nightly udeps --all-targets --workspace }
We've added the two flags to make sure that the run covers all the crates in the workspace, and all targets within each crate. Otherwise, we might get a false alarm if a crate is only used in an example, a binary target or integration tests.
TIP: It is a common mistake to mix up
--alland--all-targets. As mentioned previously,--allis an obsolete alias for--workspaceand using it does not cover all targets of your crate.
Let's see what we get:
unused dependencies:
`bot v0.1.0 (/home/magnusi/ws-tooling-testauskameli/bot)`
└─── dependencies
└─── "openssl-sys"
`testauskameli v0.1.0 (/home/magnusi/ws-tooling-testauskameli/testauskameli)`
└─── dependencies
├─── "diesel"
├─── "toml"
├─── "tracing-subscriber"
└─── "vial"
Note: They might be false-positive.
For example, `cargo-udeps` cannot detect usage of crates that are only used in doc-tests.
To ignore some dependencies, write `package.metadata.cargo-udeps.ignore` in Cargo.toml.
Ohoho, good providence. Diesel is a massive dependency, and OpenSSL is a compatibility nightmare, the fact that we can get rid of them is very good, and so is the fact that we can get rid of the other three unused dependencies.
Unfortunately, there is no way to fix the Cargo.tomls automagically, so you need to edit the two of them by hand. However, this is still a much better option that manually going through all dependencies.
Always check if all parts of your project still compile after removing deps, per the note, there might be false positives.
Also keep in mind that cargo-udeps is not definitive, but a best effort tool. It is fairly easy to
have a false negative.
If I were to cargo add rayon to the testauskameli crate, then even though it isn't used in the library,
udeps will not report it. This is because it will already be included in your binary because rayon is in
the dependency tree of some of your dependencies, and udeps can't distinguish this scenario as "unused".
However, the downside of this is merely one line of TOML, since it is in the dependency tree, it will be compiled anyway and you are not saving time removing it.
Lints and style
Now, if all went well, the program compiles without a hitch. Better yet, it doesn't (shouldn't) print any warning either.
This however doesn't mean that the code does not have many issues and does not have a number of instances of poor style.
In Rust, we use a tool called Clippy (after the MS Word mascot) to provide a large set of very in-depth lints. Here is a total list of the lints in case you are curious: https://rust-lang.github.io/rust-clippy/master/
If you have installed the default profile of Rust, you should already have clippy, if not, adding it is as easy as adding any other toolchain component:
rustup component add clippy rust-src
And, nowadays, running is very simple also, it is just a cargo subcommand:
cargo clippy --all-targets --workspace
Well, and suddenly, with clippy, it does not compile anymore.
On my machine, I see 1 error and 20 errors:
#![allow(unused)] fn main() { warning: `testauskameli` (lib test) generated 20 warnings (1 duplicate) error: could not compile `testauskameli` due to previous error; 20 warnings emitted warning: build failed, waiting for other jobs to finish... warning: `testauskameli` (lib) generated 20 warnings (19 duplicates) error: could not compile `testauskameli` due to previous error; 20 warnings emitted }
That's a lot of warnings to fix by hand (unless you are looking for ways how to spend your time).
It is time to introduce the next utility: rustfix via the commands cargo fix and cargo clippy --fix.
This is essentially the same utility, except the former fixes general Rust warnings and the latter Clippy lints.
You see, for many more style-related warnings, the Rust toolchain provides what it considers an absolutely correct and machine applicable suggestion. Therefore, it can be applied with a machine if you so desire.
This is what rustfix is for. We do not have any regular warnings, so we shall reach after the clippy invocation:
#![allow(unused)] fn main() { cargo clippy --fix --workspace --all-targets --allow-dirty }
(only include the last flag if you are too lazy to commit your changes thus far or have a reason not to do so in the first place)
Now we are left with 1 error and 6 warnings, which is much more manageable. This is what we are left with:
#![allow(unused)] fn main() { ╭[RAM 56%] bos ~/ws-tooling-testauskameli [master][!⇡] rs v1.62.0-nightlytax: ╰ 08:03 lh-thinkpad magnusi took 5s » cargo clippy --all-targets --workspace Checking testauskameli v0.1.0 (/home/magnusi/ws-tooling-testauskameli/testauskameli) warning: called `ok().expect()` on a `Result` value --> testauskameli/src/cmd.rs:108:25 | 108 | proc_limit: env::var("KAMELI_PROCESSLIMIT") | _________________________^ 109 | | .map_or(Ok(1), |s| s.parse()) 110 | | .ok() 111 | | .expect("BUG: impossible"), | |__________________________________________^ | = note: `#[warn(clippy::ok_expect)]` on by default = help: you can call `expect()` directly on the `Result` = help: for further information visit https://rust-lang.github.io/rust-clippy/master/index.html#ok_expect warning: statement with no effect --> testauskameli/src/snippets/echo.rs:31:9 | 31 | t[0]; | ^^^^^ | = note: `#[warn(clippy::no_effect)]` on by default = help: for further information visit https://rust-lang.github.io/rust-clippy/master/index.html#no_effect warning: the operation is ineffective. Consider reducing it to `17` --> testauskameli/src/snippets/nomeme.rs:78:45 | 78 | let e = min(text.len(), 17 + 0); | ^^^^^^ | = note: `#[warn(clippy::identity_op)]` on by default = help: for further information visit https://rust-lang.github.io/rust-clippy/master/index.html#identity_op warning: the operation is ineffective. Consider reducing it to `(17 - k.len()) / 2` --> testauskameli/src/snippets/nomeme.rs:80:29 | 80 | let x = (17 - k.len()) / 2 + 0; | ^^^^^^^^^^^^^^^^^^^^^^ | = help: for further information visit https://rust-lang.github.io/rust-clippy/master/index.html#identity_op error: written amount is not handled --> testauskameli/src/utils.rs:74:5 | 74 | f.write(&[1]).expect("darn"); | ^^^^^^^^^^^^^^^^^^^^^^^^^^^^ | = note: `#[deny(clippy::unused_io_amount)]` on by default = help: use `Write::write_all` instead, or handle partial writes = help: for further information visit https://rust-lang.github.io/rust-clippy/master/index.html#unused_io_amount warning: this expression creates a reference which is immediately dereferenced by the compiler --> testauskameli/src/lib.rs:232:82 | 232 | ... .send(RunnerOutput::WrongUsage(err.to_string()), &&context) | ^^^^^^^^^ help: change this to: `&&context` | = note: `#[warn(clippy::needless_borrow)]` on by default = help: for further information visit https://rust-lang.github.io/rust-clippy/master/index.html#needless_borrow }
Clippy does not fix these issues automatically because they require inspection and might not be correct.
Let's go through them one by one.
#![allow(unused)] fn main() { warning: called `ok().expect()` on a `Result` value --> testauskameli/src/cmd.rs:108:25 | 108 | proc_limit: env::var("KAMELI_PROCESSLIMIT") | _________________________^ 109 | | .map_or(Ok(1), |s| s.parse()) 110 | | .ok() 111 | | .expect("BUG: impossible"), | |__________________________________________^ | = note: `#[warn(clippy::ok_expect)]` on by default = help: you can call `expect()` directly on the `Result` = help: for further information visit https://rust-lang.github.io/rust-clippy/master/index.html#ok_expect }
If you inspect the file, you see you can easily remove the .ok(), it's useless and probably a leftover from refactoring.
#![allow(unused)] fn main() { warning: statement with no effect --> testauskameli/src/snippets/echo.rs:31:9 | 31 | t[0]; | ^^^^^ | = note: `#[warn(clippy::no_effect)]` on by default = help: for further information visit https://rust-lang.github.io/rust-clippy/master/index.html#no_effect }
An errant statement like this usually means an issue of the "I typed the wrong thing" variety, however, in this case, it's actually not needed and we can just remove it.
#![allow(unused)] fn main() { warning: the operation is ineffective. Consider reducing it to `17` --> testauskameli/src/snippets/nomeme.rs:78:45 | 78 | let e = min(text.len(), 17 + 0); | ^^^^^^ | = note: `#[warn(clippy::identity_op)]` on by default = help: for further information visit https://rust-lang.github.io/rust-clippy/master/index.html#identity_op }
Useless addition, it might have been 17 + offset_or_cfg_val, but now, the +0 is redundant. Delete it mercilessly
(as suggested by clippy's lint documentation).
#![allow(unused)] fn main() { warning: the operation is ineffective. Consider reducing it to `(17 - k.len()) / 2` --> testauskameli/src/snippets/nomeme.rs:80:29 | 80 | let x = (17 - k.len()) / 2 + 0; | ^^^^^^^^^^^^^^^^^^^^^^ | = help: for further information visit https://rust-lang.github.io/rust-clippy/master/index.html#identity_op }
The same thing as before
#![allow(unused)] fn main() { error: written amount is not handled --> testauskameli/src/utils.rs:74:5 | 74 | f.write(&[1]).expect("darn"); | ^^^^^^^^^^^^^^^^^^^^^^^^^^^^ | = note: `#[deny(clippy::unused_io_amount)]` on by default = help: use `Write::write_all` instead, or handle partial writes = help: for further information visit https://rust-lang.github.io/rust-clippy/master/index.html#unused_io_amount }
Usually, it is a good idea to handle these, as clippy suggests. However, it is not necessary in this case, and it is also related to a part of code which is objectively extremely wicked, shockingly evil and vile. We will get back to this section of code later, for now, let's fix this issue by explicitly ignoring the value:
#![allow(unused)] fn main() { let _ = f.write(&[1]).expect("darn"); }
And here comes the final issue:
#![allow(unused)] fn main() { warning: this expression creates a reference which is immediately dereferenced by the compiler --> testauskameli/src/lib.rs:232:82 | 232 | ... .send(RunnerOutput::WrongUsage(err.to_string()), &&context) | ^^^^^^^^^ help: change this to: `&&context` | = note: `#[warn(clippy::needless_borrow)]` on by default = help: for further information visit https://rust-lang.github.io/rust-clippy/master/index.html#needless_borrow }
I admit this issue is a bit more contrived than the others, but it is an issue that happens commonly, mostly when you
have an my_string_literal: &str and you want to pass it to a function like fn do_something_with_str(s: &str) and instinctively do
do_something_with_str(&my_string_literal). As clippy suggests, this reference is useless since the compiler derefs it immediately.
If we run clippy, we should now get no errors and warnings (unless new clippy lints have been introduced since the release of this
guide).
Debugging
Now, it is time to dispense with the final beast.
If we run all the echo tests, we see some strange stuff:
╭[RAM 57%] bos ~/ws-tooling-testauskameli [master][!⇡] rs v1.62.0-nightlytax:
╰ 07:57 lh-thinkpad magnusi took 8s » for f in echo-tests/*
cat $f | cargo run --bin cli
end
Compiling testauskameli v0.1.0 (/home/magnusi/ws-tooling-testauskameli/testauskameli)
Compiling cli v0.1.0 (/home/magnusi/ws-tooling-testauskameli/cli)
Finished dev [unoptimized + debuginfo] target(s) in 4.45s
Running `target/debug/cli`
Output:
Hello, world
Finished dev [unoptimized + debuginfo] target(s) in 0.14s
Running `target/debug/cli`
Output:
#apital
Finished dev [unoptimized + debuginfo] target(s) in 0.14s
Running `target/debug/cli`
Finished dev [unoptimized + debuginfo] target(s) in 0.14s
Running `target/debug/cli`
Output:
In the first age, in the first battle, when the shadows first lengthened, one stood. Burned by the embers of Armageddon, his soul blistered by the fires of Hell and tainted beyond ascension, he chose the path of perpetual torment. In his ravenous hatred he found no peace; and with boiling blood he scoured the Umbral Plains seeking vengeance against the dark lords who had wronged him. He wore the crown of the Night Sentinels, and those that tasted the bite of his sword named him... the Doom Slayer.
Finished dev [unoptimized + debuginfo] target(s) in 0.13s
Running `target/debug/cli`
thread 'tokio-runtime-worker' panicked at 'attempt to subtract with overflow', testauskameli/src/snippets/echo.rs:30:9
note: run with `RUST_BACKTRACE=1` environment variable to display a backtrace
thread 'main' panicked at 'called `Result::unwrap()` on an `Err` value: JoinError::Panic(...)', cli/src/main.rs:49:16
fish: Process 11647, 'cargo' from job 1, 'cat $f | cargo run --bin cli' terminated by signal SIGSEGV (Address boundary error)
Oh boy, that doesn't sound good. We have one panic and one segfault, meaning that two tests fails.
(An apt observer might notice that the Capital test is a bit suspicious also)
For debugging, we have two options:
- Use debugging tools provided by the standard library
- Use a debugger
Debugging in the standard library
We won't be doing this in this case, since we don't even know where the issue is. Instead we will be using a debugger to get a bearing on where the issue occurs. However, let's briefly introduce some of the most common tools in the standard library also, for the sake of completeness
The Debug trait
This is a derivable trait that allows printing a type with the debug formatting string {:?}. This trait is
implemented for many of standard library traits and you can derive it on your types if all the types they contain
implement Debug also:
#![allow(unused)] fn main() { #[derive(Debug)] struct MyNumber(usize); println!("An example: {:?}", MyNumber(42)); }
This works well with the following.
The dbg!() macro
This macro prints and returns the value of a given expression for quick and dirty debugging.
#![allow(unused)] fn main() { let a = 2; let b = dbg!(a * 2) + 1; // ^-- prints: [src/main.rs:2] a * 2 = 4 assert_eq!(b, 5); }
Keep in mind, if you put in an owned type that isn't Copy, it might not be available, so if you want to use this macro as a free-standing statement, make sure to take the parameters by reference.
Inspecting iterators
Iterators are extremely common in Rust and it might be helpful to be able to check out how the values are looking at different stages of an iterator pipeline.
For this, the .inspect() method has been created. It gives a reference to current value, expecting a closure that
does not return anything (only a unit), and it doesn't (or rather shouldn't, don't abuse interior mutability!) modify the values in any way.
#![allow(unused)] fn main() { let a = [1, 4, 2, 3]; // this iterator sequence is complex. let sum = a.iter() .cloned() .filter(|x| x % 2 == 0) .fold(0, |sum, i| sum + i); println!("{}", sum); // let's add some inspect() calls to investigate what's happening let sum = a.iter() .cloned() .inspect(|x| println!("about to filter: {}", x)) .filter(|x| x % 2 == 0) .inspect(|x| println!("made it through filter: {}", x)) .fold(0, |sum, i| sum + i); println!("{}", sum); }
Let's get to the debugger, though.
Debugging Rust with a debugger
You might (not) be surprised to hear that Rust supports the classic C/C++ debuggers,
gdb and lldb. Personally, I am more familiar with gdb, but both should work just fine.
However, you might notice that Rust symbols in gdb are poorly readable, as they are de-sugared
and contain many things that are implementation details.
For this reason, Rust provides two wrappers for these debuggers, respectively. That is rust-gdb
and rust-lldb. These are thin wrappers that will preload scripts that resugar the symbols for
Rust, making it readable and easier to debug.
Both wrappers should pre-installed and included in every Rustup profile, but make sure you have installed the underlying debuggers as well via your system's package manager or however you wish.
Well, first, let's use movie magic to figure out that the test causing the segfault is echo-tests/empty.
Let's try running just it:
╭[RAM 59%] bos ~/ws-tooling-testauskameli [master][!⇡] rs v1.62.0-nightlytax:
╰ 08:53 lh-thinkpad magnusi » cat echo-tests/empty | cargo run --bin cli
Finished dev [unoptimized + debuginfo] target(s) in 0.11s
Running `target/debug/cli`
fish: Process 3095, 'cargo' from job 1, 'cat echo-tests/empty | cargo ru…' terminated by signal SIGSEGV (Address boundary error)
Yep, that's it.
The debug build is in the target/debug folder and the executable is called cli.
Let's try running it in GDB:
#![allow(unused)] fn main() { ╭[RAM 59%] bos ~/ws-tooling-testauskameli [master][!⇡] rs v1.62.0-nightlytax: ╰ 08:54 lh-thinkpad magnusi took 4s » rust-gdb target/debug/cli GNU gdb (GDB) 11.2 Copyright (C) 2022 Free Software Foundation, Inc. License GPLv3+: GNU GPL version 3 or later <http://gnu.org/licenses/gpl.html> This is free software: you are free to change and redistribute it. There is NO WARRANTY, to the extent permitted by law. Type "show copying" and "show warranty" for details. This GDB was configured as "x86_64-pc-linux-gnu". Type "show configuration" for configuration details. For bug reporting instructions, please see: <https://www.gnu.org/software/gdb/bugs/>. Find the GDB manual and other documentation resources online at: <http://www.gnu.org/software/gdb/documentation/>. For help, type "help". Type "apropos word" to search for commands related to "word"... Reading symbols from target/debug/cli... (gdb) run < echo-tests/empty Starting program: /home/magnusi/ws-tooling-testauskameli/target/debug/cli < echo-tests/empty [Thread debugging using libthread_db enabled] Using host libthread_db library "/usr/lib/libthread_db.so.1". [New Thread 0x7ffff7b8f640 (LWP 16243)] [New Thread 0x7ffff798e640 (LWP 16244)] [New Thread 0x7ffff778d640 (LWP 16245)] [New Thread 0x7ffff758c640 (LWP 16246)] [New Thread 0x7ffff738b640 (LWP 16247)] [New Thread 0x7ffff718a640 (LWP 16248)] [New Thread 0x7ffff6f89640 (LWP 16249)] [New Thread 0x7ffff6d88640 (LWP 16250)] [New Thread 0x7ffff6b87640 (LWP 16251)] Thread 8 "tokio-runtime-w" received signal SIGSEGV, Segmentation fault. [Switching to Thread 0x7ffff6f89640 (LWP 16249)] testauskameli::snippets::echo::{impl#0}::try_or_continue::{async_block#0} () at testauskameli/src/snippets/echo.rs:30 30 t[0] -= 32; (gdb) }
Now we precisely know, where the crash occurs, let's look at the surrounding area:
#![allow(unused)] fn main() { async fn try_or_continue(&self, content: &str) -> Either<Runner, Mismatch> { let text = if let Some(start) = content.find("echo ") { content[start + 5..].to_string() } else { return Either::Right(Mismatch::Continue); }; let t = utils::totally_safe_transmute::<&[u8], &mut [u8; 1]>(text.as_bytes()); t[0] -= 32; Either::Left(Runner::new("echo", "test", || { info!("{} (echo)", text); Box::pin(async move { Ok(RunnerOutput::Output(text)) }) })) } }
Yeah, upon closer inspection, we see here that this is probably the most unsafe, incorrect and non-portable way to capitalize a letter in Rust.
We are essentially:
- Taking a string and interpretting it as bytes
- Taking the bytes and interpretting it as an array of one byte (regardless of the actual situation)
- Taking the byte and deducting 32 from it, which is in the ASCII table the offset between capital and lowercase letters
When the string is empty, we are trying to write into memory that is not our own, producing a segfault.
Let's use reasonable rust to rewrite it:
#![allow(unused)] fn main() { async fn try_or_continue(&self, content: &str) -> Either<Runner, Mismatch> { let mut text = if let Some(start) = content.find("echo ") { content[start + 5..].to_string() } else { return Either::Right(Mismatch::Continue); }; if let Some(first) = text.get_mut(0..1) { first.make_ascii_uppercase(); }; Either::Left(Runner::new("echo", "test", || { info!("{} (echo)", text); Box::pin(async move { Ok(RunnerOutput::Output(text)) }) })) } }
Let's see how our test run looks now:
╭[RAM 59%] bos ~/ws-tooling-testauskameli [master][!⇡] rs v1.62.0-nightlytax:
╰ 09:10 lh-thinkpad magnusi took 15m34s » for f in echo-tests/*
cat $f | cargo run --bin cli
end
Compiling testauskameli v0.1.0 (/home/magnusi/ws-tooling-testauskameli/testauskameli)
Compiling cli v0.1.0 (/home/magnusi/ws-tooling-testauskameli/cli)
Finished dev [unoptimized + debuginfo] target(s) in 2.02s
Running `target/debug/cli`
Output:
Hello, world
Finished dev [unoptimized + debuginfo] target(s) in 0.09s
Running `target/debug/cli`
Output:
Capital
Finished dev [unoptimized + debuginfo] target(s) in 0.10s
Running `target/debug/cli`
Output:
Finished dev [unoptimized + debuginfo] target(s) in 0.09s
Running `target/debug/cli`
Output:
In the first age, in the first battle, when the shadows first lengthened, one stood. Burned by the embers of Armageddon, his soul blistered by the fires of Hell and tainted beyond ascension, he chose the path of perpetual torment. In his ravenous hatred he found no peace; and with boiling blood he scoured the Umbral Plains seeking vengeance against the dark lords who had wronged him. He wore the crown of the Night Sentinels, and those that tasted the bite of his sword named him... the Doom Slayer.
Finished dev [unoptimized + debuginfo] target(s) in 0.10s
Running `target/debug/cli`
Output:
test
Looks good, even the panic disappeared! We have now successfully fixed the project with minimum programming and minimum effort. Tools are a great means of saving time during development and you are encouraged to look into them deeper.
Tokio console and RR debugger
First, you need to install RR from your preferred source. Check out its website for more information on installing RR:
Now, keep in mind that RR is only officially supported on x86/64 Linux.
Your CPU also matters:
- AMD requires a special workaround script called
zen_workaround.py, which can be found here https://gitlab.ii.zone/lukas.hozda/workshop-debugging/-/blob/master/zen_workaround.py. Only ZEN CPUs are supported out of the whole AMD repertoire. - Intel mainstream CPUs are fine, but Intel Atom and Celeron are not supported
- ARM and arm architectures only have an experimental supports, nothing to write home about at this time.# Tokio console & RR debugger
The purpose of this workshop is to demonstrate the use of two tools useful for diagnosing problems in an effective manner.
These tools are:
- tokio-console - a tool to peer into the Tokio runtime of your app
- rr - a time-traveling debugger
Supplementary files for these examples can be found in this repository:
https://gitlab.ii.zone/lukas.hozda/workshop-debugging
Tokio console
The console is a conceptually simpler tool, it lets you debug and profile
asynchronous Rust applications using the Tokio framework, by reading events
emitted by trough the tracing library.
In case you haven't met with tracing directly yet (perhaps because you may
be referring to bosminer::log for logging), it is the favored logging framework
we use at Braiins.
You can find out more about tracing here:
https://docs.rs/tracing/latest/tracing/
Tokio console fits in as a layer, or optionally the whole subscriber for tracing (in case you haven't used it previously).
To be able to use the tokio console, you need to be using a relatively recent version of tokio, everything 1.1x should be fine, but latest version is optimal.
Furthermore, you will have to enable tokio unstable. In order to make it impossible
for a dependency to turn on the unstable features for the whole tree including
your application, unstable is not a feature, but a compiler config value
(you have already likely encountered the test config value, which is used when running
tests).
The tokio unstable features are enabled like this:
RUSTFLAGS="--cfg tokio_unstable" cargo <command>
Because having to type use this every time you want to run a command might be suboptimal,
you can use cargo config to apply these flags to rustc on every invocation automatically:
# .cargo/config.toml of your project
[build]
rustflags = ["--cfg", "tokio_unstable"]
That's it.
Now, you need to add the console library to your project:
cargo add console-subscriber
And install the console itself:
cargo install tokio-console
In your projects async fn main() function, you can set up the console like this:
#![allow(unused)] fn main() { console_subscriber::init(); }
If you already use tracing, you might have a specific setup for your subscriber, and might prefer adding the tokio console as a layer instead.
The following example also demonstrates configuration options:
#![allow(unused)] fn main() { let console_layer = console_subscriber::ConsoleLayer::builder() .retention(Duration::from_secs(60)) .server_addr(([127, 0, 0, 1], 6669)) .spawn(); tracing_subscriber::registry() // add the console layer to the subscriber .with(console_layer) // add other layers... .with(tracing_subscriber::fmt::layer()) // .with(...) .init(); }
It is a particularly good idea to set retention, otherwise, the console TUI will keep all finished tasks forever, which may be too much clutter to orient oneself properly.
Now, if you run your application, you should see a lot of log entries, that look like this:
2022-10-13T06:10:09.881247Z TRACE runtime.spawn{kind=task task.name= task.id=51 loc.file="/root/.cargo/registry/src/kellnr.ii.zone-97b060856f9e2fcb/ii-async-utils-0.1.0/src/halthandle.rs" loc.line=363 loc.col=13}: tokio::task::waker: op="waker.clone" task.id=1
That means it's working.
In case you don't see any of those, you might have disabled the TRACE level in tracing. To use the console, you need to enable it.
Now, you can connect to the process if you use the tokio-console command.
The default one-liner config should allow the console to connect automatically, otherwise, use this syntax:
tokio-console http://<ip-or-hostname>:<port>
Keep in mind that if you forget the http:// or make a mistake in the
address, the console will hang forever without indicating any sort of error.
It is what it is.
If all goes well, you should see something like this:
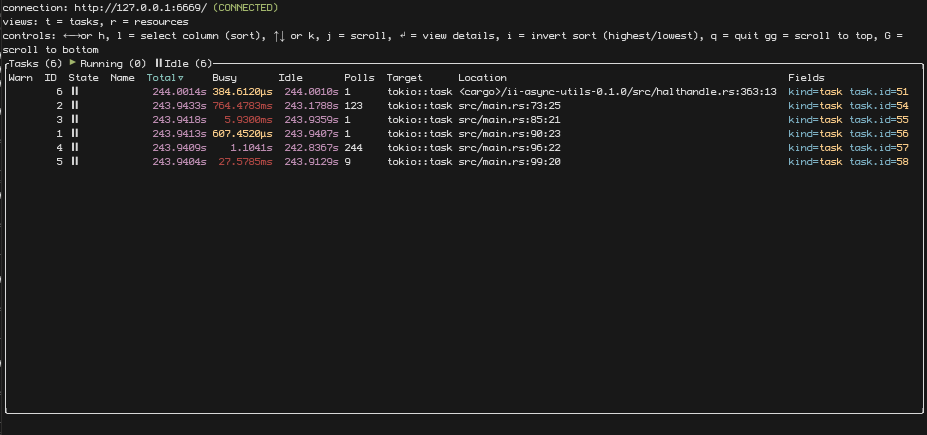
You can now navigate the console and inspect different tasks and resources, such as sleeps, intervals and mutexes.
RR debugger
Sometimes GDB may not be enough to diagnose certain problems. These are problems that may or may not happen due to random occurence, non-determinism, input from user, the file system or the network.
These leads to a class of bugs we may call heisenbugs, an homage to the Heisenberg
uncertainty principle, as that is what comes to mind trying to debug them.
This has lead to the creation of debuggers that remove non-determinism out of the
equation. RR, which stands for record and replay, stands at the forefront of
these debuggers, calling itself a "time-traveling debugger".
RR is a superset of GDB, and adds commands that let you move back in time through a particular program trace.
Setup
However, to be able to even use RR, several conditions must be met.
First, you need to install RR from your preferred source. Check out its website for more information on installing RR:
Now, keep in mind that RR is only officially supported on x86/64 Linux.
Your CPU also matters:
- AMD requires a special workaround script called
zen_workaround.py, which can be found here https://gitlab.ii.zone/lukas.hozda/workshop-debugging/-/blob/master/zen_workaround.py. Only ZEN CPUs are supported out of the whole AMD repertoire. - Intel mainstream CPUs are fine, but Intel Atom and Celeron are not supported
- ARM and its architectures only have an experimental support, nothing to write home about at this time.
Lastly, you need to decrease security regarding profiling in your kernel, so that RR can access performance data, which are necessary for producing a correct trace:
echo 1 >/proc/sys/kernelecho 1 >/proc/sys/kernel/perf_event_paranoid
All levels below 2 (1,0,-1), will work. Level 1 sacrifices the least security, and so it is used here.
Now, rr is theoretically working, and you can use it to debug C, C++ and Rust programs (And perhaps all other compatible languages like Zig or Nim or D). However, to have a great experience with Rust, you may want to consider loading its pretty-printers.
These are available in the rust-gdb and rust-lldb wrappers, but rr won't be using
a wrapper for GDB. Instead, you need to load them using the .gdbinit script, to insure
they will be available in every gdb invocation.
python
import sys
sys.path.insert(0, '/root/.rustup/toolchains/stable-x86_64-unknown-linux-gnu/lib/rustlib/etc/')
import gdb
import gdb_providers
import gdb_lookup
gdb_lookup.register_printers(gdb)
end
You are now ready to try it out :)
Compile your Rust program with debug info (either in debug profile without using
the --release flag, or by adding debug = 2 to the release profile, if you need to
inspect release profile).
We can use the randomness example from the repo attached above:
rr record target/debug/randomness
This will create a trace which will be saved under $HOME/.local/share.
You can now immediately rerun the last trace:
rr replay
RR will launch GDB stopped at the very first moment of execution. This
is not even in your binary, but in the bootstrapping code, so if you want to
seek to the beginning, you may want to set up a breakpoint at the beginning of
you main() function (use main.rs:<line> to create the breakpoint, as main()
is not the Rust main you wrote, but a Rust provided wrapper that parses the
environment into Args and such.)
You can now use all the good commands:
gdb
- s: -> step
- n: -> next
- c: -> continue
- f: -> finish
rr specific commands
- rs: -> reverse-step
- rn: -> reverse-next
- rc: -> reverse-continue
- rf: -> reverse-finish
breakpoints:
- b: -> break
- watch <symbol>
- i b: -> info break
- del: -> delete breakpoints
inspect:
- p <symbol>: -> print
- bt: -> backtrace
For example, you may try running c to see the rest of the program execution.
It should spit out the same random numbers as when you ran it while recording the trace.
The great things about traces is that they can be often transported between machines, you can send it to your coworkers to help diagnose a particular problem that only occurs in your environment.
Keep in mind that all debuggers incur a performance penalty. With rr, it is relatively
tame, only 1.5x to 2x slowdown, allegedly, but the impact will be felt more with multithreaded
loads.
Tracing
The slides for this workshop can be found here: https://docs.google.com/presentation/d/1YvQUVijlscxucTafr7l7fog6JISXZnYxnJq_jZ-mMHI/edit#slide=id.g13e3b087794_0_2
There are also runnable code examples found here:
https://gitlab.ii.zone/lukas.hozda/workshop-tracing
As mentioned in the previous workshop, tracing is our framework of choice for our logging needs. In this text, we will look over the major concepts of tracing you are likely to encounter when developing applications at Braiins.
First of,
the documentation of the tracing crate can be found here: https://docs.rs/tracing/0.1.37/tracing/
and the source code is here: https://github.com/tokio-rs/tracing
Tracing is a part of the Tokio project and it was originally released under the name tokio-trace, so you may find references to it under this name as well. If you watch the talk about the framework's release, you will find that the authors really dislike calling it a logging library.
According to the official documentation, tracing is a framework for instrumenting Rust programs
to collect structured, event-based diagnostic information. While tracing is part of the Tokio
project, and is async-aware, it is not async-exclusive, nor does it require the Tokio runtime.
Tracing can be used in any library or application regardless of if it is async or not.
The equivalent of log messages are called events in tracing, and each event might be a part of one or more spans. Processing of the logging messages is decoupled from their production, and on the processing/collecting side, you compose layers to form a subscriber.
Events
Events are structured records representing a point in time. Generally, you will produce them using macro shorthands, but technically speaking, you can produce them directly too. This will be rarely useful though.
The basic syntax of creating an event is as such:
#![allow(unused)] fn main() { use tracing::{event, Level}; event!(Level::INFO, "hello, Braiins!"); }
Shorthands that you may be used to from other logging crates are available too, and are typically the main tool developers use to create events:
#![allow(unused)] fn main() { use tracing::*; debug!("This is a debug message"); info!("This is a info message"); error!("This is a error message"); warn!("This is a warn message"); trace!("This is a trace message"); }
While you often see these used with string messages, events are structured, and you can log any data
that implements the tracing::Value trait,
or Debug, or Display.
#![allow(unused)] fn main() { debug!(first_name = "Franta", middle_name = "Pepa", surname = "Jednička"); }
For types that only implement Display and/or Debug, you choose by using either the ? symbol in front
of the value for Debug, or the % symbol for Display.
For example:
#![allow(unused)] fn main() { use std::fmt; #[derive(Debug)] struct TestStruct; impl fmt::Display for TestStruct { fn fmt(&self, f: &mut fmt::Formatter<'_>) -> fmt::Result { write!(f, "TestStruct but via Display") } } info!( test_debug = ?TestStruct, // -> prints test_debug = TestStruct test_display = %TestStruct, // -> prints test_display = TestStruct but via Display ); }
Of course, you can combine it:
#![allow(unused)] fn main() { info!("This is a message with a funny number attached", funny_number = 420); }
The macros support all of the syntax you know from format_args!() macros, such
as println!, writeln!, eprint!, and so on, and they also support all of the
features of the log facade crate macros. For example:
#![allow(unused)] fn main() { trace!( "inserting values into message with {}, like in println!()", "brackets" ); }
Spans
Spans represent a time range. Every span has a beginning and end, which is tracked by tracing. Each span can be entered and exited multiple times during their existence.
Just like events, spans have a Level. The level of a span is independent from the level of an event, and if the currently displayed level of a span is lower than the enabled ones, it's info won't be attached to the event.
You can create spans similarly to how you can create events, using the appropriate macro:
#![allow(unused)] fn main() { let my_span = span!(Level::INFO, "name_of_span", attached_data = 4); }
You can also use shorthand macros for each level:
#![allow(unused)] fn main() { let my_span = info_span!("name_of_span", attached_data = 4); }
Like this, the span isn't good for anything, and it either has to be entered, or statements must be executed in scope:
#![allow(unused)] fn main() { let _guard = my_span.enter(); info!("this event has my span attached"); }
or:
#![allow(unused)] fn main() { my_span.in_scope(|| { info!("this event has my span attached"); }); }
Spans form a tree, by default, every new span inherits the current span as a parent. This lets you attach increasingly specific contenxtual information without having to push it inside functions if you don't need it for anything else than logging the information.
If you want to break the span tree for any reason, you can do so by overriding the parent property:
#![allow(unused)] fn main() { let new_root_span = info_span!(parent: None, "new_root_span"); }
As previously mentioned, tracing is async-aware, so spans are entered and exited as the async runtime schedules
task. It also means that you can instrument futures with spans:
#![allow(unused)] fn main() { use tracing_futures::Instrument; let my_future = async { info!("hello, world")! }; let my_span = debug_span!("hello"); let my_future_instrumented = my_future.instrument(my_span); my_future_instrumented.await; // will print with span attached }
Spans can also be used to filter images you are interested in, therefore they are great for attaching information such as task / user / etc IDs you may want to filter on, as opposed to shoving them into every event message.
The authors of tracing proclaim that if you ever need to grep through tracing output, you are using tracing wrong. While that is most certainly hyperbole, it can't be denied that the filtering features are powerful enough to fit most use cases. We will take a look at how to do this when discussing the Fmt layer and subscriber.
Lastly, functions can be instrumented with spans too using the #[instrument(name = <name>, ...)] attribute.
For example:
#![allow(unused)] fn main() { #[instrument(name = "cokoliv", fields(id = id))] fn instrumented_fn(id: i32) { info!("hello {id}"); } }
It stands to reason that you may want to include data in span that's not immediately available. You can use
the .record method on a span, to record the value
of a particular field. This can also be used in case that a span field already has a value, but you want
to change the value.
Subscribers and layers
Now we are getting to the subcriber and layer part. Setting up a subscriber is the job of the application, not the library, just like it is with most logging frameworks.
In the simplest form, you can just take the basic Fmt subscriber and go with it:
#![allow(unused)] fn main() { tracing_subscriber::fmt().init(); }
You may also choose to use less shorthand, more verbose variant:
#![allow(unused)] fn main() { let subscriber = tracing_subscriber::FmtSubscriber::new(); tracing::subscriber::set_global_default(subscriber)?; }
This is all that is necessary to initialize it. As you can see from the code snippet, subscribers live in different crates from the main tracing one so that you don't have to import them into your libraries unnecesarily.
The subscriber we just created is pretty stupid, for lack of a better word, and will display all events and spans with the default formatting to stdout, regardless of any environment variables, and thus you can't filter through it. However, it will still respect the rules set forth by the tracing crate regarding which tracing levels should be compiled in. You can check the tracing crate manifest for the current set of these compile-time level-limiting features.
If we want to be able to control tracing levels and filter based on other things, we need to include the env filter.
You can do it simply like this:
#![allow(unused)] fn main() { tracing_subscriber::registry() .with(tracing_subscriber::fmt::layer()) .with(tracing_subscriber::EnvFilter::from_default_env()) .init(); }
This uses the tracing_subscriber registry to compose a slightly more involved subscriber, which uses a filtering layer on top of the fmt layer. Layers can write into a multitude of things, you may find layers that write events into ELK, honeycomb, Grafana Loki, the network, HTTP server, or others, but also can pass messages onto other layers and change filter settings, which is what the EnvFilter layer essentially does.
Subscribers can be compared to tower services and layers to tower Layers, in that they have similar semantics, just
that tracing composes a logger and tower a generic service.
Here is an example, which uses the tracing_appender crate to create a non-blocking hourly log rotate:
#![allow(unused)] fn main() { let env_filter = EnvFilter::try_from_default_env() .unwrap_or_else(|_| EnvFilter::default().add_directive(Level::INFO.into())); let stdio_layer = tracing_subscriber::fmt::layer().with_filter(env_filter); let file_appender = tracing_appender::rolling::hourly(".", "prefix.log"); let (writer, _lock) = tracing_appender::non_blocking(file_appender); let file_layer = tracing_subscriber::fmt::layer().with_writer(writer.make_writer()); tracing_subscriber::registry() .with(stdio_layer) .with(file_layer) .init(); trace!("test trace"); info!("test info"); debug!("test debug"); error!("test error"); }
If you were to run this snippet, you would see that the file contains all of the log messages, but the stdio output only by default shows INFO level and higher.
For inspiration, you can find the subscriber we use in bosminer here: https://gitlab.ii.zone/pool/bos-main/-/blob/master/open/bosminer/bosminer/src/lib.rs#L170-206
You can filter on the command line using the RUST_LOG variable, by specifying levels (ranging from trace to off) for particcular code paths
or span-based filters:
#![allow(unused)] fn main() { env RUST_LOG="[cokoliv{id=2}]=off,trace" cargo run }
Try this in the span-demo example from the example repo. It will show all messages except messages with the cokoliv span, if the span
field of id equals 2.
The full syntax is documented here: https://docs.rs/tracing-subscriber/latest/tracing_subscriber/filter/struct.EnvFilter.html
Illegal tricks with generics
This contains notes, examples and points (we could consider it an article version?) of a draft of a short talk on Rust, suitable for meetups and conferences. This particular talk is inspired by the first workshop, Tooling in Rust
Intro
You are entering the realm which is unusual. Maybe it's magic or contains some kind of monster. The second one. Prepare to enter... The Scary Door.
Working with generics in Rust is great. While the trait model may be a little unfamiliar to newcomers, it usually grows onto developers. With traits, we can model interesting type relations and create effective code while also reducing duplication.
However, it can be better.
Let's examine a couple neat tricks regarding both static dispatch and dynamic dispatch.
Detour - refreshing the two types of generics in Rust
In case you didn't encounter these terms before, static dispatch is generics done via type parameters on methods, traits and others types, and their respective trait bounds, for example:
#![allow(unused)] fn main() { trait Hello {} fn hello<T: Hello>(_: T) {} }
We call these generics static dispatch because they are resolved at compile-time. The compiler uses a technique called monomorphization, meaning it generates a copy of methods and types for each used combination of type params.
This is great for two reasons:
- You can do more with trait methods when used in static dispatch (ie. call methods that don't take the
selfparameter, or refer toSelf, or requireSelf: Sized) - It has better performance because we don't need to go through a vtable, and because static dispatch is a gateway to more optimizations such as inlining
However, the downside is that you can't put together multiple types satisfying the same trait, and static dispatch increases the size of your binary more than dynamic dispatch does
On the other hand, dynamic dispatch uses trait objects, and looks like this:
#![allow(unused)] fn main() { trait Hello {} fn hello(_: &dyn Hello) {} }
In older examples of Rust, you might have seen this without the dyn keyword. Dynamic dispatch will instead of a concrete type
perform type erasure and transform your instance of a concrete type into a so-called trait object.
With trait objects, the caller does not care or need to care about the concrete type. The benefit is that you can, for example, put multiple trait objects created from different types into a collection. You can also put together your own types that contain trait objects in their fields even if they come from different types.
Conversely from the static dispatch case, your binary will be smaller at the cost of some performance.
Choosing the correct type of generics for your use case is a fine art. My rule of thumb is to prefer static dispatch if it works in the given use case and if you can handle the bureaucracy of passing around type parameters.
A couple points to close off this section:
impl Traitin function return type position is not generics- You can add
implblocks for trait objects too:
#![allow(unused)] fn main() { trait Hello {} // this function is not part of the trait Hello, // but instead a method of the trait object itself impl dyn Hello { fn hey(&self) -> { println!("Hey"); } } }
Static dispatch trick 1: Two ways of tricking Rust into doing some sort of specialization
One of the most common things we older Rust devs like to complain about is the lack of specialization in stable Rust.
Specialization is the ability to have two overlapping trait implementations, with the compiler choosing the more specific (ie. specialized one).
Consider the following example that does not compile on stable Rust:
#![allow(unused)] fn main() { trait Hello {} // least specialized implementation impl<T> Hello for T {} // blanket implementation over options, more specialized impl<T> Hello for Option<T> {} // implementation specialized to a concrete type impl Hello for bool {} }
TIP: You might notice the standard library has actually been using specialization for quite some time.
There exist two features for specialization, #![feature(specialization, min_specialization)], none of which have been stabilized yet,
and it will probably take a long time before they will be. Despite appearances, it is difficult to get specialization right.
While we cannot replicate all three levels, there is two hacks we can use to at least get the "completely" general vs concrete variant.
1) Using autoref
Let's start with the less cursed one. You may have noticed that there are cases where Rust will automatically de-reference or reference
your types. While it will not do &T -> T, it is more than fond of doing things like T -> &T or &&T -> T. We can use this to do
something which feels like specialization if you squint your eyes hard enough, but actually isn't.
Consider the following example:
#![allow(unused)] fn main() { trait Hello {} struct MyStruct; impl<T> Hello for &T {} impl Hello for MyStruct {} }
This compiles without a hitch because these two impl blocks actually do not overlap. However, if there was a method taking &self,
you could just call anything.the_method_that_takes_borrow_self(), and it would just work. You'd have to keep in mind though, that
in case of the former, &self would be &&T, whereas for the latter, it would be &T.
Since the compiler will automatically reference variables on method calls, this will work just fine.
However, what if that is not an option?
2) Using a hell curse
What if I told you there is a way to downcast a generic type param into a concrete type without going through dynamic dispatch with Any?
Consider the following:
#![allow(unused)] fn main() { use std::any::TypeId; fn as_type<T: 'static, U: 'static>(x: &T) -> Option<&U> { if TypeId::of::<T>() == TypeId::of::<U>() { // I am going to do what's called a pro-gamer move unsafe { Some(&*(x as *const T as *const U)) } } else { None } } }
This code uses a line of unsafe, but it is actually safe.
All Rust types have a unique, opaque TypeId. Usually, TypeId is great to establish the equality of types, but not much more. It is
also used in Any to make sure the type you are downcasting to is in fact the correct type. However, the downcasting functions of
Any are implemented on dyn Any, so we would definitely need to go through dynamic dispatch, which costs performance and isn't
compile-time, and it would also get annoying to have to specify Any as supertrait and provide conversion methods to get the Any
trait object we could then downcast. No bueno.
This can be considered safe because of a couple things:
- It is enclosed in a function that requires the generic params to be
'static. This ensures we don't retype references and thus create unsound code (retyping static reference to another static reference is fine, you could still use this to do, eg.&'static T -> &'static str). - In the if, we establish the equality of the type, so we know the cast we are doing is correct
- We can trust
TypeIdbecause due to the blanket implementation and having no specialization, we can be reasonably sureTypeIdis correct (of course, one might replace the standard library completely with nightly features likeno_core, but that is wild west territory where nothing is safe. This is good enough on)
Now, how can we better fake specialization with it? By making a nice macro out of it and using it in, for example, the default implementation of a trait:
#![allow(unused)] fn main() { macro_rules! specialize { { self: $self:ident, $($x:pat if $spec_type:ty => $spec_impl:block),* default: $def_impl:block } => { #[inline] fn __as_type<T: 'static, U: 'static>(x: &T) -> Option<&U> { if TypeId::of::<T>() == TypeId::of::<U>() { // I am going to do what's called a pro-gamer move unsafe { Some(&*(x as *const T as *const U)) } } else { None } } if let Some(()) = None { unreachable!(":)") } $(else if let Some($x) = __as_type::<_, $spec_type>($self) $spec_impl)* else $def_impl } } }
We need to do a little life hack with an always false if-let (so that we can repeat else if let), but this is completely fine,
the compiler knows this will never be true and just deletes it from the final binary.
Using this macro allows us to create a sort of a match for matching on concrete types:
#![allow(unused)] fn main() { trait MyTrait: 'static + Sized { fn do_a_thing(&self) -> Option<String> { specialize! { self: self, type1 if Type1 => { dbg!(type1); Some("Hello".into()) }, type2 if Type2 => { dbg!(type2); Some("World".into()) } default: { None } } } } impl<T> MyTrait for T where T: 'static {} }
You could use this macro in different places too, and it allows destructuring (as you can type a pattern instead of type1 or type2 as identifiers).
Debugging with evil specialization
We could write another macro:
#![allow(unused)] fn main() { macro_rules! if_type { ($x:pat, $spec_type:ty) => { #[inline] fn __as_type<T: 'static, U: 'static>(x: &T) -> Option<&U> { if TypeId::of::<T>() == TypeId::of::<U>() { // I am going to do what's called a pro-gamer move unsafe { Some(&*(x as *const T as *const U)) } } else { None } } __as_type::<_, $spec_type>($x) } } }
And use it for hacky debugging by putting it in generic functions:
#![allow(unused)] fn main() { fn hello<T>(t: T) { if let Some(yea) = if_type!(t, bool) { println!("it's a bool here"); } } }
It can be useful for other things, too.
Pulling apart trait objects
In the detour, we mentioned that trait objects are sort of obscure. What if they weren't?
Let's start by considering the following example:
pub trait What { fn what(&self); } impl What for i32 { fn what(&self) { println!("{}", self); } } impl What for u32 { fn what(&self) { println!("{}", self); } } fn whatman(w: &dyn What) { w.what() } fn main() { whatman(&1i32); whatman(&1u32); }
Now imagine that whatman() is a piece of complex machinery, many lines of code and it breaks randomly,
and you need to find out which type is causing it without wasting a lot of time writing debugging statements
into the code.
Well, to our rescue comes the debugger.
While it should be also possible to do this with lldb, I will be showing this with gdb.
First, compile the project with cargo build. This will produce an un-optimized build with debugging symbols.
Trait objects
Remember (or learn) that trait objects are fat pointers. The actual pointer is composed of two pointers, a pointer to the instance of the type, and a vtable, also known as virtual function table. This table contains pointers to methods, to which the first pointer will be passed, along with whatever arguments the user needs to pass to the method.
The situation with trait objects in debuggers isn't ideal:
- while some DWARF is generated, not all, and neither vtables nor the object pointers are directly identified
- neither GDB nor LLDB can call trait methods
However, we can still work this.
Let's start by priming GDB with our binary:
rust-gdb target/debug/what
TIP: remember to use the
rust-wrappers for the debuggers
Now, we can for example add a breakpoint to whatman():
#![allow(unused)] fn main() { (gdb) break whatman Breakpoint 1 at 0x55555555be0e: file src/main.rs, line 17. }
And let's run it until you encounter the breakpoint:
#![allow(unused)] fn main() { (gdb) run }
GDB should break execution in whatman() and we can inspect the environment there.
We can look at w:
#![allow(unused)] fn main() { (gdb) print w $2 = &dyn what::What {pointer: 0x55555559105c, vtable: 0x5555555a0210} }
Let's see what the types are according to GDB:
#![allow(unused)] fn main() { (gdb) ptype w type = struct &dyn what::What { pointer: *mut dyn what::What, vtable: *mut [usize; 3], } }
Of course, this is no good. The vtable is definitely not just three usizes. It in fact contains pointers, and it can contain many of them.
You can use either explore or print to print them:
#![allow(unused)] fn main() { (gdb) p *w.vtable $7 = [93824992264080, 4, 4] }
We don't care much for the 4s, but we can look into the first address, with either x or info symbol:
#![allow(unused)] fn main() { (gdb) x (*w.vtable)[0] 0x55555555bf90 <_ZN4core3ptr24drop_in_place$LT$i32$GT$17h64e2a488662dcab3E>: 0x3c894850 }
We can read that i32 in there, but it would be better to have the name de-mangled:
#![allow(unused)] fn main() { (gdb) info symbol (*w.vtable)[0] core::ptr::drop_in_place<i32> in section .text of /root/what/target/debug/what }
Now that looks better. We can also look at the exact what() implementation starting on the 4th element of the array:
#![allow(unused)] fn main() { (gdb) info symbol (*w.vtable)[3] <i32 as what::What>::what in section .text of /root/what/target/debug/what }
Should be clear enough from this, haha.
You can try this with the enclosed repository.
Closures
https://doc.rust-lang.org/reference/expressions/closure-expr.html
You can think of a closure as an anonymous function implementing the trait(s) Fn, FnMut or FnOnce with some captured context.
Their parameters are a comma-separated list of names within a pair of pipes (|). They don't need curly braces, unless you want to have multiple statements.
fn for_each_planet<F>(f: F) where F: Fn(&'static str) { f("Earth"); f("Mars"); f("Jupiter"); } fn main() { for_each_planet(|planet| println!("Hello, {}", planet)); } // prints: // Hello, Earth // Hello, Mars // Hello, Jupiter
The borrow rules apply to them too:
fn for_each_planet<F>(f: F) where F: Fn(&'static str) { f("Earth"); f("Mars"); f("Jupiter"); } fn main() { let greeting = String::from("Good to see you"); for_each_planet(|planet| println!("{}, {}", greeting, planet)); // our closure borrows `greeting`, so it cannot outlive it }
An FnMut needs to be mutably borrowed to be called, so it can only be called once at a time.
This is legal:
fn foobar<F>(f: F) where F: Fn(i32) -> i32 { println!("{}", f(f(2))); } fn main() { foobar(|x| x * 2); } // output: 8
This isn't:
fn foobar<F>(mut f: F) where F: FnMut(i32) -> i32 { println!("{}", f(f(2))); // error: cannot borrow `f` as mutable more than once at a time } fn main() { foobar(|x| x * 2); }
FnOnce closures can only be called once at all. They exist because some closure move out variables that have been moved when captured:
fn foobar<F>(f: F) where F: FnOnce() -> String { println!("{}", f()); } fn main() { let s = String::from("alright"); foobar(move || s); // `s` was moved into our closure, and our // closures moves it to the caller by returning // it. Remember that `String` is not `Copy`. }
This is enforced naturally, as FnOnce closures need to be moved in order to be called.
Here's a closure with two arguments:
fn foobar<F>(x: i32, y: i32, is_greater: F) where F: Fn(i32, i32) -> bool { let (greater, smaller) = if is_greater(x, y) { (x, y) } else { (y, x) }; println!("{} is greater than {}", greater, smaller); } fn main() { foobar(32, 64, |x, y| x > y); }
Here's a closure ignoring both its arguments:
fn main() { foobar(32, 64, |_, _| panic!("Lalala, I am not listening!")); }
And here's a toilet closure:
fn main() { countdown(3, |_| ()); }
Called such because |_| () looks like a toilet.
Declarative macros
https://doc.rust-lang.org/book/ch19-06-macros.html
We have seen a peculiar syntax in the form of println!(). All things in the shape of name!(), name![] or name!{}
are macro invocations. Macros are structures that take source code (tokens) as input and expand to more code.
// This is a simple macro named `say_hello`. macro_rules! say_hello { // `()` indicates that the macro takes no argument. () => { // The macro will expand into the contents of this block. println!("Hello!"); }; } fn main() { // This call will expand into `println!("Hello");` say_hello!() }
example borrowed from: https://doc.rust-lang.org/rust-by-example/macros.html
More complex rules can be utilized which allow for more sophisticated transformation of input tokens. Macros can also be recursive.
Dot and colon syntax
https://doc.rust-lang.org/reference/expressions/field-expr.html https://doc.rust-lang.org/reference/expressions/path-expr.html
Dots are used to access fields of a structure or a tuple:
#![allow(unused)] fn main() { let a = (5, 4, 3, 2, 1, 0); println!("{}", a.2); // will print 3 let my_struct = give_me_my_struct_please(); my_struct.my_field; // this is "fasterthanlime" }
The dot syntax is also used for method calls:
"Hello, Braiins!".len(); // 15
The dot syntax implicitly borrows self where applicable so that you don't have to
do things like (&self).my_method() if a method requires an "&Self"-type parameter.
The double-colon, ::, is similar but for accessing members of namespaces (often refereed to as crate/module paths).
#![allow(unused)] fn main() { std::process::exit(1); // exit with an error }
In use imports, curly brackets are used to denote multiple imports.
The following three examples are the same:
#![allow(unused)] fn main() { use std::io::Read; use std::io::Write; }
#![allow(unused)] fn main() { use std::io::{Read, Write}; }
#![allow(unused)] fn main() { use std::{io::Read, io::Write}; }
You can also use glob imports or aliases
#![allow(unused)] fn main() { use std::io::*; // not recommended use std::process::exit as quit; quit(0); }
You can also use the double-colon for static methods (alternatively called associated functions) of a type:
#![allow(unused)] fn main() { let v = Vec::new(); // The goto collection/list type }
Enums
https://doc.rust-lang.org/reference/items/enumerations.html
Option, which you have likely seen all over Rust code, is not a struct - it's an enum, with two variants. Enums resemble algebraic sum types found in functional programming languages:
#![allow(unused)] fn main() { enum Option<T> { None, Some(T), } impl<T> Option<T> { fn unwrap(self) -> T { // enums variants can be used in patterns: match self { Self::Some(t) => t, Self::None => panic!(".unwrap() called on a None option"), } } } }
Result is also an enum, it can either contain something, or an error:
#![allow(unused)] fn main() { enum Result<T, E> { Ok(T), Err(E), } }
It also panics when unwrapped and containing an error.
Functions
https://doc.rust-lang.org/reference/items/functions.html
The fn keyword declares a function:
#![allow(unused)] fn main() { fn hello_world() { println!("Hello, world!"); } }
This function returns nothing, it is void. In Rust, you'd write the 'void' type as () and call it unit.
Here's a function that returns an unsigned integer. Use the arrow type to indicate:
#![allow(unused)] fn main() { fn my_favorite_number() -> u64 { 20090301 // launch of bitcoin ;-) } }
Brackets denote code blocks:
fn main() { let outside = "first"; { let inside = "second"; println!("{}", inside); } println!("{}", outside); } // result: second, first
Blocks are also expressions, which mean they evaluate to a value. TIP: You will find that all control structures in Rust are actually expressions - use wisely.
The return value of a function, block or a control structure is the last statement without a semicolon.
However, the return can be used to end a function early:
#![allow(unused)] fn main() { fn unreachable_code() -> i32 { return 0; println!("this will never happen"); } }
Functions can be generic:
#![allow(unused)] fn main() { fn fun<T>(_parameter: T) { // do something } }
They can have multiple type parameters, which can then be used in the function's declaration and its body, instead of concrete types:
#![allow(unused)] fn main() { fn foobar<L, R>(left: L, right: R) { // do something with `left` and `right` } }
Type parameters usually have constraints, so you can actually do something with them.
The simplest constraints are just trait names:
#![allow(unused)] fn main() { fn print<T: Display>(value: T) { println!("value = {}", value); } }
There's a longer syntax for type parameter constraints:
#![allow(unused)] fn main() { fn print<T>(value: T) where T: Display, { println!("value = {}", value); } }
Constraints can be more complicated: they can require a type parameter to implement multiple traits:
#![allow(unused)] fn main() { fn print<T>(value: T) where T: Display + Clone, { println!("value = {}", value.clone()); // Rust is actually fairly big-brained, so clippy // would tell you this clone is not necessary } }
If-let and Match
https://doc.rust-lang.org/reference/expressions/if-expr.html
Patterns can be used as conditions in if, we call these if-lets:
#![allow(unused)] fn main() { if let Point { 3, .. } = my_point { // do something } else { // do something esle } }
The Rust equivalent of a switch is called match. Unlike constants,
match actually takes patterns for its arms
#![allow(unused)] fn main() { fn point_function(p: Point) { match n { Number { 0.0, _ } => println!("point is on the y axis"), Number { _, 0.0 } => println!("point is on the x axis"), Number { _, _ } => println("point is not on any axis"); } } }
A match has to be exhaustive: at least one arm needs to match for every value,
otherwise, you'd get an error. If there are cases you want to ignore you can add
an explicit match arm doing nothing and matching everything else, such as _ => {}.
Many things in Rust are patterns, including identifiers, literals and so on.
Lifetimes
https://doc.rust-lang.org/reference/lifetime-elision.html https://doc.rust-lang.org/reference/trait-bounds.html https://doc.rust-lang.org/reference/memory-allocation-and-lifetime.html
Now here comes of the more difficult things in Rust. All bindings in Rust have a "lifetime":
fn main() { // `x` doesn't exist yet { let x = 42; // `x` starts existing println!("x = {}", x); // `x` stops existing } // `x` no longer exists }
Similarly, references have a lifetime:
fn main() { // `x` doesn't exist yet { let x = 42; // `x` starts existing let x_ref = &x; // `x_ref` starts existing - it borrows `x` println!("x_ref = {}", x_ref); // `x_ref` stops existing // `x` stops existing } // `x` no longer exists }
The lifetime of a reference cannot exceed the lifetime of the variable binding it borrows:
fn main() { let x_ref = { let x = 42; &x }; println!("x_ref = {}", x_ref); // error: `x` does not live long enough }
A variable binding can be immutably borrowed multiple times:
fn main() { let x = 42; let x_ref1 = &x; let x_ref2 = &x; let x_ref3 = &x; println!("{} {} {}", x_ref1, x_ref2, x_ref3); }
While borrowed, a variable binding cannot be mutated:
fn main() { let mut x = 42; let x_ref = &x; x = 13; println!("x_ref = {}", x_ref); // error: cannot assign to `x` because it is borrowed }
While immutably borrowed, a variable cannot be mutably borrowed:
fn main() { let mut x = 42; let x_ref1 = &x; let x_ref2 = &mut x; // error: cannot borrow `x` as mutable because it is also borrowed as immutable println!("x_ref1 = {}", x_ref1); }
References in function arguments also have lifetimes. however, most of the time it is not specified (lifetime elision):
#![allow(unused)] fn main() { fn print(x: &i32) { // `x` is borrowed (from the outside) for the // entire time this function is called. } }
Functions with reference arguments can be called with borrows that have different lifetimes, so:
- All functions that take references are generic
- Lifetimes are generic parameters
- Lifetimes' names start with a single quote, ':
#![allow(unused)] fn main() { // elided (non-named) lifetimes: fn print(x: &i32) {} // named lifetimes: fn print<'a>(x: &'a i32) {} }
There is a special lifetime, named 'static, which is valid for the entire program's lifetime.
String literals are 'static:
struct Person { name: &'static str, } fn main() { let p = Person { name: "Satoshi Nakamoto", }; }
Lööps
https://doc.rust-lang.org/reference/expressions/loop-expr.html
Anything that is iterable can be used in a for in loop. We've seen a range being used, but it also works with a Vec:
fn main() { for i in vec![52, 49, 21] { println!("I like the number {}", i); } }
Or a slice:
fn main() { for i in &[52, 49, 21] { println!("I like the number {}", i); } } // output: // I like the number 52 // I like the number 49 // I like the number 21
Or an actual iterator:
fn main() { // note: `&str` also has a `.bytes()` iterator. // Rust's `char` type is a "Unicode scalar value" for c in "rust".chars() { println!("Give me a {}", c); } } // output: // Give me a r // Give me a u // Give me a s // Give me a t
Even if the iterator items are filtered and mapped and flattened:
fn main() { for c in "SuRPRISE INbOUND" .chars() .filter(|c| c.is_lowercase()) .flat_map(|c| c.to_uppercase()) { print!("{}", c); } println!(); } // output: UB
Ownership
https://doc.rust-lang.org/book/ch04-02-references-and-borrowing.html
For many types in Rust, there are owned and non-owned variants. Owned means not behind a reference, can be passed to different functions without worrying about lifetimes:
- Strings: String is owned, &str is a reference
- Paths: PathBuf is owned, &Path is a reference
- Collections: Vec
is owned, &[T] is a reference
Rust has slices - they're a reference to multiple contiguous elements.
You can borrow a slice of a vector, for example:
fn main() { let v = vec![1, 2, 3, 4, 5]; let v2 = &v[2..4]; println!("v2 = {:?}", v2); } // output: // v2 = [3, 4]
Borrowing rules apply to slices.
fn tail(s: &[u8]) -> &[u8] { &s[1..] } fn main() { let x = &[1, 2, 3, 4, 5]; let y = tail(x); println!("y = {:?}", y); }
&str values are really slices.
fn file_ext(name: &str) -> Option<&str> { // this does not create a new string - it returns // a slice of the argument. name.split(".").last() } fn main() { let name = "Read me. Or don't.txt"; if let Some(ext) = file_ext(name) { println!("file extension: {}", ext); } else { println!("no file extension"); } }
Patterns
https://doc.rust-lang.org/reference/patterns.html
Patterns are pieces of syntax which are used to match values against different variants of a type and constants/literals, optionally destructuring and binding internal values to names.
We define two types of patterns in Rust:
- refutable
- irrefutable
Irrefutable patterns are such patterns that are always true. We can use the let binding to demonstrate these:
#![allow(unused)] fn main() { // bind to identifier - works for any value of any type let my_bidning = 33; // destructuring a tuple let (first, second) = (33, 33); // the unit type has only one value, the unit itself let () = (); // similar case with a unit struct struct Empty; let Empty = Empty; // destructuring a structure struct Point { x: isize, y: isize, } // x and y are now defined bindings let Point { x, y } = Point { x: 24, y: 23 }; // you can also rename let Point { x: other_x, y: other_y } = Point { x: 10, y: 11 }; // you can ignore some fields let Point { x: third_x, y: _ } = Point { x: 1, y: 2 }; // you can only take some fields and ignore the rest let Point { x: fourth_x, .. } = Point { x: 3, y: 4 }; }
Irrefutable patterns are also available in function parameters and every place where refutable patterns are valid.
Refutable patterns only match in some cases, either because you are matching a field against a constant, or because you are matching on a type that has multiple variants.
These patterns are only valid in the following three structures:
if-letwhile-letmatch
#![allow(unused)] fn main() { let result = Ok(5); let option = Some(5); if let Ok(5) = result { // only runs if result is Ok(5) } if let Ok(number) = result { // only runs if result is Ok and binds // the contained value to the identifier `number`. // You can use any valid identifier } if let Some(_) = option { // only runs if option is Some, // but ignores contained value // okay for other Enums, but for Option use methods .is_some(), is_none() // for Result use .is_ok(), .is_err() } struct Point { x: isize, y: isize, } let point = Point { x: 5, y: 5 }; if let Point { 5, y } = point { // only runs if x is 5, // binding the other field to the name y } }
Panics
https://doc.rust-lang.org/std/macro.panic.html
panic!() is also a macro. It violently stops execution with an error message, and
the file name / line number of the error, if enabled:
fn main() { panic!("Goodbye, cruel world"); } // output: thread 'main' panicked at 'Goodbye, cruel world', src/main.rs:3:5
Some methods also panic. For example, the Option type can contain something, or it can contain nothing. If .unwrap() is called on it, and it contains nothing, it panics:
fn main() { let o1: Option<i32> = Some(128); o1.unwrap(); // this is fine let o2: Option<i32> = None; o2.unwrap(); // this panics! } // output: thread 'main' panicked at 'called `Option::unwrap()` on a `None` value', src/libcore/option.rs:378:21
Functions that can fail typically return a Result:
fn main() { let s = std::str::from_utf8(&[240, 159, 141, 137]); println!("{:?}", s); // prints: Ok("🍉") let s = std::str::from_utf8(&[195, 40]); println!("{:?}", s); // prints: Err(Utf8Error { valid_up_to: 0, error_len: Some(1) }) }
If you want to panic in case of failure, you can .unwrap():
fn main() { let s = std::str::from_utf8(&[240, 159, 141, 137]).unwrap(); println!("{:?}", s); // prints: "🍉" let s = std::str::from_utf8(&[195, 40]).unwrap(); // prints: thread 'main' panicked at 'called `Result::unwrap()` // on an `Err` value: Utf8Error { valid_up_to: 0, error_len: Some(1) }', // src/libcore/result.rs:1165:5 }
Or .expect(), for a custom message:
fn main() { let s = std::str::from_utf8(&[195, 40]).expect("valid utf-8"); // prints: thread 'main' panicked at 'valid utf-8: Utf8Error // { valid_up_to: 0, error_len: Some(1) }', src/libcore/result.rs:1165:5 }
Or, you can match:
fn main() { match std::str::from_utf8(&[240, 159, 141, 137]) { Ok(s) => println!("{}", s), Err(e) => panic!(e), } // prints 🍉 }
Or you can if let:
fn main() { if let Ok(s) = std::str::from_utf8(&[240, 159, 141, 137]) { println!("{}", s); } // prints 🍉 }
Or you can bubble up the error:
fn main() -> Result<(), std::str::Utf8Error> { match std::str::from_utf8(&[240, 159, 141, 137]) { Ok(s) => println!("{}", s), Err(e) => return Err(e), } Ok(()) }
Or you can use ? to do it the concise way:
fn main() -> Result<(), std::str::Utf8Error> { let s = std::str::from_utf8(&[240, 159, 141, 137])?; println!("{}", s); Ok(()) }
Struct literals
https://doc.rust-lang.org/reference/items/structs.html
Structs are created with the struct keyword:
#![allow(unused)] fn main() { struct Point { x: f64, // 64-bit floating point, aka "double precision" y: f64, } }
You can create an instance of your struct with a struct literal
#![allow(unused)] fn main() { let positive_point = Point { x: 0.0, y: 13.0 }; let negative_point = Point { y: 0.0, x: -13.0 }; }
Destructuring works for structs too:
#![allow(unused)] fn main() { let Point { x, .. } = Point { x: 1.0, y: 2.0 }; // only keep x from this point println!("{}", x); }
Structs can be generic too:
#![allow(unused)] fn main() { struct Pair<T> { a: T, b: T, } }
Same rules apply for constraints as with functions.
Struct methods
You can declare methods on your types:
#![allow(unused)] fn main() { struct Point { x: f64, // 64-bit floating point, aka "double precision" y: f64, } impl Number { fn is_origin(&self) -> bool { self.x == 0.0 && self.y == 0.0 } } }
Ranges
https://doc.rust-lang.org/reference/expressions/range-expr.html
The .. syntax is a range literal. They can be open-ended, and their rightmost bound can be inclusive, if it's preceded by =.
fn main() { // 0 or greater println!("{:?}", (0..).contains(&100)); // true // strictly less than 20 println!("{:?}", (..20).contains(&20)); // false // 20 or less than 20 println!("{:?}", (..=20).contains(&20)); // true // only 3, 4, 5 println!("{:?}", (3..6).contains(&4)); // true }
Traits
https://doc.rust-lang.org/reference/items/traits.html
Traits denote common behavior types can have (compare with interfaces in other languages):
#![allow(unused)] fn main() { trait DoubleSelf { fn double_self(&mut self); } }
You can implement:
- one of your traits on anyone's type
- anyone's trait on one of your types
- but not a foreign trait on a foreign type
Implementing foreign traits on foreign types is called creating "orphan instances", and is generally considered a bad thing.
Here's an implementation of our trait on a type:
#![allow(unused)] fn main() { impl DoubleSelf for i32 { fn double_self(&mut self) { self = self * 2; } } }
The Rust standard library has a couple traits that don't have any methods, these are called "marker traits" and usually denote some features of a type. For example:
Copymeans "use copy semantics on instances of this type" (like C language)Sendmeans "this type is safe to send to another thread"
Trait methods can also take self by reference or mutable reference:
#![allow(unused)] fn main() { // the clone trait explicitly creates a copy of an instance from reference impl Clone for Point { fn clone(&self) -> Self { Self { self.x, self.y } // floats are copy so we can use that } } }
The dot syntax implicitly borrows self where applicable so that you don't have to
do things like (&self).my_method().
Some common traits can be automatically implemented on your type by using a derive attribute:
#![allow(unused)] fn main() { #[derive(Clone, Copy)] struct MyStruct; }
Variable bindings
https://doc.rust-lang.org/reference/statements.html#let-statements
The let keyword creates a variable binding:
#![allow(unused)] fn main() { let x; // declaration of x x = 666; // assign value to x }
You can also write this in a single line:
#![allow(unused)] fn main() { let x = 42; }
In most cases, Rust can infer types for bindings, however, you can also specify it directly:
#![allow(unused)] fn main() { let x: char = 'a'; // a is a single unicode char // Rust's primitive types are // char and str for strings // i8, i16, i32, i64, i128 for signed numbers // u8, u16, u32, u64, u128 for unsigned // f32, f64 for floating point // bool ```; It is forbidden to use unitialized, or even possibly-unitialized variables: ```rust let x; my_function(x); // error: use of possibly unitialized variable x }
The underscore _ is a special identifier for throwing away/ignoring values:
#![allow(unused)] fn main() { let _ = "this string is thrown away and probably not even in the compiled binary"; }
You might also do this for functions that return something
#![allow(unused)] fn main() { let _ = my_function(); // return value thrown away }
Prepending underscore to a binding name makes compiler ignore unused code warnings:
#![allow(unused)] fn main() { let _x = 'e'; // useful for in-progress code or some tricks }
You can create a binding with the same name as a binding that already exists in the same scope. This is called "shadowing":
#![allow(unused)] fn main() { let x = 'a'; let x = 12 * 2; // shadowed bindings don't have to have the same type }
Keep in mind that for as long as its needed, the first x also, so already existing references to it will stay valid
Rust has tuples, which are "fixed-length collections of values of different types":
#![allow(unused)] fn main() { let two = ("two", 2); two.0; // "two" two.1; // 2 Tuples can be destructured, that is, broken down to individual members: let (two_string, two_num) = ("two", 2); }
The semi-colon signifies the end of a statement:
#![allow(unused)] fn main() { let a = 1; let b = 2; let c = a - b * 2; }
Variable bindings are immutable by default and cannot be assigned to a again. Use the
mut keyword to make a binding mutable:
#![allow(unused)] fn main() { let mut x = 0; x = 2; x = 92391293; }